2. USEFUL LINKS
You will find lots of useful information about minigolf sport on the WMF
website at www.minigolfsport.com.
If you are looking to start a club or federation you should contact the
WMF office at office@minigolfsport.com.
If you want to start playing in tournaments you can find the contact
details for your national federation on the WMF website. From there
you can contact them about becoming a member and taking part in
competitions.
To buy minigolf balls, putters and even courses please contact
our sponsors via the links on the website.
WMF GOLD SPONSORS:
Editor:
World Minigolf Sport Federation
2016
Graphic design:
Reklame & Marketing Butikken A/S
Raimund Appl (raimund.appl@chello.at)
Photos: Erik Tiekstra a.m.o.
2
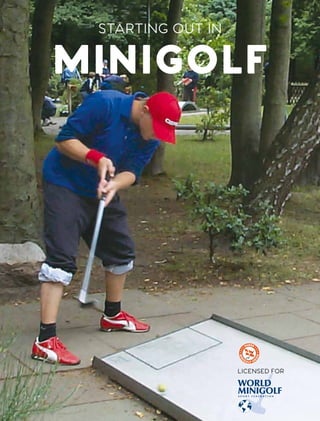
3. STARTING OUT
IN MINIGOLF!
This brochure is both an instruction guide for minigolf as well as an
inspiration for training. Everybody who is interested in Minigolf can use
this brochure when they play this popular and growing sport.
The brochure will also provide you with information about the World
Minigolf Sport Federation (WMF) and the basic rules of Minigolf
Complete rules can be downloaded from our website.
In the first pages of the brochure, you can read about the four exist-
ing types of Minigolf courses that are approved by the WMF and
played worldwide: Miniaturegolf, Feltgolf, Concrete and Minigolf Open
Standard (MOS). These course types are approved by the WMF as well
as the various national federations. All courses are designed to specific
standards and regulations.
This brochure contains the basic information about the sport of Minigolf
and is a good aide to getting started in Minigolf. If you have just started
to play in tournaments the brochure will give you some help on how to
start training. The sections “The Technique of Minigolf” and “Training
program” are not necessarily right for every single player, but can be
used as basic information.
If you have just started a club, the brochure is a useful guide for the
first training sessions. You are then prepared to be introduced as a new
member of your national federation.
If you need some additional information, please contact the WMF office:
office@minigolfsport.com
Have fun playing Minigolf
Dr. Gerhard Zimmermann
President World Minigolf Sport Federation
3
4. MINIATUREGOLF COURSE
Length 6,25 m
Width 0,90 m
Space 600-800 m2
FELTGOLF COURSE
Length 7-18 m
Width 0,8-0,9 m
Space 1000-1500 m2
CONCRETE COURSE
Length 12 m
Width 1,10 m
Space 1000-1500 m2
TYPES OF MINIGOLF COURSES
The WMF recognises four types of Minigolf courses. Each type has its own special
design, construction and obstacles.
MINIATUREGOLF
The most common type of approved tournament Minigolf courses in the world
are Miniaturegolf courses. These courses are mostly built using Fibre Cement.
These courses require less space - a complete tournament course of 18 holes
could be built in 600-800 m2
.
To set up the course, you can select from 24 different types of holes. You will find
these courses in many cities and holiday sites all over the world.
They are very popular and even though the holes are quite short, many people are
surprised at how difficult some holes can be. The Miniaturegolf courses require
some maintenance in early spring after the winter, but if you are a club, all the
members of the club could get the entire course ready for playing quite quickly.
You are not allowed to stand or walk on the course/obstacles, but this is not
necessary to play.
FELTGOLF
Sweden and Finland are known for their felt courses. The surface is felt as
indicated in the name and the borders are made of wood. This type of course can
be quite difficult as some holes are much longer than the Miniaturegolf holes.
Nowadays this type of course has grown all over Europe and it has become quite
popular to play on felt.
The felt courses require more space, a typical area 1000-1500 m2
. There could be
some variation as the total length should be at least 180 metres, while the longest
courses are well above 200 metres in length.
You could also plan the construction around the landscape and area. You can
also select the holes from almost 40 different types, even though all of these are
not used for competition, the producer can inform which holes are approved for
tournaments.
There are international tournaments played almost every year on felt courses as
they are becoming more and more popular. You are allowed to stand on these
courses when you play, but you should avoid walking on the lanes as it risks that
you bring dirt or small stones onto the course.
CONCRETE
The third type of course is Concrete. These courses were constructed in the 1950’s
by Paul Bogni who came from Switzerland. Therefore, this type is predominantly
found in Switzerland, Austria and southern Germany, but you can find concrete
courses all over Europe. There are only 18 types of obstacles and these have the
same number on every course.
The courses are constructed in concrete and the borders around them are made
of steel. It is quite expensive to build and requires more space than felt courses.
The length of the lanes is 10-12 metres, the longest being about 20-25 metres. Even
though it is expensive to build, it is very attractive to play and courses often have
large clubs and many casual players. You are also allowed to stand on these lanes
4
5. when you play and it is necessary to be in the right position when you hit the ball.
As on the felt courses you should not walk on the lanes.
MINIGOLF OPEN STANDARD (MOS)
Minigolf Open Standard courses are those built with a surface of artificial grass and
are most common in North America and Great Britain. Minigolf Open Standard
(MOS) courses are also commonly known as Adventure Golf and Crazy Golf.
This type of tournament course was officially approved by the WMF in 2007, in
order to strengthen the position of the WMF and to spread the minigolf movement
all around the world. This new section allows all member nations of the WMF to
develop under general basic conditions and rule their “own” MOS courses with
individual (non-standardised) lanes. This open strategy of the WMF allows each
member nation to approve existing courses for national tournaments and inter-
national sport events by its own decision in the name of the WMF.
The size and shape of the lanes are quite different from Miniaturegolf, Feltgolf and
Concrete courses. As MOS courses contain many different hazards to the other
three approved course type, specific rules are either published in a course rule book,
which is available at the course for all players, or explained to all players before
tournament play begins.
New types of courses with different materials used for the surface, frames and
obstacles, and different sizes of the lanes are covered by the category of MOS.
New MOS courses are being built in a lot of the newly WMF registered national
associations and are going to be produced for national promotion of minigolf in
these countries.
Even when these courses look like small editions of golf holes, minigolf, including
MOS, is a separate worldwide sport acknowledged by the Sport Accord and by the
International Golf Federation.
As there are a number of existing well designed courses throughout the world
there is the potential that approved MOS courses will help minigolf sport grow in
popularity and further establish itself as a sport in an increasing number of
countries worldwide.
5
6. MINIGOLF
AS A SPORT
Minigolf is played both as a leisure activity and a
serious sport all over the world.
A large number of championships are played every
year including World or Continental championships,
World or European Championships for juniors, and
the European Cup for National Club Champions.
Most of the member nations have national champion-
ships every year. There are also a large number of
tournaments played every year and organised by
clubs.
Minigolf is administrated worldwide by the World
Minigolf Sport Federation (WMF), and there are
also continental federations. WMF is a member of
the Sport Accord, an umbrella organisation for all
sports.
In many nations Minigolf Associations/Federations
are members of their National Sport Federations.
Teeing off area
eternit
Teeing off area
felt
Teeing off area
concrete
6
T E E I N G O F F A R E A
T E E I N G
O F F
A R E A
T E E I N G O F F A R E A
7. EQUIPMENT
Every player uses a minigolf putter and a number of minigolf balls, each with
different properties that affect how it acts in play. It´s important to have your
own personal putter and a number of minigolf balls. When you start playing it is
recommended to limit yourself to using around 5 to 7 balls. If you start with
too many balls and if you do not have an instructor to get advice from, or if you
prematurely believe that it is an advantage with many balls, there is a risk that you
can overcomplicate the sport.
MINIGOLF PUTTER
A minigolf putter consists of three parts: The grip, handle and the foot. A nice grip
is made of moulded rubber that is drawn down from the upper part of the handle.
When playing a shot,the rules state you must have both hands on the putter.
The typical material of the handle is steel. A conical steel tube that gives a sta-
ble handle that does not bend when you hit the ball. There are other types of
material, e.g. graphite.
The Putter head can be shaped like an L, the most commonly used by minigolf
players, or a T. With an L-shaped putter the weight distribution is better and
results in a more secure and stable shot for the player.
The head of the putter is also covered with rubber about 6-8 mm thick. The result
is a more controlled shot and it is not necessary to play the ball as hard as when us-
ing a metal headed putter.
By using a rubber headed putter, it is also easier to play with spin. When playing
with spin, you can add some technical finesse to your shot.
BALLS
As a casual player, you will normally play with one standard ball at most of the
minigolf courses if you are not a member of a club.
It is different for members. They normally buy a small number of balls in the
beginning and most players increase the number of minigolf balls they own when
they feel they are a better player and they have higher playing ambitions.
There are many ball producers, especially in Europe, and every year there are
new balls brought onto the market. In total more than 10,000 different minigolf
balls have been produced in the last 70 years.
The balls have different sizes (standard are 37-43 mm in diameter) and there
are variations in hardness, weight, bounce and surface. Some balls are produced
with lacquer of different types and some balls are produced without lacquer
(raw). The raw balls have the advantage that they have a much better grip when hit-
ting the borders or when you play with spin.
As mentioned, it is important to see the advantage in having more than one ball.
The balls are used on different holes and often have a specific purpose such as
Pipe ball, Labyrinth ball etc. as these balls have properties that fit these holes.
If you learn the different ball properties in the beginning and watch how the hole
has to be played, then you will begin to see where to use the balls. There is an
advantage in having a coach or an experienced player who is willing to help a new
player in the beginning.
7
8. TECHNIQUES IN MINIGOLF
Minigolf is a sport where a certain skill of technique is required. Of course you
are not supposed to know everything in advance. Normally players are building
up their technique during a certain time that fits them, but of course more pre-
cise training means that you will be a better player. The section here describes in
short, how you hit the ball and the way to play the border and with spin.
PLAYING POSITION
There are four elements to your playing position: Feet-, leg-, body position and
grip.
Basically, you should stand with your feet placed solid on the ground. There
should be a natural distance between the feet. If you are tall, you can increase
the distance between the feet to avoid that bending too much when reaching the
course with the putter.
You should bend the knees a little with your back somewhat bent forwards to
avoid standing too stiff. You should in a natural way reach your head over the
ball to see the direction, and to hit the ball from where it lays.
You should, of course also have a natural balance in the body. You are probably
already aware that the back and leg muscles have the highest load, normally
you will notice this fact when you play more rounds in a day. Therefore, it´s
important to have a playing position which is free from straining. It can be an
advantage in helping each other by giving hints to find the optimal playing
position.
GRIP
The hands are placed around the grip of the putter and by stretching the fore-
finger you will be better able to steer the putter when hitting the ball. The hands
should be placed with one hand above the other. If you have the left over the right
or vice versa is down to individual choice.
When you hold the putter you should not hold it too firmly as you will then
strengthen the hands and arms, and the shot will not be correct. Hold the putter
firmly enough so that you don´t drop it and at the same time have control over
the movements. You can eventually hold the putter more firmly or looser to find
what is optimal for you.
SHOT PERFORMANCE
You should feel that the putter is an extension of the arms and the swing mostly
proceeds in the shoulders. Now you will take the playing position that you find
optimal.
The head of the putter is placed behind the ball close to the course. You should
also check that the ball lays at the middle of the putter head to get the correct
balance at the shot.
When you are heading the shot, you should imagine that there is a line at a right
angle from the putter head through the ball centre in the direction of the target
or the direction you have chosen. When all of these things are ready, you can
perform the shot. When you start the swing, it is important that it is the same
acceleration through the entire shot. The length of the swing is the determining
factor of the power you hit the ball. A longer swing means more power to the shot.
8
9. BASIC SHOT
In order to have success in Minigolf, it is important to learn the basic shot to get the right speed and direction.
We have described that the speed is controlled through the length of the swing, phase 2. The direction is controlled by all phases and
it´s important to train all these efficiently and learn how to shoot. To get a pure shot without spin, you must move the putter in the same
movement backwards and forwards as a pendulum.
As mentioned previously, the shot is mostly done in the shoulders.
BORDER SHOT
When you are going to play at the border, the basic shot is also very important. The ball should be played without spin and with the correct
speed to get the direction you want.
Why do you play at the border? The shot at the border can be done when you cannot see the hole from the place where the ball lies.
It might be from the teeing off area or behind an obstacle. The reason could also be that it is an advantage to have another “ball line” where
it is easier to reach the hole in one shot. Sometimes you have two possibilities, direct to the hole or from the band behind. Last but not
least, at some holes the border shot is more secure and will probably give a better result in the long run compared to direct shots, which
have to be more offensive.
SPIN SHOT
A third variant of the minigolf shot that is
technically more challenging is the spin shot,
when the ball spins horizontal. You use the spin
to get another ball line, e.g. hitting the border
behind the hole. There are two types of screws:
top spin and slice. You will achieve the spin when
you draw the putter somewhat in a half circle at
the first phase of the shot. The rotating power is
transformed from the putter to the ball in phase
3 and continues in phase 4 to get a full effect.
It´s very difficult to control screw shots and for
some players it will take years until they control
the shot.
As shown on the illustrations below, the swing consists of 4 phases:
FIRST PHASE
– is the swing backwards from ball
SECOND PHASE
- is the swing forwards against the
starting point behind the ball point-
ed in the same direction as you
started and continue in the same
direction you will hit the ball
THIRD PHASE
– is when the putter gets in contact
with the ball
FOURTH PHASE
– is when the ball gets underway. The
swing should continue after you have
hit the ball and stop when the ball has
left the teeing off area. This way you
will have much better control of the
ball direction
9
10. TRAINING PROGRAM
This is a small training program that everybody can make use of. You are advised
to train in pairs in order to assist each other.
DIRECTION CONTROL
During practise you play ten shots on five different holes where you should play
the same shots. You can play against the hole or targets placed on the course. You
can vary the difficulty by changing the distance to the target. You note the hits and
mistakes you make. These statistics can be used to see the developments of the
training every day you use the same program.
SPEED
Here you will learn how to control the speed of the shot. Find a hole with a slope
that you divide into three different zones. Here you can use tape that is removable
and doesn’t damage the course. You start and play five shots in each zone and
note how many hits and mistakes you make. Then you can vary the training with
one shot in each zone. Here you also play 15 shots and note hits and mistakes.
Then you choose a hole where you can play on the border behind the hole. The
meaning of the training here is to control the distance that the ball returns from
the band. Once again you should divide in different zones to have different
targets. You play five shots to reach every zone and note the hits and mistakes.
SPIN
Here a better technical competence of the player is required and for this training
it is important that you play different shots. The spin shot is an unfamiliar move-
ment and you have to train a lot to learn it.
The spinshot is divided into top spin and slice. You can start by playing on the
border behind the hole and play in a right angle against the band. Then you can
see the effect of the shot. You can also place an obstacle e.g. 2 stones that forms
a passage where you should play straight through. Play 50 shots with 25 each
of top spin and slice, note the result, but be aware that it is rather difficult to
evaluate.
At the end of the spin-training it is important to train using the basic shot again.
Therefore you should play ten shots with variation of speed of different holes.
You can check if you play without spin, but using a two-coloured ball or put a
mark on the ball. If you don’t play straight you can see the mark or the colours
rotate around the ball.
TRAINING VARIANTS
The aim with training variants is to find new ways to play the hole, to understand
your minigolf balls better and to prepare for new courses with other variants. Try
to innovate, think untraditionally and watch what happens. Test many different
balls. Finally play a couple of rounds with different variants on the holes you have
trained on. Then you will notice if it works in practice.
10
11. SOME RULES FROM
THE HANDBOOK
The following are only some small points picked from the WMF rules handbook.
Please note that it does not cover all of the WMF’s rules and regulations.
GENERAL
Minigolf is played with one putter and minigolf balls on a minigolf course. The
target is to get the ball in the hole with as few shots as possible on every hole.
CHOICE OF BALL
The player is allowed to use one ball on each hole, but can carry any number dur-
ing a round.
SHOT
Each touch of the ball with the putter is one shot. If the ball does not reach the
hole in six shots (incl. any added points), seven points will be noted on the score
card of the played hole; this is the maximum points of each hole. Penalty points
could be added to the result.
TOURNAMENT REGULATIONS
For an international tournament, the course has to be approved by the WMF
Technical Committee. If clubs or nations do not follow the regulations, they can
be fined by the WMF or the nation’s federation/association. The players are not
allowed to make any changes to the course during the training or competition.
SCORE NOTES
The players are not allowed to note their own scores. In tournaments playing
partners mark the scores for other players in the group. Each player must ensure
that the scores are correctly noted. This is also valid if it´s someone outside the
playing group that scores.
REGULATIONS AND RULES
FOR TOURNAMENT PLAYERS
A player is only allowed to break the play or leave the course after informing
the referee. A general break of the tournament (e.g. because of rain) can only be
decided by the referee. If a player plays on a hole, he is allowed to end this hole.
If he doesn’t end the hole, he has to mark the position of the ball. It is the referee
that will decide when play starts again.
DURING PLAY IT IS
STRICTLY FORBIDDEN:
a) to smoke
b) to bring or drink alcohol
c) to take doping substances
This is also valid for officials on the course.
11
12. PLAYING RULES
Here you will find a short description of the playing rules in Minigolf. There are
also other rules, e.g. tournament regulations and rules for players. These can
be downloaded from www.minigolfsport.com or you can contact the
WMF office.
n Every lane has to be played with one putter and one ball
n You should try to get the ball in the hole with as few shots as possible
n One shot is one point
n A player has a maximum six shots to get the ball in the hole. If they cannot
manage this, it means a total of seven points for the lane
n The ball has to be played from an optional point within the teeing off area
n The first shot should always be played from the teeing off area and if the ball
does not pass the red border line, the next shot should be played from the tee-
ing off area as well. You continue until you have passed the border line. Note
that there are holes without a border line and in those you may continue until
the ball reaches the hole.
n When you have passed the border line, you continue from where the ball stops.
If the ball stops at the border or the obstacle, you are allowed to move the ball
to the line in a right angle. If the ball returns over the border line, you should
move the ball to the point where it passed the line on the return and from here
place the ball on the playing line in an right angle.
If the ball leaves the lane over the band there are two possibilities: If the ball
leaves the lane before the border line, you have to continue with next shot from
the teeing off point. If the ball leaves the lane after the border line, you should
place the ball of the playing line where the ball left the lane.
n Please note that there are no penalty points if the ball leaves the lane over the
side of the lane.
n When the round is finished, you count the points and the player with the lowest
number is the winner
12