Change Grid Row Color Conditionally
•Download as DOCX, PDF•
0 likes•32 views

This document provides steps to change the color of rows in a GridView based on certain conditions: 1. Drag and drop a GridView onto a page and connect it to a database table. 2. In the GridView's RowDataBound event, check each row's status value. 3. If the status is "Rejected", set the row's back color to orange. If the status is "Accepted", set the back color to green. This allows drawing attention to rows with different status values by displaying them in distinct colors.

Recommended
More Related Content
Similar to Change Grid Row Color Conditionally
Similar to Change Grid Row Color Conditionally (20)
More from Dharma Raju
More from Dharma Raju (10)
Recently uploaded
Recently uploaded (20)
Change Grid Row Color Conditionally
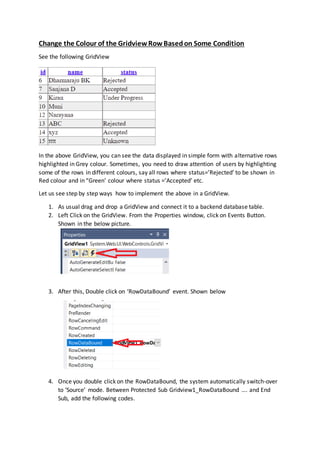
- 1. Change the Colour of the Gridview Row Basedon Some Condition See the following GridView In the above GridView, you can see the data displayed in simple form with alternative rows highlighted in Grey colour. Sometimes, you need to draw attention of users by highlighting some of the rows in different colours, say all rows where status=’Rejected’ to be shown in Red colour and in “Green’ colour where status =’Accepted’ etc. Let us see step by step ways how to implement the above in a GridView. 1. As usual drag and drop a GridView and connect it to a backend database table. 2. Left Click on the GridView. From the Properties window, click on Events Button. Shown in the below picture. 3. After this, Double click on ‘RowDataBound’ event. Shown below 4. Once you double click on the RowDataBound, the system automatically switch-over to ‘Source’ mode. Between Protected Sub Gridview1_RowDataBound …. and End Sub, add the following codes.
- 2. Protected Sub GridView1_RowDataBound(sender As Object, e As GridViewRowEventArgs) If e.Row.RowType = DataControlRowType.DataRow Then Dim rowValue As String = DataBinder.Eval(e.Row.DataItem, "Status") If InStr(rowValue, "Rejected") Then ' colour the background of the row Orange e.Row.BackColor = Drawing.Color.Orange End If End If End Sub 5. Run the program and see the background colour changed to Orange in all the rows whose status=’Rejected’. Display of my GridView is as below. 6. In the above source code, ‘Status’ is the column name of the backend database table and ‘Rejected’ is the value in that column. You can replace these with your actual table’s column name and data in that column. 7. In case, your backend table contains a mixture of uppercase and lowercase letters like ‘REJECTED’, ‘Rejected’ or ‘rejected’, then covert the values into uppercase (or lowercase) and compare. Source code for converting into uppercase and comparing the same is given below: Dim rowValue As String = DataBinder.Eval(e.Row.DataItem, "Status") rowValue = rowValue.ToUpper If InStr(rowValue, "REJECTED") Then ' color the background of the row Ornage e.Row.BackColor = Drawing.Color.Orange End If Convert into uppercase Change this also
- 3. 8. Now, let us see how to highlight some rows in another color based on the data they contain. For example, if you want to display all rows with value ‘Accepted’ in Green colour, add the below lines to the above souce (highlighted in Yellow colour). 1. Dim rowValue As String = DataBinder.Eval(e.Row.DataItem, "Status") 2. rowValue = rowValue.ToUpper 3. If InStr(rowValue, "REJECTED") Then 4. ' color the background of the row Ornage 5. e.Row.BackColor = Drawing.Color.Orange 6. 7. End If 8. 9. If InStr(rowValue, "ACCEPTED") Then 10. e.Row.BackColor = Drawing.Color.Green 11. 12. End If 13. 14. 9. Line Nos. 9 to 12 are newly added to our source code. Run the page in a browser to see the changes. My GridView’s display is as below === 0 ===