SlideShare a Scribd company logo
1 of 14
Download to read offline
การสร้างหมุด(maeker)
Week5
- เข้า Google Maps API longIn
- ไปที่ Simple map แล้วคัดลอกโค้ดที่อยู่ด้านล่างมาใช้
- เริ่มทาการเรียกแผนที่ขึ้นมาก่อน
- โดยการคัดลองมาวางไว้ใน Edit Plus
- แล้วคัดลอด Key มาวางแทนในส่วนของบรรทัดที่ 4 นับจากด้านล่างสุด
AIzaSyBq1eu0rPYkGrjqbGsmmZ00z-_jYfhgl4Y (โค้ดที่สมัครมาจากครั้งที่แล้ว)
- จากนั้นใส่ค่าพิกัดบริเวณที่สนใจลงไป ในที่นี้ต้องการให้ไปอยู่ตรงที่จังหวัดชลบุรี
lat: 13.277383, lng: 100.925864
- zoom 8 เป็น zoom 17
- SAVE แล้วดูผลรับ ภาพแผนที่จะมาปรากฏอยู่ตรง ม.บูรพา
- var map; เราสามารถลบแล้วมาประกาศตรง map = new เป็น var map = new ก็ได้
วิธีการสร้าง maeker
ตัวโค้ดทั้งหมด
<!DOCTYPE html>
<html>
<head>
<title>Simple Map</title>
<meta name="viewport" content="initial-scale=1.0">
<meta charset="utf-8">
<style>
/* Always set the map height explicitly to define the size of the div
* element that contains the map. */
#map {
height: 100%;
}
/* Optional: Makes the sample page fill the window. */
html, body {
height: 100%;
margin: 0;
padding: 0;
}
</style>
</head>
<body>
<div id="map"></div>
<script>
function initMap() {
var map = new
google.maps.Map(document.getElementById('map'), {
center: {lat: 13.277383, lng: 100.925864},
zoom: 17
});
var marker1 = new google.maps.Marker({
position:{lat: 13.277383, lng: 100.925864},
map:map,
title:'Faculty of Geoinformatice'
});
var marker2 = new google.maps.Marker({
position:{lat: 13.296552, lng: 100.913317},
map:map,
title:'Seansuk tample'
});
}
</script>
<script src="https://maps.googleapis.com/maps/api/js?key=AIzaSyBq1eu0rPYkGrjqbGsmmZ00z-
_jYfhgl4Y&callback=initMap"
async defer></script>
</body>
</html>
คาสั่ง ของการเรียก Marker
Key ที่เราได้ทาการขอมาไว้ก่อนหน้านี้ถ้าไม่เปลี่ยนจะทาการเรียกแผนที่มาใช้งานไม่ได้
ตัวโค้ดหลักของเขียน marker
});
var marker1 = new google.maps.Marker({
position:{lat: 13.277383, lng: 100.925864},
map:map,
title:'Faculty of Geoinformatice'
});
แล้วดูผลรับ จะปรากฏหมุด(maeker)ขึ้นมา และมี Faculty of Geoinformatice ขึ้นมาเมื่อนาเม้าส์ไปชี้ เพราะ
ตรง title นั้นเราได้ใส่ตัวเเปลลงไปว่า title:'Faculty of Geoinformatice' ดังนั้งจึงปรากฏชื่อ Faculty of
Geoinformatice
เราสามารถเพิ่มหมุดได้โดยใช้คาสั่งคล้ายเดิม ต่อท้ายคาสั่งของ marker1
- โดยเปลี่ยน marker1 เป็น marker2 และ title:'Faculty of Geoinformatice' เป็น title:'Seansuk tample'
});
var marker2 = new google.maps.Marker({
position:{lat: 13.296552, lng: 100.913317},
map:map,
title:'Seansuk tample'
});
- SAVE
วิธีการเพิ่ม iconbase
ตัวรูป icon ที่เราจะเรียกมาใช้จะต้องถูกเก็บไว้ให้อยู่บนโลกออนไลน์ โดยเราจะหามาจากโลก
ออนไลน์เอง จากเว็บไซน์ที่มีการให้บริการตัว icon หรือจะเอาไปฝากไว้แล้วค่อยดึงมาใช้ก็ได้
ตัวโค้ดทั้งหมด
<!DOCTYPE html>
<html>
<head>
<title>Custom Markers</title>
<meta name="viewport" content="width=device-width, initial-scale=1.0, user-scalable=no">
<meta charset="utf-8">
<style>
/* Always set the map height explicitly to define the size of the div
* element that contains the map. */
#map {
height: 100%;
}
/* Optional: Makes the sample page fill the window. */
html, body {
height: 100%;
margin: 0;
padding: 0;
}
</style>
</head>
<body>
<div id="map"></div>
<script>
var map;
function initMap() {
map = new
google.maps.Map(document.getElementById('map'), {
zoom: 16,
center: {lat: 13.277605, lng: 100.926524},
mapTypeId: 'roadmap'
});
var iconBase = 'https://maps.google.com/mapfiles/kml/shapes/';
var icons = {
parking: {
icon: iconBase + 'parking_lot_maps.png'
},
library: {
icon: iconBase + 'library_maps.png'
},
info: {
icon: iconBase + 'info-i_maps.png'
}
};
function addMarker(feature) {
var marker = new google.maps.Marker({
position: feature.position,
icon: icons[feature.type].icon,
map: map
});
}
var features = [
{
position: {lat:13.288134, lng:100.912272},
type: 'info'
}, {
position: {lat:13.276648,lng :100.924912},
type: 'parking'
}, {
position: {lat:13.279320, lng:100.924994},
type: 'library'
}
];
for (var i = 0, feature; feature = features[i]; i++) {
addMarker(feature);
}
}
</script>
<script src="https://maps.googleapis.com/maps/api/js?key=AIzaSyBq1eu0rPYkGrjqbGsmmZ00z-
_jYfhgl4Y&callback=initMap"
async defer></script>
</body>
</html>
เป็นคาสั่งกาหนดหยุดโดยจะหยุดโค้ดให้หยุดตามค่าโค้ดที่เรากาหนด
ลงไป เช่น ในโค้ดให้เริ่มตั้งแต่ 0 ไปจนถึง i++ คือการเพิ่มค้าที่ละหนึ่ง
ตัวโค้ดที่จาเป็นของการเพิ่ม icon
var iconBase = 'https://maps.google.com/mapfiles/kml/shapes/';
var icons = {
parking: {
icon: iconBase + 'parking_lot_maps.png'
},
library: {
icon: iconBase + 'library_maps.png'
},
info: {
icon: iconBase + 'info-i_maps.png'
}
};
function addMarker(feature) {
var marker = new google.maps.Marker({
position: feature.position,
icon: icons[feature.type].icon,
เป็นเว็บไซต์ที่เก็บตัว icon ไว้
map: map
});
}
var features = [
{
position: {lat:13.288134, lng:100.912272},
type: 'info'
}, {
position: {lat:13.276648,lng :100.924912},
type: 'parking'
}, {
position: {lat:13.279320, lng:100.924994},
type: 'library'
}
- SAVE แล้วดูผล
Week5

More Related Content

Similar to Week5

capture_56170244
capture_56170244capture_56170244
capture_56170244Tiew Athit
 
การใช้งาน Google Map Javascript API
การใช้งาน Google Map Javascript APIการใช้งาน Google Map Javascript API
การใช้งาน Google Map Javascript APIBoo' Noypeng
 
นางสาวศศินิภา ซิ้มศิริ รหัสนิสิต 58670396
นางสาวศศินิภา ซิ้มศิริ รหัสนิสิต 58670396นางสาวศศินิภา ซิ้มศิริ รหัสนิสิต 58670396
นางสาวศศินิภา ซิ้มศิริ รหัสนิสิต 58670396ranggo24
 

Similar to Week5 (6)

capture_56170244
capture_56170244capture_56170244
capture_56170244
 
การใช้งาน Google Map Javascript API
การใช้งาน Google Map Javascript APIการใช้งาน Google Map Javascript API
การใช้งาน Google Map Javascript API
 
นางสาวศศินิภา ซิ้มศิริ รหัสนิสิต 58670396
นางสาวศศินิภา ซิ้มศิริ รหัสนิสิต 58670396นางสาวศศินิภา ซิ้มศิริ รหัสนิสิต 58670396
นางสาวศศินิภา ซิ้มศิริ รหัสนิสิต 58670396
 
Matlab
MatlabMatlab
Matlab
 
WebGIS
WebGISWebGIS
WebGIS
 
Swishmax
SwishmaxSwishmax
Swishmax
 

More from Beer Srisudaporn (14)

Gis cap
Gis capGis cap
Gis cap
 
Week14&15
Week14&15Week14&15
Week14&15
 
Week13
Week13Week13
Week13
 
Week12
Week12Week12
Week12
 
Week 11
Week 11Week 11
Week 11
 
Week10
Week10Week10
Week10
 
Week9
Week9Week9
Week9
 
Week8
Week8Week8
Week8
 
Week7
Week7Week7
Week7
 
Week6
Week6Week6
Week6
 
Week4
Week4Week4
Week4
 
Week3
Week3Week3
Week3
 
Week2
Week2Week2
Week2
 
GIS2 : LAB11
GIS2 : LAB11GIS2 : LAB11
GIS2 : LAB11
 

Week5

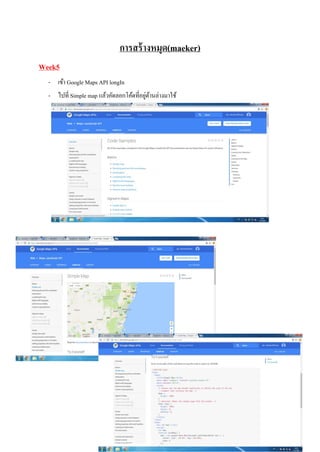
  • 1. การสร้างหมุด(maeker) Week5 - เข้า Google Maps API longIn - ไปที่ Simple map แล้วคัดลอกโค้ดที่อยู่ด้านล่างมาใช้
  • 2. - เริ่มทาการเรียกแผนที่ขึ้นมาก่อน - โดยการคัดลองมาวางไว้ใน Edit Plus - แล้วคัดลอด Key มาวางแทนในส่วนของบรรทัดที่ 4 นับจากด้านล่างสุด AIzaSyBq1eu0rPYkGrjqbGsmmZ00z-_jYfhgl4Y (โค้ดที่สมัครมาจากครั้งที่แล้ว)
  • 3. - จากนั้นใส่ค่าพิกัดบริเวณที่สนใจลงไป ในที่นี้ต้องการให้ไปอยู่ตรงที่จังหวัดชลบุรี lat: 13.277383, lng: 100.925864 - zoom 8 เป็น zoom 17 - SAVE แล้วดูผลรับ ภาพแผนที่จะมาปรากฏอยู่ตรง ม.บูรพา
  • 4. - var map; เราสามารถลบแล้วมาประกาศตรง map = new เป็น var map = new ก็ได้
  • 5. วิธีการสร้าง maeker ตัวโค้ดทั้งหมด <!DOCTYPE html> <html> <head> <title>Simple Map</title> <meta name="viewport" content="initial-scale=1.0"> <meta charset="utf-8"> <style> /* Always set the map height explicitly to define the size of the div * element that contains the map. */ #map { height: 100%; } /* Optional: Makes the sample page fill the window. */ html, body { height: 100%; margin: 0; padding: 0; } </style> </head> <body> <div id="map"></div> <script> function initMap() { var map = new google.maps.Map(document.getElementById('map'), {
  • 6. center: {lat: 13.277383, lng: 100.925864}, zoom: 17 }); var marker1 = new google.maps.Marker({ position:{lat: 13.277383, lng: 100.925864}, map:map, title:'Faculty of Geoinformatice' }); var marker2 = new google.maps.Marker({ position:{lat: 13.296552, lng: 100.913317}, map:map, title:'Seansuk tample' }); } </script> <script src="https://maps.googleapis.com/maps/api/js?key=AIzaSyBq1eu0rPYkGrjqbGsmmZ00z- _jYfhgl4Y&callback=initMap" async defer></script> </body> </html> คาสั่ง ของการเรียก Marker Key ที่เราได้ทาการขอมาไว้ก่อนหน้านี้ถ้าไม่เปลี่ยนจะทาการเรียกแผนที่มาใช้งานไม่ได้
  • 7. ตัวโค้ดหลักของเขียน marker }); var marker1 = new google.maps.Marker({ position:{lat: 13.277383, lng: 100.925864}, map:map, title:'Faculty of Geoinformatice' }); แล้วดูผลรับ จะปรากฏหมุด(maeker)ขึ้นมา และมี Faculty of Geoinformatice ขึ้นมาเมื่อนาเม้าส์ไปชี้ เพราะ ตรง title นั้นเราได้ใส่ตัวเเปลลงไปว่า title:'Faculty of Geoinformatice' ดังนั้งจึงปรากฏชื่อ Faculty of Geoinformatice
  • 8. เราสามารถเพิ่มหมุดได้โดยใช้คาสั่งคล้ายเดิม ต่อท้ายคาสั่งของ marker1 - โดยเปลี่ยน marker1 เป็น marker2 และ title:'Faculty of Geoinformatice' เป็น title:'Seansuk tample' }); var marker2 = new google.maps.Marker({ position:{lat: 13.296552, lng: 100.913317}, map:map, title:'Seansuk tample' }); - SAVE
  • 9. วิธีการเพิ่ม iconbase ตัวรูป icon ที่เราจะเรียกมาใช้จะต้องถูกเก็บไว้ให้อยู่บนโลกออนไลน์ โดยเราจะหามาจากโลก ออนไลน์เอง จากเว็บไซน์ที่มีการให้บริการตัว icon หรือจะเอาไปฝากไว้แล้วค่อยดึงมาใช้ก็ได้ ตัวโค้ดทั้งหมด <!DOCTYPE html> <html> <head> <title>Custom Markers</title> <meta name="viewport" content="width=device-width, initial-scale=1.0, user-scalable=no"> <meta charset="utf-8"> <style> /* Always set the map height explicitly to define the size of the div * element that contains the map. */ #map { height: 100%; } /* Optional: Makes the sample page fill the window. */ html, body { height: 100%; margin: 0; padding: 0; } </style> </head> <body> <div id="map"></div> <script> var map;
  • 10. function initMap() { map = new google.maps.Map(document.getElementById('map'), { zoom: 16, center: {lat: 13.277605, lng: 100.926524}, mapTypeId: 'roadmap' }); var iconBase = 'https://maps.google.com/mapfiles/kml/shapes/'; var icons = { parking: { icon: iconBase + 'parking_lot_maps.png' }, library: { icon: iconBase + 'library_maps.png' }, info: { icon: iconBase + 'info-i_maps.png' } }; function addMarker(feature) { var marker = new google.maps.Marker({ position: feature.position, icon: icons[feature.type].icon, map: map }); } var features = [ {
  • 11. position: {lat:13.288134, lng:100.912272}, type: 'info' }, { position: {lat:13.276648,lng :100.924912}, type: 'parking' }, { position: {lat:13.279320, lng:100.924994}, type: 'library' } ]; for (var i = 0, feature; feature = features[i]; i++) { addMarker(feature); } } </script> <script src="https://maps.googleapis.com/maps/api/js?key=AIzaSyBq1eu0rPYkGrjqbGsmmZ00z- _jYfhgl4Y&callback=initMap" async defer></script> </body> </html> เป็นคาสั่งกาหนดหยุดโดยจะหยุดโค้ดให้หยุดตามค่าโค้ดที่เรากาหนด ลงไป เช่น ในโค้ดให้เริ่มตั้งแต่ 0 ไปจนถึง i++ คือการเพิ่มค้าที่ละหนึ่ง
  • 12. ตัวโค้ดที่จาเป็นของการเพิ่ม icon var iconBase = 'https://maps.google.com/mapfiles/kml/shapes/'; var icons = { parking: { icon: iconBase + 'parking_lot_maps.png' }, library: { icon: iconBase + 'library_maps.png' }, info: { icon: iconBase + 'info-i_maps.png' } }; function addMarker(feature) { var marker = new google.maps.Marker({ position: feature.position, icon: icons[feature.type].icon, เป็นเว็บไซต์ที่เก็บตัว icon ไว้
  • 13. map: map }); } var features = [ { position: {lat:13.288134, lng:100.912272}, type: 'info' }, { position: {lat:13.276648,lng :100.924912}, type: 'parking' }, { position: {lat:13.279320, lng:100.924994}, type: 'library' } - SAVE แล้วดูผล