SlideShare a Scribd company logo
1 of 69
Download to read offline
1. Describe the components of the company profile
The Company Profile exists out of 5 components:
Here you can find (and modify) your organization details: like Organization Name, Primary Contact, Default locale, default language,
currency locale, used data / File Space, API requests, Salesforce.com organization ID.
○
An overview of user licenses : Salesforce, Salesforce platform, Force.com, Knowledge Only, Chatter Free, Chatter external, Chatter
only/plus, Customer portal, Partner
○
Feature licenses : Marketing user, Offline user, Knowledge user, Force.com Flow user, Service cloud user, site.com contributor,
site.com publisher, Mobile user, Salesforce CRM Content user, live agent user
○
User Licenses show status, total licenses, used licenses, remaining licenses and expiration date.○
Feature licenses are the same but do not show an expiration date as they are attached to a user license and enables extra features
for that user using checkboxes on the user's detail page
○
Fiscal year:2.
Standard Fiscal Year: Follows the Gregorian calendar, starts first day of a month you chose
Custom Fiscal Year: Follows a custom structure you can define, once a custom fiscal year chosen, you can't disable it!!!
(Changing the start month may delete existing forecasts, forecast history, forecast overrides, reports and all quotas.
Business hours: Here you can set the days and hours that your support team is available. When using escalation rules, these hours
determine the times at which cases can be escalated. Blank hours means that nobody works within the org that day. Business hours are not
the same as login hours, and have no impact on the fact that users can log in or not!
3.
Holidays: Holidays are dates and times at which business hours are suspended. Enter the dates and times at which to suspend business
hours and escalation rules associated with business hours
4.
Language settings: where you set end user and platform only languages. These do not include the "help & training section" nor the "admin
setup" (these sections cannot be translated). Languages that appear in gray are currently used by your company, users, or both and can't be
deactivated
5.
1. Company Information:
User Licenses:
Salesforce: Full access, can access any standard and custom app.
Salesforce Platform: Users can access custom apps (incl. AppExchange) but not standard CRM functionality (forecasts, opportunities). In addition
can use core platform functionality (Accounts, contacts, reports, dashboards, documents and custom tabs) Users with this license can only view
dashboards if the running user also has the same license.
Communities: There are 2 community licenses available for external users: Customer Community and Partner Community
Force.com: Users can access one custom app but not standard CRM functionality. Read only on Accounts and Contacts objects. Users with this
license can only view dashboards if the running user also has the same license.
Chatter Free: Users can access standard Chatter people, profiles, groups, and files. They can't access any Salesforce objects or data. You can
upgrade a Chatter Free license to a standard Salesforce license at any time, however, you can't convert a standard Salesforce or Chatter Only
license to a Chatter Free license.
Chatter External: Designed to allow customers in Chatter groups. Customers are users outside of a company’s email domain.
Customer portal: Allows contacts to log into your Customer Portal to manage customer support
Customer Portal - Enterprise Administration: Allows contacts with unlimited logins into your Customer Portal to manage customer support
Authenticated Website license: is designed to be used with Force.com Sites. It gives named sites users unlimited logins to your Platform Portal to
access customer support information.
Gold Partner user license: can only access Salesforce using the Partner Portal. Specific permissions to different objects can be given.
Organization Setup - 1%
08 April 2014 08:33
Admin 201 preparation Page 1
High Volume Customer Portal license: gives contacts unlimited logins to your Service Cloud Portal to access customer support information. They
can have access to accounts, assets, cases, contacts, custom objects, documents, ideas and questions depending on permission settings.
Data.com: Add, export Duns & Bradstreet company data delivered through data.com per month. Default is 300.
Database.com User Licenses: Devided in 3 license types (admin, user and Light User). Grants access to database.com schemas or metadata.
Knowledge only: Designed for users who only need access to the Salesforce Knowledge app. Access to the following tabs: Articles, Article
Management, Chatter, Chatter Files, Home, Profiles, Reports, custom objects, and custom tabs. The Knowledge Only User license includes a
Knowledge Only profile that grants access to the Articles tab.
NOTE: Changing a user license of a user also removes the permission sets assigned to that user!
Feature Licenses:
(You may have more than one type of feature license available to assign to the users in your organization. A feature license entitles a user to an
additional Salesforce feature, such as Marketing or Connect Offline.)
Marketing user, Offline user, Knowledge user, force.com flow, Service cloud user, site.com contributor, site.com publisher user, Mobile user,
Salesforce CRM Content user, live agent, data.com, work.com
Storage: (2 kinds: Data storage and File storage):
File storage: includes files in attachments, documents tab, files tab, CRM content, Chatter and Site.com assets
Data storage: are your records (values saved in object standard fields and custom fields)
For file storage, Contact Manager, Group, Professional, Enterprise, Performance, and Unlimited Editions are allocated a per-user limit multiplied
by the number of users in the organization plus an additional per-organization allocation. For example, an Enterprise Edition organization with
600 users receives 1,211 GB of file storage, or 2 GB per user multiplied by 600 users plus an additional 11 GB. A Professional Edition organization
with 600 users receives about 370 GB of file storage, or 612 MB per user multiplied by 600 users plus an additional 11 GB.
For data storage, Contact Manager, Group, Professional, Enterprise, Performance, and Unlimited Editions are allocated either 1 GB or a per-user
limit, whichever is greater. For example, a Professional Edition organization with 10 users receives 1 GB because 10 users multiplied by 20 MB per
user is 200 MB, which is less than the 1 GB minimum. A Professional Edition organization with 100 users receives more than the 1 GB minimum
because 100 users multiplied by 20 MB per user is 2,000 MB.
Language, Locale, and Currency
Currency - User in a multiple currency organization - User’s default currency for quotas, forecasts, and reports. Shown only in organizations using
multiple currencies. This must be one of the active currencies for the organization
Corporate Currency – Administrator - The currency in which the organization's corporate headquarters reports revenue. Serves as the basis for all
currency conversion rates. Only for organizations that use multiple currencies. Multiple currencies once enabled can’t be disabled by the
organization.
Information Currency – Not editable - The default currency for all currency amount fields in the user record. Available only for organizations that
use multiple currencies.
Currency Locale – Administrator - The country or geographic region in which the organization is located. The setting affects the format
of currency amounts. For single currency organizations only.
Locale – User - Country or geographic region in which user is located.
The Locale setting affects the format of date, date/time, and number fields, and the calendar. The Locale setting also affects the first and last
name order on Name fields for users, leads, and contacts. Personal locale, overrides the organization setting.
Default Currency ISO Code - Not editable - User's default currency setting for new records. Available only for organizations that use multiple
currencies.
Default Language – Administrator - This setting also determines the language in which all customizations—such as custom fields, tabs, and
user interface options—are stored. For customizations, individual users' language settings do not override this setting. Also set language for
new users in the organization.
Language – User - The primary language for the user. A user’s individual Language setting overrides the organization’s Default Language.
Default Locale – Administrator - The default country or geographic region that is selected for new users in the organization. This setting
determines the format of dates, times, and names in Salesforce. Individual users can set their personal locale, which overrides the organization
setting.
Default Time Zone – Administrator - Primary time zone in which the organization is located. A user's individual Time Zone setting overrides the
organization's Default Time Zone setting.
Time Zone – User - Primary time zone in which user works.
You can opt to use dated exchange rates by using advanced currency management to track historical exchange rates. When enabled, advanced
currency management allows maintaining a list of exchange rates by date range, and converted currency amounts on opportunities display based
on the specified Close Date, regardless of the opportunity stage. Changing the Close Date impacts converted amounts if it changes to a different
exchange rate period. If your organization uses advanced currency management, the opportunity close date determines which conversion rate to
use when displaying currency amounts. (Close date is set to the last day of the quarter)
Multiple currencies can be used in opportunities, forecasts, reports, quotes, and other currency fields.
Custom formula fields are not tied to any particular currency. If the result of a formula field is a currency amount, it displays in the currency of the
associated record. This is also true for cross-object formulas that reference merge fields with different currencies, and formulas in workflow rules
and approval processes. However, note that workflow rules and approval processes that use filters instead of formulas convert all currency values
Admin 201 preparation Page 2
to the corporate currency.
You cannot track revenue gain or loss based on currency fluctuations.
Changing conversion rates causes a mass recalculation of roll-up summary fields, which may take up to 30 minutes, depending on the number of
records affected and other factors.
Company information page limits:
Street address – 255
City, country, division, fax, phone – 40
State, zip - 20
Organization name, primary contact, - 80
If your organization has enabled Shared Activities, you can relate as many as 10 contacts to non-recurring and non-group tasks, and non-recurring
events. You assign one primary contact; all others are secondary contacts. The primary contact appears in two reports: Tasks and Events, and
Activities with Cases. If you delete the primary contact, the next contact on the activity’s related list becomes the new primary one. If that’s not
the primary contact you want, you can edit the activity to select another.
Standard apps: (Sales, Call Center, Marketing, Community, Site.com, Salesforce Chatter)
My Domain: Once the new domain name deployed to users, you cant reverse it. Up to 40 characters. You have the option of redirecting the users
(deploy) or block login from old domain (Prevent login from login.salesforce.com to provide better security) – check login history to see.
Format is: https://customdomainname.my.salesforce.com
Admin 201 preparation Page 3
2. Identify the steps to set up and maintain a user
(req: Last name, Alias, Email, Username, Community Nickname, Role, User Licence, Profile)
(Email becomes username. Community nickname and Alias are derived from email and names, role is not
compulsory)
In Salesforce, every user is identified by a username, password, and a single profile. The profile
determines what tasks users can perform, what data they see, and what they can do with the data.
A user can be assigned to one or more of feature licenses. You can also set up accounts for users outside
your organization who need to access a limited set of fields and objects. These user licenses can grant
access to Customer Portal and partner portal.
Using Salesforce to Salesforce, you can create connections to share records with other Salesforce users
outside of your organization.
Profile settings control access to applications, objects and fields.
Sharing features control access to specific records
Maximum Salesforce users per edition:
Contact Manager(5), Group(5), Professional(unlt), Enterprise(unlt), Unlimited(unlt), Developer(2)
3. Given a scenario, troubleshoot common user access and visibility issues
1. Check login history (to see what the problem is? Usually a password lockout after invalid password, if
password is the problem, reset password to send a new password and then unlock. Lockout could be
temporary or admin reset)
(if no incorrect attempt then the user was using an invalid email/username to login)
2. If access problems are one of the below then identity must be confirmed:
a. Does user profile have any login restriction?
IP address considered activated if IP address falls within trusted IP ranges
IP address previously activated by user
Browser can be identified by a cookie
b. Does user IP address in organization’s trusted IP range? (Only user with an activated IP address can
login)
User Setup - 9%
08 April 2014 08:37
Admin 201 preparation Page 4
c. Has user been activated from this IP before?
d. Does user’s web browser have valid cookies from Salesforce?
User profile login restrictions:
1. Login hours (outside of the hrs. login is denied) (Set login access for specific profiles (login hours
under profile)) (For example: customer support specialist profile can login from 7am until 5pm, Mon to
Fri)
2. IP Address (unknown IP, denied) (Set login IP ranges for specific profiles (login IP ranges under
profile)) (For example: customer support specialist profile can login from work but not at home or hotel)
Setup | Security Controls | Network Access | Trusted IP Ranges
|Security Controls | Session Settings | Session Timeout Value (1hr, 2hrs)
| Security Controls | Password Policies
| Security Controls | View Set up Audit Trail | (To check the security changes made to the
organization by the
administrator
Manage users | Profiles | Login IP Ranges
Manage users | Profiles | Login Hours (Set start and end same values so they can not login)
Manage users | Login History (To track user login, first to do when there is a user login problem)
Organization based login hours do not exist, but there is Company profile | Business Hours but used for
support escalation process not to restrict login.
What happens when a profile is logged in and login hr passes?
Nothing will happen until your session expires and you will not be able to re-login after the session. If
your admin hasn't set a session setting the user will be able to stay in the system till he closes the
browser. That login restriction is for user who will try logging in after 5:00 pm for example, applicable
only when the users are trying to log in and will not end the current session
Grant login Access: only users themselves can grant login access to the administrator
There is the possibility to log a case at Salesforce to open up "Login as-function" on your production
environment.
o If you change a user’s email address and generate new password and notify user immediately is
selected, a confirmation message will be sent to the new email address that you entered. The user must
click the link provided in that message for the new email address to take effect. This process ensures
system security. When generating a new password for a user, the new password is automatically sent to the
user’s email address and email verification is not enforced.
o If you change a user's username, a confirmation email with a login link is sent to the email address
associated with that user account. Problems might occur because an organization could have multiple login
servers. The link in the email connects directly to the server where the actual username change was made.
This ensures that users can always log in, even if server replication is slow
o Click Grant Checkout Access to give a user access to Checkout. Using Checkout, the user can purchase
Salesforce licenses, AppExchange app licenses, and other related products. Additionally, within Checkout,
the user can view the organization's quotes, installed products, orders, invoices, payments, and contracts.
Admin 201 preparation Page 5
4. Distinguish between and identify the implications of the various user interface features that an
administrator controls
User Interface (Customize | User Interface)
ロ Enable Collapsible Sections: Sections on object detailpages can be (un)collapsed (call center users
won’t see incoming calls if they collapse sidebar)
ロ Show Quick Create: The Quick Create area on a tab home page allows users to create a new record
quickly with minimal information. This setting also affects whether or not users can create new records
from within the lookup dialog. For example, with the setting enabled, users can create a new account
within the account lookup dialog while creating or editing a contact. Disable this to avoid too many
incomplete records.
ロ Enable Hover Details: Display an interactive overlay containing detailed information about a record.
The fields displayed are determined on the object's mini page layout.
ロ Enable Related List Hover Links: Related list hover links display at the top of record detail pages
and custom object detail pages in Setup.
ロ Enable Separate Loading of Related Lists: Primary record details load first, followed by related list
data. Separate loading can improve performance on record detail pages for organizations with large
numbers of related lists.
ロ Enable Inline Editing: This doesn't enable inline editing for profiles. Inline editing isn't available
for accessibility mode, system fields, formula fields, case assignments, case email notifications, lead
assignments, setup pages, on records for which you have read-only access, dashboards, documents,
pricebooks, on records for which you have read-only access, All fields in Tasks except for Subject and
Comment, All fields in Events except for Subject, Description, and Location, Full name fields of Person
Accounts, Contacts, and Leads. However, their component fields are editable, for example, First Name and
Last Name.
ロ Enable Enhanced Lists: When enabled with the Enable Inline Editing setting, users can also edit
records directly from the list, without navigating away from the page
ロ Enable New User Interface Theme: Some Salesforce features like Chatter need the new user interface
theme. Disabling the new user theme disables Chatter
ロ Enable Tab Bar Organizer: automatically arranges tabs in the main tab bar to prevent horizontal
scrolling of the page. It dynamically determines how many tabs can display based on the width of
the browser window and puts tabs that extend beyond the browser's viewable area into a drop-
down list.
ロ Enable Printable List Views: Printable list views allow users to easily print list views.
ロ Enable Spell Checker: the Check Spelling button appears in certain areas of the application where
text is entered, such as sending an email, or when creating events, tasks, cases, notes, and solutions.
ロ Enable Spell Checker on Tasks and Events: specifically for Tasks and Events
ロ Enable Customization of Chatter User Profile Pages: Enables the profile page which the user can put
extra information about himself. If not enabled only Feed and Overview tabs will be visible
Sidebar
ロ Enable Collapsible Sidebar: gives users the ability to show or hide the sidebar on every page that
normally includes the sidebar.
ロ Show Custom Sidebar Components on All Pages: If you have custom home page layouts that
include components in the sidebar, this option makes the sidebar components available on all pages
for all users in your organization. If you only want certain users to view sidebar components on all
pages, grant those user the “Show Custom Sidebar On All Pages” permission.
Calendar
ロ Enable Home Page Hover Links for Events: Enables hover links in the calendar section of the
Home tab.
Global User Interface - 1%
08 April 2014 08:38
Admin 201 preparation Page 6
Home tab.
ロ Enable Drag-and-Drop Editing on Calendar Views: Enables the dragging of events on single user
daily and weekly calendar views.
ロ Enable Click-and-Create Events on Calendar Views: Allows users to create events on day and
weekly calendar views by double-clicking a specific time slot
ロ Enable Drag-and-Drop Scheduling on List Views: Allows users to create events associated with
records by dragging records from list views on to weekly calendar views and entering the details of
the event in an interactive overlay.
ロ Enable Hover Links for My Tasks list: Enables hover links for tasks in the My Tasks section of the
Home tab and on the calendar day view.
Setup
ロ Enable Enhanced Page Layout Editor: Enables WYSIWYG editor
ロ Enable Enhanced Profile List Views: With inline editing in enhanced profile list views, you can
manage multiple profiles at once.
ロ Enable Enhanced Profile User Interface: easily navigate, search, and modify settings for a single
profile
ロ Enable Streaming API: to activate Streaming API, which allows you to receive notifications for
changes to data that match a SOQL query that you define
ロ Enable Custom Object Truncate: permanently removes all of the records from a custom object while
keeping the object and its metadata intact for future use.
Accessibility Mode is an alternate user interface mode intended for use by visually impaired users
utilizing a screen reader such as JAWS or Window-Eyes. Accessibility Mode will disable some user
interface features, such as displaying details on hover, inline editing, new user interface theme and
should not be enabled by users not using screen readers.
Admin 201 preparation Page 7
5. Explain the various organization security options
(Object is a category of information {position, candidate}, record is a single instance of an object {SW
Engineer})
----------- increased data exposure -----------
profile>OWD>Role>Sharing rules>Group queues>Criteria based, manual sharing
Sharing rules can never be stricter than the OWD settings.
Sharing Access Diagram:
1. Salesforce checks whether user’s profile has object level permission to access that object
2. Salesforce checks whether user’s profile has any administrative permissions (view all data, modify all
data)
3. Salesforce checks the ownership of the record (Organization wide defaults, role-level access, any
sharing rules will be checked)
Controlling a user's access to data in several ways:
1. To control access to applications and objects, including fields and record types within objects:
Use profiles and permission sets.
(Create record types for a custom object to display different picklist values and page layouts to different
users based on their profiles.)
2. To control access to specific records: Use sharing settings or manual sharing
You cannot delegate administrative duties related to your organization to partner portal or Customer
Portal users. However, you can delegate some portal administrative duties to portal users.
1. Object level security: (What objects can a user see?) (It is set in user Profiles and Permission sets) to
prevent user from viewing, creating, editing or deleting any instance of a particular type of object. It allows
us to hide whole tabs & objects from particular users. User wouldn’t even know the object exists. (Tab
settings, Standard / Custom object permissions)
On the platform, we set object-level access with object permissions in user profiles and permission sets
2. Field level security: (What fields on those objects can a user see?) (In user Profiles and permission
sets) (Field level access with field permissions) a variation of object level security. User is prevented from
a particular field without having to hide the whole object, such as “max salary” or “SS”.
Security and Access - 15%
08 April 2014 08:38
Admin 201 preparation Page 8
Page layouts only control the visibility of field on detail and edit pages whereas field level security
controls the visibility of fields in any part of the app (related lists, list views, reports and search results)
(in order to be absolutely sure that a user does not have access to a particular field)
(visible/ read only boxes checked – read only | only visible box checked – editable | no box –
hidden)
In the platform, we control access to individual fields with field-level security. Field-level security
controls whether a user can see, edit, and delete the value for a particular field on an object.
Organization-wide defaults allow us to specify the baseline level of access that a user has in your
organization. For example, we can make it so that any user can see any record of a particular
object to which their object permissions give them access, but so that they'll need extra
permissions to actually edit one.
Role hierarchies allow us to make sure that a manager will always have access to the same records
as his or her subordinates. (vertical)
Sharing rules allow us to make automatic exceptions to organization-wide defaults for particular
groups of users. (horizontal)
Manual sharing allows record owners to give read and edit permissions to folks who might not
have access to the record any other way.
3. Record level security: (Org. wide defaults (Which records should be hidden by default?), Role
hierarchy / Sharing model / Manual sharing (What exceptions should we make?))
Profiles: (compulsory when setting up the user, user must be associated with a profile)
A collection of settings (what user can see) and Permissions (what user can do)
A profile contains user permissions and access settings that control what users can do and see within
their organization. Profiles are typically defined by a user's job function (for example, system
administrator or sales representative), but you can have profiles for anything that makes sense for your
organization.
A profile can be assigned to many users, but a user can be assigned to only one profile at a time, where
all of the members of the group have the same folder permissions and access to the same software.
Profiles never override organization’s sharing model or role hierarchy. (Exp: A profile set to allow a user
access to create, edit, delete leads but a user with above profile cannot edit, delete other users leads if
organizations lead sharing model is read only)
o Which standard and custom apps users can view?
o Which tabs users can view?
o Which record types are available to users?
Profiles control:
Admin 201 preparation Page 9
o Which page layouts users see?
o Object permissions that allow users to create, read, edit, and delete records
o Which fields within objects users can view and edit
o Admin Permissions that allow users to manage the system and apps within it
o Which Apex classes and Visualforce pages users can access
o Which desktop clients users can access
o The hours during which and IP addresses from which users can log in (profile login hours, Profile
IP addresses)
o Which service provider’s users can access (if Salesforce is enabled as an identity provider)
You can use standard profiles, or create, edit, and delete custom profiles. For standard profiles, only
certain settings can be changed. You can never edit object permissions on a standard profile. So you must
first clone the standard profile to create a custom profile and then assign user and then use permission
sets to grant additional permissions.
When a custom object is created, most profiles don’t give access to the object (except those with “modify
all data” under Profiles| Standard Object Permissions and Custom Object Permissions)
Standard profiles (6 Types):
Permission Sets: (Administrative and General) (Standard object permissions, custom object
permissions) is a collection of settings and permissions that determine what a user can do. If the custom
box is not checked it is a standard profile and we cannot edit standard profiles permission set. But we can
choose which tabs should appear at top of user’s / profile’s page and also select which apps to display in
Force.com. (Default on (displayed on top of user’s page),Default off (hidden from user’s page but
available when all Tabs is clicked), Tab hidden (completely hidden)
Hiding a tab is not sufficient to prevent a user from accessing records of that tab
You can only assign permission sets that have the same user licenses as the user or permission sets with
no associated license. You cannot change the license later.
If you plan to assign this permission set to multiple users with different licenses, choose '--
None--'.
If only users with one type of license will use this permission set, choose the same license
that’s associated with them.
Who will use this permission set?
Select the type of users who will use this permission set:
1. Grant access to custom object or App:
Example: Many users in an organization are doing the same job. Assign them all one profile that grants
them access to do their job and then assign permission sets to user if they are assigned to a special
Admin 201 preparation Page 10
project. New App custom profile, Test profile & take it away when it is not needed anymore.
2. Temporary/long term permission set:
Example: A user goes on vacation. Create a permission set to grant access to a custom object or app to
another user. After main man returns remove it.
Difference between profiles and permission sets?
o Users can have only one profile, but they can have many permission sets
o Therefore profiles are used to grand the minimum permissions and settings that every type of user
needs. (Assigned before permission sets)
o Then use permission sets to grant additional permissions without changing anyone’s profiles. (Also,
permission sets can be temporary or long term)
Example: (Recruiting App)
Recruiter: Own profile
Hiring Manager: Permission sets
Standard Employees: Start with low profile + permission sets
Interviewers: Any employee can be an interviewer (grant and revoke access as needed) so permission set.
Although there is permission to create, read or edit on an object does not necessarily mean users will be
allowed to read every object’s record because:
1. Permissions on a record always evaluated according to a combination of object, field and record level
permissions
2. When object vs. record level permissions conflict, the most restrictive setting wins. (If a record level is
more restrictive, although object level allows it, still the record level wins because it is more restrictive)
6. Describe the features and capabilities of the sharing model
Record Access (Record level security)
Changing your sharing model deletes any manual shares your users have created.
Ownership: Record owners can view/edit, transfer, delete records. They can also view but not edit the
Accounts their records are associated to.
Org wide defaults: The administrator can define the default-sharing model for your organization by
setting organization-wide defaults. Organization-wide defaults specify the default level of access to
records. Allow us to specify a baseline level of access that any user has in the org. Exp: Any user can see
any record of an object but they will need extra permission to edit a record/object.
a. Private: This setting for a given object allows users to access only the data they own. No one will be
able to view records owned by others.
b. Public Read only: This setting allows users to see, but not change, records in their organization,
regardless of who owns those items. Items can also be added by anyone onto related lists with this
permission level. (Providing objects have a Look up relationship)
c. Public Read/Write: This setting allows all users the ability to view and edit records owned by
others. But ownership itself cannot be changed except by the owner.
d. Public Read/Write/Transfer: This setting on an object allows all users the ability to view, edit, and even
change ownership of records owned by other
o Solutions are always Public Read/Write.
o Service contracts are always Private.
o The ability to view or edit a document, report, or dashboard is based on a user's access to the
folder in which it's stored.
o Users can only view the forecasts of other users who are placed below them in the role hierarchy,
unless forecast sharing is enabled.
o When a custom object is on the detail side of a master-detail relationship with a standard object,
its organization-wide default is set to Controlled by Parent and it is not editable.
o You can't change the organization-wide default settings from private to public for a custom object
if Apex code uses the sharing entries associated with that object. For example, if Apex code
You can't change the organization-wide sharing default setting for some objects:
Admin 201 preparation Page 11
retrieves the users and groups who have sharing access on a custom object Invoice__c (represented
as Invoice__share in the code), you can't change the object's organization-wide sharing setting from
private to public.
1) Roles Hierarchy: Open up access (vertical) Create role hierarchy to give access to the managers of the
account owners (managers inherit the privileges of user below them) (Allows to make sure that a
manager will always have access to the same records as his subordinates).
Users who need access to same records can be grouped together with Sharing rules.
o Users can always view and edit all data owned by or shared with users below them in the role
hierarchy.
o An option (Grant Access Using Hierarchies) on your organization-wide default allows you to
ignore the hierarchies when determining access to data. Grant using hierarchies cannot be disabled
for standard objects.
o Contacts that are not linked to an account are always private. Only the owner of the contact and
administrators can view it. Contact sharing rules do not apply to private contacts.
o Notes and attachments marked as private via the Private checkbox are accessible only to the
person who attached them and administrators.
o Events marked as private via the Private checkbox are accessible only by the event owner. Other
users cannot see the event details when viewing the event owner’s calendar. However, users with the
“View All Data” or “Modify All Data” permission can see private event details in reports and
searches, or when viewing other users’ calendars.
o Users above a record owner in the role hierarchy can only view or edit the record owner’s records
if they have the “Read” or “Edit” object permission for the type of record
Exceptions to Role Hierarchy-based Sharing
2) Sharing rules: (based on record owner or criteria) opens up access (horizontal/lateral), used by the
admin it is a way to automatically grant users access to objects when OWD or Role hierarchy doesn’t
allow it. (Allows making automatic exceptions to organization wide defaults for a particular group of
users) (Sharing rules works best if used on a predicted group of users {Roles}. Exp: Recruiters all belong to
either recruiting manager or recruiter roles, sharing rules works best but for interviewers, a new set of
interviewer will be assigned for each job. Hiring manager will be using a different set of interviewees
depending on the position they are hiring for. Team of interviewees is hard to predict. )(Manage Users |
Admin 201 preparation Page 12
Public Groups){use public groups when defining a sharing rule for more than 1 person or group or role}
o Sharing rules allow you to selectively grant data access to defined sets of users.
o You can use sharing rules to grant wider access to data. You cannot restrict access below your
organization-wide default levels.
o Sharing rules apply to all new and existing records that meet the definition of the source data set.
o Sharing rules apply to both active and inactive users.
o When you change the access levels for a sharing rule, all existing records are automatically updated to
reflect the new access levels.
o When you delete a sharing rule, the sharing access created by that rule is automatically removed.
o When you transfer records from one user to another, the sharing rules are reevaluated to add or remove
access to the transferred records as necessary.
o When you modify which users are in a group, role, or territory, the sharing rules are reevaluated to add
or remove access as necessary.
o Sharing rules automatically grant additional access to related records. For example, opportunity sharing
rules give role or group members access to the account associated with the shared opportunity if they do
not already have it. Likewise, contact and case sharing rules provide the role or group members with
access to the associated account as well.
o If multiple sharing rules give a user different levels of access to a record, the user gets the most
permissive access level.
o Users in the role hierarchy are automatically granted the same access that users below them in the
hierarchy have from a sharing rule, provided that the object is a standard object or the Grant Access Using
Hierarchies option is selected.
o Regardless of sharing rules, users can, at a minimum, view the accounts in their territories. Also, users
can be granted access to view and edit the contacts, opportunities, and cases associated with their
territories' accounts.
o Making changes to sharing rules may require changing a large number of records at once. To process
these changes efficiently, you request may be queued and you may receive an email notification when the
process has completed.
o You can create rules to share records between most types of Customer Portal users and Salesforce users.
Similarly, you can create sharing rules between Customer Portal users from different accounts as long as
they have the Customer Portal Manager user license. However, you can't include high-volume portal users
in sharing rules because they don't have roles and can't be in public groups.
o You can easily convert sharing rules that include Roles, Internal and Portal Subordinates to include
Roles and Internal Subordinates instead by using the Convert Portal User Access wizard. Furthermore, you
can use this wizard to convert any publicly accessible report, dashboard, and document folders to folders
that are accessible by all users except for portal users.
o Lead sharing rules do not automatically grant access to lead information after leads are converted into
account, contact, and opportunity records.
o In a master detail object relationship, you cannot create a sharing rule for a detail object, it is inherited.
Sharing rules based on Record owner or based on Criteria:
Criteria-based sharing rules determine whom to share records with based on field values in records. For
example, let's say you use a custom object for job applications, with a custom picklist field named
“Department.” You can create a criteria-based sharing rule that shares all job applications in which the
Department field is set to “IT” with all IT managers in your organization.
Admin 201 preparation Page 13
Although criteria-based sharing rules are based on values in the records and not the record owners, a
role or territory hierarchy still allows users higher in the hierarchy to access the records.
You can create criteria-based sharing rules for accounts, opportunities, cases, contacts, leads, campaigns,
and custom objects. You can create up to 50 criteria-based sharing rules per object.
3) Manual sharing: open up access (flexible), for owners or users with full access to give users read/write
access to another user or group who might not have access to the record any other way.
4) Implicit access (Accounts and associated child records)
5) Teams (Account, Case, and Opportunity)
In environments where the sharing model for an object has been set to Private or Public Read Only, an
administrator can grant users additional access to records by setting up a role hierarchy and defining
sharing rules. Role hierarchies and sharing rules can only be used to grant additional access—they
cannot be used to restrict access to records beyond what was originally specified with the
sharing model through organization-wide defaults.
Roles: (principal element in sharing rules, users can be grouped into roles based on their need to access
data. Each role in hierarchy should represent a level of data access required by users)
Depending on your sharing settings, roles can control the level of visibility that users have into your
organization’s data. If the Grant Access Using Hierarchies option is disabled for a custom object, only the
record owner and users granted access by the organization-wide defaults receive access to the object's
records. You can create up to 500 roles for your organization.
Every user must be assigned to a role, or their data will not display in opportunity reports, forecast roll-
ups, and other displays based on roles. If your organization uses territory management, forecasts are
based on the territory hierarchy rather than the role hierarchy.
Role Name: The unique name used by the API and managed packages. The name must begin with a letter
and use only alphanumeric characters and underscores. The name cannot end with an underscore or
have two consecutive underscores.
Sharing Groups: These groups are automatically created and maintained. The Role group contains all
users in this role plus all users in roles above this role. The Role and Subordinates group contains all users
in this role plus all users in roles above and below this role in the hierarchy. The Role and Internal
Subordinates group (available if Customer Portals or partner portals are enabled for your organization)
contains all users in this role plus all users in roles above and below this role, excluding Customer Portal
and partner portal users.
Users that gain access to data due to their position in hierarchies do so based on a setting in your
organization-wide defaults (Grant Access Using Hierarchies)
Roles control Records: Roles primarily control a user’s record level access permissions through role
hierarchy and sharing rules. Roles is the easiest way to define record level access permissions.
Profiles and Permission Sets control a user’s object & field level access permissions: A user can’t be
defined without being assigned to a particular profile, since the profile specifies the most basic access for
users. Each role in the hierarchy should just represent a level of data access that a user or group of users
needs.
Admin 201 preparation Page 14
7. Given a scenario, apply the appropriate security controls
1. Who is the most restricted user of this object?
(Standard employee)
2. Is there ever going to be an instance of this object that this user shouldn’t be allowed to see?
(Yes – Sharing model is Private)
(No) 3. Is there ever going to be an instance of this object that this user shouldn’t be allowed to edit?
(Yes – Sharing model is Public Read Only)(No – Sharing model is Public Read/Write)
8. Describe the various profiles controls
Standard profiles:
System Admin: Has access to all functionality that does not require an additional license. For example,
administrators cannot manage campaigns unless they also have a Marketing User license.
Standard platform user: Can use custom apps and the apps from Appexchange + can use core platform
functionality such as accounts, contacts, reports, dashboards, and custom tabs
Solution manager: Can review and publish solutions. Also has access to the same functionality as the
Standard User
Marketing user: Can manage campaigns, import leads, create letterheads, create HTML email templates,
manage public documents, and update campaign history via the import wizards. Also has access to the
same functionality as the Standard User.
Partner user: Can only log in via a partner portal.
Customer portal user/manager: Can only log in via a Customer Portal. Can view and edit data they
directly own or data owned by or shared with users below them in the Customer Portal role hierarchy;
and they can view and edit cases where they are listed in the Contact Name field.
Contract manager: Can create, edit, activate, and approve contracts. This profile can also delete contracts
as long as they are not activated. Can edit personal quota and override forecasts.
Read only: (executive team) Can view the organization's setup, run and export reports, and view, but not
edit, other records.
Chatter user/moderator: Can only log in to Chatter. Can access all standard Chatter people, profiles,
groups, and files.
Site.com user: Can only log in to the Site.com app. Each Site.com Only user also needs a Site.com
Publisher feature license to create and publish sites, or a Site.com Contributor feature license to edit the
site's content
9. Given a scenario, determine the appropriate use of a custom profile
Admin 201 preparation Page 15
A profile is a collection of permissions and other settings associated with a user or a group of users. Your
organization has a number of standard profiles already defined. If you create a custom object, the
permissions to access that object (“Read,” “Create,” “Edit,” and “Delete”) are disabled for most profiles.
This security setting ensures that access to custom objects and their data is only explicitly granted to
users. You can change these permissions in custom profiles, but not standard profiles.
Overview of User Permissions and Access:
User permissions and access settings specify what users can do within an organization. For example,
permissions determine a user's ability to edit an object record, view the Setup menu, empty the
organizational recycle bin, or reset a user's password. Access settings determine other functions, such as
access to Apex classes, app visibility, and the hours when users can log in.
Permissions and access settings are specified in user profiles and permission sets. Every user is assigned
only one profile, but can also have multiple permission sets. Permission sets are the best way to apply
system access to users without affecting all other users that have the same profile. (exp: permission 1 +
permission 2 + permission 3 (up to 1000) grouped into a permission set to create a profile like permission
without creating complete profiles.
When determining access for your users, it's a good idea to use profiles to assign the minimum
permissions and access settings for specific groups of users, then use permission sets to grant additional
permissions.
Because you can assign many permission sets to users and permission sets are reusable, you can
distribute access among more logical groupings of users, regardless of their primary job function. For
example, you can create a permission set that gives read access to a custom object and assign it to a large
group of users, and create another permission set that gives edit access to the object and assign it to only
a few users. You can assign these permission sets to various types of users, regardless of their profiles.
The following table shows the types of permissions and access settings that are specified in profiles and
permission sets
Delegating Data Administration: (Overriding the security and sharing configurations and who has such
powers and how powers are granted) Creating a profile with “manage Users” permission is not
recommended because of security risks {can expire all passwords, edit login hours, edit/delete profiles,
etc.} so we use delegated administration. Limited admin privileges such as create/edit users, reset
passwords, assign users to specific profiles, login as a user who granted login access)
Global Administrative permissions: “View all data”, “Modify all data” (including mass transfer / update
records and Undelete what others delete) “Customize Application”—Customize just about anything in
Salesforce, from page layouts to the data model
“Manage Users”—Add and remove users, reset passwords, grant permissions, and more
(Global permissions apply to records of every object in organization permissions, if global is too
permissive then use object permissions) there are two ways to delegate restricted data administrative
access (overriding sharing)
1. Object level permissions: (View all, modify all) Object permissions apply to records of a specific
object. Or create a permission set with “modify all” and assign to roles.
a. Delegated Administrators: Users
b. User Administration (Roles): lets us kinds of users this group can manage
c. Assignable profiles: lets us specify the profiles this group can assign to users they
manage.
d. Custom Object Administration: specify custom objects delegated admins can administer.
2. Delegated Administration groups: is a group of non-admin users with limited admin privileges.
Security controls | Delegated Administration
Profiles and permission sets – Objects and fields level access permissions
Roles – Record level access permissions through role hierarchy and sharing rules
Sharing rules and role hierarchies can never be stricter than our org-wide default settings.
A public group is a collection of individual users, other groups, individual roles, and/or roles with their
subordinates that all have a function in common. Using a public group when defining a sharing rule
makes the rule easier to create and, more important, easier to understand later, especially if it's one of
many sharing rules that you're trying to maintain in a large organization. You'll need to create a public
group if you ever want to define a sharing rule that encompasses more than one or two groups or roles,
Admin 201 preparation Page 16
or any individual.
Profile controls access to objects and records using roles
One Account can have many Opportunities, many opportunities can belong to one account.
Admin 201 preparation Page 17
Standard APPs: Sales, Call Center, Marketing, Community, Site.com
10. Describe the standard object architecture and relationship model
Overview of Relationships:
Use relationships to associate an object with other objects in Salesforce. (Custom fields and relationships)
You can define different types of relationships by creating custom relationship fields on an object.
There are different types of relationships between objects in Salesforce. Their differences include how
they handle data deletion, sharing, and required fields in page layouts.
Master-detail
This type of relationship closely links objects together such that the master record controls certain
behaviors of the detail and subdetail record. For example, you can define a two-object master-detail
relationship, such as Account—Expense Report, that extends the relationship to subdetail records,
such as Account—ExpenseReport—Expense Line Item. You can then perform operations across
the master—detail—subdetail relationship. (Exp: Job application – Review - Detail)
Behaviors of master-detail relationships include:
o When a master record is deleted, the related detail and subdetail records are also deleted. (Because
review is useless without job application object)
o By default, records can’t be reparented in master-detail relationships. Administrators can, however,
allow child records in master-detail relationships on custom objects to be reparented to different parent
records by selecting the Allow reparenting option in the master-detail relationship definition.
o The Owner field on the detail and subdetail records is not available and is automatically set to the owner
of the master record. Custom objects on the “detail” side of a master-detail relationship can't have sharing
rules, manual sharing, or queues, as these require the Owner field.
o The security settings for the master record control the detail and subdetail records.
o The master-detail relationship field (which is the field linking the objects) is required on the page layout
of the detail and subdetail records.
o The master object can be a standard object, such as Account or Opportunity, or a custom object.
o As a best practice, don't exceed 10,000 child records for a master-detail relationship.
o In a many-to-many relationship, a user can’t delete a parent record if more than 200 junction object
records are associated with it and if the junction object has a roll-up summary field that rolls up to the
other parent
o Custom object: Maximum Number of Master – Detail Relationships = 23
o A master detail relationship on an object can only be created before the object contains record data
Lookup
This type of relationship links two objects together. Simple relationship between 2 objects. Lookup
relationships are similar to master-detail relationships, except they do not support sharing or roll-up
summary fields.
Exp: job application object – (lookup field that references) – Position records (Then many job
applications can be related to a single position record)
With a lookup relationship, you can:
o Link two different objects. (new position field on job application record, job application related list on
position object)
o Link an object with itself (with the exception of the user object {Hierarchical} user can not be added to
related lists because it is a unique standard object). For example, you might want to link a custom object
called “Job Application” with itself to show two applications are related to the same job.
When you define a lookup relationship, you have the option to include a lookup field on the page layouts
for that object as well as create a related list on the related object's page layouts.
You can't delete an object or record in a lookup relationship if the combined number of records between
the two linked objects is more than 100,000. To delete an object or record in a lookup relationship, first
Standard and Custom Objects - 18%
08 April 2014 08:39
Admin 201 preparation Page 18
delete an appropriate number of its child records.
Hierarchical
This type of relationship is a special lookup relationship available only for the user object. It allows users
to use a lookup field to associate one user with another that does not directly or indirectly refer to itself.
For example, you can create a custom hierarchical relationship field to store each user's direct manager.
Many to Many
A many-to-many relationship allows each record of one object to be linked to multiple records from
another object and vice versa. Use a junction object to connect the two objects you want to relate to
each other.
A Junction object is a custom object with two master detail relationships with a sole purpose of simply
relating two objects.
Creating the many-to-many relationship consists of:
1. Creating the junction object: (Job Application)
2. Creating the two master-detail relationships: (A look up field on job Applications that references
Position records {Lookup(position)}, A look up field on job applications that points to Candidate records
{Lookup(candidate)}.
3. Customizing the related lists on the page layouts of the two master objects: Job Application under
Position Page Layout and Job Applications under Candidate page Layout.
4. Customizing reports to maximize the effectiveness of the many-to-many relationship: Under custom
app reports
Exp: Many Websites vs. Many Open positions (One website can host many open positions and one open
position can be posted to many websites)
Create a junction object called Job Postings. Now one Website can have many Job Postings and one open
position can have many Job Postings. Job posting always represents a posting about a single position on a
single website. In related lists instead of relating open positions to job postings, we relate it to websites.
Exp: Many Positions vs. many Candidates (multiple candidates can apply to one position or one candidate
can apply to many positions)
Create a junction object called Job Application. Now one candidate can have many job applications and
one position can have many job applications. A candidate applies to a position via job application. So
each time a candidate wants to apply for a position, recruiter can create a job application.
In a 2 master detail relationship, 2nd Master detail relationship has no effect on the look and feel of the
junction object. But sharing is done through the master object.
11. Explain how to create, delete, and customize fields, page layouts, and list views for custom and
standard objects
1. Navigate to the fields area of the appropriate object:
To add a custom field:
For standard objects, click Your Name > Setup > Customize, select the appropriate object from the
Customize menu, and click Fields.
For custom task and event fields, click Your Name > Setup > Customize > Activities > Activity Custom
Fields.
For custom objects, click Your Name > Setup > Create > Objects, and select one of the custom objects in
the list.
2. Click New in the Custom Fields & Relationships section of the page.
For custom settings, click Your Name > Setup > Develop > Custom Settings, and click the name of the
custom setting. (Allowed limit = 2 MB.) (Custom settings are similar to custom objects. Use custom
settings to create and manage custom data at the organization, profile, and user levels. Custom settings
data is stored in the application cache. This means you can access it efficiently, without the cost of
repeated queries. Custom settings data can be used by formula fields, Visualforce, Apex, and the
Force.com Web Services API.)
3. Choose the type of field to create, and click Next.
Tip: From this section, you can also set field dependencies and field history tracking on custom objects.
Note:
Some data types are only available for certain configurations. For example, the Master-Detail
Relationship option is available only for custom objects when the custom object does not already have a
master-detail relationship. Also, custom settings only allow a subset of the available data types.
Admin 201 preparation Page 19
Relationship fields count towards custom field limits.
Field types not listed in custom field types may appear if your organization installed a package from the
AppExchange that uses those custom field types.
The Roll-Up Summary option is only available on certain objects.
4. For relationship fields, choose the object that you want to associate with it.
5. Enter a field label.
Field types correspond to API data types. For more information, see “API Data Types and API Field Types”
in the Web Services API Developer's Guide.
The Field Name is automatically populated based on the field label you enter. This name can contain only
underscores and alphanumeric characters, and must be unique in your organization. It must begin with a
letter, not include spaces, not end with an underscore, and not contain two consecutive underscores. Use
the field name for merge fields in custom links, custom s-controls, and when referencing the field from
the API.
Tip: Ensure that both the custom field name and label are not identical to the name and label of any
existing standard or custom field for that object. Identical values may result in unexpected behavior when
you reference that name in a merge field.
If a standard field and custom field have matching names or labels, the merge field displays the value of
the custom field.
6. Enter any field attributes.
7. For relationship fields, optionally create a lookup filter to limit the valid values and lookup dialog
results for the field.
8. Click Next to continue.
9. In Enterprise, Unlimited, and Developer Editions, specify the field's access settings for each
profile, and click Next.
If two custom fields have matching names or labels, the merge field may not display the value of the field
you expect. For example, if you create a field label called Email, the field name automatically populates as
Email__c. If you also have a standard field with the label Email, the merge field may not be able to
distinguish between the standard and custom field names. Make both the custom field name and label
unique by adding a character to each, such as Email2 and Email2__c, respectively.
Note:
When you create a custom field, by default the field isn't visible or editable for portal profiles, unless the
field is universally required.
10. Choose the page layouts that should display the field as an editable field.
Profiles with “View Encrypted Data” permission are indicated with an asterisk.
11. For relationship fields, choose whether to create a related list that displays information about
the associated records. You can choose to put the related list on any page layouts for that object.
The field is added as the last field in the first two-column section on the page layout. For long text area
fields, the field is added to the end of the first one-column section on the page layout. For user custom
fields, the field is automatically added to the bottom of the user detail page. For universally required
fields, you cannot remove the field from page layouts or make it read only.
12. Click Save to finish or Save & New to create more custom fields.
To change the label of the custom related list as it will appear on the page layouts of the associated
object, edit the Related List Label. To add the new related list to page layouts that users have already
customized, check Append related list to users’ existing personal customizations.
Note: Creating fields may require changing a large number of records at once. To process these changes
efficiently,you request may be queued and you may receive an email notification when the process has
completed.
Creating Page Layouts
Available in: Enterprise, Unlimited, and Developer Editions, User Permissions Needed
To create page layouts: “Customize Application”
To create a new page layout:
1. Click Your Name > Setup > Customize, select an object or record type, and click Page Layouts.
For opportunities, click Your Name > Setup > Customize > Opportunities > Opportunity Products > Page
Layouts to create or edit the additional page layouts for products on opportunities. For person accounts,
click Your Name > Setup > Customize > Accounts > Person Accounts > Page Layouts to create
Admin 201 preparation Page 20
or edit the additional page layouts for person accounts. For campaign members, click Your Name >
Setup > Customize > Campaigns > Campaign Member > Page Layouts.
2. Click New.
Tip: To create a new page layout by cloning an existing one:
In the enhanced page layout editor, click Edit next to a layout, and then click Save As on the layout page.
In the original page layout editor, select a layout, and then click Clone on the layout page.
If you clone a page layout using this method, skip the following step.
3. Optionally, choose an existing page layout to clone.
4. Type a name for the new layout.
5. Click Save.
12. Given a scenario, determine the appropriate fields and page layouts for custom and standard
objects
13. Explain how to create, delete, and customize record types for custom and standard objects
14. Given a scenario, determine the appropriate record types and business processes for custom and
standard objects
For custom objects: Create | Objects |---Object | Record Types
For standard objects: Customize |---Object | Record Types
Record types allow you to specify categories of records that display different picklist values and page
layouts. You can also associate record types with profiles, so you can specify the picklist values and page
layouts that different types of users can see in record detail pages.
Exp: Record types – IT positions, Non-IT positions (these are record types) (need a separate page
layout for each record type)
Both usability and data integrity are adversely affected by irrelevant data. So take away unnecessary
choices by utilizing record types.
15. Explain the implications of deleting fields
o Before deleting a custom field, consider where it is referenced. You can’t delete a custom field that is
referenced elsewhere. For example, you cannot delete a custom field that is referenced by a field update or
Apex.
o When you delete a custom field, all of the field history data is deleted and changes are no longer
tracked.
o A background process periodically runs that cleans up metadata associated with deleted custom fields.
This process will affect the Last Modified Date and Last Modified By fields on page layouts, record types,
and custom objects.
Deleted custom fields and their data are stored until your organization permanently deletes them or 15
days has elapsed, whichever happens first. Until that time, you can restore the field and its data.
However, the field still counts against the maximum number of custom fields allowed in your
organization.
16. Describe when to use and how to create formula fields
1. Begin building a formula field the same way you create a custom field.
2. Select the data type for the formula. Choose the appropriate data type for your formula based on the
output of your calculation.
3. Choose the number of decimal places for currency, number, or percent data types. This setting is
ignored for currency fields in multicurrency organizations. Instead, the Decimal Places for your currency
setting apply.
Note: Salesforce uses the round half up tie-breaking rule for numbers in formula fields. For example,
12.345 becomes 12.35 and −12.344 becomes −12.34.
4. Click Next.
5. Build your formula:
a. If you are building a formula in the Advanced Formula tab or for approvals or rules, such as workflow,
Admin 201 preparation Page 21
validation, assignment, auto-response, or escalation, click Insert Field, choose a field, and click Insert.
To create a basic formula that passes specific Salesforce data, select the Simple Formula tab, choose the
field type in the Select Field Type drop-down list, and choose one of the fields listed in the Insert Field
drop-down list.
Tip: Build cross-object formulas to span to related objects and reference merge fields on those objects.
Note: Because formula fields are automatically calculated, they are read-only on record detail pages and
do not update last modified date fields. Formula fields are not visible on edit pages.
In account formulas, all business account fields are available as merge fields. However, account fields
exclusive to person accounts such as Birthdate and Email are not available. Formulas on Activities that
use standard fields shouldn't be placed on both the Task and Event pages. This is because both Tasks and
Events are considered Activities. For instance, if a formula is used on a standard field only available for
Tasks, it will also mistakenly be pulled into Events.
o Default value formulas for a type of record can only reference fields for that type of record. However,
formula fields and formulas for approvals or rules, such as workflow, validation, assignment, auto-
response, or escalation, for a type of record can reference fields for that type of record as well as any
records that are related through a lookup or master-detail relationship. For example, a formula for a
validation rule on opportunities can reference merge fields for accounts and campaigns as well as
opportunities, and a formula field on accounts can reference fields for cases.
o Formula fields that a user can see may reference fields that are hidden or read only using field-level
security. If the formula field contains sensitive information, use field-level security to hide it
o You can add activity formula fields to task and event page layouts. Note that a task-related formula field
on an event page layout may not be useful. Likewise, event-related formula fields on task page layouts
may not be useful. To determine if a record is a task or event, use the IsTask merge field. For example:
IF(IsTask, "This is a task", "This is an event")
o Character limit—Formula fields can contain up to 3,900 characters, including spaces, return
characters, and comments. If your formula requires more characters, create separate formula
fields and reference them in another formula field.The maximum number of displayed characters
after an evaluation of a formula expression is 1,300 characters.
o Save size limit—Formula fields cannot exceed 4,000 bytes (4MB) when saved. The save size
differs from the number of characters if you use multi-byte characters in your formula.
o Compile size limit—Formula fields cannot exceed 5,000 bytes (5MB) when compiled. The
compile size is the size of the formula (in bytes) including all of the fields, values, and formulas it
references.
o Long text area, encrypted, and Description fields are not available for use in formulas.
o The value of a field cannot depend on another formula that references it.
o Fields referenced in formulas cannot be deleted. Remove the field from the formula before deleting it.
o Task Due Date is not available for use in formulas.
o Campaign statistic fields cannot be referenced in formulas for field updates, approval processes,
workflow rules, or validation rules, but can be referenced in custom formula fields
o Dates and times are always calculated using the user’s time zone.
o The Created Date and Last Modified Date fields display only the date, not the date and time.
o {!CreatedDate} + 5 calculates the date and time five days after a record’s created date. Note that the
expression returns the same data type as the one given; a date field plus or minus a number returns a date,
and a date/time field plus or minus a number returns a date/time.
o When calculating dates using fractions, Salesforce ignores any numbers beyond the decimal. For
example:
TODAY() + 0.7 is the same as TODAY() + 0, which is today’s date
TODAY() + 1.7 is the same as TODAY() + 1, which is tomorrow’s date
TODAY() + (-1.8) is the same as TODAY() + (-1), which is yesterday’s date
o To calculate the value of two fractions first, group them within parentheses. For example:
TODAY() + 0.5 + 0.5 is the same as TODAY() + 0 + 0, which is today’s date
TODAY() + (0.5+0.5) is the same as TODAY() + 1, which is tomorrow’s date
o Hyperlink formula fields are just like other custom fields that you can display in list views and reports.
o Custom links display on detail pages in a predefined section; hyperlink formula fields can display on a
detail page wherever you specify.
Admin 201 preparation Page 22
o Using custom links, you can specify display properties such as window position and opening in a
separate popup position; hyperlink formula fields open in a new browser window by default or you can
specify a different target window or frame.
o Your formulas can reference custom links. Before deleting a custom link, make sure it is not referenced
in a formula field.
o Hyperlink formula fields that contain relative URLs to Salesforce pages, such as /rpt/reportwizard.jsp,
can be added to list views, reports, and related lists. However, use a complete URL, including the server
name and https://, in your hyperlink formula before adding it to a search layout. Note that formula fields
are not available in search result layouts.
o The output of your formula must be less than 19 digits
Cross Object formulas: Are formulas that span two or more objects by referencing merge fields from
related records. This means formulas on Review object can access fields on Job Application object and
formulas on the Job Application object can access fields on both Position and Candidate objects.
o Cross-object formulas that reference currency fields convert the value to the currency of the record that
contains the formula.
o Salesforce allows a maximum of ten (10) unique relationships per object in cross-object formulas. The
limit is cumulative across all formula fields, rules, and lookup filters. For example, if two different
formulas on opportunities reference two different fields of an associated account, only one unique
relationship exists (from opportunities to accounts).
o You cannot reference cross-object formulas in roll-up summary fields.
o In cross-object formulas, you cannot reference merge fields for objects related to activities. For
example, merge fields for contacts and accounts are not available in task and event formulas.
o In cross-object formulas, you cannot reference record owner merge fields for any object. For example,
the opportunity owner's Role merge field is not available in opportunity formulas.
Reference record types in formulas if you want different workflow rules, validation rules, and lookup
filters to apply to different record types. For example, you can:
o Create a workflow rule on accounts that emails different teams depending on the account record type
the user selects when creating the account.
o Create a validation rule on opportunities that allows only members of the North American sales team to
save opportunities with the Domestic record type.
When referencing a record type in a formula, use RecordType.Id instead of RecordType.Name. If you use
RecordType.Name and the record type name changes, your formula will break. The record type ID never
changes.
Using RecordType.Id can make your formula less readable, so use inline comments to make your formula
readable.
Do not use the $RecordType global variable in cross-object formulas. The $RecordType variable only
resolves to the record containing the formula, not the record to which the formula spans.
Admin 201 preparation Page 23
Leads: Not a customer yet but person / org / company that is interested in working with your company
1. First search Salesforce to see if lead has already been created
2. Add lead manually to create new lead
3. Import wizard for leads (under lead tab) or data management | Import leads (<= 50,000)
4. Web to lead
Leads are converted into an account or an opportunity in order to be a part of org’s sales pipeline
Lead status:
Open – not converted
Working – contacted
Closed – Converted
Closed – Not converted
Once converted lead creates (1. Account, 2. Contact record, 3. Associated opportunity) and also assign an
activity to do for the record owner
Accounts & Contacts: is an org/individual/company involved with your organization as a customer,
competitor and partner. (Already established relationship)
Create account manually using the sidebar or account tab | New
Import my Accounts & Contacts (≤ 500 records) (importing can also be done via outlook, Act!, .csv,
data.com)
Contact: Any point of contact/individual/influencer associated with an account. Any contact can be
related to multiple opportunities.
For multiple users: Setup | Data Management | Import Accounts | Contacts to import accounts and
contacts (ONLY AVAILABLE TO THE SYSTEM ADMINISTRATOR)
For self user: personal setup | Import| Import my accounts and contacts
Opportunity: potential revenue generating deal / event that you want to track in Salesforce (won deals,
lost deals)
Tracking a deal in Sales pipeline: (opportunity) Create Opp Update Opp Close Opportunity
Create opportunity – when converting lead to account
Create opportunity – Create new (sidebar)
Create opportunity –from opportunity tab | New
Create opportunity –from related lists
Enterprise and unlimited editions can assign sales teams to opportunities
An opportunity alert: sends a notification the first time an opportunity reaches the threshold. So, an
opportunity that reaches the threshold with 90% probability will not trigger additional alerts if the
probability subsequently goes higher. However, an opportunity that already triggered an alert and then
fell below the threshold can trigger a second alert if it crosses that threshold again.
Big Deal Alert: Your organization can use alerts that automatically send an email notification for
opportunities with large amounts (to any email and opportunity owner). Customize this alert to send an
email when an opportunity reaches a threshold. Your threshold consists of an opportunity amount and
probability. For example, you may want to send an email to your team that an opportunity of $500,000
has reached a probability of 90%. Setup | Customize | Opportunities | Big Deal Alert
A Sales Process contains the Stages an Opportunity follows through its sales cycle.
Similar Opportunities: This feature allows a user to search for opportunities that share common fields
with the user's opportunity. Once enabled, a Similar Opportunities related list appears on the
opportunity record. After creating a new Sales Process, associate it with one or more Opportunity Record
Type to apply it to new opportunities.
Predicting and Planning Sales Cycles:
1. Forecast sales revenue
2. Plan and predict your pipeline
3. Meet or exceed your quotas
Sales Cloud Applications - 9%
08 April 2014 08:40
Admin 201 preparation Page 24
Forecasts: is a revenue projection that aggregates individual opportunities into a total or summary,
expressed in a dollar amount and/or units of product (Roll up)
17. Given a scenario, identify the capabilities and implications of the sales process
Salesforce CRM Record Lifecycle
The capabilities of Salesforce CRM provides for the processing of campaigns through to customer
acquisition and beyond as shown in the following diagram:
1. Marketing Administration: At the start of the process, it is the responsibility of the Marketing team to
develop suitable campaigns in order to generate leads.
2. Campaigns: Campaign management is carried out using the Marketing Administration tools and has
links to the lead and also any opportunities that have been influenced by the campaign.
3. Marketing/Sales: When validated, leads are converted to accounts, contacts, and opportunities. This
can be the responsibility of either the marketing or sales teams and requires a suitable sales process to
have been agreed upon
Customer Acquisition
4. Leads: A lead object is a person or a company that might be interested in your product or service. If the
rep qualifies a lead and decides to pursue it, the lead is “converted,” which automatically transforms it
into three objects: an account, a contact, and an opportunity.
5. Accounts: The account object represents a company. You can create account records for prospects,
customers, competitors, partners, or any other entities that makes sense for your business. An account
record contains—or connects to—all information about your interactions with the company, such
as in-progress and completed deals, your points of contact, and records of past interactions.
6. Contacts: The contact object stores information about people who work at the companies represented
by the account object. A contact record contains all relevant information about the person, such as
phone numbers, title, role in a deal. When a rep converts a lead, the information in the lead is
automatically transferred to the contact. As your engagement with a company widens and your reps
meet more people, they can keep creating additional contacts associated with the corresponding account
record
7. Opportunities: The opportunity object contains the information for every deal you’re tracking, such as
deal size and expected close date. The opportunity object is at the core of your sales process. To gain
visibility into your pipeline, you need to make sure that your reps (usually opportunity owners) diligently
track their deals and update the opportunity fields with accurate information. Opportunities can either
be generated from lead conversion or may be entered directly by the sales team. As described earlier in
this book, the structure of Salesforce requires account ownership to be established which sees inherited
ownership of the opportunity. Account ownership is usually the responsibility of the sales team.
Opportunities are worked through a sales process using sales stages where the stage is advanced to the
point where they are set as won/closed and become sales. Unless you use the product and pricebook
objects, we recommend that your opportunity name contains account name, product, and price—for
example, “Acme Inc.-Blue Series Router XT6800-$25,000.” If you do use the product object, put
all products into a single opportunity.
Salesforce Automation
8. Activities: Activities consist of the tasks, events, calls, and emails that make it possible to track every
customer interaction. Did you just have a phone conversation in which the customer agreed to certain
terms and conditions of an in-progress deal? Click Log a Call on the opportunity record to document any
agreements. Did a customer ask you to send some collateral? Log a task so that you won’t forget.
9. Sales (Won Deals): Opportunity information should be logged in the organization’s financial system.
Upon financial completion and acceptance of the deal (and perhaps delivery of the goods or service) the
post-customer acquisition process is then enabled where the account and contact can be recognized as a
customer.
Customer Service and Support Automation
10. Cases: the customer relationships concerning incidents and requests are managed by escalating cases
within the customer services and support automation suite.
18. Given a scenario, identify when to apply the appropriate sales productivity features
Admin 201 preparation Page 25
19. Describe the capabilities of products and price books
Products, Price Books, and Schedules
Products
Products are the individual items that you sell on your opportunities and quotes. You can create a
product and associate it with a price in a price book. Each product can exist in many different price books
with many different prices. A product that is listed in a price book with an associated price is called a
price book entry. The Products related list of an opportunity detail page and the Quote Line Items related
list of a quote detail page list the products for that record. Use this related list to associate a price book
with the opportunity or quote, add or edit products, and, for opportunities, establish or edit product
schedules.
Price Books
A price book contains products and their associated prices. Each product with its associated price is
referred to as a price book entry. You can use the standard price book or create custom price books. The
standard price book is automatically generated to contain a master list of all products and standard
prices regardless of the custom price books that also contain them.
Schedules
You can establish default schedules on a product, as well as schedules for individual line items
(opportunity products) on an opportunity
Your administrator determines which types of schedules your organization can use: quantity schedules,
revenue schedules, or both. Your administrator also specifies which types of schedules can be established
for each separate product.
Quantity Schedule–Outlines the dates, number of units, and number of installments for payments,
shipping, or other use as determined by your organization.
Revenue Schedule–Outlines the dates, revenue amounts, and number of installments for
payments, recognizing revenue, or other use.
20. Describe the capabilities of lead management
Using an Assignment Rule when Creating or Editing a Lead
Your administrator can create a lead assignment rule to automatically assign leads to different users or
queues.Without a lead assignment rule, the system assigns all new web-generated leads to the Default
Lead Owner defined on the Lead Settings page.
Your administrator can assign new web-generated leads using the Web-to-Lead setup, or when creating
or editing a lead, you can check a box to assign the lead automatically using your active lead assignment
rule. An email is automatically sent to the new owner if your administrator specified an email template in
the matching rule entry. If you want this checkbox to be selected by default, your administrator can
modify the appropriate page layout.
Importing Leads
When importing new leads, your administrator can apply a lead assignment rule to automatically assign
leads to users or queues based on values in certain lead fields. Alternatively, your administrator can add a
Record Owner field to the import file to assign lead ownership. Without a lead assignment rule or Record
Owner field, imported leads are automatically assigned to the user doing the import.
Creating a Lead Manually (default assignment)
When you manually create a lead from the Leads tab, you are automatically listed as the owner of the
lead.
Taking Leads from a Queue
To take ownership of leads in a queue, go to the queue list view, check the box next to one or more
leads, and click Accept.
Changing Ownership of One Lead
To change the ownership of a lead you own or have read/write sharing access to, click the Change link
next to the Lead Owner field, and then specify the name of a user or queue. The Change link only displays
on the lead detail page, not the edit page. Select the Send Notification Email box to send an automated
email to the new lead owner. If the new owner is a queue, Salesforce sends the email to all of the queue
members.
Changing Ownership of Multiple Leads
Admin 201 preparation Page 26
You can transfer ownership of multiple leads if you have the “Transfer Leads” or “Transfer Record”
permission, the “Edit” object permission on leads, and sharing access to view the leads. To transfer
ownership of multiple leads, use either of the following methods:
From a list view or queue, select one or more leads and click Change Owner.
Use the mass transfer tool at Your Name > Setup > Data Management > Mass Transfer Records.
All leads that are assigned to you, either manually, via import, or from the web, are automatically marked
as “Unread;” that is, they have a check mark in the Unread column on leads list views. So to view your
new leads, select the My Unread leads list view. Leads are automatically marked as “Read” only after you
view or edit them. If your organization uses divisions, leads that are assigned via assignment rules are
automatically set to the default division of the new owner.
The organization-wide sharing model for an object determines the access users have to that object's
records in queues:
Public Read/Write/Transfer
Users can view and take ownership of records from any queue.
Public Read/Write or Public Read Only
Users can view any queue but only take ownership of records from queues of which they are a member
or, depending on sharing settings, if they are higher in the role or territory hierarchy than a queue
member.
Private
Users can only view and accept records from queues of which they are a member or, depending on
sharing settings, if they are higher in the role or territory hierarchy than a queue member.
Regardless of sharing model, users must have the “Edit” permission to take ownership of records in
queues of which they are a member. Administrators, users with the “Modify All” object-level permission
for Cases, and users with the “Modify All Data” permission, can view and take records from any queue
regardless of the sharing model or their membership in the queue.
User Permissions Needed
To change the status of leads: “Manage Leads”
To change the ownership of leads: “Transfer Leads” OR “Transfer Record” AND “Edit” on leads
To add leads to campaigns from a list view: Marketing User checked in your user record AND “Read” on
leads AND “Edit” on campaigns
From any lead list page, administrators can “mass update” multiple leads. From any queue list view, users
can take ownership of leads if:
o They are a member of that queue
o They are higher in the role hierarchy than a queue member
o The organization's default sharing for leads is Public Read/Write/Transfer
Select the checkboxes next to the desired leads and click one of the following buttons:
Accept: Assigns you as the owner of the selected leads and transfers open activities to you.
In organizations that are not Public Read/Write/Transfer for leads, you can take leads only from queues
of which you are a member or if you are higher in the role hierarchy than a queue member.
Change Status: Changes the Status of the leads to the value you set. You must have the “Manage Leads”
permission and read/write access to the leads to use this feature. If you change the status of a lead you
own using the Change Status button, the Unread By Owner checkbox is still selected.
Change Owner: Assigns leads to a user or queue you specify. If the new owner is a user—not a queue—
associated notes, attachments, and open activities are also transferred.
To use this feature, you must have the “Transfer Leads“ or “Transfer Record” permission, the “Edit”
object permission on leads, and access to view the leads you are updating.
Add to Campaign: Adds leads to an existing campaign.
You must have the Marketing User box checked in your user information, the “Read” permission on
leads, and the “Edit” permission on campaigns to use this feature.
Creating Leads
You can create new leads in various ways. Your administrator can set up Web-to-Lead to automatically
capture leads from your website; your administrator can import new leads using the Import My
Organization’s Leads wizard; or you can create new leads manually in the Leads tab. You can also find
Data.com contacts and add them as leads.
With Web-to-Lead, you can gather information from your company’s website and automatically generate
Admin 201 preparation Page 27
up to 500 new leads a day.
To manually create a new lead, select Lead from the Create New drop-down list in the sidebar, or click
New next to Recent Leads on the leads home page. Enter the lead information. Select the checkbox
below the lead information to assign the lead automatically using the active lead assignment rule. If you
do not check the box, you are assigned as the owner. Click Save when you are finished, or click Save &
New to save the current lead and add another.
When you create a new lead manually:
You are automatically assigned as the owner.
The Lead Status is initially set to the default status specified by your administrator.
If you select the assignment rule checkbox, the record type of the lead might change, depending on what
behavior your administrator specified for assignment rules.
The lead is marked as “Read” and will not display in the My Unread Leads list view. However, if you save
the lead using the Save & New button, the lead is marked as “Unread.”
The Lead Activity History related list of a lead detail page tracks the changes to the lead. Any time a user
modifies any of the standard or custom fields whose history is set to be tracked on the lead, a new entry
is added to the Lead History related list. All entries include the date, time, nature of the change, and who
made the change. Modifications to the related lists on the lead are not tracked in the lead history. For
information about setting up which fields are tracked.
For automated lead changes that result from Web-to-Lead, the user listed in the history is the Default
Lead Creator chosen in the Web-to-Lead Settings.
To convert leads:
When you convert a lead, Salesforce creates a new account, contact, and, optionally, an opportunity
using the information from the lead. Any campaign members are moved to the new contact and the lead
becomes read only. If an existing account and contact have the same names as those specified on the
lead, you can choose to update the existing account and contact. Information from the lead is inserted
only into blank fields; Salesforce does not overwrite existing account and contact data.
All open and closed activities from the lead are attached to the account, contact, and opportunity. You
can assign the owner of the records, and schedule a follow-up task. When you assign a new owner, only
the open activities are assigned to the new owner. If you have custom lead fields, that information can be
inserted into custom account, contact, or opportunity fields. Converted leads can't be viewed, although
they appear in lead reports. Salesforce updates the Last Modified Date and Last Modified By system fields
on converted leads when picklist values included on converted leads are changed.
Notes on Converting Leads
Conversion impact on workflow:
o You cannot convert a lead that is associated with an active approval process or has pending workflow
actions.
o Converting a lead to a person account cannot trigger workflow rules.
o If validation and triggers for lead convert are enabled in your organization, then converting a lead can
trigger a workflow action on a lead. For example, if there is an active workflow rule that updates a lead
field or transfers the owner of a lead, that rule can trigger when the lead is converted, even if the lead is no
longer visible on the Leads tab as a result of the conversion. Note that if a workflow rule creates a new task
as a result of a lead conversion, the task is assigned to the newly created contact and related to the
associated account or opportunity.
o When a lead is converted by someone who isn't the lead owner, all workflow tasks associated with the
lead that are assigned to that user, except email alerts, are reassigned to the lead owner. Workflow tasks
assigned to users other than the lead owner and lead converter aren't changed.
Conversion impact on campaigns:
o If the lead matches an existing contact and both records are linked to the same campaign, the campaign
member status is determined by whichever is further along in the lifecycle of the campaign. For example,
if the lead member status is “sent” and the contact member status is “responded,” the responded value is
applied to the contact.
o Related campaign information is always associated with the new contact record regardless of the user's
sharing access to the campaign.
Admin 201 preparation Page 28
o When more than one campaign is associated with a lead, the most recently associated campaign is
applied to the Primary Campaign Source field on the opportunity regardless of the user's sharing access to
the campaign.
When a lead is converted, Chatter feed posts associated with the lead aren’t migrated. The lead posts are
no longer available in the Chatter feed.
Salesforce ignores lookup filters when converting leads if the Enforce Validation and Triggers from Lead
Convert checkbox on the Lead Settings page is deselected.
If the lead has a record type, the default record type of the user converting the lead is assigned to records
created during lead conversion.
The default record type of the user converting the lead determines the lead source values available
during conversion.
Typically, you will want to convert a lead as soon as it becomes a real opportunity that you want to
forecast.
If your organization uses territory management, the new account is evaluated by account assignment
rules and may be assigned to one or more territories. If the rules assign the account to exactly one
territory, then the opportunity will also be assigned to that territory. If the rules assign the account to
multiple territories, then the opportunity is not assigned to any territory.
If your organization uses person accounts, you can convert leads to either person accounts or business
accounts. Leads with a blank Company field are converted to person accounts. The default person
account record type for your profile is applied to the new person account. Note that you can only create
leads with a blank Company field using the Force.com API. In particular, remove the Company field from
the page layouts of leads that will be converted to person accounts, and make the Company field
required on the page layouts of leads that will be converted to business accounts.
When you convert a lead into a existing account, you don’t automatically follow that account. However,
when you convert the lead into a new account, you automatically follow the new account, unless you
disabled feed tracking for accounts in your Chatter settings.
21. Given a scenario, identify how to automate lead management
With Web-to-Lead, you can gather information from your company’s website and automatically generate
up to 500 new leads a day.
Your company may already have a registration or other type of page where users enter their contact
information. You may also want to create a jump page where prospects respond to a campaign. With a
little extra HTML code, you can redirect that information to Salesforce to create new leads.
22. Describe the capabilities of campaign management
5 steps to make it more effective:
1. Create the campaign: After determining your marketing strategy, create a campaign to track your
efforts.
2. Create your target list: Next define who you want to target with your campaign. The method used to
create a target list depends on who you are targeting:
Rented or Purchased Lists - Simply use the list of names as your target list. We recommend that you do
not import the names into the system yet.
Existing Contacts, Leads, or Person Account - Run a contact, lead, or person account report in Salesforce
and use the Add to Campaign button to associate those records with your campaign. Alternatively, go to
a list view of contacts or leads and use the Add to Campaign button to associate those records with your
campaign. Note that person accounts are included in contact list views and can be added to campaigns
from them.
3. Execute the campaign: All campaign execution occurs outside of Salesforce. It can be online or offline,
for example:
• Online - Send email using an email execution vendor.
• Offline - Plan and host a conference; run print or radio advertisements; send direct mail pieces;
or host a Web seminar.
4. Track responses: The possible types of campaign responses can be divided into the following groups
based on the response tracking mechanism:
Website Response - Prospects respond by filling in a form on your website. Use Web-to-Lead to set up a
Admin 201 preparation Page 29
Salesforce Admin 201-certification Notes

More Related Content

What's hot

What's hot (20)

Introduction to Salesforce | Salesforce Tutorial for Beginners | Salesforce T...
Introduction to Salesforce | Salesforce Tutorial for Beginners | Salesforce T...Introduction to Salesforce | Salesforce Tutorial for Beginners | Salesforce T...
Introduction to Salesforce | Salesforce Tutorial for Beginners | Salesforce T...
 
Salesforce - Implicit Sharing, Record Locks & Skews
Salesforce - Implicit Sharing, Record Locks & SkewsSalesforce - Implicit Sharing, Record Locks & Skews
Salesforce - Implicit Sharing, Record Locks & Skews
 
Top Benefits of Salesforce in Business
Top Benefits of Salesforce in BusinessTop Benefits of Salesforce in Business
Top Benefits of Salesforce in Business
 
Profiles and permission sets
Profiles and permission setsProfiles and permission sets
Profiles and permission sets
 
Salesforce Lightning Process builder
Salesforce Lightning Process builderSalesforce Lightning Process builder
Salesforce Lightning Process builder
 
Best Practices with Apex in 2022.pdf
Best Practices with Apex in 2022.pdfBest Practices with Apex in 2022.pdf
Best Practices with Apex in 2022.pdf
 
Sharing and security in Salesforce
Sharing and security in SalesforceSharing and security in Salesforce
Sharing and security in Salesforce
 
SFDC Organization Setup
SFDC Organization SetupSFDC Organization Setup
SFDC Organization Setup
 
Architect day 20181128 - Afternoon Session
Architect day 20181128 - Afternoon SessionArchitect day 20181128 - Afternoon Session
Architect day 20181128 - Afternoon Session
 
Salesforce PPT.pptx
Salesforce PPT.pptxSalesforce PPT.pptx
Salesforce PPT.pptx
 
Salesforce Integration Pattern Overview
Salesforce Integration Pattern OverviewSalesforce Integration Pattern Overview
Salesforce Integration Pattern Overview
 
Champion Productivity with Service Cloud
Champion Productivity with Service CloudChampion Productivity with Service Cloud
Champion Productivity with Service Cloud
 
Sap security interview question & answers
Sap security interview question & answersSap security interview question & answers
Sap security interview question & answers
 
Importing data to salesforce
Importing data to salesforceImporting data to salesforce
Importing data to salesforce
 
Salesforce for Beginners
Salesforce for BeginnersSalesforce for Beginners
Salesforce for Beginners
 
Salesforce Intro
Salesforce IntroSalesforce Intro
Salesforce Intro
 
Flow in Salesforce
Flow in SalesforceFlow in Salesforce
Flow in Salesforce
 
Introduction to Salesforce Platform - Basic
Introduction to Salesforce Platform - BasicIntroduction to Salesforce Platform - Basic
Introduction to Salesforce Platform - Basic
 
Salesforce Tutorial for Beginners: Basic Salesforce Introduction
Salesforce Tutorial for Beginners: Basic Salesforce IntroductionSalesforce Tutorial for Beginners: Basic Salesforce Introduction
Salesforce Tutorial for Beginners: Basic Salesforce Introduction
 
Salesforce sharing and visibility Part 1
Salesforce sharing and visibility Part 1Salesforce sharing and visibility Part 1
Salesforce sharing and visibility Part 1
 

Viewers also liked

Flyer Night of Chocolate
Flyer Night of Chocolate Flyer Night of Chocolate
Flyer Night of Chocolate
Kristie Thomas
 
Panel Discussion: State-of-the-Art Research: Jennifer Ahern, Ph.D.
Panel Discussion: State-of-the-Art Research: Jennifer Ahern, Ph.D.Panel Discussion: State-of-the-Art Research: Jennifer Ahern, Ph.D.
Panel Discussion: State-of-the-Art Research: Jennifer Ahern, Ph.D.
TheAdlerSchool
 
CommTEL Call Centre platform & software suite (PDF)
CommTEL Call Centre platform & software suite (PDF)CommTEL Call Centre platform & software suite (PDF)
CommTEL Call Centre platform & software suite (PDF)
acuser30
 

Viewers also liked (12)

Presentazione IMDE
Presentazione IMDEPresentazione IMDE
Presentazione IMDE
 
EPC Course Outline
EPC Course OutlineEPC Course Outline
EPC Course Outline
 
Conceptes bàsics de l'edició de text
Conceptes bàsics de l'edició de textConceptes bàsics de l'edició de text
Conceptes bàsics de l'edició de text
 
Manchester store tours
Manchester store toursManchester store tours
Manchester store tours
 
Smile
SmileSmile
Smile
 
Flyer Night of Chocolate
Flyer Night of Chocolate Flyer Night of Chocolate
Flyer Night of Chocolate
 
Production schedule
Production scheduleProduction schedule
Production schedule
 
Interpreting negative research – a practitioner toolkit for clinical success
Interpreting negative research – a practitioner toolkit for clinical successInterpreting negative research – a practitioner toolkit for clinical success
Interpreting negative research – a practitioner toolkit for clinical success
 
Fundamentals of economics at abms switzerland university
Fundamentals of economics at abms switzerland universityFundamentals of economics at abms switzerland university
Fundamentals of economics at abms switzerland university
 
Panel Discussion: State-of-the-Art Research: Jennifer Ahern, Ph.D.
Panel Discussion: State-of-the-Art Research: Jennifer Ahern, Ph.D.Panel Discussion: State-of-the-Art Research: Jennifer Ahern, Ph.D.
Panel Discussion: State-of-the-Art Research: Jennifer Ahern, Ph.D.
 
CommTEL Call Centre platform & software suite (PDF)
CommTEL Call Centre platform & software suite (PDF)CommTEL Call Centre platform & software suite (PDF)
CommTEL Call Centre platform & software suite (PDF)
 
Fatca
FatcaFatca
Fatca
 

Similar to Salesforce Admin 201-certification Notes

Similar to Salesforce Admin 201-certification Notes (20)

Highlights of Spring '14 webinar
Highlights of Spring '14 webinarHighlights of Spring '14 webinar
Highlights of Spring '14 webinar
 
Salesforce Miami User Group Event - WrapUp
Salesforce Miami User Group Event - WrapUpSalesforce Miami User Group Event - WrapUp
Salesforce Miami User Group Event - WrapUp
 
Highlights of summer '14
Highlights of summer '14Highlights of summer '14
Highlights of summer '14
 
Dev day paris020415
Dev day paris020415Dev day paris020415
Dev day paris020415
 
Winter 15 : Salesforce
Winter 15 : SalesforceWinter 15 : Salesforce
Winter 15 : Salesforce
 
Salesforce editions, licenses and limits by manish
Salesforce editions, licenses and limits by manishSalesforce editions, licenses and limits by manish
Salesforce editions, licenses and limits by manish
 
Experience Clould Discussion Part 1.pptx
Experience Clould Discussion Part 1.pptxExperience Clould Discussion Part 1.pptx
Experience Clould Discussion Part 1.pptx
 
Introduction to Point-and-Click App Building
Introduction to Point-and-Click App BuildingIntroduction to Point-and-Click App Building
Introduction to Point-and-Click App Building
 
Communities Settings and Customize Community URL in Salesforce
Communities Settings and Customize Community URL in SalesforceCommunities Settings and Customize Community URL in Salesforce
Communities Settings and Customize Community URL in Salesforce
 
Salesforce Communities
Salesforce CommunitiesSalesforce Communities
Salesforce Communities
 
Salesforce interview questions walkthrough
Salesforce interview questions walkthroughSalesforce interview questions walkthrough
Salesforce interview questions walkthrough
 
Df14 Maintaining your orgs setup for optimal efficiency for dist
Df14 Maintaining your orgs setup for optimal efficiency for distDf14 Maintaining your orgs setup for optimal efficiency for dist
Df14 Maintaining your orgs setup for optimal efficiency for dist
 
Salesforce Winter ’23 Release Highlights
Salesforce Winter ’23 Release HighlightsSalesforce Winter ’23 Release Highlights
Salesforce Winter ’23 Release Highlights
 
Nonprofit user group winter 14 jl - 111013
Nonprofit user group winter 14   jl - 111013Nonprofit user group winter 14   jl - 111013
Nonprofit user group winter 14 jl - 111013
 
Winter '20 Salesforce Release for Admins and Developers + New Salesforce Mobi...
Winter '20 Salesforce Release for Admins and Developers + New Salesforce Mobi...Winter '20 Salesforce Release for Admins and Developers + New Salesforce Mobi...
Winter '20 Salesforce Release for Admins and Developers + New Salesforce Mobi...
 
Blurring the Boundaries Between Salesforce Orgs
Blurring the Boundaries Between Salesforce OrgsBlurring the Boundaries Between Salesforce Orgs
Blurring the Boundaries Between Salesforce Orgs
 
Salesforce Winter ’22 Release Highlights
Salesforce Winter ’22 Release HighlightsSalesforce Winter ’22 Release Highlights
Salesforce Winter ’22 Release Highlights
 
Salesforce Winter ’22 Release Highlights
Salesforce Winter ’22 Release HighlightsSalesforce Winter ’22 Release Highlights
Salesforce Winter ’22 Release Highlights
 
Stephen Stanley - Spring 23 highlights.pdf
Stephen Stanley - Spring 23 highlights.pdfStephen Stanley - Spring 23 highlights.pdf
Stephen Stanley - Spring 23 highlights.pdf
 
An introduction to Salesforce
An introduction to SalesforceAn introduction to Salesforce
An introduction to Salesforce
 

Recently uploaded

%+27788225528 love spells in Boston Psychic Readings, Attraction spells,Bring...
%+27788225528 love spells in Boston Psychic Readings, Attraction spells,Bring...%+27788225528 love spells in Boston Psychic Readings, Attraction spells,Bring...
%+27788225528 love spells in Boston Psychic Readings, Attraction spells,Bring...
masabamasaba
 
Abortion Pill Prices Tembisa [(+27832195400*)] 🏥 Women's Abortion Clinic in T...
Abortion Pill Prices Tembisa [(+27832195400*)] 🏥 Women's Abortion Clinic in T...Abortion Pill Prices Tembisa [(+27832195400*)] 🏥 Women's Abortion Clinic in T...
Abortion Pill Prices Tembisa [(+27832195400*)] 🏥 Women's Abortion Clinic in T...
Medical / Health Care (+971588192166) Mifepristone and Misoprostol tablets 200mg
 
The title is not connected to what is inside
The title is not connected to what is insideThe title is not connected to what is inside
The title is not connected to what is inside
shinachiaurasa2
 
AI Mastery 201: Elevating Your Workflow with Advanced LLM Techniques
AI Mastery 201: Elevating Your Workflow with Advanced LLM TechniquesAI Mastery 201: Elevating Your Workflow with Advanced LLM Techniques
AI Mastery 201: Elevating Your Workflow with Advanced LLM Techniques
VictorSzoltysek
 
CHEAP Call Girls in Pushp Vihar (-DELHI )🔝 9953056974🔝(=)/CALL GIRLS SERVICE
CHEAP Call Girls in Pushp Vihar (-DELHI )🔝 9953056974🔝(=)/CALL GIRLS SERVICECHEAP Call Girls in Pushp Vihar (-DELHI )🔝 9953056974🔝(=)/CALL GIRLS SERVICE
CHEAP Call Girls in Pushp Vihar (-DELHI )🔝 9953056974🔝(=)/CALL GIRLS SERVICE
9953056974 Low Rate Call Girls In Saket, Delhi NCR
 

Recently uploaded (20)

WSO2CON2024 - It's time to go Platformless
WSO2CON2024 - It's time to go PlatformlessWSO2CON2024 - It's time to go Platformless
WSO2CON2024 - It's time to go Platformless
 
%+27788225528 love spells in Boston Psychic Readings, Attraction spells,Bring...
%+27788225528 love spells in Boston Psychic Readings, Attraction spells,Bring...%+27788225528 love spells in Boston Psychic Readings, Attraction spells,Bring...
%+27788225528 love spells in Boston Psychic Readings, Attraction spells,Bring...
 
%in kempton park+277-882-255-28 abortion pills for sale in kempton park
%in kempton park+277-882-255-28 abortion pills for sale in kempton park %in kempton park+277-882-255-28 abortion pills for sale in kempton park
%in kempton park+277-882-255-28 abortion pills for sale in kempton park
 
Abortion Pill Prices Tembisa [(+27832195400*)] 🏥 Women's Abortion Clinic in T...
Abortion Pill Prices Tembisa [(+27832195400*)] 🏥 Women's Abortion Clinic in T...Abortion Pill Prices Tembisa [(+27832195400*)] 🏥 Women's Abortion Clinic in T...
Abortion Pill Prices Tembisa [(+27832195400*)] 🏥 Women's Abortion Clinic in T...
 
Software Quality Assurance Interview Questions
Software Quality Assurance Interview QuestionsSoftware Quality Assurance Interview Questions
Software Quality Assurance Interview Questions
 
call girls in Vaishali (Ghaziabad) 🔝 >༒8448380779 🔝 genuine Escort Service 🔝✔️✔️
call girls in Vaishali (Ghaziabad) 🔝 >༒8448380779 🔝 genuine Escort Service 🔝✔️✔️call girls in Vaishali (Ghaziabad) 🔝 >༒8448380779 🔝 genuine Escort Service 🔝✔️✔️
call girls in Vaishali (Ghaziabad) 🔝 >༒8448380779 🔝 genuine Escort Service 🔝✔️✔️
 
tonesoftg
tonesoftgtonesoftg
tonesoftg
 
%in Harare+277-882-255-28 abortion pills for sale in Harare
%in Harare+277-882-255-28 abortion pills for sale in Harare%in Harare+277-882-255-28 abortion pills for sale in Harare
%in Harare+277-882-255-28 abortion pills for sale in Harare
 
The title is not connected to what is inside
The title is not connected to what is insideThe title is not connected to what is inside
The title is not connected to what is inside
 
Direct Style Effect Systems - The Print[A] Example - A Comprehension Aid
Direct Style Effect Systems -The Print[A] Example- A Comprehension AidDirect Style Effect Systems -The Print[A] Example- A Comprehension Aid
Direct Style Effect Systems - The Print[A] Example - A Comprehension Aid
 
AI Mastery 201: Elevating Your Workflow with Advanced LLM Techniques
AI Mastery 201: Elevating Your Workflow with Advanced LLM TechniquesAI Mastery 201: Elevating Your Workflow with Advanced LLM Techniques
AI Mastery 201: Elevating Your Workflow with Advanced LLM Techniques
 
Harnessing ChatGPT - Elevating Productivity in Today's Agile Environment
Harnessing ChatGPT  - Elevating Productivity in Today's Agile EnvironmentHarnessing ChatGPT  - Elevating Productivity in Today's Agile Environment
Harnessing ChatGPT - Elevating Productivity in Today's Agile Environment
 
%in Bahrain+277-882-255-28 abortion pills for sale in Bahrain
%in Bahrain+277-882-255-28 abortion pills for sale in Bahrain%in Bahrain+277-882-255-28 abortion pills for sale in Bahrain
%in Bahrain+277-882-255-28 abortion pills for sale in Bahrain
 
CHEAP Call Girls in Pushp Vihar (-DELHI )🔝 9953056974🔝(=)/CALL GIRLS SERVICE
CHEAP Call Girls in Pushp Vihar (-DELHI )🔝 9953056974🔝(=)/CALL GIRLS SERVICECHEAP Call Girls in Pushp Vihar (-DELHI )🔝 9953056974🔝(=)/CALL GIRLS SERVICE
CHEAP Call Girls in Pushp Vihar (-DELHI )🔝 9953056974🔝(=)/CALL GIRLS SERVICE
 
W01_panagenda_Navigating-the-Future-with-The-Hitchhikers-Guide-to-Notes-and-D...
W01_panagenda_Navigating-the-Future-with-The-Hitchhikers-Guide-to-Notes-and-D...W01_panagenda_Navigating-the-Future-with-The-Hitchhikers-Guide-to-Notes-and-D...
W01_panagenda_Navigating-the-Future-with-The-Hitchhikers-Guide-to-Notes-and-D...
 
WSO2Con2024 - From Code To Cloud: Fast Track Your Cloud Native Journey with C...
WSO2Con2024 - From Code To Cloud: Fast Track Your Cloud Native Journey with C...WSO2Con2024 - From Code To Cloud: Fast Track Your Cloud Native Journey with C...
WSO2Con2024 - From Code To Cloud: Fast Track Your Cloud Native Journey with C...
 
Shapes for Sharing between Graph Data Spaces - and Epistemic Querying of RDF-...
Shapes for Sharing between Graph Data Spaces - and Epistemic Querying of RDF-...Shapes for Sharing between Graph Data Spaces - and Epistemic Querying of RDF-...
Shapes for Sharing between Graph Data Spaces - and Epistemic Querying of RDF-...
 
Architecture decision records - How not to get lost in the past
Architecture decision records - How not to get lost in the pastArchitecture decision records - How not to get lost in the past
Architecture decision records - How not to get lost in the past
 
%in Midrand+277-882-255-28 abortion pills for sale in midrand
%in Midrand+277-882-255-28 abortion pills for sale in midrand%in Midrand+277-882-255-28 abortion pills for sale in midrand
%in Midrand+277-882-255-28 abortion pills for sale in midrand
 
WSO2Con2024 - Enabling Transactional System's Exponential Growth With Simplicity
WSO2Con2024 - Enabling Transactional System's Exponential Growth With SimplicityWSO2Con2024 - Enabling Transactional System's Exponential Growth With Simplicity
WSO2Con2024 - Enabling Transactional System's Exponential Growth With Simplicity
 

Salesforce Admin 201-certification Notes

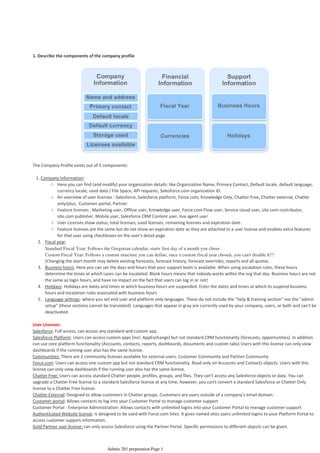
  • 1. 1. Describe the components of the company profile The Company Profile exists out of 5 components: Here you can find (and modify) your organization details: like Organization Name, Primary Contact, Default locale, default language, currency locale, used data / File Space, API requests, Salesforce.com organization ID. ○ An overview of user licenses : Salesforce, Salesforce platform, Force.com, Knowledge Only, Chatter Free, Chatter external, Chatter only/plus, Customer portal, Partner ○ Feature licenses : Marketing user, Offline user, Knowledge user, Force.com Flow user, Service cloud user, site.com contributor, site.com publisher, Mobile user, Salesforce CRM Content user, live agent user ○ User Licenses show status, total licenses, used licenses, remaining licenses and expiration date.○ Feature licenses are the same but do not show an expiration date as they are attached to a user license and enables extra features for that user using checkboxes on the user's detail page ○ Fiscal year:2. Standard Fiscal Year: Follows the Gregorian calendar, starts first day of a month you chose Custom Fiscal Year: Follows a custom structure you can define, once a custom fiscal year chosen, you can't disable it!!! (Changing the start month may delete existing forecasts, forecast history, forecast overrides, reports and all quotas. Business hours: Here you can set the days and hours that your support team is available. When using escalation rules, these hours determine the times at which cases can be escalated. Blank hours means that nobody works within the org that day. Business hours are not the same as login hours, and have no impact on the fact that users can log in or not! 3. Holidays: Holidays are dates and times at which business hours are suspended. Enter the dates and times at which to suspend business hours and escalation rules associated with business hours 4. Language settings: where you set end user and platform only languages. These do not include the "help & training section" nor the "admin setup" (these sections cannot be translated). Languages that appear in gray are currently used by your company, users, or both and can't be deactivated 5. 1. Company Information: User Licenses: Salesforce: Full access, can access any standard and custom app. Salesforce Platform: Users can access custom apps (incl. AppExchange) but not standard CRM functionality (forecasts, opportunities). In addition can use core platform functionality (Accounts, contacts, reports, dashboards, documents and custom tabs) Users with this license can only view dashboards if the running user also has the same license. Communities: There are 2 community licenses available for external users: Customer Community and Partner Community Force.com: Users can access one custom app but not standard CRM functionality. Read only on Accounts and Contacts objects. Users with this license can only view dashboards if the running user also has the same license. Chatter Free: Users can access standard Chatter people, profiles, groups, and files. They can't access any Salesforce objects or data. You can upgrade a Chatter Free license to a standard Salesforce license at any time, however, you can't convert a standard Salesforce or Chatter Only license to a Chatter Free license. Chatter External: Designed to allow customers in Chatter groups. Customers are users outside of a company’s email domain. Customer portal: Allows contacts to log into your Customer Portal to manage customer support Customer Portal - Enterprise Administration: Allows contacts with unlimited logins into your Customer Portal to manage customer support Authenticated Website license: is designed to be used with Force.com Sites. It gives named sites users unlimited logins to your Platform Portal to access customer support information. Gold Partner user license: can only access Salesforce using the Partner Portal. Specific permissions to different objects can be given. Organization Setup - 1% 08 April 2014 08:33 Admin 201 preparation Page 1
  • 2. High Volume Customer Portal license: gives contacts unlimited logins to your Service Cloud Portal to access customer support information. They can have access to accounts, assets, cases, contacts, custom objects, documents, ideas and questions depending on permission settings. Data.com: Add, export Duns & Bradstreet company data delivered through data.com per month. Default is 300. Database.com User Licenses: Devided in 3 license types (admin, user and Light User). Grants access to database.com schemas or metadata. Knowledge only: Designed for users who only need access to the Salesforce Knowledge app. Access to the following tabs: Articles, Article Management, Chatter, Chatter Files, Home, Profiles, Reports, custom objects, and custom tabs. The Knowledge Only User license includes a Knowledge Only profile that grants access to the Articles tab. NOTE: Changing a user license of a user also removes the permission sets assigned to that user! Feature Licenses: (You may have more than one type of feature license available to assign to the users in your organization. A feature license entitles a user to an additional Salesforce feature, such as Marketing or Connect Offline.) Marketing user, Offline user, Knowledge user, force.com flow, Service cloud user, site.com contributor, site.com publisher user, Mobile user, Salesforce CRM Content user, live agent, data.com, work.com Storage: (2 kinds: Data storage and File storage): File storage: includes files in attachments, documents tab, files tab, CRM content, Chatter and Site.com assets Data storage: are your records (values saved in object standard fields and custom fields) For file storage, Contact Manager, Group, Professional, Enterprise, Performance, and Unlimited Editions are allocated a per-user limit multiplied by the number of users in the organization plus an additional per-organization allocation. For example, an Enterprise Edition organization with 600 users receives 1,211 GB of file storage, or 2 GB per user multiplied by 600 users plus an additional 11 GB. A Professional Edition organization with 600 users receives about 370 GB of file storage, or 612 MB per user multiplied by 600 users plus an additional 11 GB. For data storage, Contact Manager, Group, Professional, Enterprise, Performance, and Unlimited Editions are allocated either 1 GB or a per-user limit, whichever is greater. For example, a Professional Edition organization with 10 users receives 1 GB because 10 users multiplied by 20 MB per user is 200 MB, which is less than the 1 GB minimum. A Professional Edition organization with 100 users receives more than the 1 GB minimum because 100 users multiplied by 20 MB per user is 2,000 MB. Language, Locale, and Currency Currency - User in a multiple currency organization - User’s default currency for quotas, forecasts, and reports. Shown only in organizations using multiple currencies. This must be one of the active currencies for the organization Corporate Currency – Administrator - The currency in which the organization's corporate headquarters reports revenue. Serves as the basis for all currency conversion rates. Only for organizations that use multiple currencies. Multiple currencies once enabled can’t be disabled by the organization. Information Currency – Not editable - The default currency for all currency amount fields in the user record. Available only for organizations that use multiple currencies. Currency Locale – Administrator - The country or geographic region in which the organization is located. The setting affects the format of currency amounts. For single currency organizations only. Locale – User - Country or geographic region in which user is located. The Locale setting affects the format of date, date/time, and number fields, and the calendar. The Locale setting also affects the first and last name order on Name fields for users, leads, and contacts. Personal locale, overrides the organization setting. Default Currency ISO Code - Not editable - User's default currency setting for new records. Available only for organizations that use multiple currencies. Default Language – Administrator - This setting also determines the language in which all customizations—such as custom fields, tabs, and user interface options—are stored. For customizations, individual users' language settings do not override this setting. Also set language for new users in the organization. Language – User - The primary language for the user. A user’s individual Language setting overrides the organization’s Default Language. Default Locale – Administrator - The default country or geographic region that is selected for new users in the organization. This setting determines the format of dates, times, and names in Salesforce. Individual users can set their personal locale, which overrides the organization setting. Default Time Zone – Administrator - Primary time zone in which the organization is located. A user's individual Time Zone setting overrides the organization's Default Time Zone setting. Time Zone – User - Primary time zone in which user works. You can opt to use dated exchange rates by using advanced currency management to track historical exchange rates. When enabled, advanced currency management allows maintaining a list of exchange rates by date range, and converted currency amounts on opportunities display based on the specified Close Date, regardless of the opportunity stage. Changing the Close Date impacts converted amounts if it changes to a different exchange rate period. If your organization uses advanced currency management, the opportunity close date determines which conversion rate to use when displaying currency amounts. (Close date is set to the last day of the quarter) Multiple currencies can be used in opportunities, forecasts, reports, quotes, and other currency fields. Custom formula fields are not tied to any particular currency. If the result of a formula field is a currency amount, it displays in the currency of the associated record. This is also true for cross-object formulas that reference merge fields with different currencies, and formulas in workflow rules and approval processes. However, note that workflow rules and approval processes that use filters instead of formulas convert all currency values Admin 201 preparation Page 2
  • 3. to the corporate currency. You cannot track revenue gain or loss based on currency fluctuations. Changing conversion rates causes a mass recalculation of roll-up summary fields, which may take up to 30 minutes, depending on the number of records affected and other factors. Company information page limits: Street address – 255 City, country, division, fax, phone – 40 State, zip - 20 Organization name, primary contact, - 80 If your organization has enabled Shared Activities, you can relate as many as 10 contacts to non-recurring and non-group tasks, and non-recurring events. You assign one primary contact; all others are secondary contacts. The primary contact appears in two reports: Tasks and Events, and Activities with Cases. If you delete the primary contact, the next contact on the activity’s related list becomes the new primary one. If that’s not the primary contact you want, you can edit the activity to select another. Standard apps: (Sales, Call Center, Marketing, Community, Site.com, Salesforce Chatter) My Domain: Once the new domain name deployed to users, you cant reverse it. Up to 40 characters. You have the option of redirecting the users (deploy) or block login from old domain (Prevent login from login.salesforce.com to provide better security) – check login history to see. Format is: https://customdomainname.my.salesforce.com Admin 201 preparation Page 3
  • 4. 2. Identify the steps to set up and maintain a user (req: Last name, Alias, Email, Username, Community Nickname, Role, User Licence, Profile) (Email becomes username. Community nickname and Alias are derived from email and names, role is not compulsory) In Salesforce, every user is identified by a username, password, and a single profile. The profile determines what tasks users can perform, what data they see, and what they can do with the data. A user can be assigned to one or more of feature licenses. You can also set up accounts for users outside your organization who need to access a limited set of fields and objects. These user licenses can grant access to Customer Portal and partner portal. Using Salesforce to Salesforce, you can create connections to share records with other Salesforce users outside of your organization. Profile settings control access to applications, objects and fields. Sharing features control access to specific records Maximum Salesforce users per edition: Contact Manager(5), Group(5), Professional(unlt), Enterprise(unlt), Unlimited(unlt), Developer(2) 3. Given a scenario, troubleshoot common user access and visibility issues 1. Check login history (to see what the problem is? Usually a password lockout after invalid password, if password is the problem, reset password to send a new password and then unlock. Lockout could be temporary or admin reset) (if no incorrect attempt then the user was using an invalid email/username to login) 2. If access problems are one of the below then identity must be confirmed: a. Does user profile have any login restriction? IP address considered activated if IP address falls within trusted IP ranges IP address previously activated by user Browser can be identified by a cookie b. Does user IP address in organization’s trusted IP range? (Only user with an activated IP address can login) User Setup - 9% 08 April 2014 08:37 Admin 201 preparation Page 4
  • 5. c. Has user been activated from this IP before? d. Does user’s web browser have valid cookies from Salesforce? User profile login restrictions: 1. Login hours (outside of the hrs. login is denied) (Set login access for specific profiles (login hours under profile)) (For example: customer support specialist profile can login from 7am until 5pm, Mon to Fri) 2. IP Address (unknown IP, denied) (Set login IP ranges for specific profiles (login IP ranges under profile)) (For example: customer support specialist profile can login from work but not at home or hotel) Setup | Security Controls | Network Access | Trusted IP Ranges |Security Controls | Session Settings | Session Timeout Value (1hr, 2hrs) | Security Controls | Password Policies | Security Controls | View Set up Audit Trail | (To check the security changes made to the organization by the administrator Manage users | Profiles | Login IP Ranges Manage users | Profiles | Login Hours (Set start and end same values so they can not login) Manage users | Login History (To track user login, first to do when there is a user login problem) Organization based login hours do not exist, but there is Company profile | Business Hours but used for support escalation process not to restrict login. What happens when a profile is logged in and login hr passes? Nothing will happen until your session expires and you will not be able to re-login after the session. If your admin hasn't set a session setting the user will be able to stay in the system till he closes the browser. That login restriction is for user who will try logging in after 5:00 pm for example, applicable only when the users are trying to log in and will not end the current session Grant login Access: only users themselves can grant login access to the administrator There is the possibility to log a case at Salesforce to open up "Login as-function" on your production environment. o If you change a user’s email address and generate new password and notify user immediately is selected, a confirmation message will be sent to the new email address that you entered. The user must click the link provided in that message for the new email address to take effect. This process ensures system security. When generating a new password for a user, the new password is automatically sent to the user’s email address and email verification is not enforced. o If you change a user's username, a confirmation email with a login link is sent to the email address associated with that user account. Problems might occur because an organization could have multiple login servers. The link in the email connects directly to the server where the actual username change was made. This ensures that users can always log in, even if server replication is slow o Click Grant Checkout Access to give a user access to Checkout. Using Checkout, the user can purchase Salesforce licenses, AppExchange app licenses, and other related products. Additionally, within Checkout, the user can view the organization's quotes, installed products, orders, invoices, payments, and contracts. Admin 201 preparation Page 5
  • 6. 4. Distinguish between and identify the implications of the various user interface features that an administrator controls User Interface (Customize | User Interface) ロ Enable Collapsible Sections: Sections on object detailpages can be (un)collapsed (call center users won’t see incoming calls if they collapse sidebar) ロ Show Quick Create: The Quick Create area on a tab home page allows users to create a new record quickly with minimal information. This setting also affects whether or not users can create new records from within the lookup dialog. For example, with the setting enabled, users can create a new account within the account lookup dialog while creating or editing a contact. Disable this to avoid too many incomplete records. ロ Enable Hover Details: Display an interactive overlay containing detailed information about a record. The fields displayed are determined on the object's mini page layout. ロ Enable Related List Hover Links: Related list hover links display at the top of record detail pages and custom object detail pages in Setup. ロ Enable Separate Loading of Related Lists: Primary record details load first, followed by related list data. Separate loading can improve performance on record detail pages for organizations with large numbers of related lists. ロ Enable Inline Editing: This doesn't enable inline editing for profiles. Inline editing isn't available for accessibility mode, system fields, formula fields, case assignments, case email notifications, lead assignments, setup pages, on records for which you have read-only access, dashboards, documents, pricebooks, on records for which you have read-only access, All fields in Tasks except for Subject and Comment, All fields in Events except for Subject, Description, and Location, Full name fields of Person Accounts, Contacts, and Leads. However, their component fields are editable, for example, First Name and Last Name. ロ Enable Enhanced Lists: When enabled with the Enable Inline Editing setting, users can also edit records directly from the list, without navigating away from the page ロ Enable New User Interface Theme: Some Salesforce features like Chatter need the new user interface theme. Disabling the new user theme disables Chatter ロ Enable Tab Bar Organizer: automatically arranges tabs in the main tab bar to prevent horizontal scrolling of the page. It dynamically determines how many tabs can display based on the width of the browser window and puts tabs that extend beyond the browser's viewable area into a drop- down list. ロ Enable Printable List Views: Printable list views allow users to easily print list views. ロ Enable Spell Checker: the Check Spelling button appears in certain areas of the application where text is entered, such as sending an email, or when creating events, tasks, cases, notes, and solutions. ロ Enable Spell Checker on Tasks and Events: specifically for Tasks and Events ロ Enable Customization of Chatter User Profile Pages: Enables the profile page which the user can put extra information about himself. If not enabled only Feed and Overview tabs will be visible Sidebar ロ Enable Collapsible Sidebar: gives users the ability to show or hide the sidebar on every page that normally includes the sidebar. ロ Show Custom Sidebar Components on All Pages: If you have custom home page layouts that include components in the sidebar, this option makes the sidebar components available on all pages for all users in your organization. If you only want certain users to view sidebar components on all pages, grant those user the “Show Custom Sidebar On All Pages” permission. Calendar ロ Enable Home Page Hover Links for Events: Enables hover links in the calendar section of the Home tab. Global User Interface - 1% 08 April 2014 08:38 Admin 201 preparation Page 6
  • 7. Home tab. ロ Enable Drag-and-Drop Editing on Calendar Views: Enables the dragging of events on single user daily and weekly calendar views. ロ Enable Click-and-Create Events on Calendar Views: Allows users to create events on day and weekly calendar views by double-clicking a specific time slot ロ Enable Drag-and-Drop Scheduling on List Views: Allows users to create events associated with records by dragging records from list views on to weekly calendar views and entering the details of the event in an interactive overlay. ロ Enable Hover Links for My Tasks list: Enables hover links for tasks in the My Tasks section of the Home tab and on the calendar day view. Setup ロ Enable Enhanced Page Layout Editor: Enables WYSIWYG editor ロ Enable Enhanced Profile List Views: With inline editing in enhanced profile list views, you can manage multiple profiles at once. ロ Enable Enhanced Profile User Interface: easily navigate, search, and modify settings for a single profile ロ Enable Streaming API: to activate Streaming API, which allows you to receive notifications for changes to data that match a SOQL query that you define ロ Enable Custom Object Truncate: permanently removes all of the records from a custom object while keeping the object and its metadata intact for future use. Accessibility Mode is an alternate user interface mode intended for use by visually impaired users utilizing a screen reader such as JAWS or Window-Eyes. Accessibility Mode will disable some user interface features, such as displaying details on hover, inline editing, new user interface theme and should not be enabled by users not using screen readers. Admin 201 preparation Page 7
  • 8. 5. Explain the various organization security options (Object is a category of information {position, candidate}, record is a single instance of an object {SW Engineer}) ----------- increased data exposure ----------- profile>OWD>Role>Sharing rules>Group queues>Criteria based, manual sharing Sharing rules can never be stricter than the OWD settings. Sharing Access Diagram: 1. Salesforce checks whether user’s profile has object level permission to access that object 2. Salesforce checks whether user’s profile has any administrative permissions (view all data, modify all data) 3. Salesforce checks the ownership of the record (Organization wide defaults, role-level access, any sharing rules will be checked) Controlling a user's access to data in several ways: 1. To control access to applications and objects, including fields and record types within objects: Use profiles and permission sets. (Create record types for a custom object to display different picklist values and page layouts to different users based on their profiles.) 2. To control access to specific records: Use sharing settings or manual sharing You cannot delegate administrative duties related to your organization to partner portal or Customer Portal users. However, you can delegate some portal administrative duties to portal users. 1. Object level security: (What objects can a user see?) (It is set in user Profiles and Permission sets) to prevent user from viewing, creating, editing or deleting any instance of a particular type of object. It allows us to hide whole tabs & objects from particular users. User wouldn’t even know the object exists. (Tab settings, Standard / Custom object permissions) On the platform, we set object-level access with object permissions in user profiles and permission sets 2. Field level security: (What fields on those objects can a user see?) (In user Profiles and permission sets) (Field level access with field permissions) a variation of object level security. User is prevented from a particular field without having to hide the whole object, such as “max salary” or “SS”. Security and Access - 15% 08 April 2014 08:38 Admin 201 preparation Page 8
  • 9. Page layouts only control the visibility of field on detail and edit pages whereas field level security controls the visibility of fields in any part of the app (related lists, list views, reports and search results) (in order to be absolutely sure that a user does not have access to a particular field) (visible/ read only boxes checked – read only | only visible box checked – editable | no box – hidden) In the platform, we control access to individual fields with field-level security. Field-level security controls whether a user can see, edit, and delete the value for a particular field on an object. Organization-wide defaults allow us to specify the baseline level of access that a user has in your organization. For example, we can make it so that any user can see any record of a particular object to which their object permissions give them access, but so that they'll need extra permissions to actually edit one. Role hierarchies allow us to make sure that a manager will always have access to the same records as his or her subordinates. (vertical) Sharing rules allow us to make automatic exceptions to organization-wide defaults for particular groups of users. (horizontal) Manual sharing allows record owners to give read and edit permissions to folks who might not have access to the record any other way. 3. Record level security: (Org. wide defaults (Which records should be hidden by default?), Role hierarchy / Sharing model / Manual sharing (What exceptions should we make?)) Profiles: (compulsory when setting up the user, user must be associated with a profile) A collection of settings (what user can see) and Permissions (what user can do) A profile contains user permissions and access settings that control what users can do and see within their organization. Profiles are typically defined by a user's job function (for example, system administrator or sales representative), but you can have profiles for anything that makes sense for your organization. A profile can be assigned to many users, but a user can be assigned to only one profile at a time, where all of the members of the group have the same folder permissions and access to the same software. Profiles never override organization’s sharing model or role hierarchy. (Exp: A profile set to allow a user access to create, edit, delete leads but a user with above profile cannot edit, delete other users leads if organizations lead sharing model is read only) o Which standard and custom apps users can view? o Which tabs users can view? o Which record types are available to users? Profiles control: Admin 201 preparation Page 9
  • 10. o Which page layouts users see? o Object permissions that allow users to create, read, edit, and delete records o Which fields within objects users can view and edit o Admin Permissions that allow users to manage the system and apps within it o Which Apex classes and Visualforce pages users can access o Which desktop clients users can access o The hours during which and IP addresses from which users can log in (profile login hours, Profile IP addresses) o Which service provider’s users can access (if Salesforce is enabled as an identity provider) You can use standard profiles, or create, edit, and delete custom profiles. For standard profiles, only certain settings can be changed. You can never edit object permissions on a standard profile. So you must first clone the standard profile to create a custom profile and then assign user and then use permission sets to grant additional permissions. When a custom object is created, most profiles don’t give access to the object (except those with “modify all data” under Profiles| Standard Object Permissions and Custom Object Permissions) Standard profiles (6 Types): Permission Sets: (Administrative and General) (Standard object permissions, custom object permissions) is a collection of settings and permissions that determine what a user can do. If the custom box is not checked it is a standard profile and we cannot edit standard profiles permission set. But we can choose which tabs should appear at top of user’s / profile’s page and also select which apps to display in Force.com. (Default on (displayed on top of user’s page),Default off (hidden from user’s page but available when all Tabs is clicked), Tab hidden (completely hidden) Hiding a tab is not sufficient to prevent a user from accessing records of that tab You can only assign permission sets that have the same user licenses as the user or permission sets with no associated license. You cannot change the license later. If you plan to assign this permission set to multiple users with different licenses, choose '-- None--'. If only users with one type of license will use this permission set, choose the same license that’s associated with them. Who will use this permission set? Select the type of users who will use this permission set: 1. Grant access to custom object or App: Example: Many users in an organization are doing the same job. Assign them all one profile that grants them access to do their job and then assign permission sets to user if they are assigned to a special Admin 201 preparation Page 10
  • 11. project. New App custom profile, Test profile & take it away when it is not needed anymore. 2. Temporary/long term permission set: Example: A user goes on vacation. Create a permission set to grant access to a custom object or app to another user. After main man returns remove it. Difference between profiles and permission sets? o Users can have only one profile, but they can have many permission sets o Therefore profiles are used to grand the minimum permissions and settings that every type of user needs. (Assigned before permission sets) o Then use permission sets to grant additional permissions without changing anyone’s profiles. (Also, permission sets can be temporary or long term) Example: (Recruiting App) Recruiter: Own profile Hiring Manager: Permission sets Standard Employees: Start with low profile + permission sets Interviewers: Any employee can be an interviewer (grant and revoke access as needed) so permission set. Although there is permission to create, read or edit on an object does not necessarily mean users will be allowed to read every object’s record because: 1. Permissions on a record always evaluated according to a combination of object, field and record level permissions 2. When object vs. record level permissions conflict, the most restrictive setting wins. (If a record level is more restrictive, although object level allows it, still the record level wins because it is more restrictive) 6. Describe the features and capabilities of the sharing model Record Access (Record level security) Changing your sharing model deletes any manual shares your users have created. Ownership: Record owners can view/edit, transfer, delete records. They can also view but not edit the Accounts their records are associated to. Org wide defaults: The administrator can define the default-sharing model for your organization by setting organization-wide defaults. Organization-wide defaults specify the default level of access to records. Allow us to specify a baseline level of access that any user has in the org. Exp: Any user can see any record of an object but they will need extra permission to edit a record/object. a. Private: This setting for a given object allows users to access only the data they own. No one will be able to view records owned by others. b. Public Read only: This setting allows users to see, but not change, records in their organization, regardless of who owns those items. Items can also be added by anyone onto related lists with this permission level. (Providing objects have a Look up relationship) c. Public Read/Write: This setting allows all users the ability to view and edit records owned by others. But ownership itself cannot be changed except by the owner. d. Public Read/Write/Transfer: This setting on an object allows all users the ability to view, edit, and even change ownership of records owned by other o Solutions are always Public Read/Write. o Service contracts are always Private. o The ability to view or edit a document, report, or dashboard is based on a user's access to the folder in which it's stored. o Users can only view the forecasts of other users who are placed below them in the role hierarchy, unless forecast sharing is enabled. o When a custom object is on the detail side of a master-detail relationship with a standard object, its organization-wide default is set to Controlled by Parent and it is not editable. o You can't change the organization-wide default settings from private to public for a custom object if Apex code uses the sharing entries associated with that object. For example, if Apex code You can't change the organization-wide sharing default setting for some objects: Admin 201 preparation Page 11
  • 12. retrieves the users and groups who have sharing access on a custom object Invoice__c (represented as Invoice__share in the code), you can't change the object's organization-wide sharing setting from private to public. 1) Roles Hierarchy: Open up access (vertical) Create role hierarchy to give access to the managers of the account owners (managers inherit the privileges of user below them) (Allows to make sure that a manager will always have access to the same records as his subordinates). Users who need access to same records can be grouped together with Sharing rules. o Users can always view and edit all data owned by or shared with users below them in the role hierarchy. o An option (Grant Access Using Hierarchies) on your organization-wide default allows you to ignore the hierarchies when determining access to data. Grant using hierarchies cannot be disabled for standard objects. o Contacts that are not linked to an account are always private. Only the owner of the contact and administrators can view it. Contact sharing rules do not apply to private contacts. o Notes and attachments marked as private via the Private checkbox are accessible only to the person who attached them and administrators. o Events marked as private via the Private checkbox are accessible only by the event owner. Other users cannot see the event details when viewing the event owner’s calendar. However, users with the “View All Data” or “Modify All Data” permission can see private event details in reports and searches, or when viewing other users’ calendars. o Users above a record owner in the role hierarchy can only view or edit the record owner’s records if they have the “Read” or “Edit” object permission for the type of record Exceptions to Role Hierarchy-based Sharing 2) Sharing rules: (based on record owner or criteria) opens up access (horizontal/lateral), used by the admin it is a way to automatically grant users access to objects when OWD or Role hierarchy doesn’t allow it. (Allows making automatic exceptions to organization wide defaults for a particular group of users) (Sharing rules works best if used on a predicted group of users {Roles}. Exp: Recruiters all belong to either recruiting manager or recruiter roles, sharing rules works best but for interviewers, a new set of interviewer will be assigned for each job. Hiring manager will be using a different set of interviewees depending on the position they are hiring for. Team of interviewees is hard to predict. )(Manage Users | Admin 201 preparation Page 12
  • 13. Public Groups){use public groups when defining a sharing rule for more than 1 person or group or role} o Sharing rules allow you to selectively grant data access to defined sets of users. o You can use sharing rules to grant wider access to data. You cannot restrict access below your organization-wide default levels. o Sharing rules apply to all new and existing records that meet the definition of the source data set. o Sharing rules apply to both active and inactive users. o When you change the access levels for a sharing rule, all existing records are automatically updated to reflect the new access levels. o When you delete a sharing rule, the sharing access created by that rule is automatically removed. o When you transfer records from one user to another, the sharing rules are reevaluated to add or remove access to the transferred records as necessary. o When you modify which users are in a group, role, or territory, the sharing rules are reevaluated to add or remove access as necessary. o Sharing rules automatically grant additional access to related records. For example, opportunity sharing rules give role or group members access to the account associated with the shared opportunity if they do not already have it. Likewise, contact and case sharing rules provide the role or group members with access to the associated account as well. o If multiple sharing rules give a user different levels of access to a record, the user gets the most permissive access level. o Users in the role hierarchy are automatically granted the same access that users below them in the hierarchy have from a sharing rule, provided that the object is a standard object or the Grant Access Using Hierarchies option is selected. o Regardless of sharing rules, users can, at a minimum, view the accounts in their territories. Also, users can be granted access to view and edit the contacts, opportunities, and cases associated with their territories' accounts. o Making changes to sharing rules may require changing a large number of records at once. To process these changes efficiently, you request may be queued and you may receive an email notification when the process has completed. o You can create rules to share records between most types of Customer Portal users and Salesforce users. Similarly, you can create sharing rules between Customer Portal users from different accounts as long as they have the Customer Portal Manager user license. However, you can't include high-volume portal users in sharing rules because they don't have roles and can't be in public groups. o You can easily convert sharing rules that include Roles, Internal and Portal Subordinates to include Roles and Internal Subordinates instead by using the Convert Portal User Access wizard. Furthermore, you can use this wizard to convert any publicly accessible report, dashboard, and document folders to folders that are accessible by all users except for portal users. o Lead sharing rules do not automatically grant access to lead information after leads are converted into account, contact, and opportunity records. o In a master detail object relationship, you cannot create a sharing rule for a detail object, it is inherited. Sharing rules based on Record owner or based on Criteria: Criteria-based sharing rules determine whom to share records with based on field values in records. For example, let's say you use a custom object for job applications, with a custom picklist field named “Department.” You can create a criteria-based sharing rule that shares all job applications in which the Department field is set to “IT” with all IT managers in your organization. Admin 201 preparation Page 13
  • 14. Although criteria-based sharing rules are based on values in the records and not the record owners, a role or territory hierarchy still allows users higher in the hierarchy to access the records. You can create criteria-based sharing rules for accounts, opportunities, cases, contacts, leads, campaigns, and custom objects. You can create up to 50 criteria-based sharing rules per object. 3) Manual sharing: open up access (flexible), for owners or users with full access to give users read/write access to another user or group who might not have access to the record any other way. 4) Implicit access (Accounts and associated child records) 5) Teams (Account, Case, and Opportunity) In environments where the sharing model for an object has been set to Private or Public Read Only, an administrator can grant users additional access to records by setting up a role hierarchy and defining sharing rules. Role hierarchies and sharing rules can only be used to grant additional access—they cannot be used to restrict access to records beyond what was originally specified with the sharing model through organization-wide defaults. Roles: (principal element in sharing rules, users can be grouped into roles based on their need to access data. Each role in hierarchy should represent a level of data access required by users) Depending on your sharing settings, roles can control the level of visibility that users have into your organization’s data. If the Grant Access Using Hierarchies option is disabled for a custom object, only the record owner and users granted access by the organization-wide defaults receive access to the object's records. You can create up to 500 roles for your organization. Every user must be assigned to a role, or their data will not display in opportunity reports, forecast roll- ups, and other displays based on roles. If your organization uses territory management, forecasts are based on the territory hierarchy rather than the role hierarchy. Role Name: The unique name used by the API and managed packages. The name must begin with a letter and use only alphanumeric characters and underscores. The name cannot end with an underscore or have two consecutive underscores. Sharing Groups: These groups are automatically created and maintained. The Role group contains all users in this role plus all users in roles above this role. The Role and Subordinates group contains all users in this role plus all users in roles above and below this role in the hierarchy. The Role and Internal Subordinates group (available if Customer Portals or partner portals are enabled for your organization) contains all users in this role plus all users in roles above and below this role, excluding Customer Portal and partner portal users. Users that gain access to data due to their position in hierarchies do so based on a setting in your organization-wide defaults (Grant Access Using Hierarchies) Roles control Records: Roles primarily control a user’s record level access permissions through role hierarchy and sharing rules. Roles is the easiest way to define record level access permissions. Profiles and Permission Sets control a user’s object & field level access permissions: A user can’t be defined without being assigned to a particular profile, since the profile specifies the most basic access for users. Each role in the hierarchy should just represent a level of data access that a user or group of users needs. Admin 201 preparation Page 14
  • 15. 7. Given a scenario, apply the appropriate security controls 1. Who is the most restricted user of this object? (Standard employee) 2. Is there ever going to be an instance of this object that this user shouldn’t be allowed to see? (Yes – Sharing model is Private) (No) 3. Is there ever going to be an instance of this object that this user shouldn’t be allowed to edit? (Yes – Sharing model is Public Read Only)(No – Sharing model is Public Read/Write) 8. Describe the various profiles controls Standard profiles: System Admin: Has access to all functionality that does not require an additional license. For example, administrators cannot manage campaigns unless they also have a Marketing User license. Standard platform user: Can use custom apps and the apps from Appexchange + can use core platform functionality such as accounts, contacts, reports, dashboards, and custom tabs Solution manager: Can review and publish solutions. Also has access to the same functionality as the Standard User Marketing user: Can manage campaigns, import leads, create letterheads, create HTML email templates, manage public documents, and update campaign history via the import wizards. Also has access to the same functionality as the Standard User. Partner user: Can only log in via a partner portal. Customer portal user/manager: Can only log in via a Customer Portal. Can view and edit data they directly own or data owned by or shared with users below them in the Customer Portal role hierarchy; and they can view and edit cases where they are listed in the Contact Name field. Contract manager: Can create, edit, activate, and approve contracts. This profile can also delete contracts as long as they are not activated. Can edit personal quota and override forecasts. Read only: (executive team) Can view the organization's setup, run and export reports, and view, but not edit, other records. Chatter user/moderator: Can only log in to Chatter. Can access all standard Chatter people, profiles, groups, and files. Site.com user: Can only log in to the Site.com app. Each Site.com Only user also needs a Site.com Publisher feature license to create and publish sites, or a Site.com Contributor feature license to edit the site's content 9. Given a scenario, determine the appropriate use of a custom profile Admin 201 preparation Page 15
  • 16. A profile is a collection of permissions and other settings associated with a user or a group of users. Your organization has a number of standard profiles already defined. If you create a custom object, the permissions to access that object (“Read,” “Create,” “Edit,” and “Delete”) are disabled for most profiles. This security setting ensures that access to custom objects and their data is only explicitly granted to users. You can change these permissions in custom profiles, but not standard profiles. Overview of User Permissions and Access: User permissions and access settings specify what users can do within an organization. For example, permissions determine a user's ability to edit an object record, view the Setup menu, empty the organizational recycle bin, or reset a user's password. Access settings determine other functions, such as access to Apex classes, app visibility, and the hours when users can log in. Permissions and access settings are specified in user profiles and permission sets. Every user is assigned only one profile, but can also have multiple permission sets. Permission sets are the best way to apply system access to users without affecting all other users that have the same profile. (exp: permission 1 + permission 2 + permission 3 (up to 1000) grouped into a permission set to create a profile like permission without creating complete profiles. When determining access for your users, it's a good idea to use profiles to assign the minimum permissions and access settings for specific groups of users, then use permission sets to grant additional permissions. Because you can assign many permission sets to users and permission sets are reusable, you can distribute access among more logical groupings of users, regardless of their primary job function. For example, you can create a permission set that gives read access to a custom object and assign it to a large group of users, and create another permission set that gives edit access to the object and assign it to only a few users. You can assign these permission sets to various types of users, regardless of their profiles. The following table shows the types of permissions and access settings that are specified in profiles and permission sets Delegating Data Administration: (Overriding the security and sharing configurations and who has such powers and how powers are granted) Creating a profile with “manage Users” permission is not recommended because of security risks {can expire all passwords, edit login hours, edit/delete profiles, etc.} so we use delegated administration. Limited admin privileges such as create/edit users, reset passwords, assign users to specific profiles, login as a user who granted login access) Global Administrative permissions: “View all data”, “Modify all data” (including mass transfer / update records and Undelete what others delete) “Customize Application”—Customize just about anything in Salesforce, from page layouts to the data model “Manage Users”—Add and remove users, reset passwords, grant permissions, and more (Global permissions apply to records of every object in organization permissions, if global is too permissive then use object permissions) there are two ways to delegate restricted data administrative access (overriding sharing) 1. Object level permissions: (View all, modify all) Object permissions apply to records of a specific object. Or create a permission set with “modify all” and assign to roles. a. Delegated Administrators: Users b. User Administration (Roles): lets us kinds of users this group can manage c. Assignable profiles: lets us specify the profiles this group can assign to users they manage. d. Custom Object Administration: specify custom objects delegated admins can administer. 2. Delegated Administration groups: is a group of non-admin users with limited admin privileges. Security controls | Delegated Administration Profiles and permission sets – Objects and fields level access permissions Roles – Record level access permissions through role hierarchy and sharing rules Sharing rules and role hierarchies can never be stricter than our org-wide default settings. A public group is a collection of individual users, other groups, individual roles, and/or roles with their subordinates that all have a function in common. Using a public group when defining a sharing rule makes the rule easier to create and, more important, easier to understand later, especially if it's one of many sharing rules that you're trying to maintain in a large organization. You'll need to create a public group if you ever want to define a sharing rule that encompasses more than one or two groups or roles, Admin 201 preparation Page 16
  • 17. or any individual. Profile controls access to objects and records using roles One Account can have many Opportunities, many opportunities can belong to one account. Admin 201 preparation Page 17
  • 18. Standard APPs: Sales, Call Center, Marketing, Community, Site.com 10. Describe the standard object architecture and relationship model Overview of Relationships: Use relationships to associate an object with other objects in Salesforce. (Custom fields and relationships) You can define different types of relationships by creating custom relationship fields on an object. There are different types of relationships between objects in Salesforce. Their differences include how they handle data deletion, sharing, and required fields in page layouts. Master-detail This type of relationship closely links objects together such that the master record controls certain behaviors of the detail and subdetail record. For example, you can define a two-object master-detail relationship, such as Account—Expense Report, that extends the relationship to subdetail records, such as Account—ExpenseReport—Expense Line Item. You can then perform operations across the master—detail—subdetail relationship. (Exp: Job application – Review - Detail) Behaviors of master-detail relationships include: o When a master record is deleted, the related detail and subdetail records are also deleted. (Because review is useless without job application object) o By default, records can’t be reparented in master-detail relationships. Administrators can, however, allow child records in master-detail relationships on custom objects to be reparented to different parent records by selecting the Allow reparenting option in the master-detail relationship definition. o The Owner field on the detail and subdetail records is not available and is automatically set to the owner of the master record. Custom objects on the “detail” side of a master-detail relationship can't have sharing rules, manual sharing, or queues, as these require the Owner field. o The security settings for the master record control the detail and subdetail records. o The master-detail relationship field (which is the field linking the objects) is required on the page layout of the detail and subdetail records. o The master object can be a standard object, such as Account or Opportunity, or a custom object. o As a best practice, don't exceed 10,000 child records for a master-detail relationship. o In a many-to-many relationship, a user can’t delete a parent record if more than 200 junction object records are associated with it and if the junction object has a roll-up summary field that rolls up to the other parent o Custom object: Maximum Number of Master – Detail Relationships = 23 o A master detail relationship on an object can only be created before the object contains record data Lookup This type of relationship links two objects together. Simple relationship between 2 objects. Lookup relationships are similar to master-detail relationships, except they do not support sharing or roll-up summary fields. Exp: job application object – (lookup field that references) – Position records (Then many job applications can be related to a single position record) With a lookup relationship, you can: o Link two different objects. (new position field on job application record, job application related list on position object) o Link an object with itself (with the exception of the user object {Hierarchical} user can not be added to related lists because it is a unique standard object). For example, you might want to link a custom object called “Job Application” with itself to show two applications are related to the same job. When you define a lookup relationship, you have the option to include a lookup field on the page layouts for that object as well as create a related list on the related object's page layouts. You can't delete an object or record in a lookup relationship if the combined number of records between the two linked objects is more than 100,000. To delete an object or record in a lookup relationship, first Standard and Custom Objects - 18% 08 April 2014 08:39 Admin 201 preparation Page 18
  • 19. delete an appropriate number of its child records. Hierarchical This type of relationship is a special lookup relationship available only for the user object. It allows users to use a lookup field to associate one user with another that does not directly or indirectly refer to itself. For example, you can create a custom hierarchical relationship field to store each user's direct manager. Many to Many A many-to-many relationship allows each record of one object to be linked to multiple records from another object and vice versa. Use a junction object to connect the two objects you want to relate to each other. A Junction object is a custom object with two master detail relationships with a sole purpose of simply relating two objects. Creating the many-to-many relationship consists of: 1. Creating the junction object: (Job Application) 2. Creating the two master-detail relationships: (A look up field on job Applications that references Position records {Lookup(position)}, A look up field on job applications that points to Candidate records {Lookup(candidate)}. 3. Customizing the related lists on the page layouts of the two master objects: Job Application under Position Page Layout and Job Applications under Candidate page Layout. 4. Customizing reports to maximize the effectiveness of the many-to-many relationship: Under custom app reports Exp: Many Websites vs. Many Open positions (One website can host many open positions and one open position can be posted to many websites) Create a junction object called Job Postings. Now one Website can have many Job Postings and one open position can have many Job Postings. Job posting always represents a posting about a single position on a single website. In related lists instead of relating open positions to job postings, we relate it to websites. Exp: Many Positions vs. many Candidates (multiple candidates can apply to one position or one candidate can apply to many positions) Create a junction object called Job Application. Now one candidate can have many job applications and one position can have many job applications. A candidate applies to a position via job application. So each time a candidate wants to apply for a position, recruiter can create a job application. In a 2 master detail relationship, 2nd Master detail relationship has no effect on the look and feel of the junction object. But sharing is done through the master object. 11. Explain how to create, delete, and customize fields, page layouts, and list views for custom and standard objects 1. Navigate to the fields area of the appropriate object: To add a custom field: For standard objects, click Your Name > Setup > Customize, select the appropriate object from the Customize menu, and click Fields. For custom task and event fields, click Your Name > Setup > Customize > Activities > Activity Custom Fields. For custom objects, click Your Name > Setup > Create > Objects, and select one of the custom objects in the list. 2. Click New in the Custom Fields & Relationships section of the page. For custom settings, click Your Name > Setup > Develop > Custom Settings, and click the name of the custom setting. (Allowed limit = 2 MB.) (Custom settings are similar to custom objects. Use custom settings to create and manage custom data at the organization, profile, and user levels. Custom settings data is stored in the application cache. This means you can access it efficiently, without the cost of repeated queries. Custom settings data can be used by formula fields, Visualforce, Apex, and the Force.com Web Services API.) 3. Choose the type of field to create, and click Next. Tip: From this section, you can also set field dependencies and field history tracking on custom objects. Note: Some data types are only available for certain configurations. For example, the Master-Detail Relationship option is available only for custom objects when the custom object does not already have a master-detail relationship. Also, custom settings only allow a subset of the available data types. Admin 201 preparation Page 19
  • 20. Relationship fields count towards custom field limits. Field types not listed in custom field types may appear if your organization installed a package from the AppExchange that uses those custom field types. The Roll-Up Summary option is only available on certain objects. 4. For relationship fields, choose the object that you want to associate with it. 5. Enter a field label. Field types correspond to API data types. For more information, see “API Data Types and API Field Types” in the Web Services API Developer's Guide. The Field Name is automatically populated based on the field label you enter. This name can contain only underscores and alphanumeric characters, and must be unique in your organization. It must begin with a letter, not include spaces, not end with an underscore, and not contain two consecutive underscores. Use the field name for merge fields in custom links, custom s-controls, and when referencing the field from the API. Tip: Ensure that both the custom field name and label are not identical to the name and label of any existing standard or custom field for that object. Identical values may result in unexpected behavior when you reference that name in a merge field. If a standard field and custom field have matching names or labels, the merge field displays the value of the custom field. 6. Enter any field attributes. 7. For relationship fields, optionally create a lookup filter to limit the valid values and lookup dialog results for the field. 8. Click Next to continue. 9. In Enterprise, Unlimited, and Developer Editions, specify the field's access settings for each profile, and click Next. If two custom fields have matching names or labels, the merge field may not display the value of the field you expect. For example, if you create a field label called Email, the field name automatically populates as Email__c. If you also have a standard field with the label Email, the merge field may not be able to distinguish between the standard and custom field names. Make both the custom field name and label unique by adding a character to each, such as Email2 and Email2__c, respectively. Note: When you create a custom field, by default the field isn't visible or editable for portal profiles, unless the field is universally required. 10. Choose the page layouts that should display the field as an editable field. Profiles with “View Encrypted Data” permission are indicated with an asterisk. 11. For relationship fields, choose whether to create a related list that displays information about the associated records. You can choose to put the related list on any page layouts for that object. The field is added as the last field in the first two-column section on the page layout. For long text area fields, the field is added to the end of the first one-column section on the page layout. For user custom fields, the field is automatically added to the bottom of the user detail page. For universally required fields, you cannot remove the field from page layouts or make it read only. 12. Click Save to finish or Save & New to create more custom fields. To change the label of the custom related list as it will appear on the page layouts of the associated object, edit the Related List Label. To add the new related list to page layouts that users have already customized, check Append related list to users’ existing personal customizations. Note: Creating fields may require changing a large number of records at once. To process these changes efficiently,you request may be queued and you may receive an email notification when the process has completed. Creating Page Layouts Available in: Enterprise, Unlimited, and Developer Editions, User Permissions Needed To create page layouts: “Customize Application” To create a new page layout: 1. Click Your Name > Setup > Customize, select an object or record type, and click Page Layouts. For opportunities, click Your Name > Setup > Customize > Opportunities > Opportunity Products > Page Layouts to create or edit the additional page layouts for products on opportunities. For person accounts, click Your Name > Setup > Customize > Accounts > Person Accounts > Page Layouts to create Admin 201 preparation Page 20
  • 21. or edit the additional page layouts for person accounts. For campaign members, click Your Name > Setup > Customize > Campaigns > Campaign Member > Page Layouts. 2. Click New. Tip: To create a new page layout by cloning an existing one: In the enhanced page layout editor, click Edit next to a layout, and then click Save As on the layout page. In the original page layout editor, select a layout, and then click Clone on the layout page. If you clone a page layout using this method, skip the following step. 3. Optionally, choose an existing page layout to clone. 4. Type a name for the new layout. 5. Click Save. 12. Given a scenario, determine the appropriate fields and page layouts for custom and standard objects 13. Explain how to create, delete, and customize record types for custom and standard objects 14. Given a scenario, determine the appropriate record types and business processes for custom and standard objects For custom objects: Create | Objects |---Object | Record Types For standard objects: Customize |---Object | Record Types Record types allow you to specify categories of records that display different picklist values and page layouts. You can also associate record types with profiles, so you can specify the picklist values and page layouts. You can also associate record types with profiles, so you can specify the picklist values and page layouts that different types of users can see in record detail pages. Exp: Record types – IT positions, Non-IT positions (these are record types) (need a separate page layout for each record type) Both usability and data integrity are adversely affected by irrelevant data. So take away unnecessary choices by utilizing record types. 15. Explain the implications of deleting fields o Before deleting a custom field, consider where it is referenced. You can’t delete a custom field that is referenced elsewhere. For example, you cannot delete a custom field that is referenced by a field update or Apex. o When you delete a custom field, all of the field history data is deleted and changes are no longer tracked. o A background process periodically runs that cleans up metadata associated with deleted custom fields. This process will affect the Last Modified Date and Last Modified By fields on page layouts, record types, and custom objects. Deleted custom fields and their data are stored until your organization permanently deletes them or 15 days has elapsed, whichever happens first. Until that time, you can restore the field and its data. However, the field still counts against the maximum number of custom fields allowed in your organization. 16. Describe when to use and how to create formula fields 1. Begin building a formula field the same way you create a custom field. 2. Select the data type for the formula. Choose the appropriate data type for your formula based on the output of your calculation. 3. Choose the number of decimal places for currency, number, or percent data types. This setting is ignored for currency fields in multicurrency organizations. Instead, the Decimal Places for your currency setting apply. Note: Salesforce uses the round half up tie-breaking rule for numbers in formula fields. For example, 12.345 becomes 12.35 and −12.344 becomes −12.34. 4. Click Next. 5. Build your formula: a. If you are building a formula in the Advanced Formula tab or for approvals or rules, such as workflow, Admin 201 preparation Page 21
  • 22. validation, assignment, auto-response, or escalation, click Insert Field, choose a field, and click Insert. To create a basic formula that passes specific Salesforce data, select the Simple Formula tab, choose the field type in the Select Field Type drop-down list, and choose one of the fields listed in the Insert Field drop-down list. Tip: Build cross-object formulas to span to related objects and reference merge fields on those objects. Note: Because formula fields are automatically calculated, they are read-only on record detail pages and do not update last modified date fields. Formula fields are not visible on edit pages. In account formulas, all business account fields are available as merge fields. However, account fields exclusive to person accounts such as Birthdate and Email are not available. Formulas on Activities that use standard fields shouldn't be placed on both the Task and Event pages. This is because both Tasks and Events are considered Activities. For instance, if a formula is used on a standard field only available for Tasks, it will also mistakenly be pulled into Events. o Default value formulas for a type of record can only reference fields for that type of record. However, formula fields and formulas for approvals or rules, such as workflow, validation, assignment, auto- response, or escalation, for a type of record can reference fields for that type of record as well as any records that are related through a lookup or master-detail relationship. For example, a formula for a validation rule on opportunities can reference merge fields for accounts and campaigns as well as opportunities, and a formula field on accounts can reference fields for cases. o Formula fields that a user can see may reference fields that are hidden or read only using field-level security. If the formula field contains sensitive information, use field-level security to hide it o You can add activity formula fields to task and event page layouts. Note that a task-related formula field on an event page layout may not be useful. Likewise, event-related formula fields on task page layouts may not be useful. To determine if a record is a task or event, use the IsTask merge field. For example: IF(IsTask, "This is a task", "This is an event") o Character limit—Formula fields can contain up to 3,900 characters, including spaces, return characters, and comments. If your formula requires more characters, create separate formula fields and reference them in another formula field.The maximum number of displayed characters after an evaluation of a formula expression is 1,300 characters. o Save size limit—Formula fields cannot exceed 4,000 bytes (4MB) when saved. The save size differs from the number of characters if you use multi-byte characters in your formula. o Compile size limit—Formula fields cannot exceed 5,000 bytes (5MB) when compiled. The compile size is the size of the formula (in bytes) including all of the fields, values, and formulas it references. o Long text area, encrypted, and Description fields are not available for use in formulas. o The value of a field cannot depend on another formula that references it. o Fields referenced in formulas cannot be deleted. Remove the field from the formula before deleting it. o Task Due Date is not available for use in formulas. o Campaign statistic fields cannot be referenced in formulas for field updates, approval processes, workflow rules, or validation rules, but can be referenced in custom formula fields o Dates and times are always calculated using the user’s time zone. o The Created Date and Last Modified Date fields display only the date, not the date and time. o {!CreatedDate} + 5 calculates the date and time five days after a record’s created date. Note that the expression returns the same data type as the one given; a date field plus or minus a number returns a date, and a date/time field plus or minus a number returns a date/time. o When calculating dates using fractions, Salesforce ignores any numbers beyond the decimal. For example: TODAY() + 0.7 is the same as TODAY() + 0, which is today’s date TODAY() + 1.7 is the same as TODAY() + 1, which is tomorrow’s date TODAY() + (-1.8) is the same as TODAY() + (-1), which is yesterday’s date o To calculate the value of two fractions first, group them within parentheses. For example: TODAY() + 0.5 + 0.5 is the same as TODAY() + 0 + 0, which is today’s date TODAY() + (0.5+0.5) is the same as TODAY() + 1, which is tomorrow’s date o Hyperlink formula fields are just like other custom fields that you can display in list views and reports. o Custom links display on detail pages in a predefined section; hyperlink formula fields can display on a detail page wherever you specify. Admin 201 preparation Page 22
  • 23. o Using custom links, you can specify display properties such as window position and opening in a separate popup position; hyperlink formula fields open in a new browser window by default or you can specify a different target window or frame. o Your formulas can reference custom links. Before deleting a custom link, make sure it is not referenced in a formula field. o Hyperlink formula fields that contain relative URLs to Salesforce pages, such as /rpt/reportwizard.jsp, can be added to list views, reports, and related lists. However, use a complete URL, including the server name and https://, in your hyperlink formula before adding it to a search layout. Note that formula fields are not available in search result layouts. o The output of your formula must be less than 19 digits Cross Object formulas: Are formulas that span two or more objects by referencing merge fields from related records. This means formulas on Review object can access fields on Job Application object and formulas on the Job Application object can access fields on both Position and Candidate objects. o Cross-object formulas that reference currency fields convert the value to the currency of the record that contains the formula. o Salesforce allows a maximum of ten (10) unique relationships per object in cross-object formulas. The limit is cumulative across all formula fields, rules, and lookup filters. For example, if two different formulas on opportunities reference two different fields of an associated account, only one unique relationship exists (from opportunities to accounts). o You cannot reference cross-object formulas in roll-up summary fields. o In cross-object formulas, you cannot reference merge fields for objects related to activities. For example, merge fields for contacts and accounts are not available in task and event formulas. o In cross-object formulas, you cannot reference record owner merge fields for any object. For example, the opportunity owner's Role merge field is not available in opportunity formulas. Reference record types in formulas if you want different workflow rules, validation rules, and lookup filters to apply to different record types. For example, you can: o Create a workflow rule on accounts that emails different teams depending on the account record type the user selects when creating the account. o Create a validation rule on opportunities that allows only members of the North American sales team to save opportunities with the Domestic record type. When referencing a record type in a formula, use RecordType.Id instead of RecordType.Name. If you use RecordType.Name and the record type name changes, your formula will break. The record type ID never changes. Using RecordType.Id can make your formula less readable, so use inline comments to make your formula readable. Do not use the $RecordType global variable in cross-object formulas. The $RecordType variable only resolves to the record containing the formula, not the record to which the formula spans. Admin 201 preparation Page 23
  • 24. Leads: Not a customer yet but person / org / company that is interested in working with your company 1. First search Salesforce to see if lead has already been created 2. Add lead manually to create new lead 3. Import wizard for leads (under lead tab) or data management | Import leads (<= 50,000) 4. Web to lead Leads are converted into an account or an opportunity in order to be a part of org’s sales pipeline Lead status: Open – not converted Working – contacted Closed – Converted Closed – Not converted Once converted lead creates (1. Account, 2. Contact record, 3. Associated opportunity) and also assign an activity to do for the record owner Accounts & Contacts: is an org/individual/company involved with your organization as a customer, competitor and partner. (Already established relationship) Create account manually using the sidebar or account tab | New Import my Accounts & Contacts (≤ 500 records) (importing can also be done via outlook, Act!, .csv, data.com) Contact: Any point of contact/individual/influencer associated with an account. Any contact can be related to multiple opportunities. For multiple users: Setup | Data Management | Import Accounts | Contacts to import accounts and contacts (ONLY AVAILABLE TO THE SYSTEM ADMINISTRATOR) For self user: personal setup | Import| Import my accounts and contacts Opportunity: potential revenue generating deal / event that you want to track in Salesforce (won deals, lost deals) Tracking a deal in Sales pipeline: (opportunity) Create Opp Update Opp Close Opportunity Create opportunity – when converting lead to account Create opportunity – Create new (sidebar) Create opportunity –from opportunity tab | New Create opportunity –from related lists Enterprise and unlimited editions can assign sales teams to opportunities An opportunity alert: sends a notification the first time an opportunity reaches the threshold. So, an opportunity that reaches the threshold with 90% probability will not trigger additional alerts if the probability subsequently goes higher. However, an opportunity that already triggered an alert and then fell below the threshold can trigger a second alert if it crosses that threshold again. Big Deal Alert: Your organization can use alerts that automatically send an email notification for opportunities with large amounts (to any email and opportunity owner). Customize this alert to send an email when an opportunity reaches a threshold. Your threshold consists of an opportunity amount and probability. For example, you may want to send an email to your team that an opportunity of $500,000 has reached a probability of 90%. Setup | Customize | Opportunities | Big Deal Alert A Sales Process contains the Stages an Opportunity follows through its sales cycle. Similar Opportunities: This feature allows a user to search for opportunities that share common fields with the user's opportunity. Once enabled, a Similar Opportunities related list appears on the opportunity record. After creating a new Sales Process, associate it with one or more Opportunity Record Type to apply it to new opportunities. Predicting and Planning Sales Cycles: 1. Forecast sales revenue 2. Plan and predict your pipeline 3. Meet or exceed your quotas Sales Cloud Applications - 9% 08 April 2014 08:40 Admin 201 preparation Page 24
  • 25. Forecasts: is a revenue projection that aggregates individual opportunities into a total or summary, expressed in a dollar amount and/or units of product (Roll up) 17. Given a scenario, identify the capabilities and implications of the sales process Salesforce CRM Record Lifecycle The capabilities of Salesforce CRM provides for the processing of campaigns through to customer acquisition and beyond as shown in the following diagram: 1. Marketing Administration: At the start of the process, it is the responsibility of the Marketing team to develop suitable campaigns in order to generate leads. 2. Campaigns: Campaign management is carried out using the Marketing Administration tools and has links to the lead and also any opportunities that have been influenced by the campaign. 3. Marketing/Sales: When validated, leads are converted to accounts, contacts, and opportunities. This can be the responsibility of either the marketing or sales teams and requires a suitable sales process to have been agreed upon Customer Acquisition 4. Leads: A lead object is a person or a company that might be interested in your product or service. If the rep qualifies a lead and decides to pursue it, the lead is “converted,” which automatically transforms it into three objects: an account, a contact, and an opportunity. 5. Accounts: The account object represents a company. You can create account records for prospects, customers, competitors, partners, or any other entities that makes sense for your business. An account record contains—or connects to—all information about your interactions with the company, such as in-progress and completed deals, your points of contact, and records of past interactions. 6. Contacts: The contact object stores information about people who work at the companies represented by the account object. A contact record contains all relevant information about the person, such as phone numbers, title, role in a deal. When a rep converts a lead, the information in the lead is automatically transferred to the contact. As your engagement with a company widens and your reps meet more people, they can keep creating additional contacts associated with the corresponding account record 7. Opportunities: The opportunity object contains the information for every deal you’re tracking, such as deal size and expected close date. The opportunity object is at the core of your sales process. To gain visibility into your pipeline, you need to make sure that your reps (usually opportunity owners) diligently track their deals and update the opportunity fields with accurate information. Opportunities can either be generated from lead conversion or may be entered directly by the sales team. As described earlier in this book, the structure of Salesforce requires account ownership to be established which sees inherited ownership of the opportunity. Account ownership is usually the responsibility of the sales team. Opportunities are worked through a sales process using sales stages where the stage is advanced to the point where they are set as won/closed and become sales. Unless you use the product and pricebook objects, we recommend that your opportunity name contains account name, product, and price—for example, “Acme Inc.-Blue Series Router XT6800-$25,000.” If you do use the product object, put all products into a single opportunity. Salesforce Automation 8. Activities: Activities consist of the tasks, events, calls, and emails that make it possible to track every customer interaction. Did you just have a phone conversation in which the customer agreed to certain terms and conditions of an in-progress deal? Click Log a Call on the opportunity record to document any agreements. Did a customer ask you to send some collateral? Log a task so that you won’t forget. 9. Sales (Won Deals): Opportunity information should be logged in the organization’s financial system. Upon financial completion and acceptance of the deal (and perhaps delivery of the goods or service) the post-customer acquisition process is then enabled where the account and contact can be recognized as a customer. Customer Service and Support Automation 10. Cases: the customer relationships concerning incidents and requests are managed by escalating cases within the customer services and support automation suite. 18. Given a scenario, identify when to apply the appropriate sales productivity features Admin 201 preparation Page 25
  • 26. 19. Describe the capabilities of products and price books Products, Price Books, and Schedules Products Products are the individual items that you sell on your opportunities and quotes. You can create a product and associate it with a price in a price book. Each product can exist in many different price books with many different prices. A product that is listed in a price book with an associated price is called a price book entry. The Products related list of an opportunity detail page and the Quote Line Items related list of a quote detail page list the products for that record. Use this related list to associate a price book with the opportunity or quote, add or edit products, and, for opportunities, establish or edit product schedules. Price Books A price book contains products and their associated prices. Each product with its associated price is referred to as a price book entry. You can use the standard price book or create custom price books. The standard price book is automatically generated to contain a master list of all products and standard prices regardless of the custom price books that also contain them. Schedules You can establish default schedules on a product, as well as schedules for individual line items (opportunity products) on an opportunity Your administrator determines which types of schedules your organization can use: quantity schedules, revenue schedules, or both. Your administrator also specifies which types of schedules can be established for each separate product. Quantity Schedule–Outlines the dates, number of units, and number of installments for payments, shipping, or other use as determined by your organization. Revenue Schedule–Outlines the dates, revenue amounts, and number of installments for payments, recognizing revenue, or other use. 20. Describe the capabilities of lead management Using an Assignment Rule when Creating or Editing a Lead Your administrator can create a lead assignment rule to automatically assign leads to different users or queues.Without a lead assignment rule, the system assigns all new web-generated leads to the Default Lead Owner defined on the Lead Settings page. Your administrator can assign new web-generated leads using the Web-to-Lead setup, or when creating or editing a lead, you can check a box to assign the lead automatically using your active lead assignment rule. An email is automatically sent to the new owner if your administrator specified an email template in the matching rule entry. If you want this checkbox to be selected by default, your administrator can modify the appropriate page layout. Importing Leads When importing new leads, your administrator can apply a lead assignment rule to automatically assign leads to users or queues based on values in certain lead fields. Alternatively, your administrator can add a Record Owner field to the import file to assign lead ownership. Without a lead assignment rule or Record Owner field, imported leads are automatically assigned to the user doing the import. Creating a Lead Manually (default assignment) When you manually create a lead from the Leads tab, you are automatically listed as the owner of the lead. Taking Leads from a Queue To take ownership of leads in a queue, go to the queue list view, check the box next to one or more leads, and click Accept. Changing Ownership of One Lead To change the ownership of a lead you own or have read/write sharing access to, click the Change link next to the Lead Owner field, and then specify the name of a user or queue. The Change link only displays on the lead detail page, not the edit page. Select the Send Notification Email box to send an automated email to the new lead owner. If the new owner is a queue, Salesforce sends the email to all of the queue members. Changing Ownership of Multiple Leads Admin 201 preparation Page 26
  • 27. You can transfer ownership of multiple leads if you have the “Transfer Leads” or “Transfer Record” permission, the “Edit” object permission on leads, and sharing access to view the leads. To transfer ownership of multiple leads, use either of the following methods: From a list view or queue, select one or more leads and click Change Owner. Use the mass transfer tool at Your Name > Setup > Data Management > Mass Transfer Records. All leads that are assigned to you, either manually, via import, or from the web, are automatically marked as “Unread;” that is, they have a check mark in the Unread column on leads list views. So to view your new leads, select the My Unread leads list view. Leads are automatically marked as “Read” only after you view or edit them. If your organization uses divisions, leads that are assigned via assignment rules are automatically set to the default division of the new owner. The organization-wide sharing model for an object determines the access users have to that object's records in queues: Public Read/Write/Transfer Users can view and take ownership of records from any queue. Public Read/Write or Public Read Only Users can view any queue but only take ownership of records from queues of which they are a member or, depending on sharing settings, if they are higher in the role or territory hierarchy than a queue member. Private Users can only view and accept records from queues of which they are a member or, depending on sharing settings, if they are higher in the role or territory hierarchy than a queue member. Regardless of sharing model, users must have the “Edit” permission to take ownership of records in queues of which they are a member. Administrators, users with the “Modify All” object-level permission for Cases, and users with the “Modify All Data” permission, can view and take records from any queue regardless of the sharing model or their membership in the queue. User Permissions Needed To change the status of leads: “Manage Leads” To change the ownership of leads: “Transfer Leads” OR “Transfer Record” AND “Edit” on leads To add leads to campaigns from a list view: Marketing User checked in your user record AND “Read” on leads AND “Edit” on campaigns From any lead list page, administrators can “mass update” multiple leads. From any queue list view, users can take ownership of leads if: o They are a member of that queue o They are higher in the role hierarchy than a queue member o The organization's default sharing for leads is Public Read/Write/Transfer Select the checkboxes next to the desired leads and click one of the following buttons: Accept: Assigns you as the owner of the selected leads and transfers open activities to you. In organizations that are not Public Read/Write/Transfer for leads, you can take leads only from queues of which you are a member or if you are higher in the role hierarchy than a queue member. Change Status: Changes the Status of the leads to the value you set. You must have the “Manage Leads” permission and read/write access to the leads to use this feature. If you change the status of a lead you own using the Change Status button, the Unread By Owner checkbox is still selected. Change Owner: Assigns leads to a user or queue you specify. If the new owner is a user—not a queue— associated notes, attachments, and open activities are also transferred. To use this feature, you must have the “Transfer Leads“ or “Transfer Record” permission, the “Edit” object permission on leads, and access to view the leads you are updating. Add to Campaign: Adds leads to an existing campaign. You must have the Marketing User box checked in your user information, the “Read” permission on leads, and the “Edit” permission on campaigns to use this feature. Creating Leads You can create new leads in various ways. Your administrator can set up Web-to-Lead to automatically capture leads from your website; your administrator can import new leads using the Import My Organization’s Leads wizard; or you can create new leads manually in the Leads tab. You can also find Data.com contacts and add them as leads. With Web-to-Lead, you can gather information from your company’s website and automatically generate Admin 201 preparation Page 27
  • 28. up to 500 new leads a day. To manually create a new lead, select Lead from the Create New drop-down list in the sidebar, or click New next to Recent Leads on the leads home page. Enter the lead information. Select the checkbox below the lead information to assign the lead automatically using the active lead assignment rule. If you do not check the box, you are assigned as the owner. Click Save when you are finished, or click Save & New to save the current lead and add another. When you create a new lead manually: You are automatically assigned as the owner. The Lead Status is initially set to the default status specified by your administrator. If you select the assignment rule checkbox, the record type of the lead might change, depending on what behavior your administrator specified for assignment rules. The lead is marked as “Read” and will not display in the My Unread Leads list view. However, if you save the lead using the Save & New button, the lead is marked as “Unread.” The Lead Activity History related list of a lead detail page tracks the changes to the lead. Any time a user modifies any of the standard or custom fields whose history is set to be tracked on the lead, a new entry is added to the Lead History related list. All entries include the date, time, nature of the change, and who made the change. Modifications to the related lists on the lead are not tracked in the lead history. For information about setting up which fields are tracked. For automated lead changes that result from Web-to-Lead, the user listed in the history is the Default Lead Creator chosen in the Web-to-Lead Settings. To convert leads: When you convert a lead, Salesforce creates a new account, contact, and, optionally, an opportunity using the information from the lead. Any campaign members are moved to the new contact and the lead becomes read only. If an existing account and contact have the same names as those specified on the lead, you can choose to update the existing account and contact. Information from the lead is inserted only into blank fields; Salesforce does not overwrite existing account and contact data. All open and closed activities from the lead are attached to the account, contact, and opportunity. You can assign the owner of the records, and schedule a follow-up task. When you assign a new owner, only the open activities are assigned to the new owner. If you have custom lead fields, that information can be inserted into custom account, contact, or opportunity fields. Converted leads can't be viewed, although they appear in lead reports. Salesforce updates the Last Modified Date and Last Modified By system fields on converted leads when picklist values included on converted leads are changed. Notes on Converting Leads Conversion impact on workflow: o You cannot convert a lead that is associated with an active approval process or has pending workflow actions. o Converting a lead to a person account cannot trigger workflow rules. o If validation and triggers for lead convert are enabled in your organization, then converting a lead can trigger a workflow action on a lead. For example, if there is an active workflow rule that updates a lead field or transfers the owner of a lead, that rule can trigger when the lead is converted, even if the lead is no longer visible on the Leads tab as a result of the conversion. Note that if a workflow rule creates a new task as a result of a lead conversion, the task is assigned to the newly created contact and related to the associated account or opportunity. o When a lead is converted by someone who isn't the lead owner, all workflow tasks associated with the lead that are assigned to that user, except email alerts, are reassigned to the lead owner. Workflow tasks assigned to users other than the lead owner and lead converter aren't changed. Conversion impact on campaigns: o If the lead matches an existing contact and both records are linked to the same campaign, the campaign member status is determined by whichever is further along in the lifecycle of the campaign. For example, if the lead member status is “sent” and the contact member status is “responded,” the responded value is applied to the contact. o Related campaign information is always associated with the new contact record regardless of the user's sharing access to the campaign. Admin 201 preparation Page 28
  • 29. o When more than one campaign is associated with a lead, the most recently associated campaign is applied to the Primary Campaign Source field on the opportunity regardless of the user's sharing access to the campaign. When a lead is converted, Chatter feed posts associated with the lead aren’t migrated. The lead posts are no longer available in the Chatter feed. Salesforce ignores lookup filters when converting leads if the Enforce Validation and Triggers from Lead Convert checkbox on the Lead Settings page is deselected. If the lead has a record type, the default record type of the user converting the lead is assigned to records created during lead conversion. The default record type of the user converting the lead determines the lead source values available during conversion. Typically, you will want to convert a lead as soon as it becomes a real opportunity that you want to forecast. If your organization uses territory management, the new account is evaluated by account assignment rules and may be assigned to one or more territories. If the rules assign the account to exactly one territory, then the opportunity will also be assigned to that territory. If the rules assign the account to multiple territories, then the opportunity is not assigned to any territory. If your organization uses person accounts, you can convert leads to either person accounts or business accounts. Leads with a blank Company field are converted to person accounts. The default person account record type for your profile is applied to the new person account. Note that you can only create leads with a blank Company field using the Force.com API. In particular, remove the Company field from the page layouts of leads that will be converted to person accounts, and make the Company field required on the page layouts of leads that will be converted to business accounts. When you convert a lead into a existing account, you don’t automatically follow that account. However, when you convert the lead into a new account, you automatically follow the new account, unless you disabled feed tracking for accounts in your Chatter settings. 21. Given a scenario, identify how to automate lead management With Web-to-Lead, you can gather information from your company’s website and automatically generate up to 500 new leads a day. Your company may already have a registration or other type of page where users enter their contact information. You may also want to create a jump page where prospects respond to a campaign. With a little extra HTML code, you can redirect that information to Salesforce to create new leads. 22. Describe the capabilities of campaign management 5 steps to make it more effective: 1. Create the campaign: After determining your marketing strategy, create a campaign to track your efforts. 2. Create your target list: Next define who you want to target with your campaign. The method used to create a target list depends on who you are targeting: Rented or Purchased Lists - Simply use the list of names as your target list. We recommend that you do not import the names into the system yet. Existing Contacts, Leads, or Person Account - Run a contact, lead, or person account report in Salesforce and use the Add to Campaign button to associate those records with your campaign. Alternatively, go to a list view of contacts or leads and use the Add to Campaign button to associate those records with your campaign. Note that person accounts are included in contact list views and can be added to campaigns from them. 3. Execute the campaign: All campaign execution occurs outside of Salesforce. It can be online or offline, for example: • Online - Send email using an email execution vendor. • Offline - Plan and host a conference; run print or radio advertisements; send direct mail pieces; or host a Web seminar. 4. Track responses: The possible types of campaign responses can be divided into the following groups based on the response tracking mechanism: Website Response - Prospects respond by filling in a form on your website. Use Web-to-Lead to set up a Admin 201 preparation Page 29