
Recommended
More Related Content
Similar to Alpine wired dci installation & operation
Similar to Alpine wired dci installation & operation (20)
Recently uploaded
Recently uploaded (20)
Alpine wired dci installation & operation
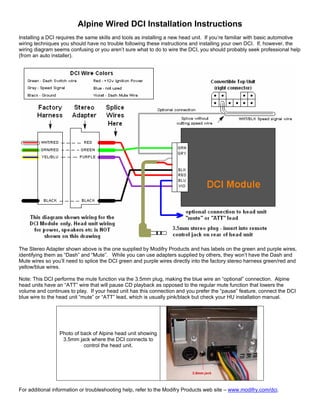
- 1. Alpine Wired DCI Installation Instructions Installing a DCI requires the same skills and tools as installing a new head unit. If you’re familiar with basic automotive wiring techniques you should have no trouble following these instructions and installing your own DCI. If, however, the wiring diagram seems confusing or you aren’t sure what to do to wire the DCI, you should probably seek professional help (from an auto installer). The Stereo Adapter shown above is the one supplied by Modifry Products and has labels on the green and purple wires, identifying them as “Dash” and “Mute”. While you can use adapters supplied by others, they won’t have the Dash and Mute wires so you’ll need to splice the DCI green and purple wires directly into the factory stereo harness green/red and yellow/blue wires. Note: This DCI performs the mute function via the 3.5mm plug, making the blue wire an “optional” connection. Alpine head units have an “ATT” wire that will pause CD playback as opposed to the regular mute function that lowers the volume and continues to play. If your head unit has this connection and you prefer the “pause” feature, connect the DCI blue wire to the head unit “mute” or “ATT” lead, which is usually pink/black but check your HU installation manual. Photo of back of Alpine head unit showing 3.5mm jack where the DCI connects to control the head unit. For additional information or troubleshooting help, refer to the Modifry Products web site – www.modifry.com/dci.
- 2. Wiring to the Vehicle Speed Sensor The DCI has an optional Speed-Controlled Volume feature that requires one additional wire be connected to the Vehicle Speed Sensor (VSS). 1. Extend the DCI gray wire with a piece of 18 to 22 gauge wire and run it behind the passenger dash for connection to the speed signal wire. The speed signal is available at the Convertible Top Module located behind the passenger dash access panel, shown here with the 6 snaps that hold it in place identified by yellow circles. 2. Remove the access cover. You can use a small flat pry bar or a putty knife to carefully pry the cover off. If the cover has not been off before the snaps may be fairly tight, just be careful to avoid cracking the plastic or scratching the dash. 3. Locate the Convertible Top Module, which is a black box with a blue label. It has 2 wiring connectors on the bottom side. Separate the wires on the right connector and look for a white/black wire on the bottom row of wires. It’s identified here with the yellow arrow. 4. You will need to splice (T-tap) the extended DCI gray wire into the white/black wire. Do not cut the white/black wire, it prevents the convertible top from being operated if the vehicle is moving. If the white/black wire were cut near the Top Module and the DCI connected to the opposite end of the speed signal wire, the DCI would see the speed signal but the Top Module wouldn’t. This would allow the top to be lowered with the vehicle moving (assuming you pulled the hand brake up one click), which is a safety hazard. Don’t do it! Here is a photo of a T-tap crimp connector being attached to the speed signal wire. And here’s the final photo showing the completed connection to the speed signal wire.
- 3. Operation of the Alpine Wired DCI Please note that the DCI does not operate exactly like the factory stereo controls. This is because the DCI provides extra functions and the fact that aftermarket head units use different commands than the factory head unit. Review the tables below to familiarize yourself with the commands before operating your DCI. The biggest difference is how the CH button works. It is used to change FM/AM bands, not to change radio presets, and has no function when playing a CD. Functions provided by the stock dash buttons Press this button to get this function MUTE mutes the audio output, pauses CD play if ATT lead is connected MODE changes from Radio to CD (and Aux/Changer depending on head unit) CH changes Radio bands (FM1, FM2, AM1 etc) Volume Up/Dn adjust volume up or down in steps, hold the dash switch to raise or lower volume quickly Functions provided by pressing multiple buttons Hold this button and press this button to get this function MODE Volume Up seeks next higher radio station (next track in CD mode) MODE Volume Down seeks previous radio station (previous track in CD mode) CH Volume Up changes to next higher radio preset (next CD or MP3 folder) CH Volume Down changes to previous radio preset (previous CD or MP3 folder) MODE CH toggles the SCV feature On and Off (Speed-Controlled Volume) Special note on the MUTE function – When the DCI puts the HU into MUTE mode it disables all the other dash controls, including the SCV function. This is because the head unit will come out of MUTE if it receives another command, which can be pretty annoying and can cause the MUTE to get out of sync with the dash controls. When the dash switch is pressed again to turn off MUTE, the SCV feature re-activates and will adjust the volume based on your new speed.
- 4. The SCV (Speed Controlled Volume) feature The SCV feature operates by measuring vehicle speed and raising and lowering the volume at programmed intervals. By setting 2 dip switches you can choose one of 4 different levels of volume boost which I call Low, Medium, High, and Maximum. The 4 settings control the 'interval' (in mph) between volume changes, except that the first volume increase always occurs at 15 mph. The chart below shows the 4 settings and at what speeds the volume is increased. If you don't want to use the SCV function, just don't connect the vehicle speed sensor wire and it will be disabled. Here's what the SCV dip switches look like on the DCI Dip Switch Setting Interval First Volume Up Second Volume Up Third Volume Up Fourth Volume Up Low 23 mph 15 38 61 84 Medium 19 mph 15 34 53 72 High 15mph 15 30 45 60 Maximum 11 mph 15 26 37 48 The 4 settings for the SCV function work pretty much the same - the only difference is how much volume boost is added. It is easier to understand if I describe one setting in detail, and I'll use the 'HIGH' setting in my example. When the DCI determines that vehicle speed has reached 15 mph, it sends one VOLUME UP command to the head unit. At every succeeding interval of 15 mph (for the HIGH setting) it will send an additional VOLUME UP command, so that by the time you reach highway speeds (60 mph) the volume will have been increased 4 times. (15, 30, 45, and 60 mph) As you slow down, the volume will be reduced, and if you were to stop, the volume will return to it's initial setting. The difference is that when slowing down, the VOLUME DOWN commands occur at different speeds than when you speed up. There is a good reason for this, as I'll explain. Let's assume you are driving on the Interstate at 60 mph. The volume will have been increased 4 times, at 15, 30, 45, and 60 mph. As you cruise at 60, it would be annoying if every time your speed wavered between 59 and 60 mph the volume lowered and then increased again. So the DCI was designed to wait till your speed slows significantly before dropping the volume. It must see the speed drop by 1/2 of the speed 'interval' before it makes a volume adjustment. In this example, the speed interval is 15 mph, so the volume will not decrease till you slow below 52.5 mph (half of 15 is 7.5). The effect is that if you are cruising at 60 mph, you will need to either speed up to 75 or slow down to 52 before a volume change occurs, which eliminates annoying volume changes if your speed varies just a little. Bear in mind the DCI checks vehicle speed about once a second, so if you accelerate quickly you may notice the volume adjustments lag a little behind. Don't be concerned, it will catch up within a second or two and adjust the volume appropriately. Also, Infra-red DCI versions 6.0 and later allow you to disable the SCV feature from the dash switches. Holding the MODE switch and momentarily pressing CH will toggle the feature ON and OFF. The DCI will remember the ON/OFF condition until you change it again.