გორი ციხისჯვარი
•Download as PPTX, PDF•
0 likes•380 views

პრეზენტაცია მომზადებულია ილიას სახელმწიფო უნივერსიტეტის ,,საქართველოს ტურისტული რესურდების" პროგრამის ფარგლებში გოჩა შარვაშიძის მიერ.პრეზენტაციის პირველ ნაწილში განხილულია გორის მუზეუმების ტური მუზეუმ ნაკრძალ უფლისციხესთან ერთად.მეორე ნაწილში კი ბორჯომის მუნიციპალიტეტის ტური კურორტ ციხისჯვრის ჩათვლით.

Recommended
Recommended
More Related Content
Similar to გორი ციხისჯვარი
More from Gocha Sharvashidze
More from Gocha Sharvashidze (20)
გორი ციხისჯვარი
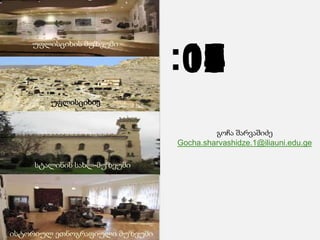
- 1. უფლისციხის მუზეუმი :10 00 01 02 03 04 05 06 07 08 09 უფლისციხიე გოჩა შარვაშიძე Gocha.sharvashidze.1@iliauni.edu.ge სტალინის სახლ-მუზეუმი ისტორიულ ეთნოგრაფიული მუზეუმი
- 2. თბილისი გორი დაარსდა 1935 წელს. დაცულია 48100-ზე მეტი ექსპონანტი. ზოგიერთი მათგანი განსაკუთრებული მნიშვნელობისაა. ასეთია: მესაქონლეობის, ლითონწარმოების, კედლის მხატვრობის, მცირე ფორმის ქანდაკების, ჰერალდიკისა და სახალხო სანახაობის ამსახველი მასალა, რომლებიც წარმოდგენას გვაძლევენ წინა აზიისა და ქართველ ტომთა უძველესი კულტურის მჭიდრო კავშირზე
- 3. საბჭოთა კავშირის ლიდერის, იოსებ სტალინის სახელობის მუზეუმი გორში. ის სამი ნაწილისაგან შედგება 1. 2. 3. საექსპოზიციო შენობა კოშკით მემორიალური სახლი სტალინის პირადი ვაგონი
- 4. უფლისციხე 1 •მდებარეობა 2 • ისტორიული მომოხილვა 3 • კომპლექსში შემავალი ნაგებობები.
- 5. IVდღე გორი უფლისციხე უფლისწულის ეკლესია მდებარეობს შიდა ქალაქის შუა უბანში, ამაღლებულ კლდის მასივზე. თარიღდება ადრინდელი ფეოდალური ხანით. აშენებულია წარმართული გრძელი ნაგებობა შედგება მწკრივად განლაგებული ოთხი ნაწილისაგან. ტაძრის ადგილზე
- 6. მუზეუმში წარმოდგენილია უფლისციხის ნაქალაქარსა და მის გარეუბნებში მოპოვებული არქეოლოგიური მასალა
- 8. Iდღე თბილისი ნეძვის ეკლესია გოგიას ციხე მწვანე მონასტერი ბაკურიანი ციხისჯვარი ,,მგზავრები“ ქ.ბორჯომიდან რამოდენიმე სამთო-კლიმატური კურორტი კილომეტრში, სოფ.ჩითახევის ქ.ბორჯომს ჩრდილო– ბაკურიანი საქართველოს ნეძვი, IX საუკუნის ქართული მახლობლად, დაბურული დასავლეთიდან შუა ერთ-ერთ ულამაზეს, ხუროთმოძღვრებისშუაგულში ფოთლოვანი ტყის ძეგლი საუკუნეების ძეგლი, ე.წ. ბორჯომის ხეობაში ბორჯომის მუნიციპალიტეტში დგას ქართული გოგიას ციხე დაჰყურებს მდებარეობს. ხუროთმოძღვრების ძეგლი მწვანე მონასტერი
- 9. ბაკურიანი ციხისჯვარი ციხისჯვარი ციხესიმაგრე ციხისჯვარი ბუნებრივი სამკურნალო ფაქტორები ბუნებრივი სამკურნალო ისტორიულიბორჯომის - სოფელი ციხესიმაგრე ფაქტორები: სამხრეთმდებარეობს საშუალო მუნიციპალიტეტში. მთის ზედა სარტყლის ჰავა ბორჯომულას საქართველოში, თორში, მდინარე თორის ქვაბულში, და სუსტად სულფიდური, ქლორიდულშავწყალას სათავეებთან, მის ერთ-ერთი შენაკადის მდინარე კარბონატული, ნატრიუმიანი მარჯვენა ნაპირებზე, ზღვის შავიწყლის ნაპირზე სოფელ მინერალური მეტრიზე ციხისჯვარში დონიდან 1800 წყლები
- 11. სვოტ ანალიზი ძლიერი მხარეები: საფრთხეები: მდინარეთა ქსელი საკმაოდ მკაცრი კლიმატი გამაჯანსაღებელი წყაროები კურორტის არააქტუალურობა მაღალი მთის კლიმატი მოსახლეობის ემიგრაცია მრავალფეროვანი მცენარეული საფარი სუსტი მხარეები გრუნტის გზა წყაროების დაბალი მინერალიზაცია განუვითარებელი ინფრასტრუქტურა შესაძლებლობები: განვითარდეს როგორც კომბინირებული კურორტი სალაშქრო ტურიზმის განვითარება ეკოტურიზმის განვითარება
Editor's Notes
- Animated pictures fly in from gray to full color(Advanced)Tip: For the effects on this slide, it is recommended to use pictures with a “portrait” (vertical) orientation. To reproduce the text effects on this slide, do the following:On the Home tab, in the Slides group, click Layout, and then clickBlank. On the Insert tab, in the Text group, click Text Box, and then on the slide, drag to draw the text box.Enter text in the text box, and then select the text. On the Home tab, in the Font group, select Georgiafrom the Font list, enter 34 in the Font Size box, click Italic, click the arrow next to Font Color, and then under Theme Colors click Aqua, Accent 5, Darker 25% (fifth row, ninth option from the left).Drag the text box into the upper half of the slide, slightly left of the center.To reproduce the first picture with animation effects on this slide, do the following:On the Insert tab, in the Images group, click Picture.In the Insert Picture dialog box, select a picture and then click Insert. On the slide, select the picture. Under Picture Tools, on the Format tab, in the bottom right corner of the Size group, click the Size and Position dialog box launcher. In the Format Picture dialog box, resize or crop the picture as needed so that the height is set to 3.81” and the width is set to 2.54”. To crop the picture, click Crop in the left pane, and in the Crop pane, under Crop position, enter values into the Height, Width, Left, and Top boxes. To resize the picture, click Size in the left pane, and in the Size pane, under Size and rotate, enter values into the Height and Width boxes.Drag the picture into the into the top left corner of the slide. (Note: Align the left edge of the picture with the left edge of the slide, and leave a small margin between the top edge of the picture and the top edge of the slide.)Select the picture. Under PictureTools, on the Format tab, in the bottom right corner of the Picture Styles group, click the Format Picture dialog box launcher.In the Format Picture dialog box, in the left pane click Picture Correction, in the Picture Correction pane, under Brightness and Contrast, in the Brightness box, enter 50%.Also in the Format Picture dialog box, in the left pane click Picture Color, in the Picture Color pane, under Recolor, click the button next to Presets and click Grayscale.On the Animations tab, in the Advanced Animation group, click Add Animation, and then under Entrance click Fly In.Also on the Animations tab, in the Animation group, click Effect Option, and then click From Left.Also on the Animations tab, in the Timing group, do the following:In the Start list, select With Previous.In the Duration box, enter 1.00 seconds.Also on the Animations tab, in the Advanced Animation group, click Add Animation, and then click More Entrance Effects. In the Add Entrance Effect dialog box,under Subtle, click Expand, and then click OK.Also on the Animations tab, in the Timing group, do the following:In the Start list, select With Previous.In the Duration box, enter 1.00 seconds.To reproduce the second picture with animation effects on this slide, do the following:On the slide, select the picture. On the Home tab, in the Clipboard group, click the arrow to the right of Copy, and then click Duplicate.Drag the second picture until its left side slightly overlaps the right side of the first picture.Select the second picture. Under PictureTools, on the Format tab, in the bottom right corner of the Picture Styles group, click the Format Picture dialog box launcher. In the Format Picture dialog box, in the left pane click Picture Corrections, in the PictureCorrection pane, under Brightness and Contrast, in the Brightness box, enter 40%.On the Animations tab, in the Advanced Animation group, click Animation Pane.Press and hold CTRL, and then select the third and fourth animation effects (fly-in and expand effects for the second picture) in the Animation Pane. On the Animations tab, in the Timing group, in the Delay box, enter 0.2.To reproduce the third picture with animation effects on this slide, do the following:On the slide, select the second picture. On the Home tab, in the Clipboard group, click the arrow to the right of Copy, and then click Duplicate.Drag the third picture until its left side slightly overlaps the right side of the second picture.Select the third picture. Under PictureTools, on the Format tab, in the bottom right corner of the Picture Styles group, click the Format Picture dialog box launcher. In the Format Picture dialog box, in the left pane click Picture Corrections, in the Picture Corrections pane, under Brightness and Contrast, in the Brightness box, enter 20%. Press and hold CTRL, and then select the fifth and sixth animation effects (fly-in and expand effects for the third picture) in the Animation Pane. On the Animations tab, in the Timing group, in the Delay box, enter 0.4.To reproduce the fourth picture with animation effects on this slide, do the following:On the slide, select the third picture. On the Home tab, in the Clipboard group, click the arrow to the right of Copy, and then click Duplicate.Drag the fourth picture until its left side slightly overlaps the right side of the third picture.Select the fourth picture. Under PictureTools, on the Format tab, in the bottom right corner of the Picture Styles group, click the Format Picture dialog box launcher. In the Format Picture dialog box, in the left pane click Picture Corrections, in the Picture Corrections pane, under Brightness and Contrast, in the Brightness box, enter 0%. Press and hold CTRL, and then select the seventh and eighth animation effects (fly-in and expand effects for the fourth picture) in the Animation Pane. On the Animations tab, in the Timing group, in the Delay box, enter 0.6.To reproduce the fifth picture with animation effects on this slide, do the following:On the slide, select the fourth picture. On the Home tab, in the Clipboard group, click the arrow to the right of Copy, and then click Duplicate.Drag the fifth picture until its left side slightly overlaps the right side of the fourth picture.Select the fifth picture. Under PictureTools, on the Format tab, in the bottom right corner of the Picture Styles group, click the Format Shape dialog box launcher. Also in the Format Picture dialog box, in the left pane click Picture Color, in the Picture Color pane, under Recolor, click the button next to Presets and click No Recolor.Press and hold CTRL, and then select the ninth and 10th animation effects (fly-in and expand effects for the fifth picture) in the Animation Pane. On the Animations tab, in the Timing group, in the Delay box, enter 0.8.To reproduce the animation effects for the text box on this slide, do the following:On the Home tab, in the Editing group, click Select, and then click Selection Pane.In the Selection and Visibility pane, select the text box. On the Animations tab, in the Advanced Animation group, click Add Animation, and then under Entrance click Fade.Also on the Animations tab, in the Timing group, do the following:In the Start list, select With Previous.In the Duration box, enter 0.50 seconds.In the Delay box, enter 1.30 seconds.In the Selection and Visibility pane, press and hold CTRL, and then select the first, second, third, and fourth pictures. On the Animations tab, in the AdvancedAnimation group, click Add Animation, and then under Exit click Fade.Also on the Animations tab, in the Timing group, do the following:In the Start list, select With Previous.In the Duration list, select 1.00 second.In the Animation Pane, select the 12th animation effect (first fade effect). On the Animations tab, in the Timing group, in the Delay box enter 1.40 seconds.In the Animation Pane, select the 13th animation effect (second fade effect). On the Animations tab, in the Timing group, in the Delay box enter 1.60 seconds.In the Animation Pane, select the 14th animation effect (third fade effect). On the Animations tab, in the Timing group, in the Delay box enter 1.80 seconds.In the Animation Pane, select the 15th animation effect (fourth fade effect). On the Animations tab, in the Timing group, in the Delay box enter 2.00 seconds.To reproduce the background effects on this slide, do the following:Right-click the slide background area, and then click Format Background. In the Format Background dialog box, click Fill in the left pane, select Gradient fill in the right pane, and then do the following:In the Type list, select Radial.Click the button next to Direction, and then click From Center (third option from the left).Under Gradient stops, click Add gradient stops or Remove gradient stops until three stops appear in the drop-down list.Also under Gradient stops, customize the gradient stops as follows:Select the first stop in the slider, and then do the following:In the Position box, enter 0%.Click the button next to Color, and then under Theme Colors click White, Background 1, Darker 5%(second row, first option from the left). Select the next stop in the slider, and then do the following: In the Position box, enter 34%.Click the button next to Color, and then under Theme Colors click White, Background 1, Darker 15% (third row, first option from the left). Select the last stop in the slider, and then do the following: In the Position box, enter 100%.Click the button next to Color, and then under Theme Colors click White, Background 1, Darker 50% (sixth row, first option from the left).
- SmartArt custom animation effects: pictures peek-in(Basic)To reproduce the SmartArt effects on this page, do the following:On the Home tab, in the Slides group, click Layout, and then clickBlank. On the Insert tab, in the Illustrations group, click SmartArt.In the Choose a SmartArt Graphic dialog box, in the left pane, click Matrix. In the Matrix pane, double-click Titled Matrix (second option from the left) to insert the graphic into the slide. Select the graphic. Under SmartArt Tools, on the Format tab, click Size, and then do the following:In the Height box, enter 5.67”.In the Width box, enter 8.5”.Under SmartArt Tools, on the Format tab, click Arrange, click Align, and then do the following:Click Align to Slide.Click Align Middle. Click Align Center. Select the graphic, and then click one of the arrows on the left border. In the Type your text here dialog box, enter text in the top-level bullet only (text for the rounded rectangle at the center of the graphic). To remove the [Text] placeholder in the second-level bullets, select each bullet and press SPACE.On the slide, select the graphic. Under SmartArtTools, on the Design tab, in the SmartArtStyles group, click More, and then under Best Match for Document click Moderate Effect.Select the rounded rectangle at the center of the graphic. On the Home tab, in the Font group, select 28 from the Font Size list, click the arrow next to Font Color, and then click White, Background 1 (first row, first option from the left).With the rounded rectangle selected, under SmartArtTools, on the Format tab, in the bottom right corner of the ShapeStyles group, click the FormatShape dialog box launcher. In the FormatShape dialog box, click Fill in the left pane, select Gradient fill in the Fill pane, and then do the following:In the Type list, select Linear.In the Direction list, select LinearUp (second row, second option from the left).Under Gradient stops, click Add or Remove until three stops appear in the drop-down list.Also under Gradient stops, customize the gradient stops as follows:Select Stop 1 from the list, and then do the following:In the Stop position box, enter 0%.Click the button next to Color, and then under Theme ColorsclickWhite, Background 1, Darker 35% (fifth row, first option from the left).Select Stop 2 from the list, and then do the following: In the Stop position box, enter 80%.Click the button next to Color, and then under Theme ColorsclickWhite, Background 1, Darker 35% (fifth row, first option from the left).Select Stop 3 from the list, and then do the following: In the Stop position box, enter 100%.Click the button next to Color, and then under Theme ColorsclickWhite, Background 1, Darker 15% (third row, first option from the left).Right-click the top left shape in the graphic, and then click Format Shape. In the Format Shape dialog box, in the left pane, click Fill. In the Fill pane, click Picture or texture fill,and then under Insert from, click File.In the Insert Picture dialog box, select a picture and then click Insert. Right-click the top right shape in the graphic, and then click Format Shape. In the Format Shape dialog box, in the left pane, click Fill. In the Fill pane, click Picture or texture fill,and then under Insert from, click File.In the Insert Picture dialog box, select a picture and then click Insert. Right-click the bottom left shape in the graphic, and then click Format Shape. In the Format Shape dialog box, in the left pane, click Fill. In the Fill pane, click Picture or texture fill,and then under Insert from, click File.In the Insert Picture dialog box, select a picture and then click Insert. Right-click the bottom right shape in the graphic, and then click Format Shape. In the Format Shape dialog box, in the left pane, click Fill. In the Fill pane, click Picture or texture fill,and then under Insert from, click File.In the Insert Picture dialog box, select a picture and then click Insert. To reproduce the animation effects on this slide, do the following:On the Animations tab, in the Animations group, click CustomAnimation.On the slide, select the graphic, and then do the following in the CustomAnimation task pane: Click Add Effect, point to Entrance, and then click MoreEffects. In the Add Entrance Effect dialog box, under Subtle, click Expand. Under Modify: Expand, in the Speed list, select Fast.Under Modify: Expand, in the Start list, select After Previous.Also in the Custom Animation task pane, click the arrow to the right of theanimation effect, and then click EffectOptions. In the Expand dialog box, on the SmartArt Animation tab, in the Group Graphic list, select One by one.Also in the Custom Animation taskpane, click the double-arrow below the animation effect to expand the list of effects, and then do the following:Press and hold CTRL, and then select all five animation effects in the Custom Animation task pane. Under Modify: Expand, in the Start list, select With Previous.Press and hold CTRL, select the second, third, fourth, and fifth animation effects (expand effects for the picture-filled rectangles), and then do the following:Click Change, point to Entrance, and then click MoreEffects. In the Change Entrance Effect dialog box, under Basic, click Peek In. Under Modify: Peek In, in the Speed list, select Fast.Select the second animation effect. Under Modify: Peek In, in the Start list, select After Previous.Select the third animation effect. Under Modify: Peek In, in theDirection list, select From Left.Select the fourth animation effect. Under Modify: Peek In, in the Direction list, select From Right.Select the fifth animation effect. Under Modify: Peek In, in the Direction list, select From Top.To reproduce the background effects on this slide, do the following:Right-click the slide background area, and then click Format Background. In the Format Background dialog box, click Fill in the left pane, select Gradient fill in the Fill pane, and then do the following:In the Type list, select Radial.Click the button next to Direction, and then click From Corner (fifth option from the left).Under Gradient stops, click Add or Remove until two stops appear in the drop-down list.Also under Gradient stops, customize the gradient stops as follows:Select Stop 1 from the list, and then do the following:In the Stop position box, enter 0%.Click the button next to Color, and then under Theme ColorsclickWhite, Background 1 (first row, first option from the left).Select Stop 2 from the list, and then do the following: In the Stop position box, enter 71%.Click the button next to Color, and then under Theme ColorsclickWhite, Background 1, Darker 15% (third row, first option from the left).
- Animated multiple successive images in a picture show(Basic)To reproduce the picture effects on this slide, do the following:On the Home tab, in the Slides group, click Layout, and then clickBlank. On the Home tab, in the Drawing group, clickShapes, and then under Rectangles click Rectangle (first option from the left). On the slide, drag to draw a rectangle.Select the rectangle. Under DrawingTools, on theFormat tab, in the Size group, do the following:In the Shape Height box, enter 4.55”.In the Shape Width box, enter 8”.On the Home tab, in the bottom corner of the Drawing group, click the Format Shape dialog box launcher. In the Format Shape dialog box, in the left pane, click Fill. In the Fill pane, click Solid fill. Click the button next to Color, and then under Theme Colors click Black, Text 1 (top row, second option from the left).Also in the Format Shape dialog box, in the left pane, click Line Color. In the Line Color pane, click Solid line, click the button next to Color, and then under Theme Colors click Black, Text 1, Lighter 35% (third row, second option from the left).Also in the Format Shape dialog box, in the left pane, click Line Style, and then do the following in the Line Style pane: In the Width box, enter 20 pt.In the Cap type list, select Flat.In the Join type list, select Miter.Also in the Format Shape dialog box, in the left pane, click Shadow.In the Shadow pane, click the button next to Presets, and then under Perspective click Perspective Diagonal Upper Right (first row, second option from the left).Also in the Format Shape dialog box, in the left pane, click 3-D Format, and then do the following in the 3-D Format pane:Under Bevel, click the button next to Top, and then under Bevel click Hard Edge (third row, third option from the left). Next to Top, in the Width box, enter 27 pt, and in the Height box, enter 5.5 pt. Under Depth, click the button next to Color, and then under Theme Colors click Black, Text 1, Lighter 35% (third row, second option from the left). In the Depth box, enter 40 pt. Also in the Format Shape dialog box, in the left pane, click 3-DRotation, and then do the following in the 3-DRotation pane: Click the button next to Presets, and then under Perspective, click Perspective Contrasting Left (second row, fourth option from the left).In the X box, enter 20⁰.In the Y box, enter 9.3⁰.In the Z box, enter 358⁰.In the Perspective box, enter 45⁰.Click Close to close the dialog box.On the slide, drag the rectangle slightly to the left to position it in the middle of the slide. On the Insert tab, in the Images group, click Picture.In the Insert Picture dialog box, select a picture, and then click Insert.On the slide, select the picture. Under Picture Tools, on the Format tab, in the bottom right corner of the Size group, click the Size and Position dialog box launcher. In the Size and Position dialog box, on the Size tab, resize or crop the picture as needed so that under Size and rotate, the Height box is set to 4.11” and the Width box is set to 7.3”. Crop the picture on the Crop tab by entering values into the boxes under Picture Position and Crop Position. Under DrawingTools, on the Format tab, in the PictureStyles group, click the arrow next to PictureBorder, and then do the following:Under Theme Colors clickBlack, Text 1 (first row, second option from the left). Point to Weight, and then click3 pt.Under PictureTools, on the Format tab, in the bottom right corner of the PictureStyles group, click the Format Shape dialog box launcher. In the Format Picture dialog box, in the left pane, click 3-DRotation, and then do the following in the 3-DRotation pane:Click the button next to Presets, and then under Perspective click Perspective Contrasting Left (second row, fourth option from the left).In the X box, enter 20⁰.In the Y box, enter 9.3⁰.In the Z box, enter 358⁰.In the Perspective box, enter 45⁰.Select the picture. On the Home tab, in the Clipboard group, click the arrow under Paste, and then click Duplicate. Repeat this process one more time for a total of three pictures.NOTE: You can do this procedure with as many pictures as you want. This article uses three for purposes of demonstration.Select the second picture and repeat steps 12-14. Do this for each picture that you have added.Press and hold CTRL, and then select all three pictures on the slide. On the Home tab, in the Drawing group, click Arrange, point to Align, and repeat to do each of the following:Click Align Slide.Click Align Middle.Click Align Center.Drag the group of three pictures into the middle of the rectangle (picture frame). TIP: You might find it easiest to position the pictures precisely in the frame rectangle by selecting a picture, holding down the CTRL key and using the keyboard direction arrows.To reproduce the animation effects on this slide, do the following:On the Home tab, in the Editing group, click Select, and then click SelectionPane.On the Animations tab, in the Animation group, click Animation Pane.In the SelectionandVisibility pane, select the first picture and do the following:On the Animations tab, in the Advanced Animation group, click Add Animation, then under Exit, click Fade, and then click OK. In the Animation Pane, click the arrow at the picture’s animation effect and click Timing, then in the Fade dialog box, do the following:In the Start box, click After Previous.In the Delay box, enter 0.5.In the Duration box, click 2 seconds (Medium).Repeat steps 1 through 3 for the other pictures. TIP: If all pictures are assigned the Exit animation, the ending image on the slide will be blank. To prevent this, do not assign the Exit animation effect to the final picture.To reproduce the background effects on this slide, do the following:Right-click the slide background area, and then click Format Background. In the Format Background dialog box, on the Fill tab, do the following:Select Gradient fill.In the Type list, select Linear.Click the button next to Direction, and then click Linear Up (second row, second option from the left). Under Gradient stops, click Add or Remove until two stops appear on the slider.Select a stop on the slider, and then do the following:In the Stop position box, enter 0%.Click the button next to Color, and then under Theme Colors click White, Background 1, Darker 35% (fifth row, first option from the left).Select the other stop on the slider, and then do the following: In the Stop position box, enter 54%.Click the button next to Color, and then under Theme Colors click Black, Text 1, Lighter 15% (fifth row, second option from the left).
- Animated picture changes during motion path(Advanced)To reproduce the first picture effect on this slide, do the following:On the Home tab, in the Slides group, click Layout and then click Blank. On the Insert tab, in the Images group, click Picture. In the Insert Picture dialog box, select a picture, and then click Insert. Under Picture Tools, on the Format tab, in the bottom right corner of the Size group, click the Size and Position dialog box launcher. In the Format Picture dialog box, resize or crop the picture as needed so that the height is set to 2” and the width is set to 2”. To crop the picture, click Crop in the left pane, and in the Crop pane, under Crop position, enter values into the Height, Width, Left, and Top boxes. To resize the picture, click Size in the left pane, and in the Size pane, under Size and rotate, enter values into the Height and Width boxes.Also in the Format Picture dialog box, click Line Color in the left pane. In the Line Color pane, select Solid line, click the button next to Color, and then under Theme Colors click White, Background 1 (first row, first option from the left).Also in the Format Picture dialog box, click Line Style in the left pane, and then in the Line Style pane, in the Width box, enter 1.5 pt. Also in the Format Picture dialog box, click Shadow in the left pane. In the Shadow pane, click the button next to Presets, and then under Outer click Offset Center (second row, second option from the left). On the slide, select the picture. On the Animations tab, in the Advanced Animation group, click Add Animation, and then under Entrance click Fade.Also on the Animations tab, in the Timing group, do the following:In the Start list, select With Previous.In the Duration list, select 1.00 seconds.Also on the Animations tab, in the Advanced Animation group, click Add Animation, and then under Motion Paths click Lines.Also on the Animations tab, in the Animation group, click Effect Options, and then click Right.Also on the Animations tab, in the Timing group, do the following:In the Start list, select With PreviousIn the Duration box, enter 10.00 seconds.On the slide, select the motion path. Press and hold SHIFT to constrain the path to a straight, horizontal line, and then drag the right adjustment handle to the right, stopping approximately 1.5” left of the right edge of the slide. (Note: On the View tab, in the Show/Hide group, select Ruler to measure approximately where the endpoint is on the slide.)To reproduce the other pictures on this slide, do the following:Select the picture. On the Home tab, in the Clipboard group, click the arrow to the right of Copy, and then click Duplicate. Repeat this process for a total of four duplicate pictures. Select a duplicate picture. Under Picture Tools, on the Format tab, in the Adjust group, click Change Picture. In the Insert Picture dialog box, select a new picture, and then click Insert. Under Picture Tools, on the Format tab, in the bottom right corner of the Size group, click the Size and Position dialog box launcherIn the Format Picture dialog box, resize or crop the picture as needed so that the height is set to 2” and the width is set to 2”. To crop the picture, click Crop in the left pane, and in the Crop pane, under Crop position, enter values into the Height, Width, Left, and Top boxes. To resize the picture, click Size in the left pane, and in the Size pane, under Size and rotate, enter values into the Height and Width boxes.Repeat steps 2-4 for the other duplicate pictures. To reproduce the other animation effects on this slide, do the following:On the Animations tab, in the Advanced Animation group, click Animation Pane.In the Animation Pane, select the third animation effect (fade effect for the second picture). On the Animations tab, in the Timing group, in the Delay box, enter 2.5. In the Animation Pane, select the fifth animation effect (fade effect for the third picture). On the Animations tab, in the Timing group, in the Delay box, enter 5. In the Animation Pane, select the seventh animation effect (fade effect for the fourth picture). On the Animations tab, in the Timing group, in the Delay box, enter 7.5. On the slide, press and hold SHIFT and select all four pictures. On the Home tab, in the Drawing group, click Arrange, point to Align, and then do the following:Click Align Selected Objects.Click Align Center. Click Align Middle. Drag the pictures into the top left corner of the slide. To reproduce the background effects on this slide, do the following:On the Home tab, in the Drawing group, click Shapes, and then under Rectangles click Rectangle (first option from the left). On the slide, drag to draw a rectangle. Select the rectangle. Under Drawing Tools, on the Format tab, in the Size group, do the following:In the Shape Height box, enter 3.42”.In the Shape Width box, enter 10”.Under DrawingTools, on the Format tab, in the Shape Styles group, click the Format Shape dialog box launcher. In the Format Shape dialog box, click Line Color in the left pane, in the LineColor pane, select No line. Also in the Format Shape dialog box, click Fill in the left pane, in the Fill pane, select Gradient fill, and then do the following:In the Type list, select Linear.Click the button next to Direction, and then click Linear Down (first row, second option from the left).Under Gradient stops, click Add gradient stops or Remove gradient stops until two stops appear in the drop-down list.Also under Gradient stops, customize the gradient stops that you added as follows:Select the first stop in the slider, and then do the following:In the Position box, enter 1%.Click the button next to Color, click More Colors, and then in the Colors dialog box, on the Custom tab, enter values for Red: 94, Green: 156, Blue: 198.In the Transparency box, enter 60%.Select the last stop in the slider, and then do the following: In the Position box, enter 100%.Click the button next to Color, click More Colors, and then in the Colors dialog box, on the Custom tab, enter values for Red: 94, Green: 156, Blue: 198.In the Transparency box, enter 90%.On the slide, drag the rectangle vertically to position it just above the middle of the slide. On the Home tab, in the Drawing group, click Arrange, and then do the following:Point to Align, and then click Align to Slide.Point to Align, and then click Align Center.Click Send to Back. Right-click the slide background area, and then click Format Background. In the Format Background dialog box, click Fill in the left pane, in the Fill pane, select Gradient fill,and then do the following:In the Type list, select Linear.Click the button next to Direction, and then click Linear Down (first row, second option from the left)In the Angle box, enter 90⁰.Under Gradient stops, click Add gradient stops or Remove gradient stops until two stops appear in the drop-down list.Also under Gradient stops, customize the gradient stops that you added as follows:Select the first stop in the slider, and then do the following:In the Position box, enter 70%.Click the button next to Color, and then click White, Background 1, Darker 5% (second row, first option from the left).Select the last stop in the slider, and then do the following: In the Position box, enter 100%.Click the button next to Color, and then click White, Background 1, Darker 25% (fourth row, first option from the left).