1. iPhone Software installation and operation
System Requirement:
Mobile device platforms: Apple iPhone OS 4.0. (iPhone 3G not supported) Mobile device must support network (GPRS/3G/Wifi ... etc.). Application Software: APP Store (iPhone built-in) Other: iTunes account is needed before downloading applications
1-1 iTune software installation and registration
To make the mobile device login DVR and monitor remotely, please follow these steps to install the software:
STEP1: Download iTunes Visit Apple website http://www.apple.com/itunes/ to download & install the iTunes.
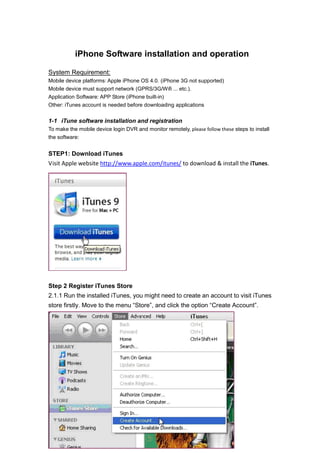
Step 2 Register iTunes Store
2.1.1 Run the installed iTunes, you might need to create an account to visit iTunes store firstly. Move to the menu “Store”, and click the option “Create Account”.
3. Step 5: Fill in your personal info & continue.
Please note that the options of Payment Method are different from different regions,
please select another payment method.
Don’t worry, “SCDVR” is a free software & you don’t need to pay for it.
Step 6: Finished the register, go to your email box to verify your account.
Step 7: Click the link included in the email message.
4. Step 8: It will connect to the iTunes store and turn to iTunes interface.
Step 9: Sign in your account.
Step 10: The register of your iTunes store account has been done.
5. 1-2 iWatch DVR connection software installation (via the phone itself the App Store)
Step 1: Have phone connected to the network (through GPRS/3G/Wifi ... etc), and launch App Store programs.
Step 2: Enter the name to search for " iWatch DVR"
6. Step 3: This is FREE software available for free download, right click on the "FREE" to start the download.
Step 4: Click on the right of the "INSTALL" to start the download.
7. Step 5: Sign in Username & Password.
Step 6: Wait process complete. iPhone will generate a new ” iWatch DVR” program.
.
8. 1-3 How to operate “iWatch DVR” program.
Step 1: Run “iWatch DVR” program in the beginning.
Step 2: Add new DVR information.
When you use program first time, must enter and save DVR’s information. Please press the “+” then enter the DVR’s Name/ IP/ Port/ Username/ Password, after these information fill. Click “Save” this button to save these DVR’s information.
Step 3: Change DVR’s information.
9. If you need to change DVR’s information, please press the “ ”.
Press the top right corner "Edit" to edit, after press the "Done".
Step 4: Login DVR.
10. Application software can store multiple sets of DVR data. You can choice to connect to the DVR and click to view live display.
Depending on network connection status will affect the connection time. When the connection is successful, DVR live will appear.
Step 5: Channel switching.
Single display
- Slide up there will be a single partition quickly switches the menu, as shown.
- Slide the screen to the left to switch to the next channel; Slide the screen to the right to switch to the previous channel.
11. - In quad display, double click the channel screen to return to its single channel screen.
-
Quad display
- Done a narrow gesture on single channel screen to switch to quad display.
- In the quad display, slide the screen to the left to the next four channel quad display; Slide the screen to the right to the previous four channel quad display
Step 6: PTZ control.
If the camera is a PTZ camera (DVR's PTZ & RS-485 settings need to enable PTZ), PTZ button
in the bottom left of the toolbar functions will become a white icon.
12. Press PTZ button to enter PTZ mode to operate the PTZ. In the vertical screen, PTZ icon
will appear top right corner of the screen that is currently in the PTZ mode.
Buttons:
– exit PTZ mode
13. – go to a preset point
– set a preset point
iris+ /
iris- – open or close an iris.
Focus+ /
Focus- – adjusting focal distance
Gesture:
Zoom in / out –pinch to zoom in or out.
Pan / Tilt – To control PTZ movement (viewing direction) by touching the screen and scrolling on the frame. The yellow circle indicates the point of origin. The point of origin is set when the finger touches screen.
Set a preset point: Go to a preset point:
Landscape mode:
A
PTZ icon showed at the top left corner in PTZ mode.
14. Step 7: Relay control.
It can control the connection relay on DVR. Each relay can be controlled separately.