
Recommended
Recommended
More Related Content
What's hot
What's hot (20)
Similar to Build Beautiful Rain Gardens to Filter Runoff
Similar to Build Beautiful Rain Gardens to Filter Runoff (20)
More from Sotirakou964
More from Sotirakou964 (20)
Recently uploaded
Recently uploaded (20)
Build Beautiful Rain Gardens to Filter Runoff
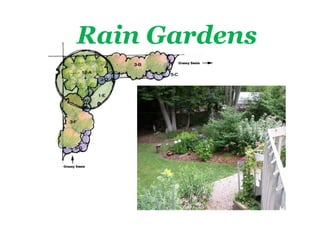
- 1. Rain Gardens
- 2. Rain gardens are • Attractive • Landscaped areas shaped to capture runoff • Planted with perennial native plants that do not mind getting "wet feet" • Built in a shape that allows water to percolate • Amazingly beneficial
- 3. Collect Runoff & Pollution Beautifully
- 4. Rain gardens • Enhance the beauty of yards and communities • Provide habitat for birds and butterflies • Help keep water clean by filtering storm water • Help alleviate flooding problems
- 6. Step 1: Locate and Prepare the Site • Pick a site for your garden that tends to collect water or where runoff from your driveway or downspout can be diverted into it • Your rain garden should be at least 10 feet away from foundations, underground utilities, and drainfields • You can also calculate the best spot(s) – there’s lots of help out there!
- 7. For Best Results …
- 8. Step 2: Your Design - Select Your Plants! » For best results, native plants suitable for your garden’s conditions » Select a variety of native flowers, ferns, grasses, shrubs and small trees that will provide color and interest throughout the season » Group plants together for the most impact; estimate one small plant per square foot » Plants also provide food and habitat for birds, butterflies and bees. • There are many Resources for Garden Design and Plants • http://www.mass.gov/dfwele/der/riverways/pdf/raingardenfactsheet.pdf
- 9. A variety of choices
- 10. Step 3: Prepare your Site Lay out a rope or garden hose in the shape desired as a guide for digging Create the “saucer” contour of the garden. For best infiltration, the bottom of the garden should be level Dig the garden; the depth of the depression is generally from 4 to 8” (but sometimes as much as 12”) Introduce sand, gravel, peat, etc, that are needed to give proper drainage Create a swale to direct water into the garden from a downspout or pavement
- 12. Step 4: Get Out Your Gloves and Tools! Amend the soil to allow the rain garden to both evaporate and slowly drain rain waters A roto-tiller or larger equipment may be required Volunteers needing to fulfill scout or school service projects may be ready and willing to assist if you’re doing a rain garden for a school, church, or town building!
- 13. Step 4: Maintaining Your Rain Garden Rain Gardens are Easy to Maintain but are not Maintenance Free During the first two or three years water and replace plants that did not survive, and/or rearrange plants to wetter or dryer areas if needed. Mulch annually to keep soil moist and allow easy infiltration of rain water 2-3 inches of mulch every spring. Use a natural, un-dyed mulch. Weed annually Keep the plant community diverse and attractive, periodically clear dead vegetation and any debris
- 14. Opportunities Abound! One of my favorites – center of cul de sac!
- 15. Opportunities - Wherever Cars are Parked!
- 16. See a Garden in Massachusetts, e.g.: • Cohasset: Water • Plymouth: Town Hall, Treatment Plant King St.; Lincoln St.; Stephens along Pond & Arrowood Field; Plimoth Streets. Plantation • Hull: Weir River Estuary • Scituate: Scituate High Center School; Hughey Rd. • Ipswich: IRWA, County • Wilmington: Eleven Rd; Partridge Place gardens along Silver • Leominster: Trustees of Lake Avenue, near Silver Reservations, Lindell Ave. Lake Beach
- 17. Many Resources, here’s a few! • http://www.greenscapes.org/Raingardens • http://www.greenscapes.org/Page-567.html • http://www.lowimpactdevelopment.org/raingarden_design/t emplates.htm • http://www.thejonahcenter.org/milardogarden.php • http://www.groundwater.org/ta/raingardens.html • http://rainkc.com/index.cfm/fuseaction/plants.search/index.h tm • http://www.cmhc-schl.gc.ca/en/co/maho/la/la_005.cfm • http://learningstore.uwex.edu/Rain-Gardens-A-How-to- Manual-for-Homeowners-P372C82.aspx • http://www.for-wild.org/download/rainclay/rainclay.html
- 18. Opportunities – Adopt an Island Rain Garden?!?