Emergent Methods: Multi-lingual narrative tracking in the news - real-time ex...
4
1. /home/sas/dad/AdventNet/ZohoViewer/webapps/zv/store/j/j0abYj/j0abYj http://viewer.zoho.com//store/j/j0abYj/j0abYj.htm
staying organized
A short production may include only a few clips; longer productions may require hundreds
or even thousands of assets. With the current propensity for repurposing, it has become more
important than ever for videographers to keep assets well organized. Make sure your software
ONLINE AND OFFLINE EDITING
includes a good asset management system that lets you preview clips, identify clips visually with
Online editing: In online editing, you assemble and
still or poster frames you select, annotate clips with essential information, and easily access edit all the elements to create your final cut. Online
detailed information about all your video and audio assets. editing used to be done only on high-end worksta-
tions that could meet the quality and data-processing
In Adobe Premiere Pro, the Project panel manages all the assets in your video project including requirements of broadcast video. Editors who could
video, audio, stills, titles, and nested timelines. You can organize your assets into folders called not afford an online system had to rent time at a
bins, which can be given custom names, such as Scene 12, Voiceovers, or Chase Scene. The post-production facility. As personal computers and
affordable workstations have become more powerful,
Project panel displays assets and associated metadata in columns, with which you can sort and
online editing has become practical for a wider range
search data. The Project window can be displayed in a variety of different ways, depending on the of high-quality productions.
task at hand:
For online editing using analog source material, you
capture clips once at the highest level of quality your
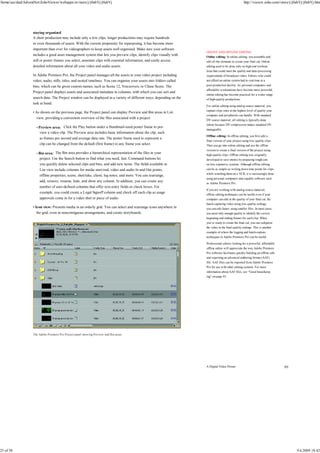
• As shown on the previous page, the Project panel can display Preview and Bin areas in List
computer and peripherals can handle. With standard
view, providing a convenient overview of the files associated with a project.
DV source material, all editing is typically done
online because DV compression makes standard DV
➤ Preview area: Click the Play button under a thumbnail-sized poster frame to pre-
manageable.
view a video clip. The Preview area includes basic information about the clip, such
Offline editing: In offline editing, you first edit a
as frames per second and average data rate. The poster frame used to represent a
final version of your project using low-quality clips.
clip can be changed from the default (first frame) to any frame you select. Then you go into online editing and use the offline
version to create a final version of the project using
➤ Bin area: The Bin area provides a hierarchical representation of the files in your high-quality clips. Offline editing was originally
project. Use the Search button to find what you need, fast. Command buttons let developed to save money by preparing rough cuts
you quickly delete selected clips and bins, and add new items. The fields available in on less expensive systems. Although offline editing
List view include columns for media start/end, video and audio In and Out points, can be as simple as writing down time points for clips
while watching them on a VCR, it is increasingly done
offline properties, scene, shot/take, client, log notes, and more. You can rearrange,
using personal computers and capable software such
add, remove, rename, hide, and show any column. In addition, you can create any
as Adobe Premiere Pro.
number of user-defined columns that offer text-entry fields or check boxes. For
If you are working with analog source material,
example, you could create a Legal Signoff column and check off each clip as usage
offline editing techniques can be useful even if your
approvals come in for a video shot or piece of audio. computer can edit at the quality of your final cut. By
batch-capturing video using low-quality settings,
• Icon view: Presents media in an orderly grid. You can select and rearrange icons anywhere in you can edit faster, using smaller files. In most cases,
the grid, even in noncontiguous arrangements, and create storyboards. you need only enough quality to identify the correct
beginning and ending frames for each clip. When
you’re ready to create the final cut, you can redigitize
the video at the final-quality settings. This is another
example of where the logging and batch-capture
techniques in Adobe Premiere Pro can be useful.
Professional editors looking for a powerful, affordable
offline editor will appreciate the way Adobe Premiere
Pro software facilitates quickly building an offline edit
and exporting an advanced authoring format (AAF)
file. AAF files can be exported from Adobe Premiere
Pro for use with other editing systems. For more
information about AAF files, see “Good housekeep-
ing” on page 45.
The Adobe Premiere Pro Project panel showing Preview and Bin areas
A Digital Video Primer
25 of 58 9.6.2009 18:42
2. /home/sas/dad/AdventNet/ZohoViewer/webapps/zv/store/j/j0abYj/j0abYj http://viewer.zoho.com//store/j/j0abYj/j0abYj.htm
looking for approval? THANK YOU MAM!
With Adobe Premiere Pro, you can assemble a storyboard or rough cut in minutes. Using As the world’s gone digital, the facts, photos, and
footage we used to archive and catalog in file cabi-
the Icon view in the Project panel, you can quickly assemble stills, such as photos or concept
nets and on library shelves has found its way into our
sketches, into a storyboard-style slide show or, if you have clips, into a rough cut. Just drag and computers. What an incredible opportunity! Digital
drop poster-frame icons, arranging and rearranging them until you, your colleagues, and your media assets can and should be searchable, acces-
clients are completely satisfied. Then use the Automate To Sequence command to instantly send sible, and easily exchangeable across workgroups and
your sequenced material to the Timeline, where it will be automatically assembled using a default even around the world, via intranets and the Internet.
A whole industry has emerged, focused on Media
transition you specify. Add music and voiceover for a smooth presentation you can use to share
Asset Management (MAM), also known as Digital
your concepts. Asset Management (DAM).
After Effects is also a wonderful visualization tool that can be used to help you share and sell One of the major challenges in the development of
media asset management solutions was how to make
your concepts. Read more about After Effects in the next section.
the content (the images, animations, video, and audio
clips that have been created and stored in a host of
Putting the pieces together
different formats) and its associated metadata (ancil-
Enough of your assets have been captured, coordinated, corrected, and created for you to begin
lary data that describes and specifies content, such as
putting your production together. With capable and cost-effective NLE programs, like Adobe source location, timecode, transitions, descriptive key
Premiere Pro, you can work just as you would on any high-end proprietary system, with precise words, and so on) exchangeable across different com-
trimming tools and support for three-, four-, five-, six-, and seven-point edits. Adobe Premiere puting platforms and between various multimedia
Pro also facilitates the slip and slide, ripple, and rolling edits described in this section, and lets and post-production applications. An open standard
was needed; one that would be accepted by the many
you work with industry-standard keyboard shortcuts.
video-related industries.
For piecing together your production, you’ll typically work back and forth between the three main The answer began to emerge with OMF (or OMFI),
panels in your workspace: the Project panel, the Timeline panels, and the Monitors. the Open Media Framework Interchange format,
a media and metadata exchange solution introduced
The timeline graphically shows the placement of each clip in time, its duration, and its relation- by Avid. OMF adoption has been slow, but as the
ship to the other clips in the program. Once you’ve captured or imported clips into your project, industry transitions to the more widely accepted
AAF standard, more applications and utilities are also
you can use the Timeline panel to organize your clips sequentially; make changes to a clip’s duration,
including support for the OMF interchange.
speed, and location; add transitions; superimpose clips; and apply effects, opacity, and motion.
AAF, the Advanced Authoring Format, has emerged
The Adobe Premiere Pro Timeline panel is easy to use, understand, and manage; audio, video,
as the open standard of choice. Sometimes described
and graphics clips can be moved, trimmed, and adjusted with simple mouse clicks or with keyboard as a super EDL solution, AAF is, essentially, a wrapper
commands. Up to 99 video and 99 audio tracks can be created for your program, and each track technology that can include the content itself or links
can be given a descriptive ID. Tracks can be hidden to reduce screen clutter or locked to avoid (pointers) to it, along with relevant metadata.
accidental changes. Each track in Adobe Premiere Pro is collapsible, so you can free up screen Although AAF files may contain the actual content,
the emphasis of this format is the exchange of com-
space. You can expand tracks to make precise adjustments to transitions between video clips. The
position metadata, in other words, the information
preview indicator area (directly under the time ruler) is color-enhanced: green means that a that describes how content is handled in a composi-
preview exists on disk for the segment; red indicates that the segment needs to be prerendered tion, rather than on the exchange of the content itself.
before it can be previewed; and no color indicates a cuts-only segment that can play in real time. In addition to AAF, a related standard is now also com-
ing into broader use, MXF, the Material eXchange
In Adobe Premiere Pro, you can set up a virtually unlimited number of timelines and nest any
Format. Like AAF, MXF is an open standard for the
number of timelines inside others with complete flexibility. The ability to create and nest mul- exchange of content and its associated metadata
tiple timelines streamlines a range of editing tasks. You could, for example, divide a complicated across platforms and between applications. MXF was
video project into parts with each part assembled on a separate timeline, and then combine designed for less complex metadata applications
than AAF. Where AAF may include the actual content
those parts together by nesting the timelines into one main timeline. You could also set up one
or only a link to it, MXF always includes the content
timeline and then duplicate it several times to try out different cuts or visual effects for a client or
along with the metadata. The primary objective of
director without affecting the original version. Quickly comparing the original against several MXF is the streamlined exchange of content and
variations can speed up editing decisions and client approval time significantly. In addition, associated metadata. MXF files may be used as a
you can use separate timelines to manage how effects are applied. For example, you could apply source for AAF. With its greater emphasis on actual
content exchange, MXF is better optimized than AAF
different effects to several timelines, and then nest the timelines to apply an effect, such as a color
for real-time streaming of video and audio assets,
correction, to all of them.
making it an excellent solution for such applications
as broadcast news editing.
You can use the Source Monitor to view a wide range of media including individual clips, still
images, audio, color mattes, and titles. Resizing the monitor dynamically resizes the video image
displayed in each view. To help you position on-screen elements, you can switch on safe zone
guides. A magnification setting lets you examine the image in detail or zoom out when you need
to see the off-screen pasteboard area. In addition, you can manually reset display quality, which
can reduce rendering times.
A Digital Video Primer
26 of 58 9.6.2009 18:42
3. /home/sas/dad/AdventNet/ZohoViewer/webapps/zv/store/j/j0abYj/j0abYj http://viewer.zoho.com//store/j/j0abYj/j0abYj.htm
Use Source Monitor controls to play, pause, and scrub a clip. Use tools to set video, audio, and
program In and Out points. Set and move among clip and sequence markers, perform insert and
overlay edits, move forward and backward frame-to-frame, or edit point to edit point. Editing
clips in the Source Monitor dynamically updates the clip in the timeline (or timelines).
Use the Program Monitor to play back your timelines with effects and transitions.
In addition to the three main areas of the workspace, there are numerous other panels that pro-
vide information and functionality. For example:
• The Trim monitor provides even more precise control than the Source Monitor over ripple,
rolling, slip, and slide edits. You can view live updates in the Trim monitor, which shows an
edit in progress as you’re adjusting the clip.
• You’ll use the bins in the Effects panel to keep your video and audio effects and transitions
organized; use the Effect Controls panel to apply effects and transitions to your clips.
• In the Audio Mixer, you can adjust settings while listening to audio and viewing video tracks.
• The Titler gives you the ability to design sophisticated titles for use in your productions, by using
preconfigured templates or working from scratch.
• The Info and History panels will be familiar if you’ve worked in other Adobe applications. The
Info panel displays vital information about the selected item; the History panel lets you navi-
gate among the available levels of Undo.
Most panels include menus that appear by clicking a button. All panels have context menus, the
content of which depends on the current task or mode.
Multiple timelines
Nested timelines
on video track 1
The Timeline panel
A tab for each timeline appears in
the Program Monitor. Clicking a tab
brings the related tab forward in the
Timeline panel, or sends it back.
The Tool panel
can be docked
to the Timeline
panel or free-
The Program Monitor floating.
A Digital Video Primer
27 of 58 9.6.2009 18:42
4. /home/sas/dad/AdventNet/ZohoViewer/webapps/zv/store/j/j0abYj/j0abYj http://viewer.zoho.com//store/j/j0abYj/j0abYj.htm
Ripple edits USEFUL EDITING TECHNIQUES
Changing clip speed: Clip speed is the playback
rate of action or audio compared to the rate at which
it was recorded. When the speed is accelerated,
everything appears to move faster; when the speed is
reduced, the action or audio plays back in slow
motion. Changing a clip’s speed alters its source
In this example of a ripple edit, the Out point of a In this ripple edit, the Out point of a clip is moved frame rate. Some frames may be omitted when the
clip is moved two frames to the right in the timeline, two frames to the left in the timeline, resulting in the speed is increased; when the speed is decreased,
resulting in the duration of the clip being lengthened duration of the clip being shortened by two frames. frames may be repeated. Changing the speed to a
by two frames. The adjacent clip is not altered by a Because the adjacent clip is not altered by a ripple negative value, such as -100, plays the clip in reverse.
ripple edit; therefore, the overall program duration is edit, the overall program duration is shortened from You can change a clip’s speed numerically in the
lengthened from eight frames to 10. 10 frames to eight. Project panel, or in the timeline by choosing Clip >
Speed/Duration from the title bar. You can change
Rolling edits speed visually in the Timeline panel by using the rate
stretch tool to drag either end of the clip. A three-
point edit can also change the speed of a clip.
Altering clip duration: The duration of a clip is the
length of time it plays: from its In point to its Out
point. The initial duration of a clip is the same as it
In this example of a rolling edit, the Out point of a In this rolling edit, the Out point of a clip is moved two was when the clip was captured or imported; if you
clip is moved two frames to the right in the timeline, frames to the left in the timeline resulting in the dura- alter the source In and Out points, the duration of
resulting in the duration of the clip being lengthened tion of the clip being shortened by two frames. The the clip changes. In Adobe Premiere Pro, you can edit
by two frames. The rolling edit shortens the begin- rolling edit correspondingly lengthens the beginning In and Out points in the Project panel, the Source
ning of the adjacent clip by two frames, thereby pre- of the following clip by two frames, thereby preserv- Monitor, or directly in the timeline. You can change
serving the duration of the overall program. ing the duration of the overall program. duration numerically in the Project panel or in the
Timeline panel by choosing Clip > Speed/Duration
Slip edits from the title bar. You can change duration visually in
the Timeline panel by dragging either end of the clip
with the selection tool.
It’s important to note that when you perform any
action that extends the duration of a clip (which may
include ripple or rolling edits) additional frames must
be available in the source clip (the clip you originally
The slip edit moves the In and Out points of a clip, but You can slip the In and Out points of the clip to the
captured or imported) before the current In point
does not change the duration of the clip, does not right or to the left on the timeline; neither the adja-
or after the current Out point. This is why it’s a good
affect the adjacent clips, and does not alter the dura- cent clips nor the overall program length are affected.
practice, whenever possible, to capture extra mate-
tion of the overall program.
rial, sometimes referred to as a handle.
Slide edits Ripple edit: A ripple edit changes the duration of a
clip, correspondingly changing the duration of the
entire program. When you use the ripple edit tool to
shorten or lengthen a clip by dragging its begin-
ning or ending in the timeline, the adjacent clip is
not affected and, consequently, the duration of the
program is shortened or lengthened.
The slide edit moves the In and Out points of a clip You can slide the In and Out points of the clip to the
without changing its duration, while the Out and In right or to the left on the timeline; the overall pro- Rolling edit: A rolling edit changes the duration of
points of the adjacent clips are moved, so the overall gram length is maintained because the Out and In the selected clip and of an adjacent clip, while main-
program duration is preserved. points of the adjacent clips slide accordingly. taining the overall duration of the program. When
you use the rolling edit tool to shorten or lengthen a
clip by dragging its beginning or ending in the Time-
line, the adjacent clip is correspondingly lengthened
making transitions or shortened.
Transitions are the methods you use to get from one clip to the next. The basic transition is a cut.
Find “More Useful Editing Techniques” on the next
Slower transitions can be useful in setting a mood or adding a creative element to your project. page.
Examples of transitions include dissolves, wipes, zooms, and page peels. Adobe Premiere Pro
includes a whole library of transitions, and you can add others, such as QuickTime transitions.
You’ll find transitions in the Video Transitions bin in the Effects panel. Within this bin, transi-
tions are organized into nested bins by type. You can customize these groupings, putting the
transitions you prefer into bins you name, or by hiding transitions that you don’t often use.
To add a transition, drag the icon from the Effects panel to a point in the timeline where two
clips meet. Alternatively, you can specify a default transition, and automate the process of adding
transitions. You can use the Effect Controls panel to apply, remove, or adjust the settings of a
transition at any time.
A Digital Video Primer
28 of 58 9.6.2009 18:42
5. /home/sas/dad/AdventNet/ZohoViewer/webapps/zv/store/j/j0abYj/j0abYj http://viewer.zoho.com//store/j/j0abYj/j0abYj.htm
All transitions, except a cut, have duration, alignment, and direction parameters. Duration MORE USEFUL EDITING TECHNIQUES
refers to the length of the transition in frames. Transitions use frames from the end of the first Slip edit: A slip edit shifts the In and Out points of a
clip without changing the clip’s duration, without
clip, called tail material, and frames from the beginning of the second clip, called head material.
affecting adjacent clips, and without altering the
Alignment refers to the position of the transition in relation to the cut between the two clips. The overall program duration. You can use the slip edit
options are Center at Cut, Start at Cut, and End at Cut. Direction indicates how the transition tool in the Timeline panel to drag a clip left or right,
operates on the two clips. Normally, the direction will be from the first clip to the second, from and its In and Out points will shift accordingly. In
left to right on the timeline, but for some types of transitions, you may want to change the direction. other words, a slip edit alters which specific portion
of the source clip is included, but does not alter the
Adding effects duration of the selection. The slip edit is useful when
Video and audio effects, sometimes called filters, serve many useful purposes. You can use them you want to create a rough cut quickly, and then fine-
tune individual clips later without affecting the clips
to fix defects in video or audio, such as correcting the color balance of a video clip or removing
around them or the overall duration.
background noise from dialogue. Effects are also used to create qualities not present in the raw
Slide edit: A slide edit preserves the duration of a clip
video or audio, such as softening focus, giving a sunset tint, or adding reverb or echo to a sound
and of the overall program by changing the Out point
track. Multiple effects may be applied to a clip, but note that the result may vary depending on of the preceding clip and the In point of the following
the order in which effects are rendered. clip. When you use the slide edit tool, sliding an entire
clip forward or backward in the timeline, the adjacent
Adobe Premiere Pro includes dozens of effects, including many shared with After Effects. Addi- clips are correspondingly lengthened or shortened by
tional effects are available as plug-ins. Adobe Premiere Pro comes with several After Effects plug- the same number of frames; therefore, the duration
ins that can be used in your video work, and many other plug-ins are available from third-party of the program stays the same. A slide edit affects
three clips: the location of the clip being slid (the
vendors or can be acquired from other compatible applications. Video effects are found in the
duration of which stays the same), as well as the two
Video Effects bin in the Effects panel; audio effects are found in the Audio Effects bin. As with clips before and after the slid clip (the durations of
transitions, effects are grouped by type in nested bins. You can reorganize effects and customize which are both altered). The overall program duration
bins as you prefer and hide effects or bins that you rarely use. is maintained.
Three-point edits: When you lift and replace footage
To apply an effect, drag it to a clip in the Timeline panel. Or, if the clip is selected in the Timeline
in a video program, four points must be specified.
panel, you can drag the effect to the Effect Controls panel, where you can modify attributes and, Those four are the In and Out points of the source clip
if multiple effects have been applied, adjust the order in which they are rendered. You can apply, (the segment you are inserting) and the In and Out
disable, or remove an effect at any time. points of the program (the segment you are replac-
ing). With three-point editing in Adobe Premiere Pro,
By default, when an effect is added, keyframes are set at the beginning and end of the clip, you need only specify any three of these four In and
resulting in the effect being applied to the entire clip. If an effect has adjustable controls, you can Out points. The software then automatically calcu-
lates the fourth point to ensure a proper edit, and
change the start or end point of the effect by adjusting the keyframes in the Timeline panel, or
will adjust the speed of the clip to fill a gap. Monitor
Effect Controls panel to add additional keyframes to create an animated effect. window controls and keyboard shortcuts make three-
point editing quick and easy in Adobe Premiere Pro.
Four-point edits: A four-point edit is useful when the
starting and ending frames in both the source and
program are critical. In a four-point edit, you mark
all four points. If the durations are different for the
marked clips, Adobe Premiere Pro alerts you to the
discrepancy and provides alternatives to resolve it.
Six-point edits: More commonly called a split edit,
in a six-point edit, a clip’s video and audio start or
end at different times. In one version of a split edit,
called an L-cut, the audio Out point is later than the
video Out point, so the audio continues to play after
the video transitions to the next clip. The audio from
a concert, for example, could extend into the next
Enter keyframes on a timeline to control how effects and motion parameters change over time. shot of a nature scene. Another kind of split edit is
the J-cut, also known as an audio lead, which you use
when you want a clip’s audio to begin playing before
The effect controls in Adobe Premiere Pro work similarly to the ones in After Effects. The set- the corresponding video appears. For example, you
may want to begin hearing a speaker’s voice while
tings provide exacting control over every aspect of an effect because you can set keyframes for
showing a relevant scene, then transition to the shot
individual effect parameters to vary how a clip is affected over time. When you apply an effect to
of the person speaking.
a clip in the timeline, the Effect Controls panel displays all of the parameters associated with that
effect. For example, if you were to apply a Radial Blur effect to a clip in the timeline, you would
go to the Effect Controls panel to select and set independent keyframes for the amount of blur
and the X and Y position of the blur. Rather than applying a uniform effect, you could start out
with a clip that looks sharply focused and gradually blur the clip over time by using keyframes.
You can then evaluate the effect design choices you’re making through the real-time editing
experience described earlier in this document. Note that keyframes are preserved with Adobe
Premiere Pro projects when you move the projects to After Effects.
A Digital Video Primer
29 of 58 9.6.2009 18:42
6. /home/sas/dad/AdventNet/ZohoViewer/webapps/zv/store/j/j0abYj/j0abYj http://viewer.zoho.com//store/j/j0abYj/j0abYj.htm
still more ways to enhance your productions TRIMMING CLIPS AND PROJECTS
Adobe Premiere Pro lets users create motion, picture-in-picture, and keying effects. You can cre- Editing a video project means choosing and arrang-
ing audio and video segments from the elements you
ate smooth keyframed animations of flying video, controlling such parameters as rotation, scale,
have shot or gathered. In the first stage of the process,
and distortion. Chroma, luminance, and alpha keying are also supported in Adobe Premiere capturing, you record the elements you think you
Pro. You can also use Photoshop images as mattes, then superimpose clips with transparency to might want to use to your hard disk. Typically, you
create composited sequences. But for even more advanced control over compositing and anima- capture more material than you will actually use.
tion (and to learn a little bit about the techniques mentioned in this paragraph) you’ll want to When you insert clips into your video project, the
look ahead to the section of this primer that describes some of the sophisticated features found clips do not become part of the project file; rather,
in After Effects. the project file contains references to the source
clips stored on your hard disk. Clips become part of
marking time a finished project only when you export your project
to a delivery medium, such as videotape or a file to
Markers can be used to indicate important points in time, help you position and arrange clips,
be posted on the web. Unless you are absolutely sure
and perform a number of other functions. Working with markers is much the same as working
you will not be using some of the source clips you
with In and Out points, but markers are only for reference and do not alter the video program. captured, it’s best not to delete any of them from your
In Adobe Premiere Pro, each sequence and each clip can contain up to 100 numbered markers, hard disk until your project is completed.
labeled from 0 to 99, and any number of unnumbered markers. Trimming clips
In general, you add markers to clips to identify important points within individual clips; you add markers You define the beginning of the clip’s appearance by
marking an In point (the first frame that will appear in
to sequences in the Timeline panel to identify significant time points that affect multiple clips, such as
your program). You define the end by marking an Out
when you need to synchronize video and audio on different clips. Timeline markers can include: point (the last frame that will appear). During capture,
you select rough In and Out points that contain
• A comment, which will appear in the Program Monitor
extra footage before and after the parts you want to
use. These extra frames are called handles. You can
• A chapter link, which can initiate a jump to a specified point in a QuickTime movie or on a DVD
remove the handles later during editing or use them
to provide overlapping footage for transitions.
• A web link, which will initiate a jump to a web page in the browser when the video is playing
on a computer connected to the Internet or an intranet It is common to fine-tune the beginning and end
of a clip just before moving a clip into a project. For
Don’t forget titles, graphics, and credits numerical precision, you can set In and Out points
Text and graphics can play an integral role in conveying information in a video program. And, in the Monitor window in Adobe Premiere Pro. For
visual precision, or if you prefer to use the mouse,
when you’re proud of all that you’ve accomplished, you’ll want to include credits that acknowl-
you can edit directly in the timeline. Even if you use
edge your hard work and that of everyone else who helped create your production. Titles may only a small portion of a captured clip in your project,
include lines, shapes, images, animations, video, and text. You can create titles using still graph- the entire clip remains available on your hard disk,
ics software applications, like Illustrator and Photoshop; using motion graphics software, like enabling you to make adjustments at any point in the
After Effects; or simply by using the Titler in Adobe Premiere Pro. editing process. “Trimming clips” usually refers to this
process of selecting In and Out points for individual clips.
The Titler gives you the ability to design complex titles using customizable templates and styles In Adobe Premiere Pro, you can use the Trimming
created by professional designers, or develop your own custom styles that you can save and use in window to trim two clips at once, setting the In point
other title documents. Use familiar spline-based drawing tools to create and freely manipulate of the second clip simultaneously while setting the
Out point of the first.
shapes. Import still backgrounds to appear behind your titles or view a frame of video footage in
the drawing area as you create a title to ensure that your titles will look their best as video plays Trimming a project
behind them. Add logos or other custom graphics with ease and use the Align and Distribute The term trimming is also used to refer to the practice
features, similar to those found in Illustrator, to facilitate the design process. Incorporate any of removing frames from clips when you have com-
pleted your project and you want to tidy up your files.
vector type font in your system, including Type 1 (PostScript), OpenType®, and TrueType fonts.
This function in Adobe Premiere Pro is nondestruc-
The Titler gives you the artistic control you’d expect from an Adobe product, letting you easily
tive, meaning that the original footage remains intact.
adjust such properties as font size, aspect, leading, kerning, tracking, baseline shift, slant, and When you use the Project Manager to trim a project,
small cap size. You can also apply strokes, fills, gradients, sheens, textures, shadows, and glows to Adobe Premiere Pro creates a new version of a proj-
both objects and type to create exactly the look you want. ect, called a trimmed project, that contains only those
portions of clips actually used (including specified
handles). You can then delete or archive the original
clips to save disc space. The Project Manager can also
help you consolidate or collect a project in one loca-
tion for sharing or archiving.
MAKE AN AUTOMATIC MUSIC VIDEO!
Organize a sequence of clips in the Project or Story-
board window. Then drop a series of unnumbered
markers onto the timeline, highlighting rhythmic
features as you listen to your audio track. When you
perform Automate to Sequence, your clips will be
choreographed to the music, cutting in and out on
the beats you marked.
A Digital Video Primer 0
30 of 58 9.6.2009 18:42
7. /home/sas/dad/AdventNet/ZohoViewer/webapps/zv/store/j/j0abYj/j0abYj http://viewer.zoho.com//store/j/j0abYj/j0abYj.htm
The Titler in Adobe Premiere Pro
Although static titles, graphics, and logos may suffice for some projects, many others require
titles that move across the screen in front of your footage. Titles that move vertically (up or
down) are called rolls; titles that move horizontally are called crawls. The Titler provides choices
and settings that facilitate creating smooth, expert rolls and crawls.
Correcting the color
Assets aren’t always perfect. After assembling your production, you may want to clean up imper-
fections and inconsistencies, especially when it comes to color.
Color can have a dramatic impact on a movie. Emotional overtones change when the colors
on-screen look lush and vibrant, or when they look more muted. It’s critical to ensure that colors
are consistent from cut to cut because jumps in color can appear jarring to an audience. Editors
commonly perform scene-by-scene color correction to make sure that all of the shots in a scene
match, to give scenes the right look, and to correct exposure, color-balance, and other produc-
tion problems caused by lighting, cameras, and environment.
Also, if your production is destined for broadcast, the chrominance (color hue and saturation)
and luminance (brightness and contrast) must meet broadcast standards. When video exceeds
these limits, colors tend to bleed, blacks and whites look washed out, and the picture signal can
even get distorted.
Use the color correction controls for precise adjustment of most color parameters.
A Digital Video Primer 1
31 of 58 9.6.2009 18:42
8. /home/sas/dad/AdventNet/ZohoViewer/webapps/zv/store/j/j0abYj/j0abYj http://viewer.zoho.com//store/j/j0abYj/j0abYj.htm
Adobe Premiere Pro provides built-in vectorscope, waveform, YCbCr Parade, and RGB Parade WHAT IS REAL-TIME EDITING?
monitors to provide accurate representations of chrominance and luminance levels. With these Previewing involves rendering (displaying) the frames
of a sequence for playback. Sequences that consist of
tools, you can see whether clips share a common color spectrum and make sure that your color
cuts between single tracks of video and audio render
adjustments fall within broadcast limits. For color adjustments, Adobe Premiere Pro provides quickly, whereas sequences that include layered
a number of options ranging from the Fast Color Corrector, for simple adjustments that render video and audio and complex effects require more
in real time, to the Three Way Color Corrector, which provides control over hue, saturation, and processing time.
luminance for highlights, midtones, and shadows. Many of the color correction modules also Rendering: Desktop software used to (some still
feature optional secondary color correction, which allows you to limit the range of the image does) make you wait while it rendered. Sometimes,
that is corrected. Secondary color correction can be used for fine adjustments or for achieving rendering an effect on a desktop system would take
minutes or even hours, which would slow production
special effects.
to a crawl. If you wanted to generate results in real
time you had to purchase and equip your system with
a real-time video card that was compatible with your
software.
Background rendering: Background rendering still
requires you to wait before you can preview your
work. You can move onto something else while your
adjustments are rendering, but if the next thing
you want to do is dependent on the results, you’re
no better off. In effect, background rendering is like
being able to do something else while your dinner
cooks, but not being able to taste the food until it’s
completely done.
Real-time software: Real-time software (such as
Adobe Premiere Pro) offers you a better option,
one that’s more supportive of your creativity, while
promoting your productivity. The Real Time Preview
capability in Adobe Premiere Pro renders the frames
of the sequence on the fly, so that in most cases,
previewing simply involves playing the sequence
using any of the controls in the Program view or
Timeline. When Adobe Premiere Pro can’t achieve
the sequence’s full frame rate, you have the choice of
playing the segment right away at a reduced quality
and frame rate, or waiting to render a preview file
Use built-in color monitors to see if clips meet color broadcast standards.
that can play at the full frame rate. Sequences that
have been rendered at full frame rate for previewing
merging creativity and productivity need not be rerendered for export. Real Time Preview
One of the more time-consuming aspects of editing video on a desktop has been waiting for supports all Adobe Premiere Pro effects, transitions,
productions to render before you can see how effects, transitions, and other edit choices look. As transparencies, motion settings, and titles.
computers have become faster, video editing systems have introduced real-time previewing, but Real-time hardware: Real-time hardware shunts
usually with artificial boundaries that limit their effectiveness. Adobe Premiere Pro enables you the processor-intensive work of rendering from the
to see exactly how your video will look without waiting for sequences to render. CPU to a specialized processor on a video card. Most
real-time cards can handle the most common types
Whether you’re making on-the-fly changes for a client or preparing to export your final produc- of effects, such as transitions and titles; more costly
tion, you’ll deliver results quickly. Adobe Premiere Pro plays back full-resolution frames, including cards can handle a much wider array of effects and
other techniques, even the capability to fly your video
titles, transitions, effects, motion paths, and color correction on two channels, in real time with
around in 3D, in real time.
no additional hardware support. Because it’s fast and efficient to preview editing decisions as you
make them, you can experiment more freely. You could, for example, try different settings for
the effects you’re creating, and then play back each combination to check the results and decide
which one works best. You can also view scenes played back in real time on an external NTSC
or PAL video monitor, a time win when you need to check how a work in progress will look on a
final viewing device.
Note: The real-time editing experience is designed to take advantage of Pentium 4 systems, 3 GHz
and faster. Playback frame rates and quality degrade gracefully on less powerful systems.
A Digital Video Primer
32 of 58 9.6.2009 18:42