Frameless base cabinet 1 door 1 drawer
•
2 likes•555 views

FRAMELESS BASE CABINET 1 DOOR 1 DRAWER For more information visit us @ www.domaincabinetsdirect.com

Recommended
More Related Content
Similar to Frameless base cabinet 1 door 1 drawer
Similar to Frameless base cabinet 1 door 1 drawer (10)
Recently uploaded
Recently uploaded (20)
Frameless base cabinet 1 door 1 drawer
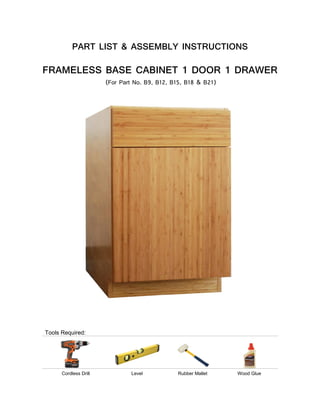
- 1. PART LIST & ASSEMBLY INSTRUCTIONS FRAMELESS BASE CABINET 1 DOOR 1 DRAWER Tools Required: Cordless Drill Level Rubber Mallet Wood Glue (For Part No. B9, B12, B15, B18 & B21)
- 2. PLAI_FL_B1d1dwr Page 2 of 5 A Right Side Panel x1 M Drawer Box Back x1 B Left Side Panel x1 N Drawer Box Side x2 C Bottom Panel x1 O Drawer Box Bottom x1 D Back Panel x1 P 5/8” Screw x25 E Shelf x1 Q 2” Screw x25 F Back Top Support Beam x1 R 7/8” Screw x4 G Front Support Beam x2 S Wood Dowell x30 H Hanging Rail x2 T Soft Close Glide (Pair) x1 I Toe Kick x1 U Metal Shelf Pin x4 J Door x1 V Drawer Release x2 K Drawer Front x1 W Door Hinge x2 L Drawer Box Front x1 X Rail Support (Not Used) x2
- 3. PLAI_FL_B1d1dwr Page 3 of 5 1. Remove all pieces from box. 2. Place Right Side Panel (A) onto flat surface. 3. Place Dowels (S) into predrilled holes. 4. Gently tap down with rubber mallet. 1. Place one Soft Close Glide (T) 1/8” from the front edge of the Right Side Panel (A), line up with predrilled holes. 2. Using 5/8” Screw (P) screw glide into predrilled holes. 3. Repeat step for Left Side Panel (B). 1. Place Back Top Support Beam (F), Front Support Beam (G), Hanging Rail (H), and Toe Kick (I) on to Dowels of Right Side Panel (A). 2. Ensure bamboo veneer side of Front Support Beam (G) is facing bottom of cabinet. 3. Place Dowels (S) into predrilled holes of Support Beams and Toe Kick (I). 1. Insert Back Panel (D) into routed slots. 2. Place Bottom Panel (C) on to Dowels of Right Side Panel (A). (Will fasten with screws in next step)
- 4. PLAI_FL_B1d1dwr Page 4 of 5 1. Carefully place Left Side Panel (B) on top of Support Beams. 2. Drive 2” Screws (Q) into predrilled holes. 3. Using care to support unscrewed side, stand cabinet up-right, then screw in Right Side Panel (A). 1. Place small drop of wood glue into each dovetail groove. 2. Attach Drawer Box Front (L) & Drawer Box Back (M) to one Drawer Box Side (N). 3. Insert Drawer Box Bottom (O) into routed slots of Drawer Box Sides. 4. Attach remaining Drawer Box Side (N) to complete Drawer Box. 1. With Drawer Box upside down, place the Drawer Release (V) against the Drawer Box Front (L). 2. Using 5/8” Screw (P), attach Drawer Release (V) to Drawer Box Front (L).
- 5. PLAI_FL_B1d1dwr Page 5 of 5 1. Place Drawer Box on to extended Glides (T). 2. Reach under Drawer Box, pull Soft Close Glides (T) into Drawer Release (V) until they click. (Ensure rear pin on glides sets into notch of Drawer Box Back (M)) 1. Place Door (J) on to nonabrasive clean flat surface. 2. Insert Door Hinges (W) into cored holes of the door 3. To ensure alignment, place level flat against door and push against Door Hinges (W). 4. Holding pressure on level, use 5/8” Screws (P) to attach Door Hinges (W). 1. Line up Door (J) with predrilled holes of cabinet side, use the 5/8” Screw (P) to attach door. 2. Use screwdriver (recommended) or cordless drill to adjust Door Hinges (W) for proper door alignment. 1. Using the 7/8” Screw (R) attach Drawer Box Front (L) to Drawer Front (K). (Ensure alignment with door and adjacent cabinets)