How To Set Up Your Own Business Card On Your Facebook Profile With Microsoft Dynamics Connect
•
1 like•2,358 views

A social media tool and a quick step by step guide on how to set up your own business card on your facebook profile with Microsoft Dynamic Connect on Facebook.

Recommended
Recommended
More Related Content
Recently uploaded
Recently uploaded (14)
Featured
Featured (20)
How To Set Up Your Own Business Card On Your Facebook Profile With Microsoft Dynamics Connect
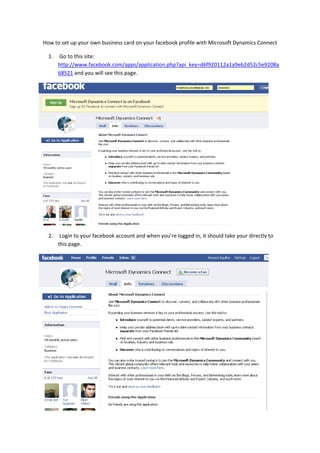
- 1. How to set up your own business card on your facebook profile with Microsoft Dynamics Connect 1. Go to this site: http://www.facebook.com/apps/application.php?api_key=d6f920112a1a9eb2d52c5e9208a 68521 and you will see this page. 2. Login to your facebook account and when you’re logged in, it should take your directly to this page.
- 2. 3. Alternatively, you can just log in to your facebook account first then do a search on the applications page for Microsoft Dynamics Connect. To get to the applications page you need to click on Applications – then click on “browse more applications”. 4. It will take you to this page.
- 3. 5. Type Microsoft Dynamics Connect on the search apps box and press enter. It should take you here. Click on the Microsoft Dynamics Connect link. 6. It should take you to this page. Click “Go to application” to add it on to your facebook profile.
- 4. 7. After clicking the link – facebook will ask you if you want to allow access. Click Allow. 8. Then it will ask you to sign in with your Windows Live ID. Click on Sign In.
- 5. 9. It should take you to this page. If you already have a Windows Live ID, all you need to do is to sign in or log in to your account. If not, you will need to register and go through the process. If you already have your details, enter it and just click on Sign in. 10. You will get to this page, where you get to enter your details for your online business card.
- 6. 11. After entering your details and clicking on save, it should now take you to this page. 12. Congratulations! You can now post edit and customize your profile according to your needs. Just follow the prompts. Here is an example of my profile after some customizing it. 13. By the way, you might have to verify your email address to activate your online ID, so just be aware of the messages on your facebook account. Enjoy!