Fog of war and deception markers
•
1 like•437 views

Method to represent hidden units and nomo for spotting different sized targets at different ranges.

Recommended
More Related Content
Similar to Fog of war and deception markers
Similar to Fog of war and deception markers (7)
More from Steve Hagarty
More from Steve Hagarty (9)
Recently uploaded
Recently uploaded (20)
Fog of war and deception markers
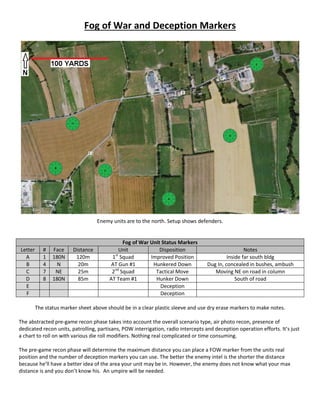
- 1. Fog of War and Deception Markers Enemy units are to the north. Setup shows defenders. Fog of War Unit Status Markers Letter # Face Distance Unit Disposition Notes A 1 180N 120m 1st Squad Improved Position Inside far south bldg B 4 N 20m AT Gun #1 Hunkered Down Dug In, concealed in bushes, ambush C 7 NE 25m 2nd Squad Tactical Move Moving NE on road in column D 8 180N 85m AT Team #1 Hunker Down South of road E Deception F Deception The status marker sheet above should be in a clear plastic sleeve and use dry erase markers to make notes. The abstracted pre-game recon phase takes into account the overall scenario type, air photo recon, presence of dedicated recon units, patrolling, partisans, POW interrigation, radio intercepts and deception operation efforts. It’s just a chart to roll on with various die roll modifiers. Nothing real complicated or time consuming. The pre-game recon phase will determine the maximum distance you can place a FOW marker from the units real position and the number of deception markers you can use. The better the enemy intel is the shorter the distance because he’ll have a better idea of the area your unit may be in. However, the enemy does not know what your max distance is and you don’t know his. An umpire will be needed.
- 2. Each unit that is actually on the playing surface will have a FOW marker placed on the playing surface until it is spotted or shoots and the enemy has a LOS to it. Each FOW marker shows the designation, distance and direction to the unit it is designated to. The markers can be oriented in any 360 degree direction. Use the one of eight directions to point towards the unit it signifies and measure the distance from the middle of the marker. “Face” is the direction the figures would be facing once put on the board. # is the number 1-8 for the direction from the marker the unit occupies. Measure distance from the center of the marker. The marker can also represent the exact location of the unit too. When a new unit comes onto the playing surface a new FOW marker is placed with the same distance restrictions as others that are placed. Each turn of movement the player determines where moving units will end up on the map and reorient or change the FOW markers if needed or desired to show the correct direction # and distance on his status sheet. Example: Unit C, the 2nd Squad, is moving NE on the road and moves to the road junction. The FOW marker could stay in the same exact spot but change the # (direction number on the marker) to 8 and distance to 50m. The unit has actually moved but the marker stays in place just the notes for the new location are noted. Players can also switch markers around. Example: The 1st Squad is using marker A and marker F is a deception marker. The player can switch marker A to a deception marker and place it anywhere that is out of the LOS of the enemy and them place and orient marker F to show the 1st Squads location without moving the 1st Squad. This can end up confusing your opponent if he’s trying to keep track of markers. If players are unsure of an enemy location they can send a one or two man scout team to check it out or conduct some Recon by Fire. Hunkered Down infantry, weapons teams and AT gun units cannot normally be spotted over 25 meters. When they pop up to an improved position and/or open fire the enemy units with a LOS can perform a Situational Awareness check to see if and when they can react. Over watch your scouts! You’d need an umpire to determine when units will get a LOS and be located. If you spot an enemy unit you can wait any number of turns to request that the figures or actual unit is put on the playing surface. You don’t need to do that right away. There may be a situation where the enemy can be using a FOW marker to advance a unit thinking it has not been spotted only for the enemy to open up when he’s close enough or moves into the kill zone of an ambush. Enemy units that fire will normally have their muzzle flashes spotted even if concealed. Once a unit is spotted the FOW marker is removed but can be used again later. A unit does not need to be assigned or keep the same letter FOW marker throughout the game. When you move out of enemy LOS you can remove the unit figures from the playing surface and place a new FOW marker at the spot that the unit “disappeared” from sight. In a later turn that unit can be assigned a different letter marker to confuse the enemy but keep the original marker in place of move it around. You could place a FOW marker among the enemy that designates a real unit or as a deception. The only requirement is that it cannot be more than the maximum distance allowed in the pre-game recon. You can use deception markers to simulate unknown surprise threats to the enemy flanks. If a deception marker is placed and the enemy has a LOS to the location it represents (not the actual marker) the umpire tells the player there is nothing there but the person placing the deception marker is not told. Your own deception markers can deceive you. Air recon and spotter planes can spot enemy units not concealed and in their LOS but a radio check must be made to get the information to the troops on the ground. That will take some time. The units do not have to be put on the playing surface and the umpire can update the player on the enemy location until he fires at it. That means you may have what you think is an unspotted unit get ambushed or hit by a mortar and artillery barrage when you least expect it. This has not been play tested and there are most likely a number of changes that need to be made. It should be workable for small to medium sized games.
- 3. This is another little experiment I’m working on based on some other papers and research I’ve run across. It’s somewhat scientific and somewhat subjective. To determine maximum spotting range put one end of a straight edge on the status of the “Spotting Status” unit in the left vertical scale. Next select the target vehicle type, camo or not and front/hull down/side aspect (there may be size modifiers) and line up the straight edge on that middle vertical scale. The maximum spotting range is on the right vertical scale. Example: Spotting a camo dug in AT gun from a moving unbuttoned up vehicle. Size is .4 meters x .4 for camo = .16 means you’d have to almost be right on top of it, maybe 50 meters max. Static and unbuttoned it would be spotted at about 275 meters.
- 4. Spotting Rules I wrote my own spotting rules based on the maximum angular resolution of the human eye at 1,000 being 30cm to 60cm or 1-2 feet. Camouflage decreases the distance by about 60%. Using binoculars increases max distance by about 3x-4x. I’ve checked these figures out with my Grandfathers WWI binoculars. I’m not going into various modifiers and I admit a lot of spotting / visual distances are somewhat subjective and you can get as simple or complicated as you’d want. I don’t use rules like “scanning” frontages and I don’t take other crew members into account for SA Checks as they are assumed to be busy with their duties and normally don’t have good periscopes and hatches to search around. Concealed is different than camouflage. Concealed is completely blocked from enemy LOS like having a tarp or similar cover to obstruct view. This can be dropped to fire and expose to the enemy. Maximum Range Spotting Chart (Unaided / Binoculars) Vertical Height .5 feet 1 foot 1.5 feet 2 feet 2.5 feet 3 feet Max Distance – No Camo 300/900m 600/1800m 1000/2500m 1500/3500m 2500/5000m 4000/6000m Max distance – Camo 125/500m 250/700m 400/1200m 500/1500m 600/1800m 800/2500m Situational Awareness Check (SA Check): As soon as there is any new enemy or friendly activity in the unit’s LOS and within maximum spotting range it can attempt to become aware of it and respond by engaging, moving or shooting. The success of this check is determined by the aspect spotting through, vehicle commander exposure status (buttoned or unbuttoned), range and enemy cover/concealment with a single D20 die roll. While engaging or firing at another target they can only check their frontal 90 degree aspect essentially making them blind in the other 270 degrees until they become unengaged or engage a new target. This throws an additional level of randomness into the game as you never know how long it will take to successfully observe an enemy and engage them before they can engage you or move out of your LOS. Engaging means moving the vehicle and/or rotating the turret. If you are too pre-occupied someone may sneak up on you. Situational Awareness Aspects: Each vehicle, gun and infantry has a 360 degree area that it can attempt to be aware of and spot enemy units. Infantry units that are suppressed (taken defensive action against enemy fire) spot as buttoned up units until they are unsuppressed. Once a target is engaged it does not have to be reacquired again by SA Checks can still be made while engaged. Any unengaged unit can spot in all 360 degree aspects. In the Situational Awareness image to the right the values for unbuttoned are to the left of the “/” and the buttoned up values to the right of the “/”. The frontal are is inbetween the blue lines. The arc is oriented to the direction the gun or turret is facing, not the vehicle/hull facing. The player does not select specific units to “search” for. He rolls the D20 and if the die roll is <= to the value in that specific arc he can respond to any enemy or friendly unit in that arc in his LOS out to maximum spotting range. Example: A player has his tank commander unbuttoned and his D20 die roll is an 11. He can immediately respond to threats in his front and two front flank aspects. He will have a delay of 3 phases/seconds in his rear flank aspect and 7 seconds in his rear aspect. So if there is a threat in their rear flank aspect needing to rotate the turret 100 degrees at 20 degrees/second it would take 3 phases to respond and 5 to get the gun on the target for a total of 8 phases/seconds. If that threat had his turret pointed at you you’ll probably get off a snap shot with an additional 2 seconds of aim time. If not spend 4-8 seconds to perform a good range estimation and aim. In this situation seeing an enemy on your flank already aiming at you knowing it will take a minimum of 10 seconds to get the shot off you may decide to move out and take evasive action instead of shooting. I think this gives a fair replication of a tank commander swivelling his head around with his main attention to the front. Not all tanks have the same ratings. Better optics, cupola and multiple vision ports will give a higher buttoned up number. Units with scissors binoculars will have a slightly higher unbuttoned value in their front arc and the buttoned up value will only be about two less than the unbuttoned value because of the ability to observe and use the binoculars while buttoned up. Infantry and anti-tank units have better 360 degree values. Suppressed infantry and anti-tank guns spot as buttoned up with pin markers increasing time to respond.