3 Ways to Record PowerPoint
•Download as PPTX, PDF•
0 likes•110 views

There are 3 ways to record a PowerPoint presentation: 1. Using the built-in recording tools in PowerPoint. 2. Using the Camtasia Studio recording toolbar installed within PowerPoint. This allows recording of slides, audio, and camera footage. 3. After recording, you can either stop recording or continue recording additional slides. The recording can then be produced or edited before producing the final video.

Recommended
More Related Content
Viewers also liked
Viewers also liked (19)
Similar to 3 Ways to Record PowerPoint
Similar to 3 Ways to Record PowerPoint (11)
More from VisualBee.com
More from VisualBee.com (20)
3 Ways to Record PowerPoint
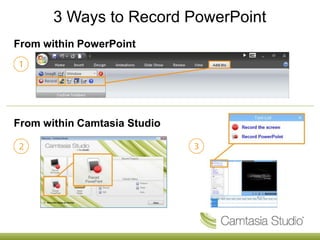
- 1. 3 Ways to Record PowerPoint From within PowerPoint From within Camtasia Studio
- 2. Setting Up for Recording Begins recording your PowerPoint Presentation. Records Audio for the PowerPoint slides. The Camtasia Studio Records Camera with the PowerPoint Presentation. Recording Toolbar within PowerPoint Displays the Camera Preview during recording. Click the Recording options icon to set up specific options for recording, including: • Records the mouse cursor • Video and Audio Format • Audio source • Camera Setup • Hotkeys for Record/Pause and Stop Opens help topic for more information.
- 3. During Recording 1. Click record to launch the Slideshow. 2. Check the microphone input level. When ready, select the Click to begin recording button or use the hotkeys. 3. Control the PowerPoint presentation normally during the recording. 4. Press Esc to stop recording.
- 4. After Recording 1. At the end of the recording; choose whether to Stop Recording or Continue Recording. If you choose to Continue Recording, click the Stop Recording button in the PowerPoint recording toolbar. 2. After you save the file, choose whether to: • Produce your recording. or • Edit your recording before producing it.
- 5. Cancelling a Recording 1. Press 2. When the Save Camtasia Recording As… dialog box appears, click Cancel. 3. When the dialog box appears asking if you are sure you want to delete the current video capture, click Yes.