12. Awareness Reason 50 Thousand Planets Love 500 Thousand Planets Violence 5 million Planets Organization 50 million Planets Growth 500 million Planets Chaos 50 Billion Planets The Proportions of the Universe
13. Remember; this is a hidden symbol... It represents the invisible Aspects of this Figure. You will need to remember this To solve future riddles
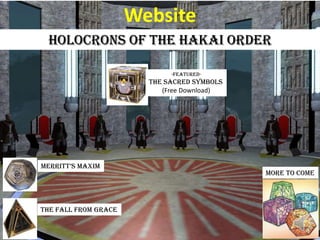
14. Holocron of the fall from grace This is the next holocron in the series. The code to unlick it is:
Editor's Notes
3-D cube with three pictures(Intermediate)To reproduce the picture-filled cube on this slide, do the following:On the Home tab, in theSlides group, click Layout, and then click Blank.On the Insert tab, in the Illustrations group, click Picture. In the Insert Picture dialog box, select a picture, and then click Insert. Select the picture. Under Picture Tools, on the Format tab, in the bottom right corner of the Size group, click the Size and Position dialog box launcher. In the Size and Position dialog box, on the Size tab, resize or crop the picture as needed so that under Size and rotate, the Height box is set to 3.42” and the Width box is set to 3.42”. Resize the picture under Size and rotate by entering values into the Height and Width boxes. Crop the picture under Crop from by entering values into the Left, Right, Top, and Bottom boxes. Under Picture Tools, on the Format tab, in the bottom right corner of the Picture Styles group, click the Format Shape dialog box launcher. In the Format Picture dialog box, in the left pane, click Line Color. In the Line Color pane, select Solid line, click the button next to Color, click More Colors, and then in the Colors dialog box, on the Custom tab, enter values for Red: 8, Green: 18, Blue: 31.Also in the Format Shape dialog box, click Line Style in the left pane, and then in the Line Style pane, in the Width box, enter 0.75 pt. Also in the FormatShape dialog box, click 3-D Format in the left pane. In the 3-D Format pane, under Bevel, click the button next to Top, and then under Bevel click Convex (second row, third option from the left). Next to Top, in the Width box, enter 6 pt, and in the Height box, enter 6 pt. Select the picture. On the Home tab, in the Clipboard group, click the arrow under Paste, and then click Duplicate. Repeat this process again to create a total of three pictures. Drag the pictures on the slide so that each one is visible. Select one of the duplicate pictures. Under Picture Tools, on the Format tab, in the Adjust group, click Change Picture. In the Insert Picture dialog box, select a picture and click Insert.Under Picture Tools, on the Format tab, in the bottom right corner of the Size group, click the Size and Position dialog box launcher. In the Size and Position dialog box, on the Size tab, resize or crop the picture as needed so that under Size and rotate, the Height box is set to 3.42” and the Width box is set to 3.42”. Resize the picture under Size and rotate by entering values into the Height and Width boxes. Crop the picture under Crop from by entering values into the Left, Right, Top, and Bottom boxes. Repeat steps 10-11 for the other duplicate picture. Select the picture that will appear on the top side of the cube. Under Picture Tools, on the Format tab, in the Picture Styles group, click Picture Effects, point to 3-D Rotation, and then under Parallel click Off Axis 1 Top (second row, third option from the left).Select the picture that will appear on the left side of the cube. Under Picture Tools, on the Format tab, in the Picture Styles group, click Picture Effects, point to 3-D Rotation, and then under Parallel click Off Axis 1 Left (second row, first option from the left).Select the picture that will appear on the right side of the cube. Under Picture Tools, on the Format tab, in the Picture Styles group, click Picture Effects, point to 3-D Rotation, and then under Parallel click Off Axis 1 Right (second row, second option from the left).Drag the pictures on the slide to create a cube. The edges of each picture may not line up exactly. To align the pictures as closely as possible, you may want to zoom in on the slide. On the View tab, click Zoom. In the Zoom dialog box, click 400%, and then drag the pictures on the slide. Press and hold SHIFT and select all three pictures on the slide. On the Home tab, in the Drawing group, click Group. On the Home tab, in the Editing group, click Select, and then click Selection Pane. To edit the name of the group, in the Selection and Visibility pane, double-click the group and enter Cube Group.To reproduce the shadow effects on this slide, do the following:On the Home tab, in the Drawing group, click Shape, and then under Rectangles click Rectangle (first option from the left). On the slide, drag to draw a rectangle. Select the rectangle. Under DrawingTools, on theFormat tab, in the Size group, do the following:In the Shape Height box, enter 3.42”.In the Shape Width box, enter 3.42”.On the Home tab, in the Drawing group, click the arrow next to Shape Fill, and then under Theme Colors click White, Background 1 (first row, first option from the left).On the Home tab, in the Drawing group, click the arrow next to Shape Outline, and then click No Outline. On the Home tab, in the bottom right corner of the Drawing group, click the Format Shape dialog box launcher. In the Format Shape dialog box, click 3-D Rotation in the left pane. In the 3-D Rotation pane, click the button next to Presets, and then under Parallel click Off Axis Top 1 (second row, third option from the left).Also in the Format Shape dialog box, in the left pane, click Shadow. In the Shadow pane, click the button next to Presets, under Perspective click Below (first row, third option from the left), and then do the following: In the Transparency box, enter 72%.In the Size box, enter 110%.In the Blur box, enter 41 pt. In the Angle box, enter 115°.In the Distance box, enter 111 pt. On the Home tab, in the Drawing group, click Arrange, and then click Send to Back. Drag the rectangle under the cube until the cube appears to be floating.On the Home tab, in the Editing group, click Select, and then click Selection Pane. In the Selection and Visibility pane, press and hold CTRL and select both Cube Group and the rectangle. On the Home tab, in the Drawing group, click Arrange, and then click Group.With the group still selected on the slide, on the Home tab, in the Drawing group, click Arrange, point to Align, and then do the following:Click Align to Slide.Click Align Center.Click Align Middle. To reproduce the background effects on this slide, do the following:On the Design tab, in the Background group, click Background Styles, and then click Style 8 (second row, fourth option from the left). (Note: If this action is taken in a PowerPoint document containing more than one slide, the background style will be applied to all of the slides.)
Framed pictures in a row in perspective (Intermediate)To reproduce the picture effects on this slide, do the following:On the Home tab, in the Slides group, click Layout and then click Blank. On the Insert tab, in the Illustrations group, click Picture. In the Insert Picture dialog box, select a picture and then click Insert.Under Picture Tools, on the Format tab, in the bottom right corner of the Size group, click the Size and Position dialog box launcher. In the Size and Position dialog box, on the Size tab, resize or crop the picture as needed so that under Size and rotate, the Height box is set to 2” and the Width box is set to 2.67”. Resize the picture under Size and rotate by entering values into the Height and Width boxes. Crop the picture under Crop from by entering values into the Left, Right, Top, and Bottom boxes. Under Picture Tools, on the Format tab, in the Picture Styles group, click Reflected Beveled, Black.Select the picture. On the Home tab, in the Clipboard group, click the arrow under Paste, and then click Duplicate. Right-click the duplicate picture, and then click Change Picture. In the Insert Picture dialog box, select a picture and click Insert. If the inserted picture is a different height and width, adjust the width and height. Under Picture Tools, on the Format tab, in the bottom right corner of the Size group, click the Size and Position dialog box launcher. In the Size and Position dialog box, on the Size tab, resize or crop the picture as needed so that under Size and rotate, the Height box is set to 2” and the Width box is set to 2.67”. Resize the picture under Size and rotate by entering values into the Height and Width boxes. Crop the picture under Crop from by entering values into the Left, Right, Top, and Bottom boxes. Repeat the process in steps 6-8 to create another duplicate picture, for a total of three pictures. Drag the pictures to form a row across the slide. Press and hold SHIFT and select all three pictures. On the Home tab, in the Drawing group, click Arrange, and then do the following:Point to Align, and then click Align to Slide. Point to Align, and then click Align Middle.Point to Align, and then click Distribute Horizontally. Click Group. On the Home tab, in the Drawing group, click Shape Effects, point to 3-D Rotation, and then under Perspective click Perspective Contrasting Left (second row, fourth option from the left). Drag the group to position it above the middle of the slide and also position it slightly to the left. To reproduce the background effects on this slide, do the following:Right-click the slide background area, and then click Format Background. In the Format Background dialog box, click Fill in the left pane, select Gradient fill in the Fill pane, and then do the following:In the Type list, select Linear.Click the button next to Direction, and then click Linear Down (first row, second option from the left).In the Angle text box, enter 90⁰.Under Gradient stops, click Add or Remove until two stops appear in the drop-down list.Also under Gradient stops, customize the gradient stops that you added as follows:Select Stop 1 from the list, and then do the following:In the Stop position box, enter 50%.Click the button next to Color, and then under Theme Colors click Black, Text 1, Lighter 5% (sixth row, second option from the left).Select Stop 2 from the list, and then do the following: In the Stop position box, enter 100%.Click the button next to Color, and then under Theme Colors click Dark Blue, Text 2, Lighter 40% (fourth row, fourth option from the left).