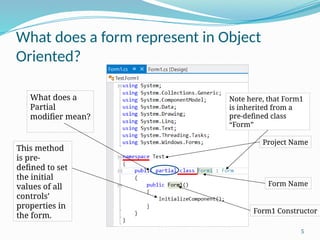
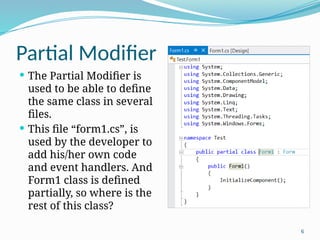
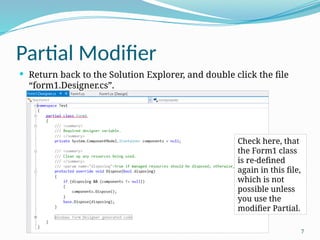
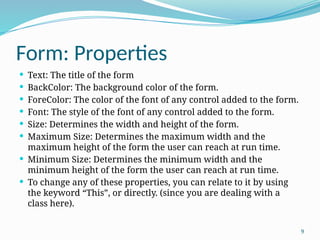
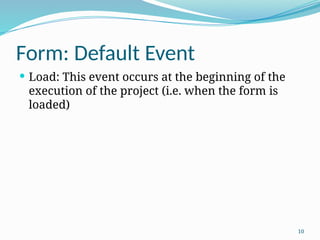
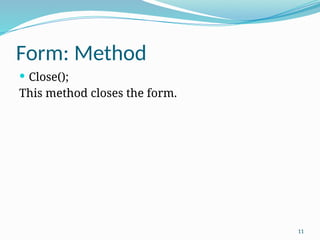
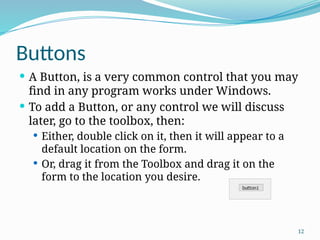
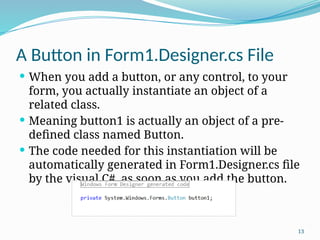
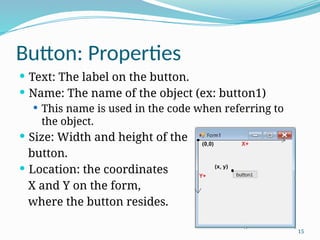
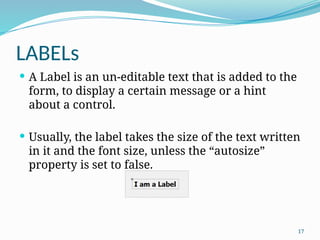
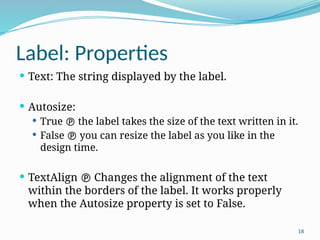
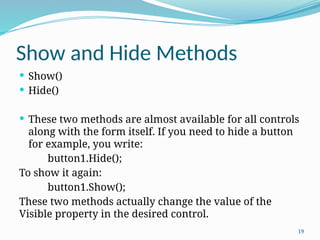
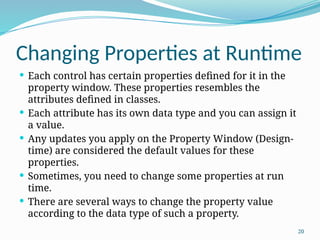
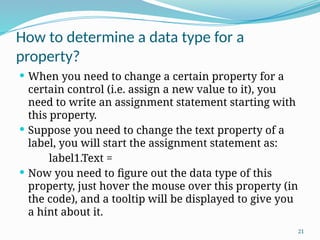
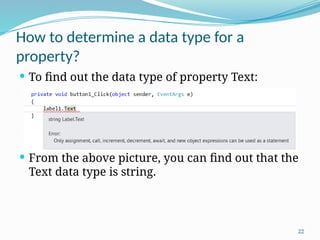
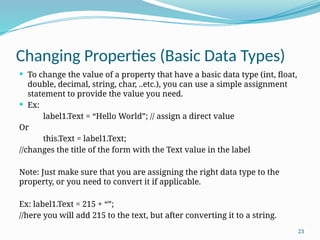
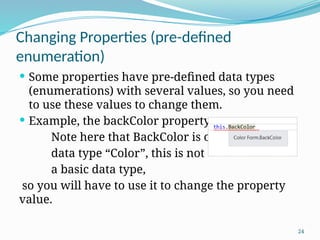
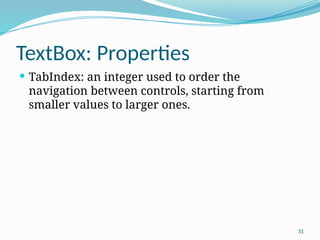
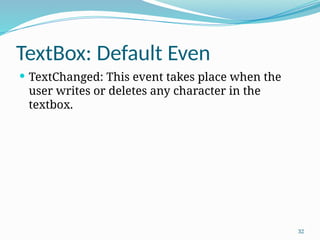
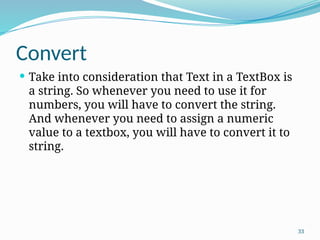
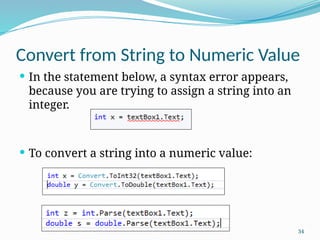
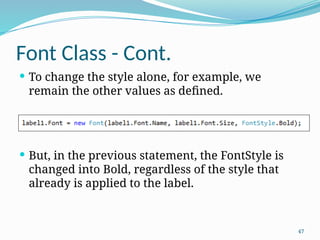
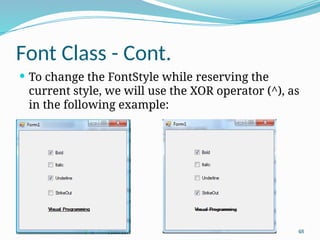
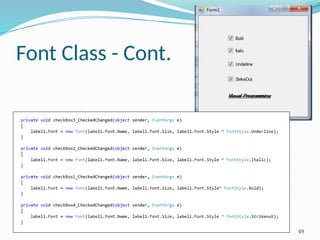
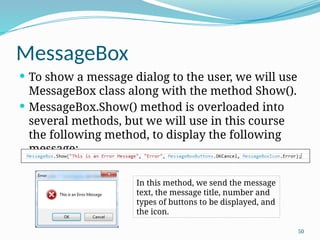
Visual programming
Chapter 3: GUI (Graphical User
Interface) Part I
Eman Alnaji
Dareen Hamoudeh
2
Contents
 Form
 Buttons
 Labels
 TextBoxes
 GroupBoxes
 Panels
 CheckBoxes
 RadioButtons
 Font Class
 MessageBox
 PictureBox
3
Form
 The form is the most important element in a
Visual C# Project, since it is the interface
(window) that the user interacts with.
 When you first create your project, form1, is
always created at the beginning, meaning that
you can’t have a project without a form.
4
What does a form represent in Object
Oriented?
 To relate the visual programming to Object
Oriented concept.
 The project  a namespace
 The Form  a class
 Assume you have a project named “Test”
 Check the Solution Explorer window, and open
file “Form1.cs” by double clicking on it.
5
What does a form represent in Object
Oriented?
Project Name
Form Name
Form1 Constructor
This method
is pre-
defined to set
the initial
values of all
controls’
properties in
the form.
What does a
Partial
modifier mean?
Note here, that Form1
is inherited from a
pre-defined class
“Form”
6
Partial Modifier
 The Partial Modifier is
used to be able to define
the same class in several
files.
 This file “form1.cs”, is
used by the developer to
add his/her own code
and event handlers. And
Form1 class is defined
partially, so where is the
rest of this class?
7
Partial Modifier
 Return back to the Solution Explorer, and double click the file
“form1.Designer.cs”.
Check here, that
the Form1 class
is re-defined
again in this file,
which is not
possible unless
you use the
modifier Partial.
8
Form1.Designer.cs
 Why this file is created? And who created it?
 This file is automatically created by Visual C#, to
contain all definitions of all controls added to the
form. We will discuss this shortly.
9
Form: Properties
 Text: The title of the form
 BackColor: The background color of the form.
 ForeColor: The color of the font of any control added to the form.
 Font: The style of the font of any control added to the form.
 Size: Determines the width and height of the form.
 Maximum Size: Determines the maximum width and the
maximum height of the form the user can reach at run time.
 Minimum Size: Determines the minimum width and the
minimum height of the form the user can reach at run time.
 To change any of these properties, you can relate to it by using
the keyword “This”, or directly. (since you are dealing with a
class here).
10
Form: Default Event
 Load: This event occurs at the beginning of the
execution of the project (i.e. when the form is
loaded)
11
Form: Method
 Close();
This method closes the form.
12
Buttons
 A Button, is a very common control that you may
find in any program works under Windows.
 To add a Button, or any control we will discuss
later, go to the toolbox, then:
 Either, double click on it, then it will appear to a
default location on the form.
 Or, drag it from the Toolbox and drag it on the
form to the location you desire.
13
A Button in Form1.Designer.cs File
 When you add a button, or any control, to your
form, you actually instantiate an object of a
related class.
 Meaning button1 is actually an object of a pre-
defined class named Button.
 The code needed for this instantiation will be
automatically generated in Form1.Designer.cs file
by the visual C#, as soon as you add the button.
14
A Button in Form1.Designer.cs File
 This leads us to the reason why Form1 class is
divided into these two files. Form1.Designer.cs to
be used mainly by the visual C#, and Form1.cs is
to be used by the developer (YOU!).
 And of course all controls that we will discuss
later are added in the same way.
15
Button: Properties
 Text: The label on the button.
 Name: The name of the object (ex: button1)
 This name is used in the code when referring to
the object.
 Size: Width and height of the
button.
 Location: the coordinates
X and Y on the form,
where the button resides.
16
Button: Properties
 Enabled: True  a control can be accessed by the
user
False  a control cannot be accessed by
the user.
 Visible: True  a control is displayed on the form
False  a control is hidden from the
form.
Important Note: The previous properties apply on
almost all controls, and are handled in the same
way.
17
LABELs
 A Label is an un-editable text that is added to the
form, to display a certain message or a hint
about a control.
 Usually, the label takes the size of the text written
in it and the font size, unless the “autosize”
property is set to false.
18
Label: Properties
 Text: The string displayed by the label.
 Autosize:
 True  the label takes the size of the text written in it.
 False  you can resize the label as you like in the
design time.
 TextAlign  Changes the alignment of the text
within the borders of the label. It works properly
when the Autosize property is set to False.
19
Show and Hide Methods
 Show()
 Hide()
 These two methods are almost available for all controls
along with the form itself. If you need to hide a button
for example, you write:
button1.Hide();
To show it again:
button1.Show();
These two methods actually change the value of the
Visible property in the desired control.
20
Changing Properties at Runtime
 Each control has certain properties defined for it in the
property window. These properties resembles the
attributes defined in classes.
 Each attribute has its own data type and you can assign it
a value.
 Any updates you apply on the Property Window (Design-
time) are considered the default values for these
properties.
 Sometimes, you need to change some properties at run
time.
 There are several ways to change the property value
according to the data type of such a property.
21
How to determine a data type for a
property?
 When you need to change a certain property for a
certain control (i.e. assign a new value to it), you
need to write an assignment statement starting with
this property.
 Suppose you need to change the text property of a
label, you will start the assignment statement as:
label1.Text =
 Now you need to figure out the data type of this
property, just hover the mouse over this property (in
the code), and a tooltip will be displayed to give you
a hint about it.
22
How to determine a data type for a
property?
 To find out the data type of property Text:
 From the above picture, you can find out that the
Text data type is string.
23
Changing Properties (Basic Data Types)
 To change the value of a property that have a basic data type (int, float,
double, decimal, string, char, ..etc.), you can use a simple assignment
statement to provide the value you need.
 Ex:
label1.Text = “Hello World”; // assign a direct value
Or
this.Text = label1.Text;
//changes the title of the form with the Text value in the label
Note: Just make sure that you are assigning the right data type to the
property, or you need to convert it if applicable.
Ex: label1.Text = 215 + “”;
//here you will add 215 to the text, but after converting it to a string.
24
Changing Properties (pre-defined
enumeration)
 Some properties have pre-defined data types
(enumerations) with several values, so you need
to use these values to change them.
 Example, the backColor property.
Note here that BackColor is of
data type “Color”, this is not
a basic data type,
so you will have to use it to change the property
value.
25
Changing Properties (pre-defined
enumeration)
 When using Color.
a list of all valid values
will appear so that you
can select from them.
26
Changing Properties (Composite Properties)
 Some properties consist of other several
properties, such as
 Font (Name, Size, Style)
 Size (width, height)
 Location (X, Y)
 So, to change these properties, or properties they
consist of, we have to instantiate an object of the
class related to this property.
27
Changing Properties (Composite Properties)
 Example: To change the property of a label font.
In this code, you can change the three composite
properties of the font. Here you change the font name
to “Arial”, the font size to 16 and the style to Bold.
Of course you can change only one of them, by
remaining the others as they are set in the Properties
Window. This will be discussed Later.
28
TextBoxes
 A TextBox is an editable control that is mainly
used to enable the user to enter data using
keyboard.
29
TextBox: Properties
 Text
 Multiline: If true, you can use Enter and add several
lines to the textBox
 ScrollBars: In case of Multiline Textboxes, vertical
and horizontal scrollbars can be displayed.
 WordWrap:
 True  The lines won’t exceed the borders of the
textbox.
 False  you can continue writing in the line until you
press Enter.
 This property only works when Multiline is activated.
30
TextBox: Properties
 Forecolor: The color of the text inside.
 Readonly: when True, the user cannot write in
the textbox, but can access it and copy its
contents.
 Enabled
 PasswordChar: takes a single character as a
value, and this character will be used to mask the
entry in the textbox (password behavior)
 UseSystemPasswordChar: If True  it masks the
value in PasswordChar, and uses the password
character used by Windows on the current PC.
31
TextBox: Properties
 TabIndex: an integer used to order the
navigation between controls, starting from
smaller values to larger ones.
32
TextBox: Default Even
 TextChanged: This event takes place when the
user writes or deletes any character in the
textbox.
33
Convert
 Take into consideration that Text in a TextBox is
a string. So whenever you need to use it for
numbers, you will have to convert the string.
And whenever you need to assign a numeric
value to a textbox, you will have to convert it to
string.
34
Convert from String to Numeric Value
 In the statement below, a syntax error appears,
because you are trying to assign a string into an
integer.
 To convert a string into a numeric value:
35
Convert from a numeric value into a string
 We have several ways to convert into a string:
36
TextBox: Method
 Clear(): This method is used to clear any text in
the textbox.
37
GroupBoxes
 A GroupBox is considered a container. It is used
to gather several controls in one place, were you
can apply several actions on them at the same
time.
 Example: groubBox1.Hide();
 This method will hide the groupbox and its
contents, without the need to hide each control in
a separate statement.
38
GroupBox: Properties
 Text: The caption appears at the top of a
GroupBox
39
Panels
 A Panel is another type of containers, that is used
mainly as the groupbox, but it has extra
properties that don’t exist in a groupbox.
40
Panel: Properties
 BorderStyle: Can be (None, FixedSingle, Fixed3D)
 AutoScroll: if True, the scrollbars will appear if
the controls inside the panel exceed its borders.
41
CheckBoxes
 CheckBoxes are used to give several options to a
user to check or uncheck. The user can select
only one or several of them, or can unselect all of
them.
42
CheckBox: Properties
 Text
 Checked:
 True
 False
 CheckState:
 Checked
 UnChecked
 Indeterminate
43
CheckBox: Default Event
 CheckedChanged
 This event takes place whenever the Checked
Property is changed either to True or False.
44
RadioButton: Properties/Default Event
 Properties:
 Checked
 True
 False
 Default Event
 CheckedChanged: Takes place when the checked
property is changed to True or False.
45
RadioButtons
 RadioButtons are used to give several options to user, but the
user have to choose only one of each group. To separate several
radiobuttons into several groups, we can use any of the
containers in Visual C#, such as: GroupBox, Panel and the Form
itself.
46
Font Classs
 To change the font of a certain control, for
example a label or a textbox, we instantiate an
object from Font Class, and send the new values
of (FontName, FontSize and FontStyle).
 But, in this statement, we change all the 3 values
at the same time.
47
Font Class - Cont.
 To change the style alone, for example, we
remain the other values as defined.
 But, in the previous statement, the FontStyle is
changed into Bold, regardless of the style that
already is applied to the label.
48
Font Class - Cont.
 To change the FontStyle while reserving the
current style, we will use the XOR operator (^), as
in the following example:
49
Font Class - Cont.
50
MessageBox
 To show a message dialog to the user, we will use
MessageBox class along with the method Show().
 MessageBox.Show() method is overloaded into
several methods, but we will use in this course
the following method, to display the following
message:
In this method, we send the message
text, the message title, number and
types of buttons to be displayed, and
the icon.
51
MessageBox – User Respond
 In the previous example, we only show a
message, and don’t handle the respond of the
user (i.e. whither the user clicked OK or
CANCEL).
 To handle the user respond, we need to define a
variable of type DialogResult, as in the following
example
52
MessageBox – User Respond
53
PictureBox and Properties
 A PictureBox is
used to display an
image to the user.
 Properties:
 Image: where the
selected image file
resides. You can
import an image
from your PC.
54
PictureBox: Properties
 SizeMode: Determines
how the image is
displayed in the
pictureBox.
 Normal: Displays the
topleft corner of the
original image, according
to the size of the
picurebox.
 StretchImage: Changes
the ratios of the original
image to fit exactly in the
pictureBox.
 AutoSize: changes the size
of the PictureBox,
according to the size of
the original image.
 CenterImage: crops a part
of the original image from
its center according to the
size of the PictureBox.
 Zoom: Changes the size of
the original image, to fit
in the PictureBox, but
with reserving the ratios
of the image.
55
PictureBox – Default Event and Method
 Default Event:
 Click: occurs when
the user clicks on the
image using mouse.
 Method:
 FromFile: This
method is used to
change the displayed
image at runtime.
Important Note: Make sure to write the path
in a correct way, so that the program can find
the actual file. Also, make sure to write the
correct extension of the image.
56
The End

Visual programming Chapter 3: GUI (Graphical User Interface)

  • 1.
    Visual programming Chapter 3:GUI (Graphical User Interface) Part I Eman Alnaji Dareen Hamoudeh
  • 2.
    2 Contents  Form  Buttons Labels  TextBoxes  GroupBoxes  Panels  CheckBoxes  RadioButtons  Font Class  MessageBox  PictureBox
  • 3.
    3 Form  The formis the most important element in a Visual C# Project, since it is the interface (window) that the user interacts with.  When you first create your project, form1, is always created at the beginning, meaning that you can’t have a project without a form.
  • 4.
    4 What does aform represent in Object Oriented?  To relate the visual programming to Object Oriented concept.  The project  a namespace  The Form  a class  Assume you have a project named “Test”  Check the Solution Explorer window, and open file “Form1.cs” by double clicking on it.
  • 5.
    5 What does aform represent in Object Oriented? Project Name Form Name Form1 Constructor This method is pre- defined to set the initial values of all controls’ properties in the form. What does a Partial modifier mean? Note here, that Form1 is inherited from a pre-defined class “Form”
  • 6.
    6 Partial Modifier  ThePartial Modifier is used to be able to define the same class in several files.  This file “form1.cs”, is used by the developer to add his/her own code and event handlers. And Form1 class is defined partially, so where is the rest of this class?
  • 7.
    7 Partial Modifier  Returnback to the Solution Explorer, and double click the file “form1.Designer.cs”. Check here, that the Form1 class is re-defined again in this file, which is not possible unless you use the modifier Partial.
  • 8.
    8 Form1.Designer.cs  Why thisfile is created? And who created it?  This file is automatically created by Visual C#, to contain all definitions of all controls added to the form. We will discuss this shortly.
  • 9.
    9 Form: Properties  Text:The title of the form  BackColor: The background color of the form.  ForeColor: The color of the font of any control added to the form.  Font: The style of the font of any control added to the form.  Size: Determines the width and height of the form.  Maximum Size: Determines the maximum width and the maximum height of the form the user can reach at run time.  Minimum Size: Determines the minimum width and the minimum height of the form the user can reach at run time.  To change any of these properties, you can relate to it by using the keyword “This”, or directly. (since you are dealing with a class here).
  • 10.
    10 Form: Default Event Load: This event occurs at the beginning of the execution of the project (i.e. when the form is loaded)
  • 11.
    11 Form: Method  Close(); Thismethod closes the form.
  • 12.
    12 Buttons  A Button,is a very common control that you may find in any program works under Windows.  To add a Button, or any control we will discuss later, go to the toolbox, then:  Either, double click on it, then it will appear to a default location on the form.  Or, drag it from the Toolbox and drag it on the form to the location you desire.
  • 13.
    13 A Button inForm1.Designer.cs File  When you add a button, or any control, to your form, you actually instantiate an object of a related class.  Meaning button1 is actually an object of a pre- defined class named Button.  The code needed for this instantiation will be automatically generated in Form1.Designer.cs file by the visual C#, as soon as you add the button.
  • 14.
    14 A Button inForm1.Designer.cs File  This leads us to the reason why Form1 class is divided into these two files. Form1.Designer.cs to be used mainly by the visual C#, and Form1.cs is to be used by the developer (YOU!).  And of course all controls that we will discuss later are added in the same way.
  • 15.
    15 Button: Properties  Text:The label on the button.  Name: The name of the object (ex: button1)  This name is used in the code when referring to the object.  Size: Width and height of the button.  Location: the coordinates X and Y on the form, where the button resides.
  • 16.
    16 Button: Properties  Enabled:True  a control can be accessed by the user False  a control cannot be accessed by the user.  Visible: True  a control is displayed on the form False  a control is hidden from the form. Important Note: The previous properties apply on almost all controls, and are handled in the same way.
  • 17.
    17 LABELs  A Labelis an un-editable text that is added to the form, to display a certain message or a hint about a control.  Usually, the label takes the size of the text written in it and the font size, unless the “autosize” property is set to false.
  • 18.
    18 Label: Properties  Text:The string displayed by the label.  Autosize:  True  the label takes the size of the text written in it.  False  you can resize the label as you like in the design time.  TextAlign  Changes the alignment of the text within the borders of the label. It works properly when the Autosize property is set to False.
  • 19.
    19 Show and HideMethods  Show()  Hide()  These two methods are almost available for all controls along with the form itself. If you need to hide a button for example, you write: button1.Hide(); To show it again: button1.Show(); These two methods actually change the value of the Visible property in the desired control.
  • 20.
    20 Changing Properties atRuntime  Each control has certain properties defined for it in the property window. These properties resembles the attributes defined in classes.  Each attribute has its own data type and you can assign it a value.  Any updates you apply on the Property Window (Design- time) are considered the default values for these properties.  Sometimes, you need to change some properties at run time.  There are several ways to change the property value according to the data type of such a property.
  • 21.
    21 How to determinea data type for a property?  When you need to change a certain property for a certain control (i.e. assign a new value to it), you need to write an assignment statement starting with this property.  Suppose you need to change the text property of a label, you will start the assignment statement as: label1.Text =  Now you need to figure out the data type of this property, just hover the mouse over this property (in the code), and a tooltip will be displayed to give you a hint about it.
  • 22.
    22 How to determinea data type for a property?  To find out the data type of property Text:  From the above picture, you can find out that the Text data type is string.
  • 23.
    23 Changing Properties (BasicData Types)  To change the value of a property that have a basic data type (int, float, double, decimal, string, char, ..etc.), you can use a simple assignment statement to provide the value you need.  Ex: label1.Text = “Hello World”; // assign a direct value Or this.Text = label1.Text; //changes the title of the form with the Text value in the label Note: Just make sure that you are assigning the right data type to the property, or you need to convert it if applicable. Ex: label1.Text = 215 + “”; //here you will add 215 to the text, but after converting it to a string.
  • 24.
    24 Changing Properties (pre-defined enumeration) Some properties have pre-defined data types (enumerations) with several values, so you need to use these values to change them.  Example, the backColor property. Note here that BackColor is of data type “Color”, this is not a basic data type, so you will have to use it to change the property value.
  • 25.
    25 Changing Properties (pre-defined enumeration) When using Color. a list of all valid values will appear so that you can select from them.
  • 26.
    26 Changing Properties (CompositeProperties)  Some properties consist of other several properties, such as  Font (Name, Size, Style)  Size (width, height)  Location (X, Y)  So, to change these properties, or properties they consist of, we have to instantiate an object of the class related to this property.
  • 27.
    27 Changing Properties (CompositeProperties)  Example: To change the property of a label font. In this code, you can change the three composite properties of the font. Here you change the font name to “Arial”, the font size to 16 and the style to Bold. Of course you can change only one of them, by remaining the others as they are set in the Properties Window. This will be discussed Later.
  • 28.
    28 TextBoxes  A TextBoxis an editable control that is mainly used to enable the user to enter data using keyboard.
  • 29.
    29 TextBox: Properties  Text Multiline: If true, you can use Enter and add several lines to the textBox  ScrollBars: In case of Multiline Textboxes, vertical and horizontal scrollbars can be displayed.  WordWrap:  True  The lines won’t exceed the borders of the textbox.  False  you can continue writing in the line until you press Enter.  This property only works when Multiline is activated.
  • 30.
    30 TextBox: Properties  Forecolor:The color of the text inside.  Readonly: when True, the user cannot write in the textbox, but can access it and copy its contents.  Enabled  PasswordChar: takes a single character as a value, and this character will be used to mask the entry in the textbox (password behavior)  UseSystemPasswordChar: If True  it masks the value in PasswordChar, and uses the password character used by Windows on the current PC.
  • 31.
    31 TextBox: Properties  TabIndex:an integer used to order the navigation between controls, starting from smaller values to larger ones.
  • 32.
    32 TextBox: Default Even TextChanged: This event takes place when the user writes or deletes any character in the textbox.
  • 33.
    33 Convert  Take intoconsideration that Text in a TextBox is a string. So whenever you need to use it for numbers, you will have to convert the string. And whenever you need to assign a numeric value to a textbox, you will have to convert it to string.
  • 34.
    34 Convert from Stringto Numeric Value  In the statement below, a syntax error appears, because you are trying to assign a string into an integer.  To convert a string into a numeric value:
  • 35.
    35 Convert from anumeric value into a string  We have several ways to convert into a string:
  • 36.
    36 TextBox: Method  Clear():This method is used to clear any text in the textbox.
  • 37.
    37 GroupBoxes  A GroupBoxis considered a container. It is used to gather several controls in one place, were you can apply several actions on them at the same time.  Example: groubBox1.Hide();  This method will hide the groupbox and its contents, without the need to hide each control in a separate statement.
  • 38.
    38 GroupBox: Properties  Text:The caption appears at the top of a GroupBox
  • 39.
    39 Panels  A Panelis another type of containers, that is used mainly as the groupbox, but it has extra properties that don’t exist in a groupbox.
  • 40.
    40 Panel: Properties  BorderStyle:Can be (None, FixedSingle, Fixed3D)  AutoScroll: if True, the scrollbars will appear if the controls inside the panel exceed its borders.
  • 41.
    41 CheckBoxes  CheckBoxes areused to give several options to a user to check or uncheck. The user can select only one or several of them, or can unselect all of them.
  • 42.
    42 CheckBox: Properties  Text Checked:  True  False  CheckState:  Checked  UnChecked  Indeterminate
  • 43.
    43 CheckBox: Default Event CheckedChanged  This event takes place whenever the Checked Property is changed either to True or False.
  • 44.
    44 RadioButton: Properties/Default Event Properties:  Checked  True  False  Default Event  CheckedChanged: Takes place when the checked property is changed to True or False.
  • 45.
    45 RadioButtons  RadioButtons areused to give several options to user, but the user have to choose only one of each group. To separate several radiobuttons into several groups, we can use any of the containers in Visual C#, such as: GroupBox, Panel and the Form itself.
  • 46.
    46 Font Classs  Tochange the font of a certain control, for example a label or a textbox, we instantiate an object from Font Class, and send the new values of (FontName, FontSize and FontStyle).  But, in this statement, we change all the 3 values at the same time.
  • 47.
    47 Font Class -Cont.  To change the style alone, for example, we remain the other values as defined.  But, in the previous statement, the FontStyle is changed into Bold, regardless of the style that already is applied to the label.
  • 48.
    48 Font Class -Cont.  To change the FontStyle while reserving the current style, we will use the XOR operator (^), as in the following example:
  • 49.
  • 50.
    50 MessageBox  To showa message dialog to the user, we will use MessageBox class along with the method Show().  MessageBox.Show() method is overloaded into several methods, but we will use in this course the following method, to display the following message: In this method, we send the message text, the message title, number and types of buttons to be displayed, and the icon.
  • 51.
    51 MessageBox – UserRespond  In the previous example, we only show a message, and don’t handle the respond of the user (i.e. whither the user clicked OK or CANCEL).  To handle the user respond, we need to define a variable of type DialogResult, as in the following example
  • 52.
  • 53.
    53 PictureBox and Properties A PictureBox is used to display an image to the user.  Properties:  Image: where the selected image file resides. You can import an image from your PC.
  • 54.
    54 PictureBox: Properties  SizeMode:Determines how the image is displayed in the pictureBox.  Normal: Displays the topleft corner of the original image, according to the size of the picurebox.  StretchImage: Changes the ratios of the original image to fit exactly in the pictureBox.  AutoSize: changes the size of the PictureBox, according to the size of the original image.  CenterImage: crops a part of the original image from its center according to the size of the PictureBox.  Zoom: Changes the size of the original image, to fit in the PictureBox, but with reserving the ratios of the image.
  • 55.
    55 PictureBox – DefaultEvent and Method  Default Event:  Click: occurs when the user clicks on the image using mouse.  Method:  FromFile: This method is used to change the displayed image at runtime. Important Note: Make sure to write the path in a correct way, so that the program can find the actual file. Also, make sure to write the correct extension of the image.
  • 56.