Valtra Valmet 6850 TRACTOR Service Repair Manualjkdjksmde
This is the Highly Detailed factory service repair manual for theVALTRA VALMET 6850 TRACTOR, this Service Manual has detailed illustrations as well as step by step instructions,It is 100 percents complete and intact. they are specifically written for the do-it-yourself-er as well as the experienced mechanic.VALTRA VALMET 6850 TRACTOR Service Repair Workshop Manual provides step-by-step instructions based on the complete dis-assembly of the machine. It is this level of detail, along with hundreds of photos and illustrations, that guide the reader through each service and repair procedure. Complete download comes in pdf format which can work under all PC based windows operating system and Mac also, All pages are printable. Using this repair manual is an inexpensive way to keep your vehicle working properly.
Service Repair Manual Covers:
General
Engine
Electrical System
Power Transmission
Brake System
Steering System and Front Axle
Frame and Wheels
Cab and Shields
Hydraulics
Tools
File Format: PDF
Compatible: All Versions of Windows & Mac
Language: English
Requirements: Adobe PDF Reader
NO waiting, Buy from responsible seller and get INSTANT DOWNLOAD, Without wasting your hard-owned money on uncertainty or surprise! All pages are is great to haveVALTRA VALMET 6850 TRACTOR Service Repair Workshop Manual.
Looking for some other Service Repair Manual,please check:
https://www.aservicemanualpdf.com/
Thanks for visiting!
8
Valtra Valmet 6550 TRACTOR Service Repair Manualkjksemjdmkdm
This is the Highly Detailed factory service repair manual for theVALTRA VALMET 6550 TRACTOR , this Service Manual has detailed illustrations as well as step by step instructions,It is 100 percents complete and intact. they are specifically written for the do-it-yourself-er as well as the experienced mechanic.VALTRA VALMET 6550 TRACTOR Service Repair Workshop Manual provides step-by-step instructions based on the complete dis-assembly of the machine. It is this level of detail, along with hundreds of photos and illustrations, that guide the reader through each service and repair procedure. Complete download comes in pdf format which can work under all PC based windows operating system and Mac also, All pages are printable. Using this repair manual is an inexpensive way to keep your vehicle working properly.
Service Repair Manual Covers:
General
Engine
Electrical System
Power Transmission
Brake System
Steering System and Front Axle
Frame and Wheels
Cab and Shields
Hydraulics
Tools
File Format: PDF
Compatible: All Versions of Windows & Mac
Language: English
Requirements: Adobe PDF Reader
NO waiting, Buy from responsible seller and get INSTANT DOWNLOAD, Without wasting your hard-owned money on uncertainty or surprise! All pages are is great to haveVALTRA VALMET 6550 TRACTOR Service Repair Workshop Manual.
Looking for some other Service Repair Manual,please check:
https://www.aservicemanualpdf.com/
Thanks for visiting!
8
Valtra Valmet 8150 TRACTOR Service Repair Manualjksmekmdm
This is the Highly Detailed factory service repair manual for theVALTRA VALMET 8150 TRACTOR, this Service Manual has detailed illustrations as well as step by step instructions,It is 100 percents complete and intact. they are specifically written for the do-it-yourself-er as well as the experienced mechanic.VALTRA VALMET 8150 TRACTOR Service Repair Workshop Manual provides step-by-step instructions based on the complete dis-assembly of the machine. It is this level of detail, along with hundreds of photos and illustrations, that guide the reader through each service and repair procedure. Complete download comes in pdf format which can work under all PC based windows operating system and Mac also, All pages are printable. Using this repair manual is an inexpensive way to keep your vehicle working properly.
Service Repair Manual Covers:
General
Engine
Electrical System
Power Transmission
Brake System
Steering System and Front Axle
Frame and Wheels
Cab and Shields
Hydraulics
Tools
File Format: PDF
Compatible: All Versions of Windows & Mac
Language: English
Requirements: Adobe PDF Reader
NO waiting, Buy from responsible seller and get INSTANT DOWNLOAD, Without wasting your hard-owned money on uncertainty or surprise! All pages are is great to haveVALTRA VALMET 8150 TRACTOR Service Repair Workshop Manual.
Looking for some other Service Repair Manual,please check:
https://www.aservicemanualpdf.com/
Thanks for visiting!
8
Valtra Valmet 8100 TRACTOR Service Repair Manualjknksemmd
This is the Highly Detailed factory service repair manual for theVALTRA VALMET 8100 TRACTOR, this Service Manual has detailed illustrations as well as step by step instructions,It is 100 percents complete and intact. they are specifically written for the do-it-yourself-er as well as the experienced mechanic.VALTRA VALMET 8100 TRACTOR Service Repair Workshop Manual provides step-by-step instructions based on the complete dis-assembly of the machine. It is this level of detail, along with hundreds of photos and illustrations, that guide the reader through each service and repair procedure. Complete download comes in pdf format which can work under all PC based windows operating system and Mac also, All pages are printable. Using this repair manual is an inexpensive way to keep your vehicle working properly.
Service Repair Manual Covers:
General
Engine
Electrical System
Power Transmission
Brake System
Steering System and Front Axle
Frame and Wheels
Cab and Shields
Hydraulics
Tools
File Format: PDF
Compatible: All Versions of Windows & Mac
Language: English
Requirements: Adobe PDF Reader
NO waiting, Buy from responsible seller and get INSTANT DOWNLOAD, Without wasting your hard-owned money on uncertainty or surprise! All pages are is great to haveVALTRA VALMET 8100 TRACTOR Service Repair Workshop Manual.
Looking for some other Service Repair Manual,please check:
https://www.aservicemanualpdf.com/
Thanks for visiting!
8
Valtra Valmet 6600 TRACTOR Service Repair Manualjjkmsmnj
This is the Highly Detailed factory service repair manual for theVALTRA VALMET 6600 TRACTOR, this Service Manual has detailed illustrations as well as step by step instructions,It is 100 percents complete and intact. they are specifically written for the do-it-yourself-er as well as the experienced mechanic.VALTRA VALMET 6600 TRACTOR Service Repair Workshop Manual provides step-by-step instructions based on the complete dis-assembly of the machine. It is this level of detail, along with hundreds of photos and illustrations, that guide the reader through each service and repair procedure. Complete download comes in pdf format which can work under all PC based windows operating system and Mac also, All pages are printable. Using this repair manual is an inexpensive way to keep your vehicle working properly.
Service Repair Manual Covers:
General
Engine
Electrical System
Power Transmission
Brake System
Steering System and Front Axle
Frame and Wheels
Cab and Shields
Hydraulics
Tools
File Format: PDF
Compatible: All Versions of Windows & Mac
Language: English
Requirements: Adobe PDF Reader
NO waiting, Buy from responsible seller and get INSTANT DOWNLOAD, Without wasting your hard-owned money on uncertainty or surprise! All pages are is great to haveVALTRA VALMET 6600 TRACTOR Service Repair Workshop Manual.
Looking for some other Service Repair Manual,please check:
https://www.aservicemanualpdf.com/
Thanks for visiting!
8
Valtra Valmet 6200 TRACTOR Service Repair Manualkjmemf uikfjmd
This is the Highly Detailed factory service repair manual for theVALTRA VALMET 6200 TRACTOR, this Service Manual has detailed illustrations as well as step by step instructions,It is 100 percents complete and intact. they are specifically written for the do-it-yourself-er as well as the experienced mechanic.VALTRA VALMET 6200 TRACTOR Service Repair Workshop Manual provides step-by-step instructions based on the complete dis-assembly of the machine. It is this level of detail, along with hundreds of photos and illustrations, that guide the reader through each service and repair procedure. Complete download comes in pdf format which can work under all PC based windows operating system and Mac also, All pages are printable. Using this repair manual is an inexpensive way to keep your vehicle working properly.
Service Repair Manual Covers:
General
Engine
Electrical System
Power Transmission
Brake System
Steering System and Front Axle
Frame and Wheels
Cab and Shields
Hydraulics
Tools
File Format: PDF
Compatible: All Versions of Windows & Mac
Language: English
Requirements: Adobe PDF Reader
NO waiting, Buy from responsible seller and get INSTANT DOWNLOAD, Without wasting your hard-owned money on uncertainty or surprise! All pages are is great to haveVALTRA VALMET 6200 TRACTOR Service Repair Workshop Manual.
Looking for some other Service Repair Manual,please check:
https://www.aservicemanualpdf.com/
Thanks for visiting!
Valtra Valmet 8950 TRACTOR Service Repair Manualjhsefnn kjsfem
This is the Highly Detailed factory service repair manual for theVALTRA VALMET 8950 TRACTOR, this Service Manual has detailed illustrations as well as step by step instructions,It is 100 percents complete and intact. they are specifically written for the do-it-yourself-er as well as the experienced mechanic.VALTRA VALMET 8950 TRACTOR Service Repair Workshop Manual provides step-by-step instructions based on the complete dis-assembly of the machine. It is this level of detail, along with hundreds of photos and illustrations, that guide the reader through each service and repair procedure. Complete download comes in pdf format which can work under all PC based windows operating system and Mac also, All pages are printable. Using this repair manual is an inexpensive way to keep your vehicle working properly.
Service Repair Manual Covers:
General
Engine
Electrical System
Power Transmission
Brake System
Steering System and Front Axle
Frame and Wheels
Cab and Shields
Hydraulics
Tools
File Format: PDF
Compatible: All Versions of Windows & Mac
Language: English
Requirements: Adobe PDF Reader
NO waiting, Buy from responsible seller and get INSTANT DOWNLOAD, Without wasting your hard-owned money on uncertainty or surprise! All pages are is great to haveVALTRA VALMET 8950 TRACTOR Service Repair Workshop Manual.
Looking for some other Service Repair Manual,please check:
https://www.aservicemanualpdf.com/
Thanks for visiting!
Valtra Valmet 6600E TRACTOR Service Repair Manualjksjemf usekfjmf
This is the Highly Detailed factory service repair manual for theVALTRA VALMET 6600E TRACTOR, this Service Manual has detailed illustrations as well as step by step instructions,It is 100 percents complete and intact. they are specifically written for the do-it-yourself-er as well as the experienced mechanic.VALTRA VALMET 6600E TRACTOR Service Repair Workshop Manual provides step-by-step instructions based on the complete dis-assembly of the machine. It is this level of detail, along with hundreds of photos and illustrations, that guide the reader through each service and repair procedure. Complete download comes in pdf format which can work under all PC based windows operating system and Mac also, All pages are printable. Using this repair manual is an inexpensive way to keep your vehicle working properly.
Service Repair Manual Covers:
General
Engine
Electrical System
Power Transmission
Brake System
Steering System and Front Axle
Frame and Wheels
Cab and Shields
Hydraulics
Tools
File Format: PDF
Compatible: All Versions of Windows & Mac
Language: English
Requirements: Adobe PDF Reader
NO waiting, Buy from responsible seller and get INSTANT DOWNLOAD, Without wasting your hard-owned money on uncertainty or surprise! All pages are is great to haveVALTRA VALMET 6600E TRACTOR Service Repair Workshop Manual.
Looking for some other Service Repair Manual,please check:
https://www.aservicemanualpdf.com/
Thanks for visiting!
Valtra Valmet 6400 TRACTOR Service Repair Manualjhksejdm
This is the Highly Detailed factory service repair manual for theVALTRA VALMET 6400 TRACTOR, this Service Manual has detailed illustrations as well as step by step instructions,It is 100 percents complete and intact. they are specifically written for the do-it-yourself-er as well as the experienced mechanic.VALTRA VALMET 6400 TRACTOR Service Repair Workshop Manual provides step-by-step instructions based on the complete dis-assembly of the machine. It is this level of detail, along with hundreds of photos and illustrations, that guide the reader through each service and repair procedure. Complete download comes in pdf format which can work under all PC based windows operating system and Mac also, All pages are printable. Using this repair manual is an inexpensive way to keep your vehicle working properly.
Service Repair Manual Covers:
General
Engine
Electrical System
Power Transmission
Brake System
Steering System and Front Axle
Frame and Wheels
Cab and Shields
Hydraulics
Tools
File Format: PDF
Compatible: All Versions of Windows & Mac
Language: English
Requirements: Adobe PDF Reader
NO waiting, Buy from responsible seller and get INSTANT DOWNLOAD, Without wasting your hard-owned money on uncertainty or surprise! All pages are is great to haveVALTRA VALMET 6400 TRACTOR Service Repair Workshop Manual.
Looking for some other Service Repair Manual,please check:
https://www.aservicemanualpdf.com/
Thanks for visiting!
8
Valtra Valmet 6300 TRACTOR Service Repair Manualjjskemfm kmsefm
This is the Highly Detailed factory service repair manual for theVALTRA VALMET 6300 TRACTOR, this Service Manual has detailed illustrations as well as step by step instructions,It is 100 percents complete and intact. they are specifically written for the do-it-yourself-er as well as the experienced mechanic.VALTRA VALMET 6300 TRACTOR Service Repair Workshop Manual provides step-by-step instructions based on the complete dis-assembly of the machine. It is this level of detail, along with hundreds of photos and illustrations, that guide the reader through each service and repair procedure. Complete download comes in pdf format which can work under all PC based windows operating system and Mac also, All pages are printable. Using this repair manual is an inexpensive way to keep your vehicle working properly.
Service Repair Manual Covers:
General
Engine
Electrical System
Power Transmission
Brake System
Steering System and Front Axle
Frame and Wheels
Cab and Shields
Hydraulics
Tools
File Format: PDF
Compatible: All Versions of Windows & Mac
Language: English
Requirements: Adobe PDF Reader
NO waiting, Buy from responsible seller and get INSTANT DOWNLOAD, Without wasting your hard-owned money on uncertainty or surprise! All pages are is great to haveVALTRA VALMET 6300 TRACTOR Service Repair Workshop Manual.
Looking for some other Service Repair Manual,please check:
https://www.aservicemanualpdf.com/
Thanks for visiting!
This is the Highly Detailed factory service repair manual for theVALTRA T 190 TRACTOR, this Service Manual has detailed illustrations as well as step by step instructions,It is 100 percents complete and intact. they are specifically written for the do-it-yourself-er as well as the experienced mechanic.VALTRA T 190 TRACTOR Service Repair Workshop Manual provides step-by-step instructions based on the complete dis-assembly of the machine. It is this level of detail, along with hundreds of photos and illustrations, that guide the reader through each service and repair procedure. Complete download comes in pdf format which can work under all PC based windows operating system and Mac also, All pages are printable. Using this repair manual is an inexpensive way to keep your vehicle working properly.
Service Repair Manual Covers:
General
Engine
Electrical System
Power Transmission
Brakes
Front Axle and Steering System
Frame and Wheels
Cab and Shields
Hydraulics
Tools
File Format: PDF
Compatible: All Versions of Windows & Mac
Language: English
Requirements: Adobe PDF Reader
NO waiting, Buy from responsible seller and get INSTANT DOWNLOAD, Without wasting your hard-owned money on uncertainty or surprise! All pages are is great to haveVALTRA T 190 TRACTOR Service Repair Workshop Manual.
Looking for some other Service Repair Manual,please check:
https://www.aservicemanualpdf.com/
Thanks for visiting!
Valtra T 120 TRACTOR Service Repair Manualjmkmdd kjdiud
This is the Highly Detailed factory service repair manual for theVALTRA T 120 TRACTOR, this Service Manual has detailed illustrations as well as step by step instructions,It is 100 percents complete and intact. they are specifically written for the do-it-yourself-er as well as the experienced mechanic.VALTRA T 120 TRACTOR Service Repair Workshop Manual provides step-by-step instructions based on the complete dis-assembly of the machine. It is this level of detail, along with hundreds of photos and illustrations, that guide the reader through each service and repair procedure. Complete download comes in pdf format which can work under all PC based windows operating system and Mac also, All pages are printable. Using this repair manual is an inexpensive way to keep your vehicle working properly.
Service Repair Manual Covers:
General
Engine
Electrical System
Power Transmission
Brakes
Front Axle and Steering System
Frame and Wheels
Cab and Shields
Hydraulics
Tools
File Format: PDF
Compatible: All Versions of Windows & Mac
Language: English
Requirements: Adobe PDF Reader
NO waiting, Buy from responsible seller and get INSTANT DOWNLOAD, Without wasting your hard-owned money on uncertainty or surprise! All pages are is great to haveVALTRA T 120 TRACTOR Service Repair Workshop Manual.
Looking for some other Service Repair Manual,please check:
https://www.aservicemanualpdf.com/
Thanks for visiting!
Valtra T 140 TRACTOR Service Repair Manualjkmdmm mkueoi
This is the Highly Detailed factory service repair manual for theVALTRA T 140 TRACTOR, this Service Manual has detailed illustrations as well as step by step instructions,It is 100 percents complete and intact. they are specifically written for the do-it-yourself-er as well as the experienced mechanic.VALTRA T 140 TRACTOR Service Repair Workshop Manual provides step-by-step instructions based on the complete dis-assembly of the machine. It is this level of detail, along with hundreds of photos and illustrations, that guide the reader through each service and repair procedure. Complete download comes in pdf format which can work under all PC based windows operating system and Mac also, All pages are printable. Using this repair manual is an inexpensive way to keep your vehicle working properly.
Service Repair Manual Covers:
General
Engine
Electrical System
Power Transmission
Brakes
Front Axle and Steering System
Frame and Wheels
Cab and Shields
Hydraulics
Tools
File Format: PDF
Compatible: All Versions of Windows & Mac
Language: English
Requirements: Adobe PDF Reader
NO waiting, Buy from responsible seller and get INSTANT DOWNLOAD, Without wasting your hard-owned money on uncertainty or surprise! All pages are is great to haveVALTRA T 140 TRACTOR Service Repair Workshop Manual.
Looking for some other Service Repair Manual,please check:
https://www.aservicemanualpdf.com/
Thanks for visiting!
This is the Highly Detailed factory service repair manual for theVALTRA T 180 TRACTOR, this Service Manual has detailed illustrations as well as step by step instructions,It is 100 percents complete and intact. they are specifically written for the do-it-yourself-er as well as the experienced mechanic.VALTRA T 180 TRACTOR Service Repair Workshop Manual provides step-by-step instructions based on the complete dis-assembly of the machine. It is this level of detail, along with hundreds of photos and illustrations, that guide the reader through each service and repair procedure. Complete download comes in pdf format which can work under all PC based windows operating system and Mac also, All pages are printable. Using this repair manual is an inexpensive way to keep your vehicle working properly.
Service Repair Manual Covers:
General
Engine
Electrical System
Power Transmission
Brakes
Front Axle and Steering System
Frame and Wheels
Cab and Shields
Hydraulics
Tools
File Format: PDF
Compatible: All Versions of Windows & Mac
Language: English
Requirements: Adobe PDF Reader
NO waiting, Buy from responsible seller and get INSTANT DOWNLOAD, Without wasting your hard-owned money on uncertainty or surprise! All pages are is great to haveVALTRA T 180 TRACTOR Service Repair Workshop Manual.
Looking for some other Service Repair Manual,please check:
https://www.aservicemanualpdf.com/
Thanks for visiting!
Valtra M 150 TRACTOR Service Repair Manualkjmemf uikfjmd
This is the Highly Detailed factory service repair manual for theVALTRA M 150 TRACTOR, this Service Manual has detailed illustrations as well as step by step instructions,It is 100 percents complete and intact. they are specifically written for the do-it-yourself-er as well as the experienced mechanic.VALTRA M 150 TRACTOR Service Repair Workshop Manual provides step-by-step instructions based on the complete dis-assembly of the machine. It is this level of detail, along with hundreds of photos and illustrations, that guide the reader through each service and repair procedure. Complete download comes in pdf format which can work under all PC based windows operating system and Mac also, All pages are printable. Using this repair manual is an inexpensive way to keep your vehicle working properly.
Service Repair Manual Covers:
General
Engine
Electrical System
Power Transmission
Brakes
Front Axle and Steering System
Frame and Wheels
Cab and Shields
Hydraulics
Tools
File Format: PDF
Compatible: All Versions of Windows & Mac
Language: English
Requirements: Adobe PDF Reader
NO waiting, Buy from responsible seller and get INSTANT DOWNLOAD, Without wasting your hard-owned money on uncertainty or surprise! All pages are is great to haveVALTRA M 150 TRACTOR Service Repair Workshop Manual.
Looking for some other Service Repair Manual,please check:
https://www.aservicemanualpdf.com/
Thanks for visiting!
𝘼𝙣𝙩𝙞𝙦𝙪𝙚 𝙋𝙡𝙖𝙨𝙩𝙞𝙘 𝙏𝙧𝙖𝙙𝙚𝙧𝙨 𝙞𝙨 𝙫𝙚𝙧𝙮 𝙛𝙖𝙢𝙤𝙪𝙨 𝙛𝙤𝙧 𝙢𝙖𝙣𝙪𝙛𝙖𝙘𝙩𝙪𝙧𝙞𝙣𝙜 𝙩𝙝𝙚𝙞𝙧 𝙥𝙧𝙤𝙙𝙪𝙘𝙩𝙨. 𝙒𝙚 𝙝𝙖𝙫𝙚 𝙖𝙡𝙡 𝙩𝙝𝙚 𝙥𝙡𝙖𝙨𝙩𝙞𝙘 𝙜𝙧𝙖𝙣𝙪𝙡𝙚𝙨 𝙪𝙨𝙚𝙙 𝙞𝙣 𝙖𝙪𝙩𝙤𝙢𝙤𝙩𝙞𝙫𝙚 𝙖𝙣𝙙 𝙖𝙪𝙩𝙤 𝙥𝙖𝙧𝙩𝙨 𝙖𝙣𝙙 𝙖𝙡𝙡 𝙩𝙝𝙚 𝙛𝙖𝙢𝙤𝙪𝙨 𝙘𝙤𝙢𝙥𝙖𝙣𝙞𝙚𝙨 𝙗𝙪𝙮 𝙩𝙝𝙚 𝙜𝙧𝙖𝙣𝙪𝙡𝙚𝙨 𝙛𝙧𝙤𝙢 𝙪𝙨.
Over the 10 years, we have gained a strong foothold in the market due to our range's high quality, competitive prices, and time-lined delivery schedules.
5 Warning Signs Your BMW's Intelligent Battery Sensor Needs AttentionBertini's German Motors
IBS monitors and manages your BMW’s battery performance. If it malfunctions, you will have to deal with an array of electrical issues in your vehicle. Recognize warning signs like dimming headlights, frequent battery replacements, and electrical malfunctions to address potential IBS issues promptly.
Core technology of Hyundai Motor Group's EV platform 'E-GMP'Hyundai Motor Group
What’s the force behind Hyundai Motor Group's EV performance and quality?
Maximized driving performance and quick charging time through high-density battery pack and fast charging technology and applicable to various vehicle types!
Discover more about Hyundai Motor Group’s EV platform ‘E-GMP’!
Symptoms like intermittent starting and key recognition errors signal potential problems with your Mercedes’ EIS. Use diagnostic steps like error code checks and spare key tests. Professional diagnosis and solutions like EIS replacement ensure safe driving. Consult a qualified technician for accurate diagnosis and repair.
What Exactly Is The Common Rail Direct Injection System & How Does It WorkMotor Cars International
Learn about Common Rail Direct Injection (CRDi) - the revolutionary technology that has made diesel engines more efficient. Explore its workings, advantages like enhanced fuel efficiency and increased power output, along with drawbacks such as complexity and higher initial cost. Compare CRDi with traditional diesel engines and discover why it's the preferred choice for modern engines.
What Does the PARKTRONIC Inoperative, See Owner's Manual Message Mean for You...Autohaus Service and Sales
Learn what "PARKTRONIC Inoperative, See Owner's Manual" means for your Mercedes-Benz. This message indicates a malfunction in the parking assistance system, potentially due to sensor issues or electrical faults. Prompt attention is crucial to ensure safety and functionality. Follow steps outlined for diagnosis and repair in the owner's manual.
What Does the Active Steering Malfunction Warning Mean for Your BMWTanner Motors
Discover the reasons why your BMW’s Active Steering malfunction warning might come on. From electrical glitches to mechanical failures and software anomalies, addressing these promptly with professional inspection and maintenance ensures continued safety and performance on the road, maintaining the integrity of your driving experience.
Comprehensive program for Agricultural Finance, the Automotive Sector, and Empowerment . We will define the full scope and provide a detailed two-week plan for identifying strategic partners in each area within Limpopo, including target areas.:
1. Agricultural : Supporting Primary and Secondary Agriculture
• Scope: Provide support solutions to enhance agricultural productivity and sustainability.
• Target Areas: Polokwane, Tzaneen, Thohoyandou, Makhado, and Giyani.
2. Automotive Sector: Partnerships with Mechanics and Panel Beater Shops
• Scope: Develop collaborations with automotive service providers to improve service quality and business operations.
• Target Areas: Polokwane, Lephalale, Mokopane, Phalaborwa, and Bela-Bela.
3. Empowerment : Focusing on Women Empowerment
• Scope: Provide business support support and training to women-owned businesses, promoting economic inclusion.
• Target Areas: Polokwane, Thohoyandou, Musina, Burgersfort, and Louis Trichardt.
We will also prioritize Industrial Economic Zone areas and their priorities.
Sign up on https://profilesmes.online/welcome/
To be eligible:
1. You must have a registered business and operate in Limpopo
2. Generate revenue
3. Sectors : Agriculture ( primary and secondary) and Automative
Women and Youth are encouraged to apply even if you don't fall in those sectors.
"Trans Failsafe Prog" on your BMW X5 indicates potential transmission issues requiring immediate action. This safety feature activates in response to abnormalities like low fluid levels, leaks, faulty sensors, electrical or mechanical failures, and overheating.
Why Is Your BMW X3 Hood Not Responding To Release CommandsDart Auto
Experiencing difficulty opening your BMW X3's hood? This guide explores potential issues like mechanical obstruction, hood release mechanism failure, electrical problems, and emergency release malfunctions. Troubleshooting tips include basic checks, clearing obstructions, applying pressure, and using the emergency release.
Things to remember while upgrading the brakes of your carjennifermiller8137
Upgrading the brakes of your car? Keep these things in mind before doing so. Additionally, start using an OBD 2 GPS tracker so that you never miss a vehicle maintenance appointment. On top of this, a car GPS tracker will also let you master good driving habits that will let you increase the operational life of your car’s brakes.
In this presentation, we have discussed a very important feature of BMW X5 cars… the Comfort Access. Things that can significantly limit its functionality. And things that you can try to restore the functionality of such a convenient feature of your vehicle.
4. 3
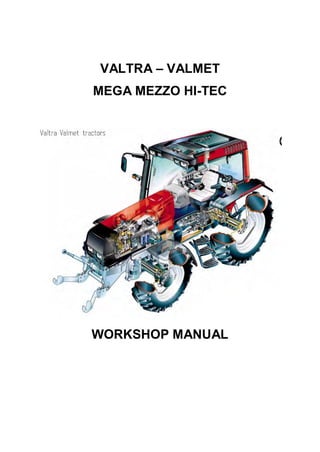
To the reader
The Service Manual for the Valmet tractors is intended to be a practical reference source to be used in work-
shop. The repair instructions in the manual are based on methods which have been worked out in practice
during normal workshop conditions and which are based on the use of special tools from the manufacturer
when stated in the instructions. The manual also contains descriptions of the design and function of the
components.
Detailed maintenance instructions can be found in Operator’s Manual.
The Service Manual will be continually updated with new revised pages which should be inserted in the
manual. Alterations and additions will first appear as service bulletins.
Only genuine Valmet spare parts should be used to ensure the best possible function of the machine. Cer-
tain operations should be carried out with the aid of special tools designed by Valmet.
Valmet Tractors Inc.
Tractor Service
5. Model Code Page
11. General 6000--8950 110 0
1. 9. 2002
1. 8. 2000
The following supplements have been published for the Valmet 6000---8950 Service Manual:
Ordering number Date Notes
39 256 211
39 256 212
39 256 213
39 256 214
39 256 215
39 256 216
39 256 217
39 256 218
39 256 219
39 260 211
39 260 212
39 260 213
39 260 214
39 260 215
15. 6. 1992
1. 9. 1992
15. 5. 1993
1. 1. 1994
1. 1. 1995
15. 4. 1995
15. 5. 1996
1. 4. 1997
1. 8. 1998
1. 11. 1998
1. 6. 1999
1. 10. 1999
1. 8. 2000
1. 9. 2002
Supplement no. 39 256 211 (15. 6. 1992)
Includes:
--- Autocontrol III
--- air conditioning
--- tractor 8000
--- amendments
Supplement no. 39 256 212 (1. 9. 1992)
Includes:
--- 20---series engines
--- amendments
Supplement no. 39 256 213 (15. 5. 1993)
Includes:
--- Delta Powershift
--- tractor 8400
--- amendments
--- the latest fitting instructions of optional equipment
Supplement no. 39 256 214 (1. 1. 1994)
Includes:
--- tractors 6000 and 8200
--- Autocontrol II
--- Autocontrol IV
--- Sige---axle differential lock
--- industrial front axle
--- latest air conditioning
--- amendments
Supplement no. 39 256 215 (1. 1. 1995)
Includes:
--- amendments
--- the latest fitting instructions of optional equipment
Supplement no. 39 256 216 (15. 4. 1995)
Includes:
--- engine intake air system and cooling system, modifications
--- Autocontrol 2.1
--- Agrodata---instrument
--- hydraulic type clutch release mechanism
--- DPS, modifications
Supplement no. 39 256 217 (15. 5. 1996)
Includes:
--- tractor 6800
--- tractors 8050---8750
--- amendments
Supplement no. 39 256 218 (1. 4. 1997)
Includes:
--- tractors 6200 and 8000R
--- front PTO
--- CareTel
--- Hi Shift
--- amendments
--- the latest fitting instructions of optional equipment
Supplement no. 39 256 219 (1. 8. 1998)
Includes:
--- FieldMaster
--- pressure air brakes for trailer (optional)
--- latest fitting instructions for optional equipment
--- amendments
--- new folder, new index leaves (10---30 and40---100) andnew
spine labels.
Supplement no. 39 260 211 (1. 11. 1998)
Includes:
--- HiTech reverse shuttle
--- Autocontrol V
--- New 50---series models
--- Front axle air suspension
--- E---engines
--- Amendments
Supplement no. 39 260 212 (1. 6. 1999)
Includes:
--- Autocontrol 2.2
--- amendments (e.g. for AC V)
--- fitting instructions for optional equipment
Supplement no. 39 260 213 (1. 10. 1999)
Includes:
--- Carraro 20.29 front axle
--- amendments (e.g. version 42 of AC V)
Supplement no. 39 260 214 (1. 8. 2000)
Includes:
--- HiTech gen. 2, AC---5.2
--- front PTO on 6250H---6850Hi tractors
--- modified lubricating oil pump for 6---cyl. engines
--- new rear axle housing for transmissions 650/550
--- amendments
--- updated fitting instructions for optional equipment
Supplement no. 39 260 215 (1. 9. 2002)
Includes:
--- transmission and final drives 700
--- Agroline---instrument
--- technical modifications
6. 7
Model Code Page
11. Layout
8. 11. 1990
6000--8750 110 1
Layout of Service Manual
1. Division into groups
The manual is divided intogroups (10---100) which are based on the make---up of the tractor. The groups are listed on the firstindex
leaf.
Example. 10. General
20. Engine, fuel and cooling systems
30. Electrical system
40. Power transmission
a.s.o.
The number designation for each group is given in the top left box of the respective pages (and the first figure in the code designa-
tion)
410 1
50
60
70
80
90
100
Code Page
2. Division into components or sub---groups
Each group is further divided into components or sub---groups. The number and the name of each component is given in the top
left box on each page (and comprise the two first figures in the code designation).
Example. 41. Clutch
42. Gearbox
44. Quick---shift gear
45. Final drives etc.
7. 8
Model Code Page
11. Layout
8. 11. 1990
6000--8750 110 2
3. Code designation
Three---digit code designations are used to distinguish the different document groups for the respective components. The same
code is also used in the Time List as a reference tothe text in this Manual. The code designation numbers appear both in the box at
the top of the page and also in the headings.
Example: Code 410:
--- Group: Power transmission (4)
--- Component: Clutch (41)
--- Document group: General (410)
4. Page numbers
The instructions for all components are numbered in consecutive order in the right---hand box at the top of the page. The page
numbers begin with page 1 for each component.
41. Clutch
15. 5. 1993
Model Code Page
6100---8400 410 1
8. 11. 1990
5. Date
At the top of each page there are two boxes for dates. In the case of a revised issue, the date of the earlier issue is printed in the
crossed---over box and the date of the current issue is printed in the ”real” date box.
6. Model
At the top of each page the tractor model for which the page is valid is indicated.
7. Additions and amendments of the service manual
New and up---dated pages will be continually added to the service manual. The new pages should be inserted as indicated by the
code: the first digit (also the first digit on the index leaf) indicated the group:
--- the two first digits indicate the component or sub---group
--- the third digit indicates the document group for the respective components
--- the page number indicates the definite position of the page within the service manual
If there are two pages with the same code and page number the page with the later date in the date box (and the old date in the
crossed---over box) is valid (or the current page).
N.B. Fitting instructions for extra equipment are inserted into the service manual at the end of group concerned (E.g. code 39 is
inserted at the end of group 30).
8. 9
Model Code Page
11. Layout 6000--8750 110 3
1. 4. 1997
8. 11. 1990
Code designation in the Service Manual
10. General
110 Layout
120 Repairs
130 Maintenance
20 Engine
21. Engine
210 Technical data, tools, description
211 Cylinder block and flywheel housing
212 Cylinder head and valve mechanism
213 Crank mechanism
214 Timing gears
215 Lubrication system and oil sump
216 Induction and exhaust system, turbocharger
219 Removing and fitting engine
22. Fuel system
220 Technical data, tools, description
222 Fuel feed pump and fuel filters
223 Injection pump and injectors
23. Cooling system
230 Technical data, tools, description
231 Thermostat and coolant pump
30. Electrical system
310 Specifications, wiring diagrams
311 Autocontrol II
312 Autocontrol 2.1
313 Sigma---power
320 AC power lift
321 ACD power lift
330 Agrodata
331 AD---instrument
340 Autocontrol---III
350 Autocontrol IV
360 CareTel
40. Power transmission
41. Clutch
410 Technical data, tools, description
411 Clutch assembly and pedal rods
412 Hydraulic coupling
42. Gearbox
420 Technical data, tools, description
421 Selector forks
422 Gear shift levers
423 Shafts and gear wheels
424 Differential
44. Quick---shift gear, DPS, reverse shuttle, 4WD clutch
440A Quick---shift gear, technical data, tools, description
440B Reverse shuttle, technical data, tools, description
440C 4WD clutch, technical data, tools, description
441 Quick---shift gear, repair instructions
442 Reverse shuttle, repair instructions
443 4WD clutch, repair instructions
444 DPS, repair instructions
45. Final drives
450 Technical data, tools, description
451 Final drives, repair instructions
46 Power take---off
460 Technical data, tools, description
461 Power take---off, repair instructions
463 Front PTO, repair instructions
9. Thank you very much
for your reading. Please
Click Here Then Get
More Information.
NOTE:
If there is no response to
click on the link above,
please download the PDF
document first and then
click on it.
10. 10
Model Code Page
11. Layout 6000--8750 110 4
1. 4. 1997
8. 11. 1990
50. Brakes
510 Technical data, description
511. Service brakes
520 Parking brake
60. Steering system and front axle
61. Steering system
610 Technical data, tools, description
611 Steering valve
612 Priority valve
613 Steering cylinder
614 Adjustment
64. Powered front axle
640 Technical data, tools, description
641 Front axle housing and front axle suspension
643 Hubs
644 Differential
645 Industrial front axle
70 Frame and wheels
710 Tractor frame
720 Tyres and wheel discs
80 Cab and shields
810 Cab
820 Shields
830 Air conditioner
90 Hydraulics
910 Technical data, tools, description
911 Pump and pipes
912 Working hydraulics
913 Three---point linkage, towing hook
920 AC power lift
100. Special tools
101 Special tools (ETV)
102 Locally manufactured tools
Note! Separate fitting instructions for the optional equipments are inserted into the Service Manual. These instructions are posi-
tioned to the end of each main group. E.g. code 39 are placed to the end of group 30.
11. 11
Model Code Page
12. Repairs
8. 11. 1990 6000--8750 120 1
General instructions for repairs
Outer oil seals
The Service Manual contains instructions for changing all outer oil seals, (e.g. oil seals on the PTO shaft end, on the output shaft
to the front wheel drive and on the pinion shaft on the powered front axle, and so on).
Sealing compound and glue
If sealing compounds or glue are required for the repair work, the instructions will specify a sealing compound or glue which is
readily available through specialist dealers. Some seals should be greased before fitting and the space between the lips of the
seal should be filled with universal grease. If the seal is to be pushed over splines or sharp edges the seal should be protected
with for example a thin plastic foil.
Tightening torques and setting values
All necessary tightening torques and setting values for each repair operation are given at the beginning of each repair section
under the heading Technical Data. The most important values can also be found in the repair instructions.
Table 1 later gives the tightening torques in order of dimension, quality and surface treatment. The values given in the table should
be used if the tightening torque is not given in the repair instructions.
Safety
Always bear safety in mind when repairing or servicing the tractor. Use tools and lifting devices in the correct way . When you
are removing tractor components or splitting the tractor, every tractor part must be supported in such a way, that norisk of accident
exists. Avoid working under the supported tractor part if it is not absolutely necessary. When supporting the tractor the centre of
gravity of the frame part must always be checked. For instance the wedges must always be fitted between front axle and engine
to prevent axle oscillation when splitting the front frame of the tractor.
Trouble---shooting
The following procedure, combined with the information contained in the workshop manual will be helpful in tracing faults accu-
rately. It consists of following a number of logical steps to locate and correct the problem:
a) Determine the problem
b) List possible causes
c) Differentiate the causes
d) Conduct checks in logical order to determine the exact cause
e) Consider approximate remaining service life against cost of parts and labour..
f) Make any necessary repairs.
g) Recheck the parts and functions for correct operation
12. 12
Model Code Page
12. Repairs
8. 11. 1990 6000--8750 120 2
Handling of heavy components
Unless otherwise specified, all removals should be accom-
plished using adjustable lifting equipment. All supporting
slings must be parallel to each other and as near vertical as
possible in relation to the object being lifted. However, where
slings are of a far greater capacity than the weight of the load
to be fitted, a triangular lifting arrangement may be used.
Oikein
Rätt
Right
Richtig
Giusto
Väärin
Fel
Wrong
Falsch
Sbagliato
Correct
Teisingai
Mauvais
Netei-
singai
When removing a component at an angle, remember that the
capacity of an eyebolt is reduced when the angle between the
supporting members and the object becomes less than 90˚.
B
C
D
A
Forged eyebolt support
A. Load
B. Lifting shackle
C. Shackle retaining plate ( 3 mm thick)
D. Sleeve
When necessary the forged eyebolt can be supported in the
way shown in figure above. Sleeve D may or may not be
welded to plate.
Warning! If a part resists removal, check that allnuts andbolts
have been removed and that there is no interference from ad-
jacent parts.
Cleanliness
Toensure long life of a machine, it is important tokeep dirt and
foreign material out of its vital working components. Precau-
tions must be taken to safeguard against this. Enclosed com-
partments, seals and filters have been provided to keep the
supply of air, fuel and lubricant clean. These protective de-
vices must not be removed.
Whenever hydraulic, fuel, lubricating oil or lines are discon-
nected, clean the point of disconnection and the surrounding
area. As soon as a line has been disconnected, cap, plug or
tape the line or opening to prevent the ingress of foreign ma-
terial.
The same cleaning and covering precautions should be taken
when access covers or inspection plates are removed.
Clean and inspect all parts. Make sure that all passages and
holes are clear. Cover all parts to keep them clean. Make sure
parts are clean when they are reassembled. Leave new parts
in their wrapping until they are actuallyneeded forreassembly
Assembly
When reassembling a machine, complete each step in se-
quence. never partially assemble one part then start to as-
semble another. Make all recommended adjustments. Al-
ways check the job on completion to ensure that nothing has
been overlooked. Recheck the various adjustments before
putting the machine back into service.
Note! Before fitting new parts, remove rust preventative com-
pound from all machined surfaces (usually ”peel---off sub-
stances).
Lubrication
Where applicable, fill the compartments of repaired or re-
newed components with the quantity, type and grade of clean
lubricant recommended in the routine maintenance section of
the Operator’s Manual.
Shims
When shims are removed, tie them together and identify their
location. Keep shims clean and take care not to bend them
before refitting them.
Gaskets
Make sure that the holes in gaskets line up with lubricating oil
passages in the mating parts. If gaskets have tobe made, use
material of the correct type and thickness. Make sure that
holes are punched in the right places.
Incorrectly punched gaskets can cause serious damage.
Lip type rubber seals
Lubricate the lips of lip---type rubber seals with oil before fit-
ment. Do not use grease on seals, except for grease seals.