Unix is a multi-user and multitasking operating system developed in 1969. It consists of a kernel that manages system resources and coordinates tasks. The shell is a command line interpreter that translates commands for the kernel. There are many standard commands and utilities to manage files and directories in a hierarchical structure. Users login with a user ID and password to access and utilize system resources.


![Unix
28
Here, each of the individual entries separated by the colon character (:) are directories. If
you request the shell to execute a command and it cannot find it in any of the directories
given in the PATH variable, a message similar to the following appears –
$hello
hello: not found
$
There are variables like PS1 and PS2 which are discussed in the next section.
PS1andPS2Variables
The characters that the shell displays as your command prompt are stored in the variable
PS1. You can change this variable to be anything you want. As soon as you change it, it'll
be used by the shell from that point on.
For example, if you issued the command −
$PS1='=>'
=>
=>
=>
Your prompt will become =>. To set the value of PS1 so that it shows the working
directory, issue the command –
=>PS1="[u@h w]$"
[root@ip-72-167-112-17 /var/www/tutorialspoint/unix]$
[root@ip-72-167-112-17 /var/www/tutorialspoint/unix]$
The result of this command is that the prompt displays the user's username, the machine's
name (hostname), and the working directory.
There are quite a few escape sequences that can be used as value arguments for PS1;
try to limit yourself to the most critical so that the prompt does not overwhelm you with
information.
Escape Sequence Description
t Current time, expressed as HH:MM:SS
d Current date, expressed as Weekday Month Date
n Newline](https://image.slidesharecdn.com/unixtutorial-180719000332/85/Unix-tutorial-36-320.jpg)


![Unix
31
Following is the sample example showing few environment variables −
$ echo $HOME
/root
]$ echo $DISPLAY
$ echo $TERM
xterm
$ echo $PATH
/usr/local/bin:/bin:/usr/bin:/home/amrood/bin:/usr/local/bin
$](https://image.slidesharecdn.com/unixtutorial-180719000332/85/Unix-tutorial-39-320.jpg)


![Unix
35
The cancel and lprm Commands
The cancel command terminates a printing request from the lp command. The lprm
command terminates all lpr requests. You can specify either the ID of the request
(displayed by lp or lpq) or the name of the printer.
$cancel laserp-575
request "laserp-575" cancelled
$
To cancel whatever request is currently printing, regardless of its ID, simply enter cancel
and the printer name –
$cancel laserp
request "laserp-573" cancelled
$
The lprm command will cancel the active job if it belongs to you. Otherwise, you can give
job numbers as arguments, or use a dash (-) to remove all of your jobs –
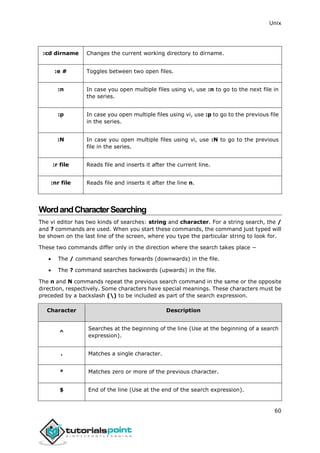
$lprm 575
dfA575diamond dequeued
cfA575diamond dequeued
$
The lprm command tells you the actual filenames removed from the printer queue.
SendingEmail
You use the Unix mail command to send and receive mail. Here is the syntax to send an
email −
$mail [-s subject] [-c cc-addr] [-b bcc-addr] to-addr
Here are important options related to mail command:
Option Description
-s Specifies subject on the command line.
-c Sends carbon copies to the list of users. List should be a comma-
separated list of names.
-b Sends blind carbon copies to list. List should be a comma-
separated list of names.](https://image.slidesharecdn.com/unixtutorial-180719000332/85/Unix-tutorial-43-320.jpg)


![Unix
42
BackgroundProcesses
A background process runs without being connected to your keyboard. If the background
process requires any keyboard input, it waits.
The advantage of running a process in the background is that you can run other
commands; you do not have to wait until it completes to start another!
The simplest way to start a background process is to add an ampersand (&) at the end of
the command.
$ls ch*.doc &
This displays all those files the names of which start with ch and end with .doc –
ch01-1.doc ch010.doc ch02.doc ch03-2.doc
ch04-1.doc ch040.doc ch05.doc ch06-2.doc
ch01-2.doc ch02-1.doc
Here, if the ls command wants any input (which it does not), it goes into a stop state until
we move it into the foreground and give it the data from the keyboard.
That first line contains information about the background process - the job number and
the process ID. You need to know the job number to manipulate it between the background
and the foreground.
Press the Enter key and you will see the following −
[1] + Done ls ch*.doc &
$
The first line tells you that the ls command background process finishes successfully. The
second is a prompt for another command.
ListingRunningProcesses
It is easy to see your own processes by running the ps (process status) command as
follows −
$ps
PID TTY TIME CMD
18358 ttyp3 00:00:00 sh
18361 ttyp3 00:01:31 abiword
18789 ttyp3 00:00:00 ps](https://image.slidesharecdn.com/unixtutorial-180719000332/85/Unix-tutorial-50-320.jpg)


![Unix
49
drwxr-sr-x 3 amrood group 512 Feb 10 10:17 pvm3
226 Transfer complete.
ftp> cd mpl
250 CWD command successful.
ftp> dir
200 PORT command successful.
150 Opening data connection for /bin/ls.
total 7320
-rw-r--r-- 1 amrood group 1630 Aug 8 1994 dboard.f
-rw-r----- 1 amrood group 4340 Jul 17 1994 vttest.c
-rwxr-xr-x 1 amrood group 525574 Feb 15 11:52 wave_shift
-rw-r--r-- 1 amrood group 1648 Aug 5 1994 wide.list
-rwxr-xr-x 1 amrood group 4019 Feb 14 16:26 fix.c
226 Transfer complete.
ftp> get wave_shift
200 PORT command successful.
150 Opening data connection for wave_shift (525574 bytes).
226 Transfer complete.
528454 bytes received in 1.296 seconds (398.1 Kbytes/s)
ftp> quit
221 Goodbye.
$
ThetelnetUtility
There are times when we are required to connect to a remote Unix machine and work on
that machine remotely. Telnet is a utility that allows a computer user at one site to make
a connection, login and then conduct work on a computer at another site.
Once you login using Telnet, you can perform all the activities on your remotely connected
machine. The following is an example of Telnet session −
C:>telnet amrood.com
Trying...
Connected to amrood.com.
Escape character is '^]'.
login: amrood](https://image.slidesharecdn.com/unixtutorial-180719000332/85/Unix-tutorial-57-320.jpg)


![Unix
53
~
~
~
~
~
~
~
~
~
"testfile" [New File]
You will notice a tilde (~) on each line following the cursor. A tilde represents an unused
line. If a line does not begin with a tilde and appears to be blank, there is a space, tab,
newline, or some other non-viewable character present.
You now have one open file to start working on. Before proceeding further, let us
understand a few important concepts.
OperationModes
While working with the vi editor, we usually come across the following two modes −
Command mode − This mode enables you to perform administrative tasks such
as saving the files, executing the commands, moving the cursor, cutting (yanking)
and pasting the lines or words, as well as finding and replacing. In this mode,
whatever you type is interpreted as a command.
Insert mode − This mode enables you to insert text into the file. Everything that's
typed in this mode is interpreted as input and placed in the file.
vi always starts in the command mode. To enter text, you must be in the insert mode
for which simply type i. To come out of the insert mode, press the Esc key, which will take
you back to the command mode.
Hint − If you are not sure which mode you are in, press the Esc key twice; this will take
you to the command mode. You open a file using the vi editor. Start by typing some
characters and then come to the command mode to understand the difference.
GettingOutofvi
The command to quit out of vi is :q. Once in the command mode, type colon, and 'q',
followed by return. If your file has been modified in any way, the editor will warn you of
this, and not let you quit. To ignore this message, the command to quit out of vi without
saving is :q!. This lets you exit vi without saving any of the changes.](https://image.slidesharecdn.com/unixtutorial-180719000332/85/Unix-tutorial-61-320.jpg)

![Unix
55
b Positions the cursor to the previous word
( Positions the cursor to the beginning of the current sentence
) Positions the cursor to the beginning of the next sentence
E Moves to the end of the blank delimited word
{ Moves a paragraph back
} Moves a paragraph forward
[[ Moves a section back
]] Moves a section forward
n| Moves to the column n in the current line
1G Moves to the first line of the file
G Moves to the last line of the file
nG Moves to the nth
line of the file
:n Moves to the nth
line of the file
fc Moves forward to c
Fc Moves back to c
H Moves to the top of the screen
nH Moves to the nth
line from the top of the screen
M Moves to the middle of the screen
L Move to the bottom of the screen](https://image.slidesharecdn.com/unixtutorial-180719000332/85/Unix-tutorial-63-320.jpg)


![Unix
74
In this chapter, we will discuss how to use shell arrays in Unix. A shell variable is capable
enough to hold a single value. These variables are called scalar variables.
Shell supports a different type of variable called an array variable. This can hold multiple
values at the same time. Arrays provide a method of grouping a set of variables. Instead
of creating a new name for each variable that is required, you can use a single array
variable that stores all the other variables.
All the naming rules discussed for Shell Variables would be applicable while naming arrays.
DefiningArrayValues
The difference between an array variable and a scalar variable can be explained as follows.
Suppose you are trying to represent the names of various students as a set of variables.
Each of the individual variables is a scalar variable as follows −
NAME01="Zara"
NAME02="Qadir"
NAME03="Mahnaz"
NAME04="Ayan"
NAME05="Daisy"
[[
We can use a single array to store all the above mentioned names. Following is the simplest
method of creating an array variable. This helps assign a value to one of its indices.
array_name[index]=value
[
Here array_name is the name of the array, index is the index of the item in the array that
you want to set, and value is the value you want to set for that item.
As an example, the following commands −
NAME[0]="Zara"
NAME[1]="Qadir"
NAME[2]="Mahnaz"
NAME[3]="Ayan"
NAME[4]="Daisy"
[[[[
Unix — Using Shell Arrays](https://image.slidesharecdn.com/unixtutorial-180719000332/85/Unix-tutorial-82-320.jpg)
![Unix
75
If you are using the ksh shell, here is the syntax of array initialization −
set -A array_name value1 value2 ... valuen
[[
If you are using the bash shell, here is the syntax of array initialization −
array_name=(value1 ... valuen)
AccessingArrayValues
After you have set any array variable, you access it as follows −
${array_name[index]}
Here array_name is the name of the array, and index is the index of the value to be
accessed. Following is an example to understand the concept –
#!/bin/sh
NAME[0]="Zara"
NAME[1]="Qadir"
NAME[2]="Mahnaz"
NAME[3]="Ayan"
NAME[4]="Daisy"
echo "First Index: ${NAME[0]}"
echo "Second Index: ${NAME[1]}"
[[[[
The above example will generate the following result –
$./test.sh
First Index: Zara
Second Index: Qadir
You can access all the items in an array in one of the following ways –
${array_name[*]}
${array_name[@]}
[[](https://image.slidesharecdn.com/unixtutorial-180719000332/85/Unix-tutorial-83-320.jpg)
![Unix
76
Here array_name is the name of the array you are interested in. Following example will
help you understand the concept –
#!/bin/sh
NAME[0]="Zara"
NAME[1]="Qadir"
NAME[2]="Mahnaz"
NAME[3]="Ayan"
NAME[4]="Daisy"
echo "First Method: ${NAME[*]}"
echo "Second Method: ${NAME[@]}"
The above example will generate the following result –
$./test.sh
First Method: Zara Qadir Mahnaz Ayan Daisy
Second Method: Zara Qadir Mahnaz Ayan Daisy](https://image.slidesharecdn.com/unixtutorial-180719000332/85/Unix-tutorial-84-320.jpg)
![Unix
78
Operator Description Example
+
Addition - Adds values on either side of
the operator
`expr $a + $b` will give 30
-
Subtraction - Subtracts right hand
operand from left hand operand
`expr $a - $b` will give -10
*
Multiplication - Multiplies values on either
side of the operator
`expr $a * $b` will give 200
/
Division - Divides left hand operand by
right hand operand
`expr $b / $a` will give 2
%
Modulus - Divides left hand operand by
right hand operand and returns
remainder
`expr $b % $a` will give 0
=
Assignment - Assigns right operand in left
operand
a=$b would assign value of b
into a
==
Equality - Compares two numbers, if both
are same then returns true.
[ $a == $b ] would return
false.
!=
Not Equality - Compares two numbers, if
both are different then returns true.
[ $a != $b ] would return true.
[
It is very important to understand that all the conditional expressions should be inside
square braces with spaces around them, for example [ $a == $b ] is correct whereas,
[$a==$b] is incorrect.
All the arithmetical calculations are done using long integers.
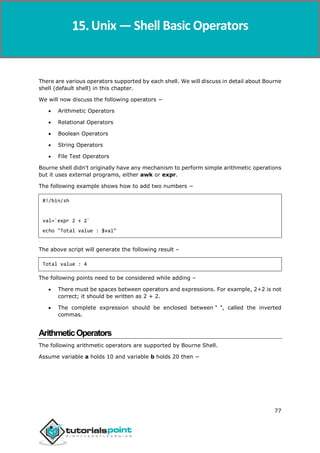
Unix - Shell Arithmetic Operators Example
Here is an example which uses all the arithmetic operators –
#!/bin/sh
a=10
b=20
val=`expr $a + $b`
echo "a + b : $val"](https://image.slidesharecdn.com/unixtutorial-180719000332/85/Unix-tutorial-86-320.jpg)
![Unix
79
val=`expr $a - $b`
echo "a - b : $val"
val=`expr $a * $b`
echo "a * b : $val"
val=`expr $b / $a`
echo "b / a : $val"
val=`expr $b % $a`
echo "b % a : $val"
if [ $a == $b ]
then
echo "a is equal to b"
fi
if [ $a != $b ]
then
echo "a is not equal to b"
fi
The above script will produce the following result –
a + b : 30
a - b : -10
a * b : 200
b / a : 2
b % a : 0
a is not equal to b
The following points need to be considered when using the Arithmetic Operators –
There must be spaces between the operators and the expressions. For example,
2+2 is not correct; it should be written as 2 + 2.
Complete expression should be enclosed between ‘ ‘, called the inverted commas.
You should use on the * symbol for multiplication.](https://image.slidesharecdn.com/unixtutorial-180719000332/85/Unix-tutorial-87-320.jpg)
![Unix
80
if...then...fi statement is a decision-making statement which has been explained
in the next chapter.
RelationalOperators
Bourne Shell supports the following relational operators that are specific to numeric values.
These operators do not work for string values unless their value is numeric.
For example, following operators will work to check a relation between 10 and 20 as well
as in between "10" and "20" but not in between "ten" and "twenty".
Assume variable a holds 10 and variable b holds 20 then −
Operator Description Example
-eq
Checks if the value of two operands are equal or not; if yes,
then the condition becomes true.
[ $a -eq $b ]
is not true.
-ne
Checks if the value of two operands are equal or not; if
values are not equal, then the condition becomes true.
[ $a -ne $b ]
is true.
-gt
Checks if the value of left operand is greater than the value
of right operand; if yes, then the condition becomes true.
[ $a -gt $b ]
is not true.
-lt
Checks if the value of left operand is less than the value of
right operand; if yes, then the condition becomes true.
[ $a -lt $b ]
is true.
-ge
Checks if the value of left operand is greater than or equal
to the value of right operand; if yes, then the condition
becomes true.
[ $a -ge $b ]
is not true.
-le
Checks if the value of left operand is less than or equal to
the value of right operand; if yes, then the condition
becomes true.
[ $a -le $b ]
is true.
It is very important to understand that all the conditional expressions should be placed
inside square braces with spaces around them. For example, [ $a <= $b ] is correct
whereas, [$a <= $b] is incorrect.
Unix - Shell Relational Operators Example
Here is an example which uses all the relational operators –
#!/bin/sh
a=10
b=20](https://image.slidesharecdn.com/unixtutorial-180719000332/85/Unix-tutorial-88-320.jpg)
![Unix
81
if [ $a -eq $b ]
then
echo "$a -eq $b : a is equal to b"
else
echo "$a -eq $b: a is not equal to b"
fi
if [ $a -ne $b ]
then
echo "$a -ne $b: a is not equal to b"
else
echo "$a -ne $b : a is equal to b"
fi
if [ $a -gt $b ]
then
echo "$a -gt $b: a is greater than b"
else
echo "$a -gt $b: a is not greater than b"
fi
if [ $a -lt $b ]
then
echo "$a -lt $b: a is less than b"
else
echo "$a -lt $b: a is not less than b"
fi
if [ $a -ge $b ]
then
echo "$a -ge $b: a is greater or equal to b"
else
echo "$a -ge $b: a is not greater or equal to b"
fi
if [ $a -le $b ]](https://image.slidesharecdn.com/unixtutorial-180719000332/85/Unix-tutorial-89-320.jpg)
![Unix
82
then
echo "$a -le $b: a is less or equal to b"
else
echo "$a -le $b: a is not less or equal to b"
fi
The above script will generate the following result –
10 -eq 20: a is not equal to b
10 -ne 20: a is not equal to b
10 -gt 20: a is not greater than b
10 -lt 20: a is less than b
10 -ge 20: a is not greater or equal to b
10 -le 20: a is less or equal to b
The following points need to be considered while working with relational operators –
There must be spaces between the operators and the expressions. For example,
2+2 is not correct; it should be written as 2 + 2.
if...then...else...fi statement is a decision-making statement which has been
explained in the next chapter.
BooleanOperators
The following Boolean operators are supported by the Bourne Shell.
Assume variable a holds 10 and variable b holds 20 then −
Operator Description Example
!
This is logical negation. This inverts a true condition into
false and vice versa.
[ ! false ] is true.
-o
This is logical OR. If one of the operands is true, then
the condition becomes true.
[ $a -lt 20 -o $b
-gt 100 ] is true.
-a
This is logical AND. If both the operands are true, then
the condition becomes true otherwise false.
[ $a -lt 20 -a $b
-gt 100 ] is false.
Unix - Shell Boolean Operators Example](https://image.slidesharecdn.com/unixtutorial-180719000332/85/Unix-tutorial-90-320.jpg)
![Unix
83
Here is an example which uses all the Boolean operators –
#!/bin/sh
a=10
b=20
if [ $a != $b ]
then
echo "$a != $b : a is not equal to b"
else
echo "$a != $b: a is equal to b"
fi
if [ $a -lt 100 -a $b -gt 15 ]
then
echo "$a -lt 100 -a $b -gt 15 : returns true"
else
echo "$a -lt 100 -a $b -gt 15 : returns false"
fi
if [ $a -lt 100 -o $b -gt 100 ]
then
echo "$a -lt 100 -o $b -gt 100 : returns true"
else
echo "$a -lt 100 -o $b -gt 100 : returns false"
fi
if [ $a -lt 5 -o $b -gt 100 ]
then
echo "$a -lt 100 -o $b -gt 100 : returns true"
else
echo "$a -lt 100 -o $b -gt 100 : returns false"
fi
[[[
The above script will generate the following result −](https://image.slidesharecdn.com/unixtutorial-180719000332/85/Unix-tutorial-91-320.jpg)
![Unix
84
10 != 20 : a is not equal to b
10 -lt 100 -a 20 -gt 15 : returns true
10 -lt 100 -o 20 -gt 100 : returns true
10 -lt 5 -o 20 -gt 100 : returns false
The following points need to be considered while using the operators −
There must be spaces between the operators and the expressions. For example,
2+2 is not correct; it should be written as 2 + 2.
if...then...else...fi statement is a decision-making statement which has been
explained in the next chapter.
StringOperators
The following string operators are supported by Bourne Shell.
Assume variable a holds "abc" and variable b holds "efg" then −
Operator Description Example
=
Checks if the value of two operands are equal or not; if yes,
then the condition becomes true.
[ $a = $b
] is not
true.
!=
Checks if the value of two operands are equal or not; if values
are not equal then the condition becomes true.
[ $a !=
$b ] is
true.
-z
Checks if the given string operand size is zero; if it is zero
length, then it returns true.
[ -z $a ]
is not
true.
-n
Checks if the given string operand size is non-zero; if it is non-
zero length, then it returns true.
[ -n $a ]
is not
false.
str
Checks if str is not the empty string; if it is empty, then it
returns false.
[ $a ] is
not false.
[[
Unix-Shell String Operators Example](https://image.slidesharecdn.com/unixtutorial-180719000332/85/Unix-tutorial-92-320.jpg)
![Unix
85
Here is an example which uses all the string operators −
#!/bin/sh
a="abc"
b="efg"
if [ $a = $b ]
then
echo "$a = $b : a is equal to b"
else
echo "$a = $b: a is not equal to b"
fi
if [ $a != $b ]
then
echo "$a != $b : a is not equal to b"
else
echo "$a != $b: a is equal to b"
fi
if [ -z $a ]
then
echo "-z $a : string length is zero"
else
echo "-z $a : string length is not zero"
fi
if [ -n $a ]
then
echo "-n $a : string length is not zero"
else
echo "-n $a : string length is zero"
fi
if [ $a ]
then](https://image.slidesharecdn.com/unixtutorial-180719000332/85/Unix-tutorial-93-320.jpg)
![Unix
86
echo "$a : string is not empty"
else
echo "$a : string is empty"
fi
The above script will generate the following result −
abc = efg: a is not equal to b
abc != efg : a is not equal to b
-z abc : string length is not zero
-n abc : string length is not zero
abc : string is not empty
The following points need to be considered while using the operator −
There must be spaces between the operators and the expressions. For example,
2+2 is not correct. It should be written as 2 + 2.
if...then...else...fi statement is a decision-making statement which has been
explained in the next chapter.
FileTestOperators
We have a few operators that can be used to test various properties associated with a Unix
file.
Assume a variable file holds an existing file name "test" the size of which is 100 bytes and
has read, write and execute permission on −
Operator Description Example
-b file
Checks if file is a block special file; if yes, then the condition
becomes true.
[ -b $file ]
is false.
-c file
Checks if file is a character special file; if yes, then the
condition becomes true.
[ -c $file ] is
false.
-d file
Checks if file is a directory; if yes, then the condition becomes
true.
[ -d $file ]
is not true.
-f file
Checks if file is an ordinary file as opposed to a directory or
special file; if yes, then the condition becomes true.
[ -f $file ] is
true.](https://image.slidesharecdn.com/unixtutorial-180719000332/85/Unix-tutorial-94-320.jpg)
![Unix
87
-g file
Checks if file has its set group ID (SGID) bit set; if yes, then
the condition becomes true.
[ -g $file ]
is false.
-k file
Checks if file has its sticky bit set; if yes, then the condition
becomes true.
[ -k $file ]
is false.
-p file
Checks if file is a named pipe; if yes, then the condition
becomes true.
[ -p $file ]
is false.
-t file
Checks if file descriptor is open and associated with a
terminal; if yes, then the condition becomes true.
[ -t $file ] is
false.
-u file
Checks if file has its Set User ID (SUID) bit set; if yes, then
the condition becomes true.
[ -u $file ]
is false.
-r file
Checks if file is readable; if yes, then the condition becomes
true.
[ -r $file ] is
true.
-w file
Checks if file is writable; if yes, then the condition becomes
true.
[ -w $file ]
is true.
-x file
Checks if file is executable; if yes, then the condition becomes
true.
[ -x $file ]
is true.
-s file
Checks if file has size greater than 0; if yes, then condition
becomes true.
[ -s $file ] is
true.
-e file Checks if file exists; is true even if file is a directory but exists.
[ -e $file ]
is true.
Unix - Shell File Test Operators Example
The following example uses all the file test operators −
Assume a variable file holds an existing file name
"/var/www/tutorialspoint/unix/test.sh" the size of which is 100 bytes and has
read, write and execute permission –
#!/bin/sh
file="/var/www/tutorialspoint/unix/test.sh"
if [ -r $file ]
then](https://image.slidesharecdn.com/unixtutorial-180719000332/85/Unix-tutorial-95-320.jpg)
![Unix
88
echo "File has read access"
else
echo "File does not have read access"
fi
if [ -w $file ]
then
echo "File has write permission"
else
echo "File does not have write permission"
fi
if [ -x $file ]
then
echo "File has execute permission"
else
echo "File does not have execute permission"
fi
if [ -f $file ]
then
echo "File is an ordinary file"
else
echo "This is sepcial file"
fi
if [ -d $file ]
then
echo "File is a directory"
else
echo "This is not a directory"
fi
if [ -s $file ]
then
echo "File size is zero"
else
echo "File size is not zero"](https://image.slidesharecdn.com/unixtutorial-180719000332/85/Unix-tutorial-96-320.jpg)
![Unix
89
fi
if [ -e $file ]
then
echo "File exists"
else
echo "File does not exist"
fi
The above script will produce the following result −
File has read access
File has write permission
File has execute permission
File is an ordinary file
This is not a directory
File size is zero
File exists
The following points need to be considered while using file test operators −
There must be spaces between the operators and the expressions. For example,
2+2 is not correct; it should be written as 2 + 2.
if...then...else...fi statement is a decision-making statement which has been
explained in the next chapter.
CShellOperators
Following link will give you a brief idea on C Shell Operators: C Shell Operators
Unix-CShellOperators
We will now list down all the operators available in C Shell. Here most of the operators are
very similar to what we have in C Programming language.
Operators are listed in the order of decreasing precedence −
Arithmetic and Logical Operators
The following table lists out a few Arithmetic and Logical Operators:
Operator Description](https://image.slidesharecdn.com/unixtutorial-180719000332/85/Unix-tutorial-97-320.jpg)


![Unix
94
In this chapter, we will understand shell decision-making in Unix. While writing a shell
script, there may be a situation when you need to adopt one path out of the given two
paths. So you need to make use of conditional statements that allow your program to
make correct decisions and perform the right actions.
Unix Shell supports conditional statements which are used to perform different actions
based on different conditions. We will now understand two decision-making statements
here –
The if...else statement
The case...esac statement
Theif...elsestatements
If else statements are useful decision-making statements which can be used to select an
option from a given set of options.
Unix Shell supports following forms of if…else statement −
if...fi statement
if...else...fi statement
if...elif...else...fi statement
UnixShell-Theif...fistatement
The if...fi statement is the fundamental control statement that allows Shell to make
decisions and execute statements conditionally.
Syntax
if [ expression ]
then
Statement(s) to be executed if expression is true
fi
The Shell expression is evaluated in the above syntax. If the resulting value is true,
given statement(s) are executed. If the expression is false then no statement would be
executed. Most of the times, comparison operators are used for making decisions.
It is recommended to be careful with the spaces between braces and expression. No space
produces a syntax error.
If expression is a shell command, then it will be assumed true if it returns 0 after
execution. If it is a Boolean expression, then it would be true if it returns true.
Unix — Shell Decision Making](https://image.slidesharecdn.com/unixtutorial-180719000332/85/Unix-tutorial-102-320.jpg)
![Unix
95
Example
#!/bin/sh
a=10
b=20
if [ $a == $b ]
then
echo "a is equal to b"
fi
if [ $a != $b ]
then
echo "a is not equal to b"
fi
The above script will generate the following result −
a is not equal to b
UnixShell-Theif...else...fistatement
The if...else...fi statement is the next form of control statement that allows Shell to
execute statements in a controlled way and make the right choice.
Syntax
if [ expression ]
then
Statement(s) to be executed if expression is true
else
Statement(s) to be executed if expression is not true
fi
The Shell expression is evaluated in the above syntax. If the resulting value is true,
given statement(s) are executed. If the expression is false, then no statement will be
executed.](https://image.slidesharecdn.com/unixtutorial-180719000332/85/Unix-tutorial-103-320.jpg)
![Unix
96
Example
The above example can also be written using the if...else statement as follows −
#!/bin/sh
a=10
b=20
if [ $a == $b ]
then
echo "a is equal to b"
else
echo "a is not equal to b"
fi
Upon execution, you will receive the following result −
a is not equal to b
UnixShell-Theif...elif...fistatement
The if...elif...fi statement is the one level advance form of control statement that allows
Shell to make correct decision out of several conditions.
Syntax
if [ expression 1 ]
then
Statement(s) to be executed if expression 1 is true
elif [ expression 2 ]
then
Statement(s) to be executed if expression 2 is true
elif [ expression 3 ]
then
Statement(s) to be executed if expression 3 is true
else
Statement(s) to be executed if no expression is true
fi](https://image.slidesharecdn.com/unixtutorial-180719000332/85/Unix-tutorial-104-320.jpg)
![Unix
97
This code is just a series of if statements, where each if is part of the else clause of the
previous statement. Here statement(s) are executed based on the true condition, if none
of the condition is true then else block is executed.
Example
#!/bin/sh
a=10
b=20
if [ $a == $b ]
then
echo "a is equal to b"
elif [ $a -gt $b ]
then
echo "a is greater than b"
elif [ $a -lt $b ]
then
echo "a is less than b"
else
echo "None of the condition met"
fi
[[
Upon execution, you will receive the following result −
a is less than b
Most of the if statements check relations using relational operators discussed in the
previous chapter.
Thecase...esacStatement
You can use multiple if...elif statements to perform a multiway branch. However, this is
not always the best solution, especially when all of the branches depend on the value of a
single variable.
Unix Shell supports case...esac statement which handles exactly this situation, and it
does so more efficiently than repeated if...elif statements.](https://image.slidesharecdn.com/unixtutorial-180719000332/85/Unix-tutorial-105-320.jpg)

![Unix
99
Example
#!/bin/sh
FRUIT="kiwi"
case "$FRUIT" in
"apple") echo "Apple pie is quite tasty."
;;
"banana") echo "I like banana nut bread."
;;
"kiwi") echo "New Zealand is famous for kiwi."
;;
esac
Upon execution, you will receive the following result −
New Zealand is famous for kiwi.
[[[[
A good use for a case statement is the evaluation of command line arguments as follows
−
#!/bin/sh
option="${1}"
case ${option} in
-f) FILE="${2}"
echo "File name is $FILE"
;;
-d) DIR="${2}"
echo "Dir name is $DIR"
;;
*)
echo "`basename ${0}`:usage: [-f file] | [-d directory]"
exit 1 # Command to come out of the program with status 1
;;
esac
[[](https://image.slidesharecdn.com/unixtutorial-180719000332/85/Unix-tutorial-107-320.jpg)
![Unix
100
Here is a sample run of the above program −
$./test.sh
test.sh: usage: [ -f filename ] | [ -d directory ]
$ ./test.sh -f index.htm
$ vi test.sh
$ ./test.sh -f index.htm
File name is index.htm
$ ./test.sh -d unix
Dir name is unix
$
The case...esac statement in the Unix shell is very similar to the switch...case statement
we have in other programming languages like C or C++ and PERL, etc.](https://image.slidesharecdn.com/unixtutorial-180719000332/85/Unix-tutorial-108-320.jpg)
![Unix
101
In this chapter, we will discuss shell loops in Unix. A loop is a powerful programming tool
that enables you to execute a set of commands repeatedly. In this chapter, we will
examine the following types of loops available to shell programmers –
The while loop
The for loop
The until loop
The select loop
UnixShell-ThewhileLoop
The while loop enables you to execute a set of commands repeatedly until some condition
occurs. It is usually used when you need to manipulate the value of a variable repeatedly.
Syntax
while command
do
Statement(s) to be executed if command is true
done
Here the Shell command is evaluated. If the resulting value is true, given statement(s) are
executed. If command is false then no statement will be executed and the program will
jump to the next line after the done statement.
Example
Here is a simple example that uses the while loop to display the numbers zero to nine −
#!/bin/sh
a=0
while [ $a -lt 10 ]
do
echo $a
a=`expr $a + 1`
done
Unix — Shell Loop Types](https://image.slidesharecdn.com/unixtutorial-180719000332/85/Unix-tutorial-109-320.jpg)


![Unix
104
Statement(s) to be executed until command is true
done
Here the Shell command is evaluated. If the resulting value is false,
given statement(s) are executed. If the command is true then no statement will be
executed and the program jumps to the next line after the done statement.
Example
Here is a simple example that uses the until loop to display the numbers zero to nine −
#!/bin/sh
a=0
until [ ! $a -lt 10 ]
do
echo $a
a = 'expr $a + 1'
done
[
Upon execution, you will receive the following result −
0
1
2
3
4
5
6
7
8
9
UnixShell-TheselectLoop
The select loop provides an easy way to create a numbered menu from which users can
select options. It is useful when you need to ask the user to choose one or more items
from a list of choices.](https://image.slidesharecdn.com/unixtutorial-180719000332/85/Unix-tutorial-112-320.jpg)


![Unix
107
NestingLoops
All the loops support nesting concept which means you can put one loop inside another
similar one or different loops. This nesting can go up to unlimited number of times based
on your requirement.
Here is an example of nesting while loop. The other loops can be nested based on the
programming requirement in a similar way −
NestingwhileLoops
It is possible to use a while loop as part of the body of another while loop.
Syntax
while command1 ; # this is loop1, the outer loop
do
Statement(s) to be executed if command1 is true
while command2 ; # this is loop2, the inner loop
do
Statement(s) to be executed if command2 is true
done
Statement(s) to be executed if command1 is true
done
Example
Here is a simple example of loop nesting. Let's add another countdown loop inside the loop
that you used to count to nine −
#!/bin/sh
a=0
while [ "$a" -lt 10 ] # this is loop1
do
b="$a"
while [ "$b" -ge 0 ] # this is loop2
do
echo -n "$b "](https://image.slidesharecdn.com/unixtutorial-180719000332/85/Unix-tutorial-115-320.jpg)

![Unix
109
In this chapter, we will discuss shell loop control in Unix. So far you have looked at creating
loops and working with loops to accomplish different tasks. Sometimes you need to stop
a loop or skip iterations of the loop.
In this chapter, we will learn following two statements that are used to control shell loops:
The break statement
The continue statement
TheinfiniteLoop
All the loops have a limited life and they come out once the condition is false or true
depending on the loop.
A loop may continue forever if the required condition is not met. A loop that executes
forever without terminating executes for an infinite number of times. For this reason, such
loops are called infinite loops.
Example
Here is a simple example that uses the while loop to display the numbers zero to nine −
#!/bin/sh
a=10
until [ $a -lt 10 ]
do
echo $a
a='expr $a + 1'
done
This loop continues forever because a is always greater than or equal to 10 and it is
never less than 10.
ThebreakStatement
The break statement is used to terminate the execution of the entire loop, after
completing the execution of all of the lines of code up to the break statement. It then steps
down to the code following the end of the loop.
Unix — Shell Loop Control](https://image.slidesharecdn.com/unixtutorial-180719000332/85/Unix-tutorial-117-320.jpg)
![Unix
110
Syntax
The following break statement is used to come out of a loop −
break
The break command can also be used to exit from a nested loop using this format –
break n
[[[
Here n specifies the nth
enclosing loop to the exit from.
Example
Here is a simple example which shows that loop terminates as soon as a becomes 5:
#!/bin/sh
a=0
while [ $a -lt 10 ]
do
echo $a
if [ $a -eq 5 ]
then
break
fi
a=`expr $a + 1`
done
Upon execution, you will receive the following result −
0
1
2
3
4
5
[[[[](https://image.slidesharecdn.com/unixtutorial-180719000332/85/Unix-tutorial-118-320.jpg)
![Unix
111
Here is a simple example of nested for loop. This script breaks out of both loops if var1
equals 2 and var2 equals 0 –
#!/bin/sh
for var1 in 1 2 3
do
for var2 in 0 5
do
if [ $var1 -eq 2 -a $var2 -eq 0 ]
then
break 2
else
echo "$var1 $var2"
fi
done
done
Upon execution, you will receive the following result. In the inner loop, you have a break
command with the argument 2. This indicates that if a condition is met you should break
out of outer loop and ultimately from the inner loop as well.
1 0
1 5
Thecontinuestatement
The continue statement is similar to the break command, except that it causes the
current iteration of the loop to exit, rather than the entire loop.
This statement is useful when an error has occurred but you want to try to execute the
next iteration of the loop.
Syntax
continue
Like with the break statement, an integer argument can be given to the continue command
to skip commands from nested loops.
continue n
Here n specifies the nth
enclosing loop to continue from.](https://image.slidesharecdn.com/unixtutorial-180719000332/85/Unix-tutorial-119-320.jpg)
![Unix
112
Example
The following loop makes use of the continue statement which returns from the continue
statement and starts processing the next statement −
#!/bin/sh
NUMS="1 2 3 4 5 6 7"
for NUM in $NUMS
do
Q='expr $NUM % 2'
if [ $Q -eq 0 ]
then
echo "Number is an even number!!"
continue
fi
echo "Found odd number"
done
[
Upon execution, you will receive the following result –
Found odd number
Number is an even number!!
Found odd number
Number is an even number!!
Found odd number
Number is an even number!!
Found odd number](https://image.slidesharecdn.com/unixtutorial-180719000332/85/Unix-tutorial-120-320.jpg)


![Unix
117
In this chapter, we will discuss in detail about the Shell quoting mechanisms. We will start
by discussing the metacharacters.
TheMetacharacters
Unix Shell provides various metacharacters which have special meaning while using them
in any Shell Script and causes termination of a word unless quoted.
For example, ? matches with a single character while listing files in a directory and
an * matches more than one character. Here is a list of most of the shell special characters
(also called metacharacters) −
* ? [ ] ' " $ ; & ( ) | ^ < > new-line space tab
A character may be quoted (i.e., made to stand for itself) by preceding it with a .
Example
Following example shows how to print a * or a ? −
#!/bin/sh
echo Hello; Word
Upon execution, you will receive the following result –
Hello
./test.sh: line 2: Word: command not found
shell returned 127
Let us now try using a quoted character –
#!/bin/sh
echo Hello; Word
Upon execution, you will receive the following result –
Hello; Word
Unix — Shell Quoting Mechanisms](https://image.slidesharecdn.com/unixtutorial-180719000332/85/Unix-tutorial-125-320.jpg)
![Unix
118
The $ sign is one of the metacharacters, so it must be quoted to avoid special handling by
the shell −
#!/bin/sh
echo "I have $1200"
[
Upon execution, you will receive the following result −
I have $1200
[
The following table lists the four forms of quoting −
Quoting Description
Single quote
All special characters between these quotes lose their special
meaning.
Double quote
Most special characters between these quotes lose their special
meaning with these exceptions:
[
$
`
$
'
"
Backslash
Any character immediately following the backslash loses its special
meaning.
Back quote
Anything in between back quotes would be treated as a command
and would be executed.
TheSingleQuotes
Consider an echo command that contains many special shell characters −
echo <-$1500.**>; (update?) [y|n]](https://image.slidesharecdn.com/unixtutorial-180719000332/85/Unix-tutorial-126-320.jpg)
![Unix
119
Putting a backslash in front of each special character is tedious and makes the line difficult
to read −
echo <-$1500.**>; (update?) [y|n]
There is an easy way to quote a large group of characters. Put a single quote (') at the
beginning and at the end of the string −
echo '<-$1500.**>; (update?) [y|n]'
Characters within single quotes are quoted just as if a backslash is in front of each
character. With this, the echo command displays in a proper way.
If a single quote appears within a string to be output, you should not put the whole string
within single quotes instead you should precede that using a backslash () as follows −
echo 'It's Shell Programming'
TheDoubleQuotes
Try to execute the following shell script. This shell script makes use of single quote −
VAR=ZARA
echo '$VAR owes <-$1500.**>; [ as of (`date +%m/%d`) ]'
[
Upon execution, you will receive the following result −
$VAR owes <-$1500.**>; [ as of (`date +%m/%d`) ]
This is not what had to be displayed. It is obvious that single quotes prevent variable
substitution. If you want to substitute variable values and to make inverted commas work
as expected, then you would need to put your commands in double quotes as follows −
VAR=ZARA
echo "$VAR owes <-$1500.**>; [ as of (`date +%m/%d`) ]"
[
Upon execution, you will receive the following result −
ZARA owes <-$1500.**>; [ as of (07/02) ]
[
Double quotes take away the special meaning of all characters except the following −
$ for parameter substitution
Backquotes for command substitution
$ to enable literal dollar signs](https://image.slidesharecdn.com/unixtutorial-180719000332/85/Unix-tutorial-127-320.jpg)


![Unix
142
In this chapter, we will discuss in detail about regular expressions with SED in Unix.
A regular expression is a string that can be used to describe several sequences of
characters. Regular expressions are used by several different Unix commands,
including ed, sed, awk, grep, and to a more limited extent, vi.
Here SED stands for stream editor. This stream-oriented editor was created exclusively
for executing scripts. Thus, all the input you feed into it passes through and goes to
STDOUT and it does not change the input file.
Invokingsed
Before we start, let us ensure we have a local copy of /etc/passwd text file to work
with sed.
As mentioned previously, sed can be invoked by sending data through a pipe to it as
follows −
$ cat /etc/passwd | sed
Usage: sed [OPTION]... {script-other-script} [input-file]...
-n, --quiet, --silent
suppress automatic printing of pattern space
-e script, --expression=script
...............................
The cat command dumps the contents of /etc/passwd to sed through the pipe into sed's
pattern space. The pattern space is the internal work buffer that sed uses for its
operations.
ThesedGeneralSyntax
Following is the general syntax for sed:
/pattern/action
Here, pattern is a regular expression, and action is one of the commands given in the
following table. If pattern is omitted, action is performed for every line as we have seen
above.
The slash character (/) that surrounds the pattern are required because they are used as
delimiters.
Unix — Regular Expressions with SED](https://image.slidesharecdn.com/unixtutorial-180719000332/85/Unix-tutorial-150-320.jpg)


![Unix
148
TheMatchingCommand
You would use the p option along with the -n option to print all the matching lines as
follows −
$ cat testing | sed -n '/root/p'
root:x:0:0:root user:/root:/bin/sh
[root@ip-72-167-112-17 amrood]# vi testing
root:x:0:0:root user:/root:/bin/sh
daemon:x:1:1:daemon:/usr/sbin:/bin/sh
bin:x:2:2:bin:/bin:/bin/sh
sys:x:3:3:sys:/dev:/bin/sh
sync:x:4:65534:sync:/bin:/bin/sync
games:x:5:60:games:/usr/games:/bin/sh
man:x:6:12:man:/var/cache/man:/bin/sh
mail:x:8:8:mail:/var/mail:/bin/sh
news:x:9:9:news:/var/spool/news:/bin/sh
backup:x:34:34:backup:/var/backups:/bin/sh
UsingRegularExpression
While matching patterns, you can use the regular expression which provides more
flexibility.
Check the following example which matches all the lines starting with daemon and then
deletes them −
$ cat testing | sed '/^daemon/d'
root:x:0:0:root user:/root:/bin/sh
bin:x:2:2:bin:/bin:/bin/sh
sys:x:3:3:sys:/dev:/bin/sh
sync:x:4:65534:sync:/bin:/bin/sync
games:x:5:60:games:/usr/games:/bin/sh
man:x:6:12:man:/var/cache/man:/bin/sh
mail:x:8:8:mail:/var/mail:/bin/sh
news:x:9:9:news:/var/spool/news:/bin/sh
backup:x:34:34:backup:/var/backups:/bin/sh
Following is the example which deletes all the lines ending with sh −
$ cat testing | sed '/sh$/d'](https://image.slidesharecdn.com/unixtutorial-180719000332/85/Unix-tutorial-156-320.jpg)
![Unix
149
sync:x:4:65534:sync:/bin:/bin/sync
The following table lists four special characters that are very useful in regular expressions.
Character Description
^ Matches the beginning of lines
$ Matches the end of lines
. Matches any single character
* Matches zero or more occurrences of the previous character
[chars]
Matches any one of the characters given in chars, where chars is a
sequence of characters. You can use the - character to indicate a range
of characters.
MatchingCharacters
Look at a few more expressions to demonstrate the use of metacharacters. For example,
the following pattern −
Expression Description
/a.c/
Matches lines that contain strings such as a+c, a-c, abc, match, and
a3c
/a*c/
Matches the same strings along with strings such as ace, yacc, and
arctic
/[tT]he/ Matches the string The and the
/^$/ Matches blank lines
/^.*$/ Matches an entire line whatever it is
/ */ Matches one or more spaces
/^$/ Matches blank lines
Following table shows some frequently used sets of characters −](https://image.slidesharecdn.com/unixtutorial-180719000332/85/Unix-tutorial-157-320.jpg)
![Unix
150
Set Description
[a-z] Matches a single lowercase letter
[A-Z] Matches a single uppercase letter
[a-zA-Z] Matches a single letter
[0-9] Matches a single number
[a-zA-Z0-9] Matches a single letter or number
CharacterClassKeywords
Some special keywords are commonly available to regexps, especially GNU utilities that
employ regexps. These are very useful for sed regular expressions as they simplify things
and enhance readability.
For example, the characters a through z and the characters A through Z, constitute one
such class of characters that has the keyword [[:alpha:]]
Using the alphabet character class keyword, this command prints only those lines in the
/etc/syslog.conf file that start with a letter of the alphabet −
$ cat /etc/syslog.conf | sed -n '/^[[:alpha:]]/p'
authpriv.* /var/log/secure
mail.* -/var/log/maillog
cron.* /var/log/cron
uucp,news.crit /var/log/spooler
local7.* /var/log/boot.log
The following table is a complete list of the available character class keywords in GNU sed.
Character Class Description](https://image.slidesharecdn.com/unixtutorial-180719000332/85/Unix-tutorial-158-320.jpg)
![Unix
151
[[:alnum:]] Alphanumeric [a-z A-Z 0-9]
[[:alpha:]] Alphabetic [a-z A-Z]
[[:blank:]] Blank characters (spaces or tabs)
[[:cntrl:]] Control characters
[[:digit:]] Numbers [0-9]
[[:graph:]] Any visible characters (excludes whitespace)
[[:lower:]] Lowercase letters [a-z]
[[:print:]] Printable characters (non-control characters)
[[:punct:]] Punctuation characters
[[:space:]] Whitespace
[[:upper:]] Uppercase letters [A-Z]
[[:xdigit:]] Hex digits [0-9 a-f A-F]
AmpersandReferencing
The sed metacharacter & represents the contents of the pattern that was matched. For
instance, say you have a file called phone.txt full of phone numbers, such as the
following −
5555551212
5555551213
5555551214
6665551215
6665551216
7775551217
You want to make the area code (the first three digits) surrounded by parentheses for
easier reading. To do this, you can use the ampersand replacement character −](https://image.slidesharecdn.com/unixtutorial-180719000332/85/Unix-tutorial-159-320.jpg)
![Unix
152
$ sed -e 's/^[[:digit:]][[:digit:]][[:digit:]]/(&)/g' phone.txt
(555)5551212
(555)5551213
(555)5551214
(666)5551215
(666)5551216
(777)5551217
Here in the pattern part you are matching the first 3 digits and then using & you are
replacing those 3 digits with the surrounding parentheses.
UsingMultiplesedCommands
You can use multiple sed commands in a single sed command as follows −
$ sed -e 'command1' -e 'command2' ... -e 'commandN' files
Here command1 through commandN are sed commands of the type discussed
previously. These commands are applied to each of the lines in the list of files given by
files.
Using the same mechanism, we can write the above phone number example as follows −
$ sed -e 's/^[[:digit:]]{3}/(&)/g'
-e 's/)[[:digit:]]{3}/&-/g' phone.txt
(555)555-1212
(555)555-1213
(555)555-1214
(666)555-1215
(666)555-1216
(777)555-1217
Note − In the above example, instead of repeating the character class keyword
[[:digit:]] three times, we replaced it with {3}, which means the preceding regular
expression is matched three times. We have also used to give line break and this has to
be removed before the command is run.
BackReferences
The ampersand metacharacter is useful, but even more useful is the ability to define
specific regions in regular expressions. These special regions can be used as reference in
your replacement strings. By defining specific parts of a regular expression, you can then
refer back to those parts with a special reference character.](https://image.slidesharecdn.com/unixtutorial-180719000332/85/Unix-tutorial-160-320.jpg)


![Unix
162
The following table lists out commands that are available on majority of Unix systems to
create and manage accounts and groups −
Command Description
useradd Adds accounts to the system
usermod Modifies account attributes
userdel Deletes accounts from the system
groupadd Adds groups to the system
groupmod Modifies group attributes
groupdel Removes groups from the system
You can use Manpage Help to check complete syntax for each command mentioned here.
CreateaGroup
We will now understand how to create a group. For this, we need to create groups before
creating any account otherwise, we can make use of the existing groups in our system.
We have all the groups listed in /etc/groups file.
All the default groups are system account specific groups and it is not recommended to
use them for ordinary accounts. So, following is the syntax to create a new group account
−
groupadd [-g gid [-o]] [-r] [-f] groupname
The following table lists out the parameters:
Option Description
-g GID The numerical value of the group's ID
-o This option permits to add group with non-unique GID
-r This flag instructs groupadd to add a system account](https://image.slidesharecdn.com/unixtutorial-180719000332/85/Unix-tutorial-170-320.jpg)


![Unix
172
LoggingActions
The action field specifies one of five actions −
Log message to a file or a device. For example, /var/log/lpr.log or
/dev/console.
Send a message to a user. You can specify multiple usernames by separating them
with commas; for example, root, amrood.
Send a message to all users. In this case, the action field consists of an asterisk;
for example, *.
Pipe the message to a program. In this case, the program is specified after the
Unix pipe symbol (|).
Send the message to the syslog on another host. In this case, the action field
consists of a hostname, preceded by an at sign; for example, @tutorialspoint.com.
TheloggerCommand
Unix provides the logger command, which is an extremely useful command to deal with
system logging. The logger command sends logging messages to the syslogd daemon,
and consequently provokes system logging.
This means we can check from the command line at any time the syslogd daemon and
its configuration. The logger command provides a method for adding one-line entries to
the system log file from the command line.
The format of the command is −
logger [-i] [-f file] [-p priority] [-t tag] [message]...
Here is the detail of the parameters −
Option Description
-f filename Uses the contents of file filename as the message to log.
-i Logs the process ID of the logger process with each line.
-p priority
Enters the message with the specified priority (specified selector entry);
the message priority can be specified numerically, or as a facility.priority
pair. The default priority is user.notice.
-t tag Marks each line added to the log with the specified tag.](https://image.slidesharecdn.com/unixtutorial-180719000332/85/Unix-tutorial-180-320.jpg)