The document is a service manual for Toyota 7FDF/FGF 15-35 vehicles. It provides information on:
- Exterior views and identification of vehicle models
- How to use the manual, including terminology, abbreviations, and inspection/adjustment procedures
- Procedures for removing and installing the engine, including points of attention
- Inspection and adjustment of engine idle speed and no-load maximum speed
Troy bilt 700 series rider service repair manualfhjskemme
This document is a professional shop manual that provides instructions and guidance for trained technicians servicing and repairing MTD 700 series riding tractors. It covers a range of systems including the engine, steering, body panels, drive system, transaxle, electrical system, and more. Technicians are advised to follow all safety instructions and use common sense when working on equipment. The manual is intended as a supplemental reference and updates may be necessary.
This service manual provides information to technicians for troubleshooting, testing, and repairing major systems and components of the Workman MD and MDX utility vehicles. It includes safety instructions, maintenance procedures, specifications, and repair information for the vehicle's engine, drivetrain, electrical system, chassis, and other components. Technicians are directed to refer to additional manuals for specific engine and system details.
The document is a service manual for the Workman MDE vehicle. It provides information to service technicians for troubleshooting, testing, and repairing major systems and components of the Workman MDE. It instructs technicians to refer to the operator's manual for operating, maintenance, and adjustment instructions. The manual contains several chapters covering safety, product records and maintenance, electrical systems, transaxles and brakes, chassis, and electrical diagrams. It provides specifications, troubleshooting guides, and procedures for servicing and repairing components.
This service manual provides information to technicians for troubleshooting, testing, and repairing major systems and components of the Workman MD and MDX utility vehicles. It includes safety instructions, maintenance procedures, specifications, and repair information for the vehicle's engine, drivetrain, electrical system, chassis, and other components. Technicians are directed to refer to operator manuals for additional information.
This document provides torque specifications and conversion factors for fasteners used on ProCore deep tine aerators. Standard torque values are listed for dry, zinc plated steel fasteners in both inch and metric sizes for grades 1, 5, and 8. Lubricated fasteners should be torqued to 25% less. Product records and maintenance procedures can be found in the operator's manual inserted at the end.
Toro pro core sr70 s service repair manualfhjskemme
This document provides torque specifications and conversion factors for fasteners used on ProCore deep tine aerators. Standard torque values are listed for dry, zinc plated steel fasteners in both inch and metric sizes for Grades 1, 5, and 8 bolts as well as Classes 8.8 and 10.9 metric bolts. Reduced torque values are recommended for lubricated fasteners. Product records and maintenance procedures can be found in the operator's manual inserted at the end of the chapter.
This document provides torque specifications and conversion factors for fasteners used on ProCore deep tine aerators. Standard torque values are listed for dry, zinc plated steel fasteners in both inch and metric sizes for grades 1, 5, and 8. Lubricated fasteners should be torqued to 25% less. Product records and maintenance procedures can be found in the operator's manual inserted at the end.
Toro pro core sr54 s service repair manualfhjskemme
This document provides torque specifications and conversion factors for fasteners used on ProCore deep tine aerators. Standard torque values are listed for dry, zinc plated steel fasteners in both inch and metric sizes for grades 1, 5, and 8. Lubricated fasteners should be torqued to 25% less. Product records and maintenance procedures can be found in the operator's manual inserted at the end.
This document provides torque specifications and conversion factors for fasteners used on ProCore deep tine aerators. Standard torque values are listed for dry, zinc plated steel fasteners in both inch and metric sizes for Grades 1, 5, and 8 bolts as well as Classes 8.8 and 10.9 metric bolts. Reduced torque values are recommended for lubricated fasteners. Product records and maintenance procedures can be found in the operator's manual.
Toro pro core processor service repair manualfhjskemme
This service manual provides information to technicians for troubleshooting, testing, and repairing major systems and components of the ProCore Processor. It instructs technicians to refer to the operator's manual for operating instructions and maintenance. The manual includes chapters covering safety, product records and maintenance, the engine, hydraulic system, electrical system, chassis, and electrical diagrams. It is intended to help ensure the correct and safe operation of the ProCore Processor.
Toro groundsmaster 5910 service repair manualfhjskemme
This service manual provides information for troubleshooting, testing, and repairing major systems and components of the Groundsmaster 5900 and 5910 mowers. It contains chapters covering safety procedures, product records and maintenance, diesel engine systems, hydraulic systems, electrical systems, axles/brakes, chassis, cutting decks, operator cab, and foldout drawings. Technicians are instructed to follow safety procedures when jacking, servicing, or performing adjustments on the mower.
Toro groundsmaster 5900 service repair manualfhjskemme
This service manual provides information for troubleshooting, testing, and repairing major systems and components of the Groundsmaster 5900 and 5910 mowers. It contains chapters covering safety procedures, product records and maintenance, diesel engine systems, hydraulic systems, electrical systems, axles/brakes, chassis, cutting decks, operator cab, and foldout drawings. Technicians are instructed to follow safety procedures when jacking, servicing, or performing adjustments on the mower.
Toro groundsmaster 4300 d service repair manualfhjskemme
Here are the key steps for jacking the machine safely:
1. Park machine on a solid, level surface such as a concrete floor.
2. Remove any attachments that could interfere with safely raising the machine.
3. Chock or block the wheels to prevent rolling.
4. Use a jack and jack stands to support the raised machine. Do not rely on just the jack.
5. Position the jack and jack stands at designated lifting points to safely support the weight of the machine.
It is critical to follow these steps when raising the machine to change attachments, tires or perform other service under the machine. Properly supporting the machine is necessary to prevent it from moving or falling, which could
Toro groundsmaster 4110 d (model 30447) service repair manualfhjskemme
This document is a service manual for the Groundsmaster 4100-D and 4110-D. It contains chapters covering safety, product records and maintenance, the Kubota diesel engine, hydraulic system, electrical system, axles/brakes, chassis, cutting deck, operator cab, and foldout drawings. The safety chapter provides instructions for safe operation, maintenance, jacking, and contains safety and instruction decals. The document instructs technicians on troubleshooting, testing, adjusting and repairing major systems and components.
Toro groundsmaster 4100 d (model 30449) service repair manualfhjskemme
This document is a service manual for the Groundsmaster 4100-D and 4110-D. It contains chapters covering safety, product records and maintenance, the Kubota diesel engine, hydraulic system, electrical system, axles/brakes, chassis, cutting deck, operator cab, and foldout drawings. The safety chapter provides instructions for safe operation, maintenance, jacking, and contains safety and instruction decals. The document instructs technicians on troubleshooting, testing, adjusting and repairing major systems and components.
John deere ts and th 6x4 gator utility vehicle service repair manualfhjskemme
The document is a technical manual for a John Deere Gator utility vehicle. It provides an overview of the manual's contents and organization. The manual contains sections on specifications, component locations, schematics, theory of operation, diagnostics, testing, repair and safety information. It notes that the manual is intended for experienced technicians and contains model-specific information to support the total product. Safety warnings are provided throughout regarding handling fluids, batteries, pressurized lines, rotating parts, and other hazards.
John deere 790 compact utility tractor service repair manualfhjskemme
This technical manual provides service information for John Deere 670, 770, 790, 870, 970, and 1070 compact utility tractors. It contains sections on general information, engine repair, electrical systems, power train, steering/brakes, hydraulics, and operation/testing. The document provides specifications, repair/removal instructions, and diagnostic information to assist technicians in servicing these tractor models. Safety messages are included throughout and components are organized by system for easy reference.
Clark c500, y350 forklift service repair manualfhjskemme
This document provides instructions and guidelines for performing planned maintenance (PM) on Clark lift trucks. It outlines the importance of regular inspections and recommends using a PM report form to document the inspections. Safety precautions are described, such as disconnecting the battery before working on electrical components. A visual inspection process is outlined to check for issues like leaks, loose or damaged parts, and worn components. Inspections of specific systems and components like the overhead guard, carriage, forks, and hydraulic and electrical systems are recommended. Records of inspections should be submitted to maintenance authorities.
Clark c500, y300 s forklift service repair manualfhjskemme
This document provides a summary of procedures for performing planned maintenance (PM) on Clark lift trucks. It outlines the importance of regular inspections and lubrication for long life and trouble-free operation. It recommends using a PM report form as a checklist to document inspections and needed repairs. Safety precautions are described, such as disconnecting the battery before working on electrical components. Visual inspections of various components like the overhead guard, carriage, forks and hydraulic systems are described to identify obvious damage, leaks or worn parts. Record keeping of inspection results is emphasized.
Clark c500, y300 l forklift service repair manualfhjskemme
This document provides instructions and maintenance procedures for Clark lift trucks. It begins with introductory information on safety signs, user safe maintenance practices, and how to perform periodic maintenance using a report form. The bulk of the document consists of an index that lists maintenance groups and sections to guide the user in maintaining different truck components and systems, such as the engine, transmission, hydraulics, brakes, and other areas. Safety is emphasized throughout and specific components like forks, cylinders and chains require close visual inspection.
Clark c500, y250 s forklift service repair manualfhjskemme
This document provides instructions and maintenance procedures for Clark lift trucks. It begins with introductory information on safety signs, user safe maintenance practices, and how to perform periodic maintenance using a report form. The bulk of the document consists of an index that lists maintenance groups and sections to guide the user in maintaining different truck components and systems, such as the engine, transmission, hydraulics, brakes, and other areas. Safety is emphasized throughout and specific components like forks, cylinders and chains require close visual inspection.
Clark c500, y250 l forklift service repair manualfhjskemme
This document provides a summary of procedures for performing planned maintenance (PM) on Clark lift trucks. It outlines the importance of regular inspections and lubrication for long life and trouble-free operation. It recommends using a PM report form as a checklist to document inspections and any needed repairs. Safety precautions are listed, such as disconnecting the battery before working on electrical components. Visual inspections of the truck and its components are described to identify obvious damage, leaks, or loose/missing parts. Specific components discussed include the overhead guard, welds, upright assembly, lift chains, forks, and wheels/tires.
Clark c500, y225 s forklift service repair manualfhjskemme
This document provides instructions and maintenance procedures for Clark lift trucks. It begins with introductory information on safety signs, user safe maintenance practices, and how to perform periodic maintenance using a report form. The bulk of the document consists of an index that lists maintenance groups and sections to guide the user through the maintenance process. Safety is emphasized throughout with warnings and cautions.
Clark c500, y225 l forklift service repair manualfhjskemme
This document provides instructions and guidelines for performing planned maintenance (PM) on Clark lift trucks. It outlines the importance of regular inspections and lubrication for long life and trouble-free operation. Technicians should use the provided PM report form as a checklist to document their visual inspections of components like the overhead guard, carriage, forks, and hydraulic and electrical systems. Safety precautions are also described, such as disconnecting the battery before working on electrical components. The document is intended to help technicians safely and properly complete routine maintenance.
Clark c500, y200 forklift service repair manualfhjskemme
This document provides instructions and guidelines for performing planned maintenance (PM) on Clark lift trucks. It outlines the importance of regular inspections and recommends using a PM report form to document the inspections. Safety precautions are listed, such as disconnecting the battery before working on electrical components. A visual inspection process is described which includes checking for leaks, loose or damaged parts, and worn components like lift chains, forks and rollers. Records of inspections should be given to those responsible for lift truck maintenance.
Clark c500, y180 forklift service repair manualfhjskemme
This document provides instructions and maintenance procedures for Clark lift trucks. It begins with introductory information on safety signs, user safe maintenance practices, and how to perform periodic maintenance using a report form. The bulk of the document consists of an index that lists maintenance groups and sections to inspect things like the engine, transmission, hydraulic components, brakes, steering and other systems. Safety is emphasized throughout and procedures are organized logically and efficiently.
Welcome to ASP Cranes, your trusted partner for crane solutions in Raipur, Chhattisgarh! With years of experience and a commitment to excellence, we offer a comprehensive range of crane services tailored to meet your lifting and material handling needs.
At ASP Cranes, we understand the importance of reliable and efficient crane operations in various industries, from construction and manufacturing to logistics and infrastructure development. That's why we strive to deliver top-notch solutions that enhance productivity, safety, and cost-effectiveness for our clients.
Our services include:
Crane Rental: Whether you need a crawler crane for heavy lifting or a hydraulic crane for versatile operations, we have a diverse fleet of well-maintained cranes available for rent. Our rental options are flexible and can be customized to suit your project requirements.
Crane Sales: Looking to invest in a crane for your business? We offer a wide selection of new and used cranes from leading manufacturers, ensuring you find the perfect equipment to match your needs and budget.
Crane Maintenance and Repair: To ensure optimal performance and safety, regular maintenance and timely repairs are essential for cranes. Our team of skilled technicians provides comprehensive maintenance and repair services to keep your equipment running smoothly and minimize downtime.
Crane Operator Training: Proper training is crucial for safe and efficient crane operation. We offer specialized training programs conducted by certified instructors to equip operators with the skills and knowledge they need to handle cranes effectively.
Custom Solutions: We understand that every project is unique, which is why we offer custom crane solutions tailored to your specific requirements. Whether you need modifications, attachments, or specialized equipment, we can design and implement solutions that meet your needs.
At ASP Cranes, customer satisfaction is our top priority. We are dedicated to delivering reliable, cost-effective, and innovative crane solutions that exceed expectations. Contact us today to learn more about our services and how we can support your project in Raipur, Chhattisgarh, and beyond. Let ASP Cranes be your trusted partner for all your crane needs!
Implementing ELDs or Electronic Logging Devices is slowly but surely becoming the norm in fleet management. Why? Well, integrating ELDs and associated connected vehicle solutions like fleet tracking devices lets businesses and their in-house fleet managers reap several benefits. Check out the post below to learn more.
Ever been troubled by the blinking sign and didn’t know what to do?
Here’s a handy guide to dashboard symbols so that you’ll never be confused again!
Save them for later and save the trouble!
Expanding Access to Affordable At-Home EV Charging by Vanessa WarheitForth
Vanessa Warheit, Co-Founder of EV Charging for All, gave this presentation at the Forth Addressing The Challenges of Charging at Multi-Family Housing webinar on June 11, 2024.
Understanding Catalytic Converter Theft:
What is a Catalytic Converter?: Learn about the function of catalytic converters in vehicles and why they are targeted by thieves.
Why are They Stolen?: Discover the valuable metals inside catalytic converters (such as platinum, palladium, and rhodium) that make them attractive to criminals.
Steps to Prevent Catalytic Converter Theft:
Parking Strategies: Tips on where and how to park your vehicle to reduce the risk of theft, such as parking in well-lit areas or secure garages.
Protective Devices: Overview of various anti-theft devices available, including catalytic converter locks, shields, and alarms.
Etching and Marking: The benefits of etching your vehicle’s VIN on the catalytic converter or using a catalytic converter marking kit to make it traceable and less appealing to thieves.
Surveillance and Monitoring: Recommendations for using security cameras and motion-sensor lights to deter thieves.
Statistics and Insights:
Theft Rates by Borough: Analysis of data to determine which borough in NYC experiences the highest rate of catalytic converter thefts.
Recent Trends: Current trends and patterns in catalytic converter thefts to help you stay aware of emerging hotspots and tactics used by thieves.
Benefits of This Presentation:
Awareness: Increase your awareness about catalytic converter theft and its impact on vehicle owners.
Practical Tips: Gain actionable insights and tips to effectively prevent catalytic converter theft.
Local Insights: Understand the specific risks in different NYC boroughs, helping you take targeted preventive measures.
This presentation aims to equip you with the knowledge and tools needed to protect your vehicle from catalytic converter theft, ensuring you are prepared and proactive in safeguarding your property.
EV Charging at MFH Properties by Whitaker JamiesonForth
Whitaker Jamieson, Senior Specialist at Forth, gave this presentation at the Forth Addressing The Challenges of Charging at Multi-Family Housing webinar on June 11, 2024.
What Could Be Behind Your Mercedes Sprinter's Power Loss on Uphill RoadsSprinter Gurus
Unlock the secrets behind your Mercedes Sprinter's uphill power loss with our comprehensive presentation. From fuel filter blockages to turbocharger troubles, we uncover the culprits and empower you to reclaim your vehicle's peak performance. Conquer every ascent with confidence and ensure a thrilling journey every time.
What Could Be Behind Your Mercedes Sprinter's Power Loss on Uphill Roads
Toyota 62 7 fdf25 forklift service repair manual
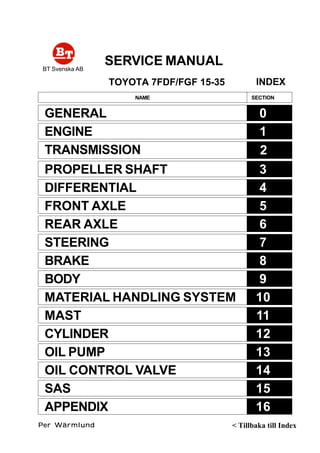
1. SERVICE MANUAL
TOYOTA 7FDF/FGF 15-35
BT Svenska AB
Per WärmlundPer WärmlundPer WärmlundPer WärmlundPer Wärmlund
NAME SECTION
GENERAL
ENGINE
TRANSMISSION
0
1
2
PROPELLER SHAFT
DIFFERENTIAL
FRONT AXLE
REAR AXLE
STEERING
BRAKE
BODY
MATERIAL HANDLING SYSTEM
MAST
CYLINDER
OIL PUMP
OIL CONTROL VALVE
SAS
APPENDIX
3
4
5
6
7
8
9
10
11
12
13
14
15
16
INDEX
< Tillbaka till Index
2. 0-1
0GENERAL
Page
EXTERIOR VIEWS......................................................... 0-2
VEHICLE MODEL .......................................................... 0-3
FRAME NUMBER........................................................... 0-4
HOW TO USE THIS MANUAL .................................... 0-5
EXPLANATIONMETHOD ................................................. 0-5
TERMINOLOGY................................................................ 0-6
ABBREVIATIONS ............................................................. 0-6
OPERATIONAL TIPS .................................................... 0-7
HOISTING THE VEHICLE ............................................ 0-8
CIRCUIT TESTER.................................................. 0-9
STANDARD BOLT & NUT TIGHTENING
TORQUE ....................................................................... 0-11
BOLT STRENGTH TYPE IDENTIFICATION METHOD ...... 0-11
TIGHTENING TORQUE TABLE ........................................ 0-12
PRECOAT BOLTS ......................................................... 0-13
HIGH PRESSURE HOSE FITTING
TIGHTENING TORQUE ............................................ 0-13
WIRE ROPE SUSPENSION ANGLE LIST ............... 0-14
SAFE LOAD FOR EACH WIRE ROPE
SUSPENSION ANGLE............................................... 0-14
COMPONENTS WEIGHT............................................. 0-15
RECOMMENDED LUBRICANT
QUANTITY & TYPES ................................................. 0-16
SMÖRJSCHEMA ........................................................... 0-18
PERIODISKT UNDERHÅLL ........................................ 0-19
UTBYTE AV SMÖRJMEDEL
OCH DELAR ................................................................. 0-25
5. 0-4
FRAME NUMBER
Frame No. Punching Position
Punching position
Series
1 ton series
2 ton series
3 ton, J3.5 ton series
Engine
4Y
1DZ-II
4Y
2Z
1DZ-II
4Y
2Z
1DZ-II
Vehicle model
42-7FGF15
42-7FGF18
02-7FDF15
02-7FDF18
42-7FGF20
42-7FGF25
02-7FDF20
02-7FDF25
62-7FDF20
62-7FDF25
02-7FGF30
02-7FGJF35
02-7FDF30
02-7FDJF35
62-7FDF30
Punching format
407FGF18 10011
7FDF18 10011
407FGF25 10011
7FDF25 10011
607FDF25 10011
7FGJF35 10011
7FDJF35 10011
607FDF30 10011
6. 0-5
HOW TO USE THIS MANUAL
EXPLANATIONMETHOD
1. Operation procedure
(1) The operation procedure is described in either pattern A or pattern B below.
Pattern A: Explanation of each operation step with illustration.
Pattern B: Explanation of operation procedure by indicating step numbers in one illustration, fol-
lowed by explanation of cautions and notes summarized as point operations.
Example of description in pattern B
DISASSEMBLY·INSPECTION·REASSEMBLY Tightening torque unit T = N·m (kgf-cm) [ft-lbf]
DisassemblyProcedure
1 Remove the cover. [Point 1]
2 Remove the bushing [Point 2] Operation explained later
3 Remove the gear.
Point Operations Explanation of key point for operation with an illustration
[Point 1]
Disassembly: Put a match mark when removing the pump cover.
[Point 2]
Inspection: Measure the bush inside diameter.
Limit: 19.12 mm (0.7528 in)
• Step Nos. are partially sometimes
omitted in illustrations.
• When a part requiring tightening
torque instruction is not indicated in
the illustration, the part name is de-
scribed in the illustration frame.
T = 46.1 ~ 48.1
(470 ~ 490)
[34.0 ~ 35.5]
7. 0-6
Abbreviation (code)
ASSY
LH
LLC
M/T
NMR
OPT
O/S
PS
RH
SAE
2. How to read components figures (Example)
(1) The components figure uses the illustration
in the parts catalog for the vehicle model.
Please refer to the catalog for checking the
part name.
The number at the right shoulder of each
components figure indicates the Fig. num-
ber in the parts catalog.
3. Matters omitted in this manual
(1) This manual omits description of the following jobs, but perform them in actual operation:
Cleaning and washing of removed parts as required
Visual inspection (partially described)
TERMINOLOGY
Caution:
Important matters of which negligence may cause accidents. Be sure to observe them.
Note:
Important items of which negligence may cause accidents, or matters in operation procedure
requiring special attention.
Standard: Values showing allowable range in inspection and adjustment.
Limit: Maximum or minimum allowable value in inspection or adjustment.
ABBREVIATIONS
Meaning
System of active stability
Special service tool
Standard
Tightening torque
Torque converter &
transmission
Number of teeth ( )
Undersize
With
Less
Meaning
Assembly
Left hand
Long life coolant
Manual transmission
No-load maximum
speed
Option
Oversize
Power steering
Right hand
Society of Automotive
Engineers (USA)
Abbreviation (code)
SAS
SST
STD
T =
T/C
T
U/S
W/
L/
-
FIG number in parts catalog
3201
8. 1-8
REMOVAL•••••INSTALLATION T = N•••••m (kgf-cm) [ft-lbf]
ENGINE ASSY
Engine mounting nut
End plate set bolt
Drive plate set bolt (for connecting engine crankshaft)
Drive plate set bolt (for connecting torque converter)
Torque converter housing set bolt
T = 53.9 ~ 99.0 (550 ~ 1010) [39.8 ~ 73.1]
T = 49.0 ~ 78.5 (500 ~ 800) [36.2 ~ 57.9]
4Y: T = 56.9 ~ 64.7 (580 ~ 660) [42.0 ~ 47.7]
1DZ-II•2Z: T = 76.5 ~ 93.2 (780 ~ 950) [56.4 ~ 68.7]
T = 14.7 ~ 21.6 (150 ~ 220) [10.9 ~ 15.9]
T = 29.4 ~ 44.1 (300 ~ 450) [21.7 ~ 32.6]
9. 1-9
Removal Procedure
1 Remove the engine hood. (See p. 9-5.)
2 Remove the toe board.
3 Drain coolant.
4 Remove the battery and battery tray.
5 Remove the relay block and electrical parts plate set bolts to free them.
6 Disconnect the accelerator wire and fuel hose. [Point 1]
7 Diesel Vehicle:
Remove the sedimenter bracket set bolt to free the bracket.
8 Disconnect connectors and wiring harness clamps around the engine.
9 Disconnect the torque converter cooler hose. [Point 2]
10 Remove the radiator.
11 Disconnect the air cleaner hose.
12 Remove the oil pump set bolts to free the pump.
13 Disconnect the exhaust pipe.
14 Disconnect the wiring from the starting motor.
15 Remove the under cover.
16 Remove the cover plate.
17 Remove 6 drive plate set bolts.
18 Remove the engine ASSY mounting nuts.
19 Slightly hoist the engine. [Point 3]
20 Support the torque converter housing with wooden blocks.
21 Separate the torque converter housing and engine. [Point 4]
22 Remove the engine ASSY with drive plate and torque converter end plate.
23 Remove the drive plate.
24 Remove the torque converter end plate.
25 Remove the starting motor.
Installation Procedure
The installation procedure is the reverse of the removal procedure.
Note:
••••• Apply sealant (08833-00080) before tightening the drive plate set bolt (for connecting engine
crankshaft).
••••• Bleed air from the fuel system after installation of the engine ASSY. (For diesel vehicle) (See p.
1-11.)
10. 1-10
Point Operations
[Point 1]
Removal:
Put a match marks on the fuel hose and the coupler.
[Point 2]
Removal:
Put a match mark on the radiator and torque converter
cooler hose.
[Point 3]
Removal•Installation:
SST 09010-20111-71 ---
09010-23320-71 ---
Removal:
Tentatively hoist up until the mounting bolt completely
comes out from the hole in the frame.
[Point 4]
Removal:
Use a straight-edge screwdriver for separation. If the fit-
ting is too tight, change the SST hook position and adjust
the engine angle for easier separation.
SST
SST
11. 1-11
AIR BLEEDING FROM FUEL SYSTEM
(DIESEL VEHICLE)
1. Operate the hand pump of the fuel filter until the pump
operating force becomes heavy.
ENGINE SPEED INSPECTION AND ADJUSTMENT
Note:
Warm up the engine, set the vehicle to the following conditions, and conduct inspection and ad-
justment.
Coolant temperature: 80°°°°°C (176°°°°°F) or more, engine oil: 70°°°°°C (158°°°°°F) or more, operating oil tem-
perature: 50°°°°°C (122°°°°°F) or more, auto choke in release state (4Y engine)
4YENGINE
Idling speed and idle up speed inspection and adjust-
ment
<Gasoline Vehicle>
1. Install the engine speedometer.
2. Disconnect the idle up actuator and inspect the idle up
speed.
Standard: 1000 ± 30 rpm
3. If the measured value is out of the specified range, ad-
just by turning adjusting screw B.
4. Connect the idle up actuator.
5. Check the idling speed.
Standard: 750 rpm
6. If the measured value is out of the specified range, ad-
just by adjusting screw A.
7. If the speed is still higher after adjustment in 3 above,
adjust using the following procedure:
A
B
Actuator
hose
+ 50
-0
12. 1-12
(1) If the auto choke cam is contacting although the cool-
ant temperature is as specified above, replace the
auto choke.
(2) If the idle up actuator rod and adjusting screw B are
in contact with each other, turn adjusting screw B coun-
terclockwise.
<LPG/Gasoline or LPG>
1. Install the engine speedometer.
2. Disconnect the idle up actuator and inspect the idle up
speed.
Standard:
LPG/Gasoline: 1000 ± 30 rpm
Actuator
hose
B
B
B
Actuator
hose
LPG/Gasoline
Actuator
hose
LPG
LPG: 1400 ± 30 rpm
LPG (France spec.): 1400 ± 30 rpm
3. If the measured value is out of the specified
range, adjust by turning adjusting screw B.
Loosen the lock nut before adjustment in
case of the LPG engine vehicle (France
spec.).
4. Connect the idle up actuator.
Lock nut
B
5. Check the idling speed.
Standard:
LPG/Gasoline: 750 rpm
LPG: 800 rpm
LPG (France spec.) : 750 rpm
+ 50
- 0
+ 50
- 0
+ 50
- 0
LPG (France spec.)
13. 1-13
A
Regulator
LPG carburetor
B
C
6. If the measured value is out of the specified range, make
adjustment according to the following procedure:
(1) Make adjustment by turning adjusting screw B (LPG
vehicle) or C (LPG/gasoline vehicle).
(If less than the standard, turn adjusting screw A coun-
terclockwise beforehand.)
(2) Slowly turn adjusting screw A clockwise or counter-
clockwise until the maximum speed is obtained.
(3) Determine the positions of adjusting screws B and C
by repeating steps (1) and (2) until the value obtained
in step (2) satisfies the standard.
(4) Slowly turn adjusting screw A clockwise until the CO
concentration becomes 2 to 3%, and then turn it 45
degrees counterclockwise from the position where the
speed begins to drop.
E
D
LPG (France spec.)
(1) Make adjustment by turning adjusting screw D (LPG
vehicle).
(If less than the standard, turn adjusting screw E clock-
wise beforehand.)
(2) Determine the position of adjusting screw D by re-
peating step (1) until the value obtained in step (1) sat-
isfies the standard.
(3) Slowly turn adjusting screw E counter-clockwise until
the CO concentration becomes 2 to 3%, and then turn
it 45 degrees counterclockwise from the position where
the speed begins to drop.
No-load Maximum Speed Inspection••••• Adjustment
<Gasoline, LPG or LPG/Gasoline Vehicle>
1. Install the engine speedometer.
2. Inspect and adjust the no-load static maximum speed.
(1) Measure the speed when the accelerator pedal is fully
depressed.
Standard:
4Y engine:
1•2 ton series: ...................... 2600 ± 50 rpm
3• J3.5 ton series: ................. 2800 ± 50 rpm
(2) If the measured value does not satisfy the standard,
make adjustment as follows:
Remove the seal and loosen the lock bolt.
Fully depress the accelerator pedal.
Turn the bushing for adjustment, while holding the
adjusting screw of the air governor immovable with
a straight-edge screwdriver.
Lock bolt
Fix.
Adjusting screw
Bushing
14. 1-14
3. Check and adjust relief down.
(1) Operate the tilt lever fully backward with the engine
running at the maximum speed, and measure the de-
crease in speed (relief down) upon full relief.
Standard: Within 300 rpm
Tilt lever
(2) If the measured value is out of the standard range,
make adjustment according to the following proce-
dure:
Turn the adjusting screw counterclockwise to de-
crease relief down.
Return the screw by 1/10 of a turn to eliminate twist-
ing of the spring in the air governor.
Adjust the no-load maximum speed.
Repeat steps , and until the measured value
satisfies the standard.
4. Check and adjust hunting.
(1) Check for hunting upon tilt relief at the no-load maxi-
mum speed.
(2) If hunting occurs a few times or more, make adjust-
ment according to the following procedure:
Turn the adjusting screw clockwise by 1/2 of a turn
or more.
Return the screw counterclockwise by 1/4 of a turn.
Finally, turn it by 1/10 of a turn to eliminate twisting
of the spring in the air governor.
Adjust the no-load maximum speed.
Repeat steps through until hunting occurs no
more.
5. Repeat adjustments in steps 2 to 4 until respective stan-
dards are satisfied.
6. Seal the lock bolt.
15. 1-15
1DZ-II•••••2Z ENGINE
Idle Speed Inspection•••••Adjustment
1. Install the engine speedometer.
2. Check the idle speed.
Standard: 750 ± 25 rpm
3. If the measured value is out of the standard, loosen the
lock nut and make adjustment by turning adjusting screw
A.
No-load Maximum Speed Inspection•••••Adjustment
1. Install the engine speedometer.
2. Inspect and adjust the no-load maximum speed.
(1) Measure the speed when the accelerator pedal is fully
depressed.
Standard:
1DZ-II engine:
1 ton series: .................... 2600 ± 50 rpm
Vehicle speed control
system spec.: .............. 2600 ± 50 rpm
2• 3 ton series: ................. 2800 ± 50 rpm
2Z engine: ........................... 2400 ± 50 rpm
(2) If the measured value does not satisfy the standard ,
make adjustment as follows:
Remove the seal and loosen the lock nut.
Make adjustment by turning adjusting screw B.
3. Check and adjust relief down.
(1) Operate the tilt lever fully backward with the engine
running at the maximum speed and measure the de-
crease in speed (relief down) upon full relief.
Standard: Within 200 rpm
4. Seal the adjusting screws after the end of adjustment.
A
B
Tilt lever
16. 1-16
AIR CLEANER
SPECIFICATIONS
Type
Size
Intake type
Filtering area cm2
(in2
)
Others
Single (STD)
Cyclone type
7-inch
Fresh air introduction type
14600 (2263)
With evacuator valve
Double (OPT)
←
←
←
Outer: 18600 (2883)
Inner: 510 (79.1)
←
COMPONENTS
1703
17. 1-17
AIR CLEANER CLEANING••••• INSPECTION
1. Open the engine hood.
2. Remove the element.
Note:
In case of the double element type (OPT), do not remove
the inner element for other than replacement.
3. Clean the element.
(1) For ordinary cleaning, blow with compressed air [690
kPa (7kgf/cm2
) [100 psi] or less] vertically along the
pleats from the inside of the element.
If heavily contaminated, washing is possible.
(2) Element washing method
Dissolve neutral detergent in tepid water (approx. 40°C
(104°F)) and immerse the element in it for about 30
minutes. Then, rinse the element well with clear wa-
ter. [Water pressure: 275 kPa (2.8 kgf/cm2
) [40 psi] or
less]
After washing, naturally dry the element or dry the
element with a dryer (cold air).
Note:
••••• Do not damage the element during washing.
••••• Never use compressed air or hot air for drying.
4. Clean the evacuator valve (dust discharge valve).
(1) Hold the tip end of the evacuator valve and discharge
dust and dirt from the inside of the valve.
5. Inspect the element.
(1) After cleaning, place an electric bulb in the element to
inspect any damage in the element. If any pinhole,
tear or damage is found, replace it with a new ele-
ment.
6. Element replacement
Replace the element after it is washed six times or gen-
erally at intervals of 12 months.
Vehicle without
vehicle speed
control system
7. Install the element.
(1) Install the evacuator valve in the illustrated direction.
Vehicle with
vehicle speed
control system
60°
25°
18. 1-18
CLOGGING WARNING SYSTEM INSPECTION
1. Warning lamp inspection
(1) See that the air cleaner warning lamp comes on when
the ignition switch is turned ON and goes out when
the engine starts.
2. Individual inspection
(1) Use a mity vac to apply a negative pressure to the
vacuum switch, and inspect conduction.
Standard
Gasoline models:
2942 ± 294 Pa (300 ± 30 mm H2O)
(22.1 ± 2.2 mmHg) [11.81 ± 1.18 in H2O]
[0.870 ± 0.087 in Hg]: Conduction
Diesel models:
7473 ± 569 Pa (762 ± 58 mm H2O)
(56.0 ± 4.3 mmHg) [30.00 ± 2.28 in H2O]
[2.205 ± 0.169 in Hg]: Conduction
RADIATOR
COMPONENTS
1603
19. 1-19
Total
amount of
coolant
7.4 (1.95)
5.9 (1.56)
9.3 (2.46)
8.3 (2.19)
9.0 (2.37)
9.5 (2.51)
8.2 (2.16)
8.8 (2.32)
9.5 (2.51)
8.8 (2.32)
SPECIFICATIONS
Type Crossflow
Fin type Corrugated fin
Coolant capacity (in radiator) See the table below
Cap opening pressure kPa (kgf/cm2
) [psi] 88 ± 14.7 (0.9 ± 0.15) [13 ± 2.1]
Others Built in torque converter cooler (torque converter model)
COOLANT CAPACITY AND ANTIFREEZE TABLE Unit: (US gal)
Radiator
capacity
2.5 (0.66)
2.5 (0.66)
3.7 (0.98)
3.7 (0.98)
3.7 (0.98)
3.7 (0.98)
3.7 (0.98)
3.7 (0.98)
3.7 (0.98)
3.7 (0.98)
LLC mixing
ratio at 30%
(to - 15°C
(5°F))
2.2 (0.58)
1.8 (0.48)
2.8 (0.74)
2.5 (0.66)
2.7 (0.71)
2.9 (0.77)
2.5 (0.66)
2.6 (0.69)
2.9 (0.77)
2.6 (0.69)
LLC mixing
ratio at 50%
(to - 35°C
(- 31°F))
3.7 (0.98)
3.0 (0.79)
4.7 (1.24)
4.2 (1.11)
4.5 (1.19)
4.8 (1.27)
4.1 (1.08)
4.4 (1.16)
4.8 (1.27)
4.4 (1.16)
Antirust
mixing at
5%
0.4 (0.11)
0.3 (0.08)
0.5 (0.13)
0.4 (0.11)
0.5 (0.13)
0.5 (0.13)
0.4 (0.11)
0.4 (0.11)
0.5 (0.13)
0.4 (0.11)
4Y
1DZ-II
4Y
1DZ-II
2Z
4Y
1DZ-II
2Z
4Y
2Z
1 ton series
2 ton series
3 ton series
J3.5 ton series
Note:
••••• The total amount of coolant does not include the capacity of the reservoir tank.
••••• Reservoir tank capacity: 0.6 (0.16 US gal) (at FULL mark position)
20. Thank you very much for
your reading. Please Click
Here. Then Get COMPLETE
MANUAL. NO WAITING
NOTE:
If there is no response to
click on the link above,
please download the PDF
document first and then
click on it.
22. 1-21
REMOVAL•••••INSTALLATION
Note:
The muffler can be removed by either of the two methods shown below.
Remove the muffler after removing the counterweight.
Remove the muffler after removing the radiator W/counterweight.
Here, method is explained.
Removal Procedure
1 Remove the counterweight. (See p. 9-6.)
2 Disconnect the exhaust pipe.
3 Remove the muffler W/tail pipe.
4 Disconnect the tail pipe from the muffler.
Installation Procedure
The installation procedure is the reverse of the removal procedure.
CATALYTIC MUFFLER MAINTENANCE
Replace the muffler ASSY every year (2000 hours) on either the gasoline or diesel engine vehicle.
3
2