Staining techniques
Staining techniquesare methods used to enhance the
visibility of microscopic structures, cells, or tissues by
applying stains or dyes.
A dye is a general purpose coloring Agent , whereas a
stain is used for coloring biological material .
A stain is an organic compound containing a benzene
ring plus a chromophore and an auxochrome group .
Chromophore is a chemical group that imparts color to
benzene.
Auxochrome group is a chemical compound that
conveys the property of ionization of chromogen [ability
to form salts ] and bind to fibers or tissues
3.
Staining techniques
stain– majority of stains used for staining bacteria are of the basic
type as nucleic acid of bacterial cells attract the positive ions , e.g.
methylene blue , crystal violet .
Acidic stains are used for background staining.
Different techniques was used for visualization , differentiation and
separation of bacteria in terms of morphology .
Mordant is a chemical that forms an insoluble complex with the stain
and fixes it or causes the stain to penetrate more deeply into the cell.
These are used in indirect staining.
Decolorizer is a chemical used to remove the excess stain in indirect
regressive staining.
Accentuater is a chemical which when added to a stain to make
the reaction more selective and intense.
4.
History of staining
17thCentury: Advent of Microscopy:
1. The invention of the microscope by Antonie van Leeuwenhoek (circa 1670) paved
the way for visualizing microorganisms.
2. Early staining methods were rudimentary, often using inks or natural dyes to
enhance contrast.
1. 19th Century: Development of Biological Stains:
1. The field of histology (study of tissues) flourished, requiring more advanced staining
techniques.
2. Christian Ehrenberg (1830s): Used iodine to stain protozoa, revealing internal
structures.
3. Joseph von Gerlach (1858): Pioneered the use of carmine and hematoxylin for
staining animal tissues.
4. Paul Ehrlich (1870s): Developed aniline dyes, introducing synthetic chemicals to
staining. He also laid the groundwork for Gram staining, a vital method for classifying
bacteria.
5.
20th Century:Advances in Techniques
1. Standardization of Staining Protocols:
1. Techniques like Gram staining, Ziehl-Neelsen staining, and periodic acid-Schiff (PAS)
became essential in microbiology and pathology.
2. Introduction of immunohistochemistry (IHC) allowed specific cellular components to
be stained using antibodies.
2. Industrial and Synthetic Dyes:
1. The synthesis of azo dyes and other chemicals expanded the range of available
stains, particularly in textiles and research.
3. Fluorescent Staining:
1. Fluorescent dyes, such as fluorescein and rhodamine, enabled visualization under
ultraviolet light, revolutionizing molecular biology and genetics.
•Hans Christian Gram (1853–1938):
•Developed the Gram stain in 1884, a technique that differentiates bacteria into Gram-positive and Gram-
negative categories based on their cell wall properties.
•Franz Ziehl and Friedrich Neelsen:
•Introduced the Ziehl-Neelsen stain for identifying acid-fast bacteria like Mycobacterium tuberculosis.
6.
Types of staining
Simple staining
positive / direct
negative / indirect
Differential staining
separation into groups
gram staining
acid fast staining
visualization of structure
Flagella staining
Capsule staining
Spore stain
Simple staining
Principle
Simple staining relies on the interaction between a basic dye and the
negatively charged components of bacterial cells, particularly their cell
walls and cytoplasm. Basic dyes are positively charged (cationic),
allowing them to bind to the negatively charged bacterial surfaces
through electrostatic attraction.
Common Stains Used
1. Methylene Blue
2. Crystal Violet
3. Safranin
4. Carbol Fuchsin
9.
Simple staining
Simple negative/indirect
staining
most of the bacterial cells possesses slightly
negatively charge.
The acidic stain is used to stain the micro
organisms. (e.g. Eosin stain, nigrosine etc).
Such stain is not responsible for the staining
of the cell because there is repulsion
between two similar charges i.e. negative
charge of acidic stain and negatively
charged bacterial cell.
The stain particle remains outside the cell
and just stains the background. The
bacterial morphology can be studied by
negative staining.
Simple positive / direct
staining
The bacterial cell possesses slightly
negatively charge.
This procedure utilizes positive stains/
basic stains to color the micro
organisms.
The negatively charged group of
bacterial cell surfaces produces
attraction between basic stains.
Here the micro organisms take up the
color of the stain and leave the
background colorless.
The stains used in this method include
methylene blue, crystal violet etc.
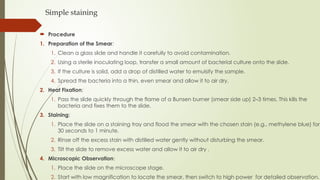
Simple staining
Procedure
1.Preparation of the Smear:
1. Clean a glass slide and handle it carefully to avoid contamination.
2. Using a sterile inoculating loop, transfer a small amount of bacterial culture onto the slide.
3. If the culture is solid, add a drop of distilled water to emulsify the sample.
4. Spread the bacteria into a thin, even smear and allow it to air dry.
2. Heat Fixation:
1. Pass the slide quickly through the flame of a Bunsen burner (smear side up) 2–3 times. This kills the
bacteria and fixes them to the slide.
3. Staining:
1. Place the slide on a staining tray and flood the smear with the chosen stain (e.g., methylene blue) for
30 seconds to 1 minute.
2. Rinse off the excess stain with distilled water gently without disturbing the smear.
3. Tilt the slide to remove excess water and allow it to air dry .
4. Microscopic Observation:
1. Place the slide on the microscope stage.
2. Start with low magnification to locate the smear, then switch to high power for detailed observation.
12.
Smear formation
Athin dried film of bacterial culture on glass slide prepared for staining is referred as
smear.
A bacterial smear is prepared by removing a loopful of a liquid culture with a sterile wire
loop and spreading it on a glass slide over an area of about 15* 30mm.
if a solid culture is used, a minute amount of the growth is emulsified in a droplet of
neutral distilled water, previously placed in the center of the slide, and spread out over
an area of about 15*30mm.
the main objective of preparing smear is.
It causes bacteria to adhere to a slide so that they could be stained and observed.
It increases the permeability of cells to stain.
It makes cell rigid.
13.
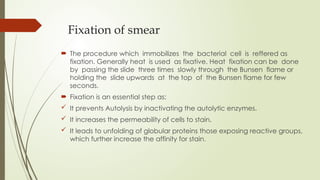
Fixation of smear
The procedure which immobilizes the bacterial cell is reffered as
fixation. Generally heat is used as fixative. Heat fixation can be done
by passing the slide three times slowly through the Bunsen flame or
holding the slide upwards at the top of the Bunsen flame for few
seconds.
Fixation is an essential step as:
It prevents Autolysis by inactivating the autolytic enzymes.
It increases the permeability of cells to stain.
It leads to unfolding of globular proteins those exposing reactive groups,
which further increase the affinity for stain.
14.
Simple staining
Results
•Bacterial Morphology: Cells will appear brightly colored (based on the stain used) against a
light background.
• Shapes such as rods (bacilli), spheres (cocci), or spirals (spirilla) will be easily distinguishable.
• Cell arrangements like chains (strepto-) or clusters (staphylo-) may also be observed.
Advantages
• Quick and easy to perform.
• Requires minimal equipment and materials.
• Provides essential preliminary information about microorganisms.
Limitations
• Does not differentiate between different types of bacteria (e.g., Gram-positive and Gram-
negative).
• Cannot provide detailed information about internal structures.
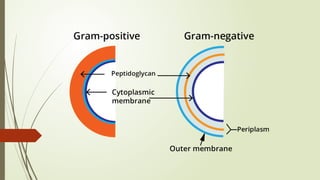
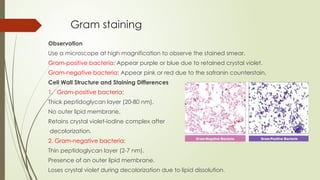
Gram staining
Gramstaining is a critical and widely used method in microbiology to classify
bacteria into two main groups: Gram-positive and Gram-negative, based on the
structure of their cell walls. It was developed by Hans Christian Gram in 1884 :---
Principle of Gram Staining :The method differentiates bacteria by the chemical and
physical properties of their cell walls
Gram-positive bacteria have a thick peptidoglycan layer that retains the crystal
violet dye
Gram-negative bacteria have a thinner peptidoglycan layer and an outer lipid
membrane, which does not retain the crystal violet after decolorization.
Materials Required
1. Bacterial culture or specimen
2. Glass slides
3. Staining reagents: Crystal violet (primary stain)Iodine solution (mordant)Alcohol or
acetone (decolorizer) Safranin (counterstain)
4. Microscope
18.
Steps in GramStaining
Preparation of Smear: Place a small drop of water on a clean glass slide. Transfer a
small amount of bacterial culture to the water using an inoculating loop and spread to
form a thin smear. Allow the smear to air dry. Heat-fix the slide by passing it through a
flame to adhere the bacteria to the slide.
Application of Crystal Violet: Flood the smear with crystal violet for 1 minute. Rinse
gently with water to remove excess stain.
Application of Iodine (Mordant): Apply iodine solution and let it sit for 1 minute. Iodine
forms a complex with crystal violet, fixing the dye in Gram-positive bacteria. Rinse
gently with water.
Decolorization: Apply alcohol or acetone (decolorizer) dropwise for 10–20 seconds. This
step removes the crystal violet-iodine complex from Gram-negative bacteria. Rinse
immediately with water to stop the decolorization process.
Counterstaining with Safranin: Flood the slide with safranin for 30 seconds to 1 minute.
Safranin stains Gram-negative bacteria pink or red. Rinse gently with water and blot dry
with absorbent paper.
Gram staining
Observation
Use amicroscope at high magnification to observe the stained smear.
Gram-positive bacteria: Appear purple or blue due to retained crystal violet.
Gram-negative bacteria: Appear pink or red due to the safranin counterstain.
Cell Wall Structure and Staining Differences
1. Gram-positive bacteria:
Thick peptidoglycan layer (20-80 nm).
No outer lipid membrane.
Retains crystal violet-iodine complex after
decolorization.
2. Gram-negative bacteria:
Thin peptidoglycan layer (2-7 nm).
Presence of an outer lipid membrane.
Loses crystal violet during decolorization due to lipid dissolution.
21.
Applications ofGram Staining
1. Clinical Diagnosis:
Helps identify the causative agents of infections and guides antibiotic selection.
2. Bacterial Classification:
Serves as the first step in bacterial taxonomy and identification.
3. Research:
Widely used in microbiological research to study bacterial morphology and behavior.
Limitations of Gram Staining
1. Not Suitable for Some Bacteria:
Bacteria without a cell wall (e.g., Mycoplasma) or those with waxy cell walls (e.g.,
Mycobacterium tuberculosis) cannot be classified using this method.
2. User Dependence:
The accuracy of the results can depend on the technique and experience of the
individual performing the staining.
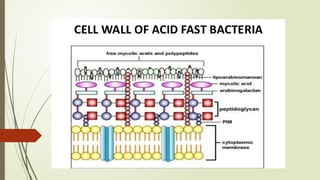
Acid fast staining
Acid-fast staining, also known as the Ziehl-Neelsen stain, is a specialized
staining technique used to identify acid-fast bacteria (AFB). These bacteria,
such as Mycobacterium tuberculosis and Mycobacterium leprae, have unique
cell walls rich in mycolic acids that resist decolorization by acid-alcohol, hence
the term "acid-fast.“
Principle of Acid-Fast Staining
Acid-fast bacteria possess a waxy, lipid-rich cell wall containing mycolic acid,
which makes them impermeable to most stains.
1. A primary stain (carbol fuchsin) penetrates the cell wall when heat or
detergent is applied.
2. Non–acid-fast cells are decolorized by acid-alcohol.
3. A counterstain (methylene blue or malachite green) is used to stain non–acid-
fast cells, contrasting with the acid-fast bacteria.
28.
Steps of acidfast staining
Preparation of the Smear:
Spread a thin layer of the bacterial sample on a slide.
Air-dry and heat-fix the smear.
Staining Process:
1. Primary Stain:
Apply carbol fuchsin to the smear.
Heat the slide gently to help the stain penetrate the waxy cell wall (steaming without boiling for 3–5 minutes).
Alternatively, a detergent (e.g., phenol) can be used in the Kinyoun method, which is a cold staining
variation.
Rinse with water.
2. Decolorization:
Wash the smear with acid-alcohol (a mixture of hydrochloric acid and ethanol).
Acid-fast bacteria retain the red color of carbol fuchsin due to their resistant cell wall
Non–acid-fast bacteria lose the stain and become colorless.
3. Counterstain:
Apply methylene blue or malachite green for 1–2 minutes.
Non–acid-fast bacteria take up the counterstain, appearing blue or green under the microscope.
Acid fast staining
Results of Acid-Fast Staining
1. Acid-fast bacteria:
1. Appear red/pink due to retained carbol fuchsin.
2. Examples: Mycobacterium tuberculosis, Mycobacterium
leprae.
2. Non–acid-fast bacteria:
1. Appear blue or green due to the counterstain.
2. Examples: Escherichia coli, Staphylococcus aureus.
Applications of Acid-Fast Staining
1. Diagnosis of Tuberculosis and Leprosy:
Used to detect Mycobacterium tuberculosis in sputum samples and Mycobacterium leprae in tissue.
2. Research in Mycobacteriology:
Helps study the structure and function of acid-fast bacteria.
3. Identification of Partially Acid-Fast Organisms:
Some bacteria, such as Nocardia, exhibit partial acid-fastness due to mycolic acid content.
31.
Acid fast staining
Variants of Acid-Fast Staining
1. Ziehl-Neelsen Staining:
Traditional method requiring heat during the staining process.
2. Kinyoun Method:
A "cold" method that uses a higher concentration of carbol fuchsin and phenol, eliminating the need for heat.
3. Fluorochrome Staining:
Uses fluorescent dyes like auramine-rhodamine to detect acid-fast bacteria under a fluorescence microscope,
offering higher sensitivity.
Limitations of Acid-Fast Staining
1. Low Sensitivity:
Requires a significant bacterial load for detection.
2. Time-Consuming:
Smear preparation and staining can take time, making it less suitable for rapid diagnostics.
3. Does Not Differentiate Species:
Cannot distinguish between different species of acid-fast bacteria.
Special staining techniques
Flagella, spore, and capsule staining are specialized staining
techniques used in microbiology to visualize specific bacterial
structures that are not easily seen using simple or Gram staining.
34.
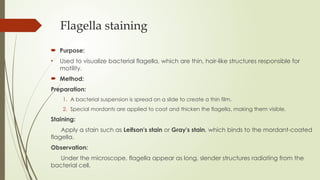
Flagella staining
Purpose:
•Used to visualize bacterial flagella, which are thin, hair-like structures responsible for
motility.
Method:
Preparation:
1. A bacterial suspension is spread on a slide to create a thin film.
2. Special mordants are applied to coat and thicken the flagella, making them visible.
Staining:
Apply a stain such as Leifson's stain or Gray's stain, which binds to the mordant-coated
flagella.
Observation:
Under the microscope, flagella appear as long, slender structures radiating from the
bacterial cell.
Examples ofBacteria with Flagella:
• Escherichia coli (peritrichous flagella).
• Vibrio cholerae (monotrichous flagella).
• Proteus mirabilis (swarming motility due to numerous flagella).
37.
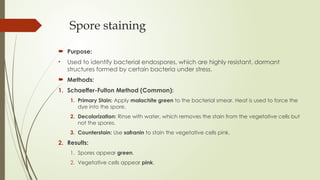
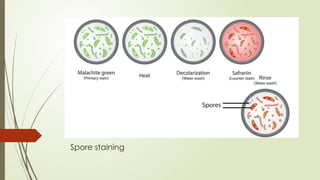
Spore staining
Purpose:
•Used to identify bacterial endospores, which are highly resistant, dormant
structures formed by certain bacteria under stress.
Methods:
1. Schaeffer-Fulton Method (Common):
1. Primary Stain: Apply malachite green to the bacterial smear. Heat is used to force the
dye into the spore.
2. Decolorization: Rinse with water, which removes the stain from the vegetative cells but
not the spores.
3. Counterstain: Use safranin to stain the vegetative cells pink.
2. Results:
1. Spores appear green.
2. Vegetative cells appear pink.
Capsule staining
Purpose:
•Used to visualize the capsule, a gelatinous, polysaccharide or polypeptide layer
surrounding some bacterial cells, which helps evade phagocytosis.
Methods:
Negative Staining (Common):
1. Uses an acidic stain (e.g., India ink or nigrosin) to stain the background.
2. The capsule remains unstained and appears as a clear halo around the bacterial cell.
Positive Staining:
A basic dye (e.g., crystal violet) can be used to stain the bacterial cell body, enhancing
contrast with the unstained capsule.
Anthony’s Method:
Combine positive and negative staining for a clearer view of the capsule.
Results:
Capsules appear as clear, unstained halos against a dark background or alongside a stained
bacterial cell.
Examples of Capsule-ProducingBacteria:
1. Streptococcus pneumoniae (causes pneumonia).
2. Klebsiella pneumoniae (causes respiratory infections).
3. Bacillus anthracis (capsule aids in virulence).
45.
Applications of Flagella,Spore, and Capsule Staining
1. Pathogen Identification:
These stains are essential for diagnosing infections caused by specific
bacteria.
2. Understanding Bacterial Physiology:
They provide insights into the structure, function, and survival
mechanisms of bacteria.
3. Research:
Widely used in studies of microbial motility, virulence, and
environmental resistance
47.
Application
. Microbiology
Identification and Classification of Microorganisms
• Gram Staining: Differentiates bacteria into Gram-positive and Gram-
negative, aiding in bacterial taxonomy and antibiotic selection.
• Acid-Fast Staining: Detects Mycobacterium tuberculosis and
Mycobacterium leprae in clinical samples.
• Spore Staining: Identifies spore-forming bacteria like Bacillus and
Clostridium.
• Flagella Staining: Reveals bacterial motility structures for species
identification.
• Capsule Staining: Demonstrates the presence of capsules, important
in understanding bacterial virulence.
48.
Clinical Diagnostics
Disease Detection
• Blood Stains (e.g., Wright's and Giemsa stains): Identify blood cell
morphology, parasites like Plasmodium (malaria), and
hematological disorders.
• Histological Stains (e.g., Hematoxylin and Eosin): Detect tissue
abnormalities, including cancer, infections, and inflammatory
conditions.
• Immunohistochemistry (IHC): Uses antibodies to stain specific
proteins for diagnosing cancers and autoimmune diseases.
• Fluorescent Staining: Detects viruses, such as in rapid diagnostic
tests for SARS-CoV-2.
49.
Research andAcademia
Cell Biology and Molecular Studies
• Fluorescent Stains (e.g., DAPI, GFP): Visualize DNA, RNA, and
proteins in live and fixed cells.
• Vital Stains (e.g., Trypan Blue): Distinguish between live and dead
cells in viability assays.
• Chromosome Stains (e.g., Giemsa): Identify chromosomal
abnormalities during karyotyping.
• Confocal Microscopy: Visualize three-dimensional structures in cells
and tissues using fluorescent dyes.
50.
Pathology
Histopathology
•Special Stains (e.g., PAS, Masson's Trichrome): Highlight specific tissue
components like glycogen, collagen, and fungi.
• Cytological Stains (e.g., Papanicolaou): Detect abnormal cells in Pap
smears for early cancer detection.
Forensic Science
Crime Scene Investigation
• Blood and Body Fluid Detection: Stains like Luminol and Amido Black
reveal blood traces.
• Fingerprint Visualization: Stains enhance latent fingerprints on various
surfaces.
• Hair and Fiber Analysis: Stains highlight the structure and composition of
forensic evidence.
51.
Environmental Science
Water and Soil Microbiology
• Staining techniques detect microbial contamination in water, such
as E. coli or Cryptosporidium.
• Fluorescent stains are used to monitor biofilm formation in water
systems.

![Staining techniques
Staining techniques are methods used to enhance the
visibility of microscopic structures, cells, or tissues by
applying stains or dyes.
A dye is a general purpose coloring Agent , whereas a
stain is used for coloring biological material .
A stain is an organic compound containing a benzene
ring plus a chromophore and an auxochrome group .
Chromophore is a chemical group that imparts color to
benzene.
Auxochrome group is a chemical compound that
conveys the property of ionization of chromogen [ability
to form salts ] and bind to fibers or tissues](https://image.slidesharecdn.com/stainingtechniquesmicroseminar-250731093928-f80b1b1d/85/staining-techniques-micro-seminar-pptxh-hj-2-320.jpg)


![Classification of bacteria [ gram staining ]
Gram negative](https://image.slidesharecdn.com/stainingtechniquesmicroseminar-250731093928-f80b1b1d/85/staining-techniques-micro-seminar-pptxh-hj-22-320.jpg)