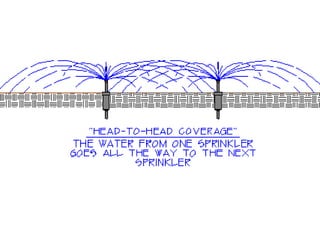
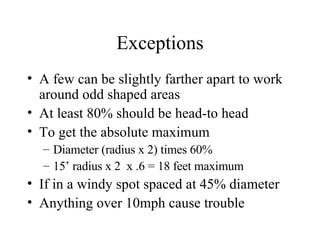
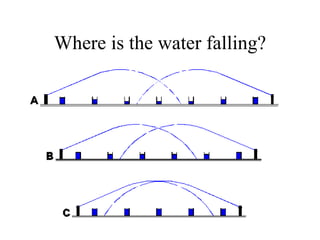
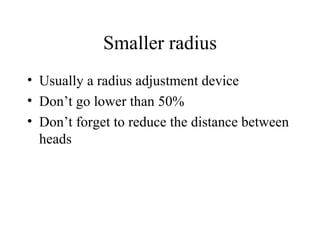
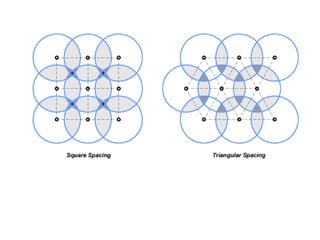
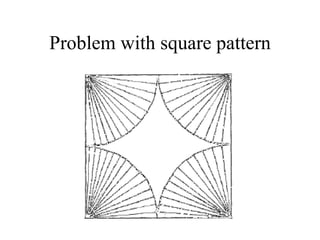
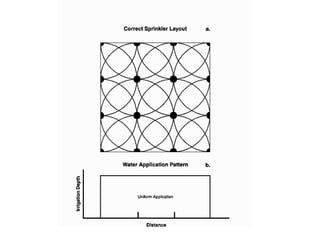
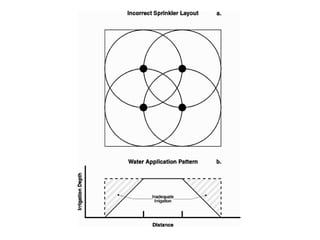
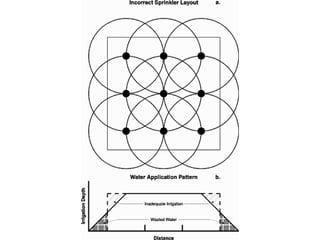
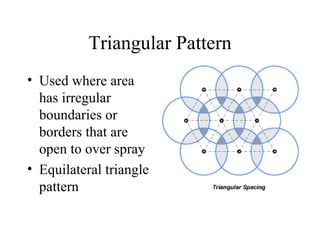
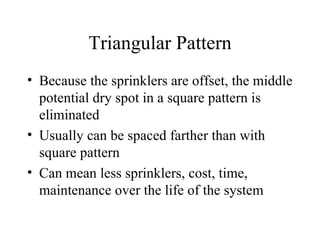
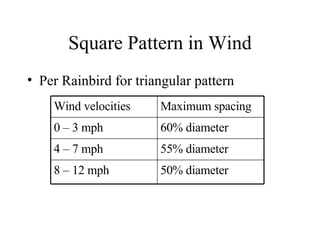
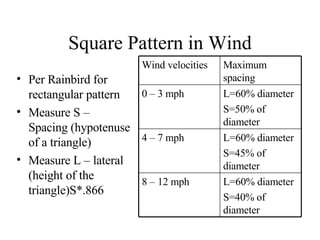
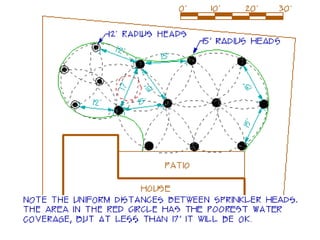
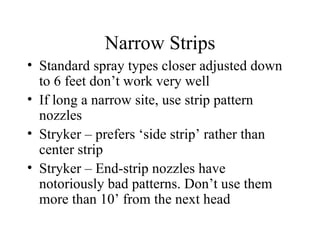
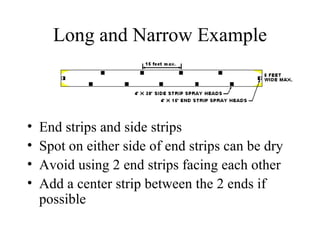
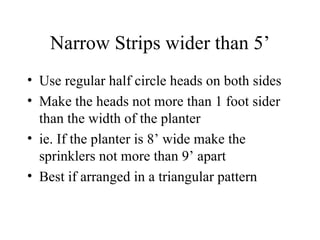
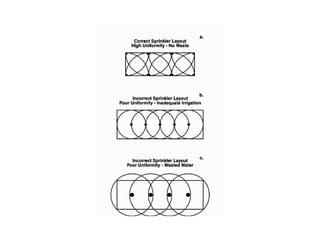
Sprinkler Spacing Area watered by each sprinkler  must overlap They are designed to require  100% overlap  of watered areas The Sprinkler radius = the distance between sprinklers
 
Exceptions A few can be slightly farther apart to work around odd shaped areas At least 80% should be head-to head To get the absolute maximum Diameter (radius x 2) times 60% 15’ radius x 2  x .6 = 18 feet maximum  If in a windy spot spaced at 45% diameter Anything over 10mph cause trouble
Where is the water falling?
Smaller radius Usually a radius adjustment device Don’t go lower than 50% Don’t forget to reduce the distance between heads
Uniformity of spacing Keep the distance as uniform as possible between heads Form an equilateral triangle if possible This creates more even water coverage than a square Changes in spacing should be made a gradually as possible
Patterns Square Triangular Rectangle
 
Square Pattern For square areas Borders with 90 0  angles Weakest for proper coverage Problem is the diameter between the corners is larger than the radius Rainbird recommends 55% spacing for 0 wind
Square Pattern in Wind Per Rainbird for square pattern 45% diameter 8 – 12 mph 50% diameter 4 – 7 mph 55% diameter 0 – 3 mph Maximum spacing Wind velocities
Problem with square pattern


Triangular Pattern Used where area has irregular boundaries or borders that are open to over spray  Equilateral triangle pattern
Triangular Pattern Because the sprinklers are offset, the middle potential dry spot in a square pattern is eliminated Usually can be spaced farther than with square pattern Can mean less sprinklers, cost, time, maintenance over the life of the system
Square Pattern in Wind Per Rainbird for triangular pattern 50% diameter 8 – 12 mph 55% diameter 4 – 7 mph 60% diameter 0 – 3 mph Maximum spacing Wind velocities
Rectangular Pattern For windy site conditions Defined straight boundaries and corners Pattern should be a 60% spacing
Square Pattern in Wind Per Rainbird for rectangular pattern Measure S – Spacing (hypotenuse of a triangle) Measure L – lateral (height of the triangle)S*.866 L=60% diameter S=40% of diameter 8 – 12 mph L=60% diameter S=45% of diameter 4 – 7 mph L=60% diameter S=50% of diameter 0 – 3 mph Maximum spacing Wind velocities
Steps Start drawing a sprinkler in each corner Draw sprinklers around the perimeter of the irrigated area Adjust to make the spacing between as even as possible Then draw the interior area sprinklers
 
Wind Spacing
Over-water Can use radius adjustments to cut down the water if necessary Easier to remove a sprinkler than to add one
Narrow Strips Standard spray types closer adjusted down to 6 feet don’t work very well If long a narrow site, use strip pattern nozzles Stryker – prefers ‘side strip’ rather than center strip Stryker – End-strip nozzles have notoriously bad patterns. Don’t use them more than 10’ from the next head
Narrow Strips continued If using standard spray sprinklers (1/4, ½, full circle nozzles) and they must be adjusted less than 6 feet use  PRESSURE COMPENSATING DEVICE  to reduce the radius The device goes under the nozzle Have to pick the correct device for each nozzle See Rainbird catalog pg.88 for 1800 PCS
Long and Narrow Example End strips and side strips Spot on either side of end strips can be dry Avoid using 2 end strips facing each other Add a center strip between the 2 ends if possible
Narrow Strips wider than 5’ Use regular half circle heads on both sides Make the heads not more than 1 foot sider than the width of the planter ie. If the planter is 8’ wide make the sprinklers not more than 9’ apart Best if arranged in a triangular pattern
 

Sprinkler Spacing

  • 1.
    Sprinkler Spacing Areawatered by each sprinkler must overlap They are designed to require 100% overlap of watered areas The Sprinkler radius = the distance between sprinklers
  • 2.
  • 3.
    Exceptions A fewcan be slightly farther apart to work around odd shaped areas At least 80% should be head-to head To get the absolute maximum Diameter (radius x 2) times 60% 15’ radius x 2 x .6 = 18 feet maximum If in a windy spot spaced at 45% diameter Anything over 10mph cause trouble
  • 4.
    Where is thewater falling?
  • 5.
    Smaller radius Usuallya radius adjustment device Don’t go lower than 50% Don’t forget to reduce the distance between heads
  • 6.
    Uniformity of spacingKeep the distance as uniform as possible between heads Form an equilateral triangle if possible This creates more even water coverage than a square Changes in spacing should be made a gradually as possible
  • 7.
  • 8.
  • 9.
    Square Pattern Forsquare areas Borders with 90 0 angles Weakest for proper coverage Problem is the diameter between the corners is larger than the radius Rainbird recommends 55% spacing for 0 wind
  • 10.
    Square Pattern inWind Per Rainbird for square pattern 45% diameter 8 – 12 mph 50% diameter 4 – 7 mph 55% diameter 0 – 3 mph Maximum spacing Wind velocities
  • 11.
  • 12.
  • 13.
  • 14.
  • 15.
    Triangular Pattern Usedwhere area has irregular boundaries or borders that are open to over spray Equilateral triangle pattern
  • 16.
    Triangular Pattern Becausethe sprinklers are offset, the middle potential dry spot in a square pattern is eliminated Usually can be spaced farther than with square pattern Can mean less sprinklers, cost, time, maintenance over the life of the system
  • 17.
    Square Pattern inWind Per Rainbird for triangular pattern 50% diameter 8 – 12 mph 55% diameter 4 – 7 mph 60% diameter 0 – 3 mph Maximum spacing Wind velocities
  • 18.
    Rectangular Pattern Forwindy site conditions Defined straight boundaries and corners Pattern should be a 60% spacing
  • 19.
    Square Pattern inWind Per Rainbird for rectangular pattern Measure S – Spacing (hypotenuse of a triangle) Measure L – lateral (height of the triangle)S*.866 L=60% diameter S=40% of diameter 8 – 12 mph L=60% diameter S=45% of diameter 4 – 7 mph L=60% diameter S=50% of diameter 0 – 3 mph Maximum spacing Wind velocities
  • 20.
    Steps Start drawinga sprinkler in each corner Draw sprinklers around the perimeter of the irrigated area Adjust to make the spacing between as even as possible Then draw the interior area sprinklers
  • 21.
  • 22.
  • 23.
    Over-water Can useradius adjustments to cut down the water if necessary Easier to remove a sprinkler than to add one
  • 24.
    Narrow Strips Standardspray types closer adjusted down to 6 feet don’t work very well If long a narrow site, use strip pattern nozzles Stryker – prefers ‘side strip’ rather than center strip Stryker – End-strip nozzles have notoriously bad patterns. Don’t use them more than 10’ from the next head
  • 25.
    Narrow Strips continuedIf using standard spray sprinklers (1/4, ½, full circle nozzles) and they must be adjusted less than 6 feet use PRESSURE COMPENSATING DEVICE to reduce the radius The device goes under the nozzle Have to pick the correct device for each nozzle See Rainbird catalog pg.88 for 1800 PCS
  • 26.
    Long and NarrowExample End strips and side strips Spot on either side of end strips can be dry Avoid using 2 end strips facing each other Add a center strip between the 2 ends if possible
  • 27.
    Narrow Strips widerthan 5’ Use regular half circle heads on both sides Make the heads not more than 1 foot sider than the width of the planter ie. If the planter is 8’ wide make the sprinklers not more than 9’ apart Best if arranged in a triangular pattern
  • 28.