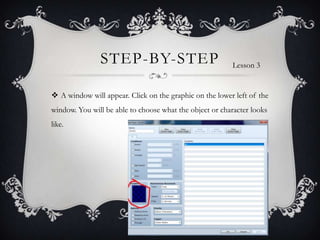
SCRIPTS
By: Hector Tejada
OBJECTIVES
 Learn how to include your script in the game
 Learn how to make characters converse in game
 Learn how to make choices
REQUIREMENTS
 RPG MAKER VX ACE
STEP-BY-STEP
 Open RPG Maker. Once you have RPG Maker open, click on the
events button or you can press F6.
Lesson 3
STEP-BY-STEP
 Once you have done this you will be able to make events. To make
events double click anywhere on the field or a place you want to
create an event.
Lesson 3
STEP-BY-STEP
 A window will appear. Click on the graphic on the lower left of the
window. You will be able to choose what the object or character looks
like.
Lesson 3
STEP-BY-STEP
 Now that you have chosen what the object or NPC looks like, we
will start implementing the script. To do this double click on a line
under contents. Another will appear, click on show text option.
Lesson 3
STEP-BY-STEP
 Then you will add what that character will say. Sounds easy
enough, right? After you have included something for the NPC to say,
let us add a choice in there.
Lesson 3
STEP-BY-STEP
 To do this you must click under the contents again and choose
show choices. Then you will enter what choices the player will be
allowed to pick. After that you will click under what choices you
made. You will then add a function like another line for the character
to say when the player chooses that option.
Lesson 3
STEP-BY-STEP
 This is what it should look like when you are done.
Lesson 3
FINAL
 Now it is time for you to try it on your own. Your assignment is to
make a character and allow that character to speak to the main
character. You must include some sort of choice in the conversation.
Lesson 3

Scripts

  • 1.
  • 2.
    OBJECTIVES  Learn howto include your script in the game  Learn how to make characters converse in game  Learn how to make choices
  • 3.
  • 4.
    STEP-BY-STEP  Open RPGMaker. Once you have RPG Maker open, click on the events button or you can press F6. Lesson 3
  • 5.
    STEP-BY-STEP  Once youhave done this you will be able to make events. To make events double click anywhere on the field or a place you want to create an event. Lesson 3
  • 6.
    STEP-BY-STEP  A windowwill appear. Click on the graphic on the lower left of the window. You will be able to choose what the object or character looks like. Lesson 3
  • 7.
    STEP-BY-STEP  Now thatyou have chosen what the object or NPC looks like, we will start implementing the script. To do this double click on a line under contents. Another will appear, click on show text option. Lesson 3
  • 8.
    STEP-BY-STEP  Then youwill add what that character will say. Sounds easy enough, right? After you have included something for the NPC to say, let us add a choice in there. Lesson 3
  • 9.
    STEP-BY-STEP  To dothis you must click under the contents again and choose show choices. Then you will enter what choices the player will be allowed to pick. After that you will click under what choices you made. You will then add a function like another line for the character to say when the player chooses that option. Lesson 3
  • 10.
    STEP-BY-STEP  This iswhat it should look like when you are done. Lesson 3
  • 11.
    FINAL  Now itis time for you to try it on your own. Your assignment is to make a character and allow that character to speak to the main character. You must include some sort of choice in the conversation. Lesson 3