This document provides troubleshooting steps for QuickBooks error 15271, which occurs when trying to update or install QuickBooks Desktop. Potential causes include an incomplete QuickBooks installation, corrupted Windows registry or files, or deleted QuickBooks files. The document outlines fixing the error by cleaning the QuickBooks installation in selective startup mode, repairing Windows components, resetting the update, and contacting technical support if issues persist. Taking a backup of the company file is also recommended before attempting fixes.


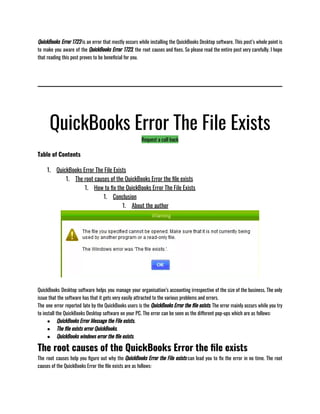
![These are the primary reasons behind the QuickBooks Error 1920, but you can fix all these common errors and
issues using different tools and manual solutions to get to know our next segment of this blog.
Solutions to fix the QuickBooks Error 1920
Most of the errors that occur in the QuickBooks Desktop software are fixable and have different manual
solutions according to their issues. There are also some official tools for the same, but in this blog, we will tell
you some of its manual solution of the QuickBooks Error 1920 that are as follows:
Solution 1: Update your Windows OS: Updating our windows OS can also sometimes help you fix the
QuickBooks Error 1920. Please ensure that you haven’t installed any security software recently and you need to
turn off the windows defender and the firewall.
Updating the software can help you fix the QuickBooks Error 1920, However, if n case the issue doesn’t resolve,
you can always move on to the next solution and see if that helps you fix the QuickBooks Error 1920.
Solution 2: Rename the Company File: Renaming the Company File in your QuickBooks Desktop software
can also fix the QuickBooks Error 1920, to do that you need to follow the steps that are as follows:
● Open the Run Windows by clicking on the Windows + R button on your keyboard.
● Now put >C:Users[Username]AppDataLocalIntuit in the search bar, and after that, you will see the
Company file that you rename accordingly.
These are the two manual solutions that may help you fix the QuickBooks Error 1920. After applying the
answers, you must restart the QuickBooks Desktop software and the PC or the workstation facing the error. But
if in case the error persists then you can try running a scan of one of the two official tools QuickBooks File
Doctor and QuickBooks Tool Hub both of them can be downloaded from the official website of the Intuit.
If you cannot fix the error yourself, you must consider hiring a QuickBooks Experts available at the QuickBooks
Desktop Error Support.
To End With
To summarise, QuickBooks Desktop software is an excellent software for managing your finances of a particular organisation, but
it can get infected by some of the errors and issues. The blog is there to help you with the QuickBooks Error 1920. Its different
aspects like the root causes and other manual solutions detailedly given above, please read the whole thing very carefully.
QuickBooks Error 80070057
Request a call back](https://image.slidesharecdn.com/quickbookserrore-book-210514080037/85/Quickbooks-Support-Phone-Number-92-320.jpg)

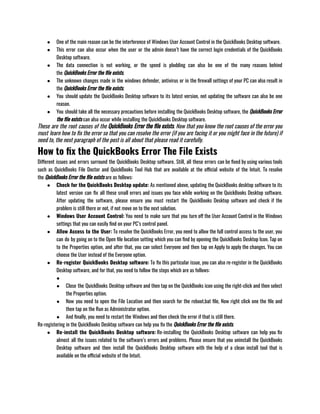


![Restore a backup from QuickBooks Online
You’ll have an .QBB file once the backup is done. You can use this to migrate your QuickBooks Desktop backup
to a live QBW working file at any time. You’ll need to transfer your backup company file if it’s on an external
computer like a flash drive or a third-party syncing programme like DropBox or Google Drive. Save the QBB file
to your machine. Then, to restore your file, follow these instructions from Intuit:
● Select Open or Restore Company from the File menu in QuickBooks.
● Then click Next after selecting Restore a backup copy.
● Then click Next after selecting Local Backup.
● Look for your backup company file on your computer. This is how it should look: [Your firm’s name]. qbb
is an acronym for “quick and dirty.”
● Choose a location for your restored company file by selecting a folder. Then choose Open.
● Click Save when you’re done. If you receive any warnings about the possibility of your data being
overwritten, choose the choice that best suits your needs. If you’re not sure if you want to overwrite
anything, don’t.
● If you’ve finished, you’ll have a new company file to deal with.
How to delete a company in QuickBooks?
Follow the steps outlined below to purge the data:
● Go to your QuickBooks Online account and sign in.
● Replace /purgecompany with /purgecompany in the URL.
● Change the URL to https://qbo.intuit.com/c28/app/purgecompany instead of
https://qbo.intuit.com/c28/app/homepage.
● The following screen will display a list of the things that will be removed.
● Once the data has been removed, type the word “YES” and then press OK.
● Once you’ve made all of your choices, click Wipe Data.
● You will be redirected to your home page once the deletion is complete.
If this is the case, you must cancel your account and begin a new subscription.
To deactivate your account, follow these steps:
● Go to https://qbo.intuit.com to log in to your QuickBooks Online account.
● Go to the top of the page and click the Gear button.
● Update your credit card by going to Your Account and selecting Update Credit Card.
● Click the Cancel Subscription connection in the Subscription Status section.
● Follow the on-screen instructions to complete the rest of the operation.
To reactivate your account, follow these steps:
● Go to https://quickbooks.intuit.com/choose-country/ to choose your country.
● Complete the User ID and password fields.
● You will log in with the same user ID and password as before. This is the best choice for you if you have
payroll activated in your account.](https://image.slidesharecdn.com/quickbookserrore-book-210514080037/85/Quickbooks-Support-Phone-Number-179-320.jpg)


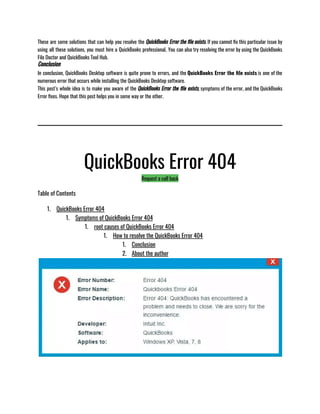
![● It is possible to damage Windows OS.
● Conflicts in a specific programme.
● Installation error.
● Some Files in the Program that are Damaged.
These are the primary reasons behind the QuickBooks Pro 2010 Stopped Working and now that you know that
you must read about the fixes of the same which is in our next segment so do give it a good read.
Troubleshooting process of QuickBooks Pro 2010 Stopped Working
QuickBooks Install Diagnostic Tool: This tool can certainly help you fix this error, and the steps to download
and use it are as follows:
● Download the QB Install Diagnostic Tool.
● Now save the file to the device that is installed with QuickBooks.
● Close all of the programmes that your operating system is running.
● Run the QuickBooks Diagnostic Tool Install (QBInstall Tool).
● After running the tool, restart your system to ensure that the Windows components are modified.
Restarting your PC: Restarting your PC can also help you fix this particular error. To know more follow the
steps given below:
● Boot your system up again.
● Open your QuickBooks Desktop after rebooting.
● Disable your antivirus temporarily if the problem persists.
Create a New User: Create a new Windows admin user account and then try using the new user admin account
to open the company file.
Re-install the QuickBooks Desktop Software: Uninstall the QuickBooks Desktop and use the clean instal
tool to reinstall it. This method will bring you the recent QuickBooks Update that can solve all your problems.
Rename QBWUSER.INI File: Rename the file QBWUSER.INI (changing the name of the file would erase the list
of company files that were opened previously and this step would require you to open your company file
manually)
● Find and open the directory in which QBWUSER.ini is located (If you are unable to find the folder,
enable all the hidden files and folders to find it).
● Location: Users[Your user name]AppDataLocalIntuitQuickBooks [year] Follow this path.
● Rename the code to QBWUSER.inii (do a right-click and select rename).
● At the end of the file name, put .old (e.g.QBWUSER.ini.old).
● Rename the file EntitlementDataStore.ecml, too.
1. If the software opens after QBWUSER.ini or EntitlementDataStore.ecml has been renamed, see if you
can open a sample company file.
2. If you can open a sample file and you are still unable to open your company file, transfer the file to
another folder or location and open it from a different location (copy the file to a local folder than a
network location).](https://image.slidesharecdn.com/quickbookserrore-book-210514080037/85/Quickbooks-Support-Phone-Number-239-320.jpg)


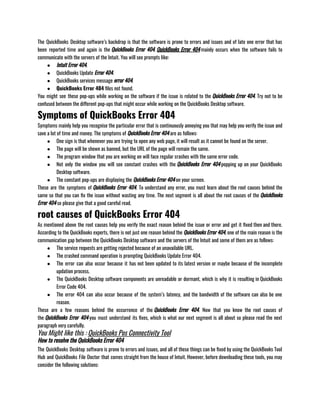
![QuickBooks is accounting software that will help you immensely to manage accounts or books of your organization, be it a small
or mid-sized organization or even if you’re a freelancer.
The main reason behind QuickBooks accounting software is so popular and successful is that the kind of variety of different
features and functions that it offers. And also, the sort of after-sales service that they provide is unmatchable.
To stay relevant, Intuit keeps rolls out the regular updates to avoid any confusion, and the various tools that they keep on
launching for the different errors or issues that you might face while working on QuickBooks Desktop. One of them
is QuickBooks Tool Hub, and the other one is the QuickBooks File Doctor.
If you are using the QuickBooks Desktop, you must know the features that it offers to make the accounting of your company or
organization very easy.
How to restore Company File in QuickBooks
When you restore a backup company file, QuickBooks uses the company file which already has a backup (.qbb) to create a
new company file.
● Open QuickBooks, and then go to the given File section and then choose Open or Restore Company.
● Choose Restore a backup copy and then tap on Next.
● Choose Local Backup and then again tap on Next.
● Browse your PC for your backup Company File. It will look alike : [Your Organisation Name].qbb.
(Please note that to avoid overwriting anything, you can always rename your current Company file or the backup, so the names
stay unique. Or also you can still save the backup that you had in a different folder.)
● Choose a folder to decide where you want to save your restored Company file. And then tap on Open.
● Once you’re ready, tap on Save. If you see any messages about your data possibly overwriting, select the option that
best fits your requirements. Don’t overwrite anything of that sort until and unless you know that you want to.
By performing the actions given above, you can easily restore Company File in QuickBooks Desktop if you know how to restore
you must know how to create and restore QuickBooks Portable Company File which is thoroughly described in our next
segment.
Create and Restore QuickBooks Portable Company File
If you want to transfer your data to some other PC or share it with someone else, creating a QuickBooks
Portable Company File is highly recommended, This becomes like a compressed file so that you can send it
to someone else through mail or putting it on a USB drive. It can also fix some minute data issues of the
QuickBooks Desktop.
To Create and Restore QuickBooks Portable Company File, you
just need to follow the methods given below:
● Update QuickBooks Desktop Software: You should simply update the QuickBooks Desktop software to its latest
version.
● Create a QuickBooks Portable Company File: To create a Portable company file, you should open your QuickBooks
Desktop and admin login.
●](https://image.slidesharecdn.com/quickbookserrore-book-210514080037/85/Quickbooks-Support-Phone-Number-285-320.jpg)