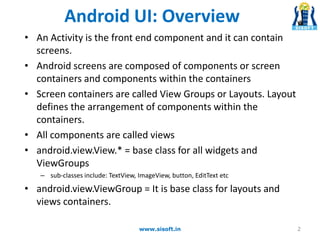
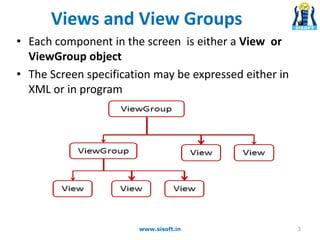
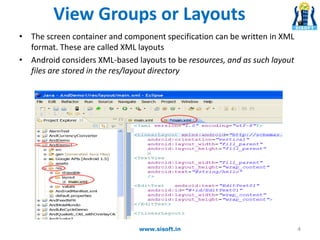
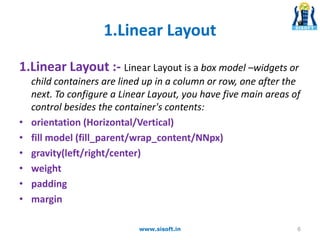
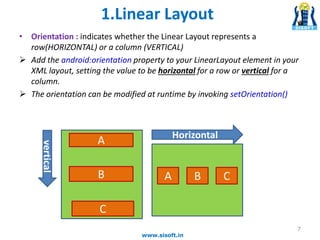
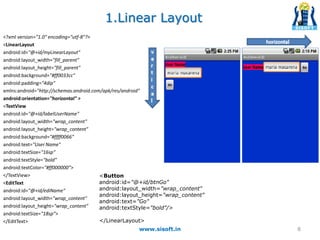
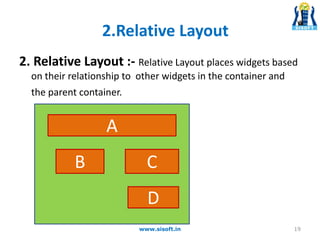
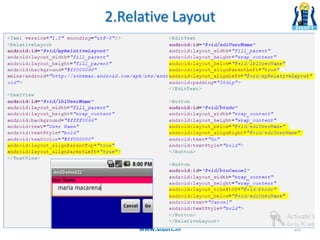
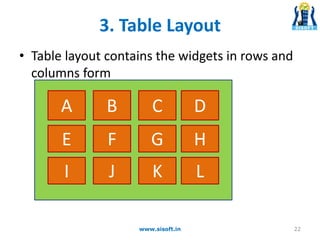
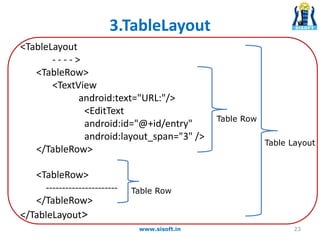
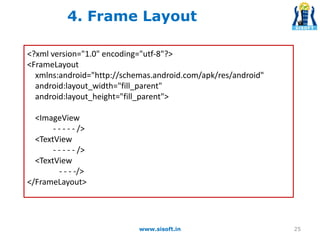
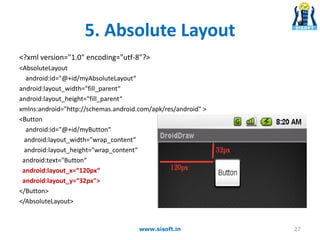
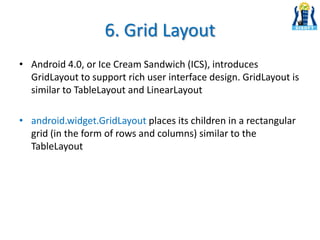
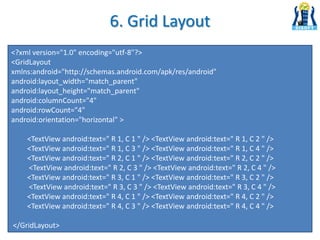
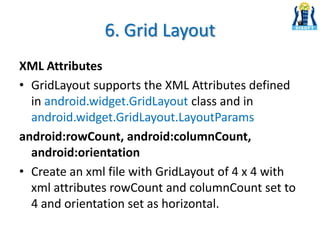
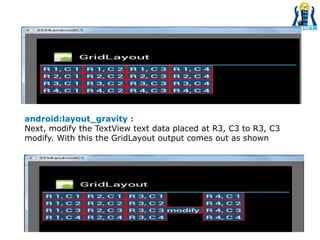
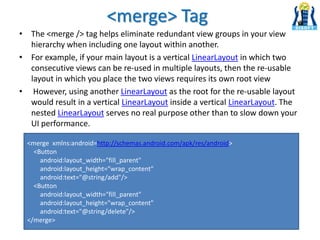
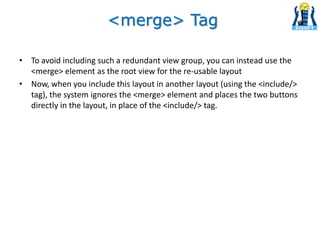
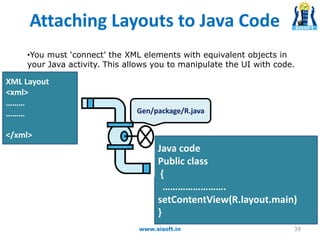
1
Sisoft Technologies Pvt Ltd
SRC E7, Shipra Riviera Bazar, Gyan Khand-3, Indirapuram, Ghaziabad
Website: www.sisoft.in Email:info@sisoft.in
Phone: +91-9999-283-283
Android UI: Overview
• An Activity is the front end component and it can contain
screens.
• Android screens are composed of components or screen
containers and components within the containers
• Screen containers are called View Groups or Layouts. Layout
defines the arrangement of components within the
containers.
• All components are called views
• android.view.View.* = base class for all widgets and
ViewGroups
– sub-classes include: TextView, ImageView, button, EditText etc
• android.view.ViewGroup = It is base class for layouts and
views containers.
2www.sisoft.in
Views and View Groups
• Each component in the screen is either a View or
ViewGroup object
• The Screen specification may be expressed either in
XML or in program
3www.sisoft.in
View Groups or Layouts
• The screen container and component specification can be written in XML
format. These are called XML layouts
• Android considers XML-based layouts to be resources, and as such layout
files are stored in the res/layout directory
4www.sisoft.in
ViewGroup or Layout
• There are six types of Layouts:
1.LinearLayout (the box model)
2.RelativeLayout (a rule-based model)
3.TableLayout (the grid model)
4.Frame Layout (it provides space in layout)
5. Absolute Layout (Non flexible model) – Deprecated Now
6. Grid Layout (the grid model) – Introduced in ice cream sandwich
5www.sisoft.in
1.Linear Layout
1.Linear Layout :- Linear Layout is a box model –widgets or
child containers are lined up in a column or row, one after the
next. To configure a Linear Layout, you have five main areas of
control besides the container's contents:
• orientation (Horizontal/Vertical)
• fill model (fill_parent/wrap_content/NNpx)
• gravity(left/right/center)
• weight
• padding
• margin
6www.sisoft.in
• Orientation : indicates whether the Linear Layout represents a
row(HORIZONTAL) or a column (VERTICAL)
 Add the android:orientation property to your LinearLayout element in your
XML layout, setting the value to be horizontal for a row or vertical for a
column.
 The orientation can be modified at runtime by invoking setOrientation()
vertical
Horizontal
A
C
B CBA
1.Linear Layout
7
www.sisoft.in
<?xml version="1.0" encoding="utf-8"?>
<LinearLayout
android:id="@+id/myLinearLayout"
android:layout_width="fill_parent"
android:layout_height="fill_parent"
android:background="#ff0033cc"
android:padding="4dip"
xmlns:android="http://schemas.android.com/apk/res/android"
android:orientation="horizontal" >
<TextView
android:id="@+id/labelUserName"
android:layout_width="wrap_content"
android:layout_height="wrap_content"
android:background="#ffff0066"
android:text="User Name"
android:textSize="16sp"
android:textStyle="bold"
android:textColor="#ff000000”>
</TextView>
<EditText
android:id="@+id/ediName"
android:layout_width="wrap_content"
android:layout_height="wrap_content"
android:textSize="18sp”>
</EditText>
www.sisoft.in 8
<Button
android:id="@+id/btnGo"
android:layout_width="wrap_content"
android:layout_height="wrap_content"
android:text="Go"
android:textStyle="bold”/>
</LinearLayout>
1.Linear Layout
1.Linear Layout
1.2 Linear Layout: Fill Model
• Widgets have a "natural" size
based on their accompanying
text.
• When their combined sizes
does not exactly match the
width of the Android device's
screen, we may have the issue
of what to do with the
remaining space.
www.sisoft.in 9
1.Linear Layout
1.2 Fill Model :
All widgets inside a LinearLayout must supply dimensional
attributes android:layout_width and android:layout_height to
help address the issue of empty space. Values used in defining
height and width are:
1.Specific a particular dimension, such as 125dip (device
independent pixels)
2. wrap_content: which means the widget should fill up its
natural space, unless that is too big, in which case Android can
use word-wrap as needed to make it fit.
3. fill_parent: which means the widget should fill up all available
space in its enclosing container, after all other widgets are
taken care of
www.sisoft.in 10
1.Linear Layout
www.sisoft.in
11
1.Linear Layout
www.sisoft.in 12
1.Linear Layout
www.sisoft.in 13
1.Linear Layout
1.2 Linear Layout: Weight
• It is used to proportionally assign space to widgets in a view.
• You set android:layout_weight to a value (1, 2, 3, …) to indicates what proportion
of the free space should go to that widget. Example Both the TextView and the
Button widgets have been set as in the previous example. Both have the
additional property android:layout_weight="1"whereas the EditText control has
android:layout_weight="2“
• Default value is 0
www.sisoft.in 14
1.Linear Layout
1.4 Linear Layout: Padding
• The padding specifies how much space there is between the
boundaries of the widget's "cell" and the actual widget
contents.
• If you want to increase the internal whitespace between the
edges of the and its contents, you will want to use the:
– android:padding property
– or by calling setPadding() at runtime on the widget's Java object.
www.sisoft.in 15
1.4 Linear Layout: Padding and Margin
1.Linear Layout
16www.sisoft.in
1.Linear Layout
• Linear Layout: Internal Margins Using Padding
www.sisoft.in 17
1.Linear Layout
• Linear Layout: (External) Margin
www.sisoft.in 18
2. Relative Layout :- Relative Layout places widgets based
on their relationship to other widgets in the container and
the parent container.
A
D
CB
2.Relative Layout
19www.sisoft.in
2.Relative Layout
www.sisoft.in 20
3.Table Layout
3. Table Layout
1.Android's Table Layout allows you to position your widgets in
a grid made of identifiable rows and columns.
2.Columns might shrink or stretch to accommodate their
contents.
3.TableLayout works in conjunction with Table Row.
4.TableLayout controls the overall behavior of the container, with
the widgets themselves positioned into one or more Table
Row containers, one per row in the grid.
21www.sisoft.in
• Table layout contains the widgets in rows and
columns form
A
FE
B
JI
G
C
K
H
D
L
22www.sisoft.in
3. Table Layout
3.TableLayout
<TableLayout
- - - - >
<TableRow>
<TextView
android:text="URL:"/>
<EditText
android:id="@+id/entry"
android:layout_span="3" />
</TableRow>
<TableRow>
----------------------
</TableRow>
</TableLayout>
23www.sisoft.in
Table Row
Table Row
Table Layout
4. Frame Layout
Frame Layout :-
• Frame Layout is designed to block out an area on the
screen to display a single item.
• FrameLayout should be used to hold a single child
view, because it can be difficult to organize child
views in a way that's scalable to different screen sizes
without the children overlapping each other.
24www.sisoft.in
www.sisoft.in 25
<?xml version="1.0" encoding="utf-8"?>
<FrameLayout
xmlns:android="http://schemas.android.com/apk/res/android"
android:layout_width="fill_parent"
android:layout_height="fill_parent">
<ImageView
- - - - - />
<TextView
- - - - - />
<TextView
- - - -/>
</FrameLayout>
4. Frame Layout
5. Absolute Layout
Absolute Layout :-
• A layout that lets you specify exact locations (x/y
coordinates) of its children.
• Absolute layouts are less flexible and harder to
maintain than other types of layouts without
absolute positioning
26www.sisoft.in
5. Absolute Layout
<?xml version="1.0" encoding="utf-8"?>
<AbsoluteLayout
android:id="@+id/myAbsoluteLayout“
android:layout_width="fill_parent“
android:layout_height="fill_parent“
xmlns:android="http://schemas.android.com/apk/res/android" >
<Button
android:id="@+id/myButton“
android:layout_width="wrap_content“
android:layout_height="wrap_content“
android:text="Button“
android:layout_x=“120px“
android:layout_y=“32px">
</Button>
</AbsoluteLayout>
27www.sisoft.in
6. Grid Layout
• Android 4.0, or Ice Cream Sandwich (ICS), introduces
GridLayout to support rich user interface design. GridLayout is
similar to TableLayout and LinearLayout
• android.widget.GridLayout places its children in a rectangular
grid (in the form of rows and columns) similar to the
TableLayout
6. Grid Layout
<?xml version="1.0" encoding="utf-8"?>
<GridLayout
xmlns:android="http://schemas.android.com/apk/res/android"
android:layout_width="match_parent"
android:layout_height="match_parent"
android:columnCount="4"
android:rowCount="4"
android:orientation="horizontal" >
<TextView android:text=" R 1, C 1 " /> <TextView android:text=" R 1, C 2 " />
<TextView android:text=" R 1, C 3 " /> <TextView android:text=" R 1, C 4 " />
<TextView android:text=" R 2, C 1 " /> <TextView android:text=" R 2, C 2 " />
<TextView android:text=" R 2, C 3 " /> <TextView android:text=" R 2, C 4 " />
<TextView android:text=" R 3, C 1 " /> <TextView android:text=" R 3, C 2 " />
<TextView android:text=" R 3, C 3 " /> <TextView android:text=" R 3, C 4 " />
<TextView android:text=" R 4, C 1 " /> <TextView android:text=" R 4, C 2 " />
<TextView android:text=" R 4, C 3 " /> <TextView android:text=" R 4, C 4 " />
</GridLayout>
6. Grid Layout
XML Attributes
• GridLayout supports the XML Attributes defined
in android.widget.GridLayout class and in
android.widget.GridLayout.LayoutParams
android:rowCount, android:columnCount,
android:orientation
• Create an xml file with GridLayout of 4 x 4 with
xml attributes rowCount and columnCount set to
4 and orientation set as horizontal.
android:layout_gravity :
Next, modify the TextView text data placed at R3, C3 to R3, C3
modify. With this the GridLayout output comes out as shown
ScrollView
•When we have more data than what can be
shown on a single screen you may use the
ScrollView control.
•It provides a sliding or scrolling access to the
data. This way the user can only see part of your
layout at one time, but the rest is available via
scrolling.
• ScrollView only supports vertical scrolling. For
horizontal scrolling, use HorizontalScrollView.
32www.sisoft.in
ScrollView Layout
<ScrollView
android:id="@+id/myScrollView1"
android:layout_width="fill_parent"
android:layout_height="fill_parent"
android:background="#ff009999“>
<LinearLayout
android:id="@+id/myLinearLayoutHorizontal1"
android:layout_width="fill_parent"
android:layout_height="fill_parent"
android:orientation="horizontal”>
<TextView
android:id="@+id/textView1"
android:layout_width="fill_parent"
android:layout_height="wrap_content"
android:text="Line1"
android:textSize="70dip"/>
<TextView
android:id="@+id/textView1"
android:layout_width="fill_parent"
android:layout_height="wrap_content"
android:text="Line1"
android:textSize="70dip"/>
-------------------------
-------------------------
</LinearLayout></ScrollView>
33www.sisoft.in
Each View or ViewGroup can have its own set of
attributes…but, some are very common
Attribute Description
layout_width specifies width of View or ViewGroup
layout_height specifies height
layout_marginTop extra space on top
layout_marginBottom extra space on bottom side
layout_marginLeft extra space on left side
layout_marginRight extra space on right side
layout_gravity how child views are positioned
layout_weight how much extra space in layout should be allocated to
View (only when in LinearLayout or TableView)
layout_x x-coordinate
layout_y y-coordinate
34www.sisoft.in
Reusing Layouts - <Include> Tag
• Although Android offers a variety of widgets to provide small and re-usable
interactive elements, you might also need to re-use larger components that
require a special layout
• To efficiently reuse complete layouts, you can use the <include/> and
<merge/> tags to embed another layout inside the current layout
• Create a Reusable Layout: If you already know the layout that you want to
reuse, create a new XML file and define the layout. For example, here's a layout
that defines a title bar to be included in each activity (titlebar.xml):
<FrameLayout xmlns:android="http://schemas.android.com/apk/res/android"
android:layout_width=”match_parent”
android:layout_height="wrap_content"
android:background="@color/titlebar_bg">
<ImageView android:layout_width="wrap_content"
android:layout_height="wrap_content"
android:src="@drawable/gafricalogo" />
</FrameLayout>
Include Tag
• Use the <include>tag : Inside the layout to which you want to add the re-
usable component, add the <include/> tag For example, here's a layout
that includes the title bar from earlier example:
<LinearLayout
xmlns:android="http://schemas.android.com/apk/res/android"
android:orientation="vertical"
android:layout_width=”match_parent”
android:layout_height=”match_parent”
android:background="@color/app_bg"
android:gravity="center_horizontal">
<include layout="@layout/titlebar"/>
<TextView android:layout_width=”match_parent”
android:layout_height="wrap_content"
android:text="@string/hello"
android:padding="10dp" />
…
</LinearLayout>
<merge> Tag
• The <merge /> tag helps eliminate redundant view groups in your view
hierarchy when including one layout within another.
• For example, if your main layout is a vertical LinearLayout in which two
consecutive views can be re-used in multiple layouts, then the re-usable
layout in which you place the two views requires its own root view
• However, using another LinearLayout as the root for the re-usable layout
would result in a vertical LinearLayout inside a vertical LinearLayout. The
nested LinearLayout serves no real purpose other than to slow down your
UI performance.
<merge xmlns:android=http://schemas.android.com/apk/res/android>
<Button
android:layout_width="fill_parent"
android:layout_height="wrap_content"
android:text="@string/add"/>
<Button
android:layout_width="fill_parent"
android:layout_height="wrap_content"
android:text="@string/delete"/>
</merge>
• To avoid including such a redundant view group, you can instead use the
<merge> element as the root view for the re-usable layout
• Now, when you include this layout in another layout (using the <include/>
tag), the system ignores the <merge> element and places the two buttons
directly in the layout, in place of the <include/> tag.
<merge> Tag
Attaching Layouts to Java Code
39www.sisoft.in
•You must ‘connect’ the XML elements with equivalent objects in
your Java activity. This allows you to manipulate the UI with code.
XML Layout
<xml>
………
………
</xml>
Java code
Public class
{
…………………….
setContentView(R.layout.main)
}
Gen/package/R.java
Attaching Layouts to Java Code
• Assume the UI in res/layout/main.xml has been created. This layout could
be called by an application using the statement
setContentView(R.layout.main);
• Individual widgets, such as myButton could be accessed by the application
using the statement findViewByID(...) as in
Button btn= (Button) findViewById(R.id.myButton);
• Where R is a class automatically generated to keep track of resources
available to the application. In particular R.id... is the collection of
widgets defined in the XML layout.
www.sisoft.in 40

Android Screen Containers & Layouts

  • 1.
    1 Sisoft Technologies PvtLtd SRC E7, Shipra Riviera Bazar, Gyan Khand-3, Indirapuram, Ghaziabad Website: www.sisoft.in Email:info@sisoft.in Phone: +91-9999-283-283
  • 2.
    Android UI: Overview •An Activity is the front end component and it can contain screens. • Android screens are composed of components or screen containers and components within the containers • Screen containers are called View Groups or Layouts. Layout defines the arrangement of components within the containers. • All components are called views • android.view.View.* = base class for all widgets and ViewGroups – sub-classes include: TextView, ImageView, button, EditText etc • android.view.ViewGroup = It is base class for layouts and views containers. 2www.sisoft.in
  • 3.
    Views and ViewGroups • Each component in the screen is either a View or ViewGroup object • The Screen specification may be expressed either in XML or in program 3www.sisoft.in
  • 4.
    View Groups orLayouts • The screen container and component specification can be written in XML format. These are called XML layouts • Android considers XML-based layouts to be resources, and as such layout files are stored in the res/layout directory 4www.sisoft.in
  • 5.
    ViewGroup or Layout •There are six types of Layouts: 1.LinearLayout (the box model) 2.RelativeLayout (a rule-based model) 3.TableLayout (the grid model) 4.Frame Layout (it provides space in layout) 5. Absolute Layout (Non flexible model) – Deprecated Now 6. Grid Layout (the grid model) – Introduced in ice cream sandwich 5www.sisoft.in
  • 6.
    1.Linear Layout 1.Linear Layout:- Linear Layout is a box model –widgets or child containers are lined up in a column or row, one after the next. To configure a Linear Layout, you have five main areas of control besides the container's contents: • orientation (Horizontal/Vertical) • fill model (fill_parent/wrap_content/NNpx) • gravity(left/right/center) • weight • padding • margin 6www.sisoft.in
  • 7.
    • Orientation :indicates whether the Linear Layout represents a row(HORIZONTAL) or a column (VERTICAL)  Add the android:orientation property to your LinearLayout element in your XML layout, setting the value to be horizontal for a row or vertical for a column.  The orientation can be modified at runtime by invoking setOrientation() vertical Horizontal A C B CBA 1.Linear Layout 7 www.sisoft.in
  • 8.
    <?xml version="1.0" encoding="utf-8"?> <LinearLayout android:id="@+id/myLinearLayout" android:layout_width="fill_parent" android:layout_height="fill_parent" android:background="#ff0033cc" android:padding="4dip" xmlns:android="http://schemas.android.com/apk/res/android" android:orientation="horizontal"> <TextView android:id="@+id/labelUserName" android:layout_width="wrap_content" android:layout_height="wrap_content" android:background="#ffff0066" android:text="User Name" android:textSize="16sp" android:textStyle="bold" android:textColor="#ff000000”> </TextView> <EditText android:id="@+id/ediName" android:layout_width="wrap_content" android:layout_height="wrap_content" android:textSize="18sp”> </EditText> www.sisoft.in 8 <Button android:id="@+id/btnGo" android:layout_width="wrap_content" android:layout_height="wrap_content" android:text="Go" android:textStyle="bold”/> </LinearLayout> 1.Linear Layout
  • 9.
    1.Linear Layout 1.2 LinearLayout: Fill Model • Widgets have a "natural" size based on their accompanying text. • When their combined sizes does not exactly match the width of the Android device's screen, we may have the issue of what to do with the remaining space. www.sisoft.in 9
  • 10.
    1.Linear Layout 1.2 FillModel : All widgets inside a LinearLayout must supply dimensional attributes android:layout_width and android:layout_height to help address the issue of empty space. Values used in defining height and width are: 1.Specific a particular dimension, such as 125dip (device independent pixels) 2. wrap_content: which means the widget should fill up its natural space, unless that is too big, in which case Android can use word-wrap as needed to make it fit. 3. fill_parent: which means the widget should fill up all available space in its enclosing container, after all other widgets are taken care of www.sisoft.in 10
  • 11.
  • 12.
  • 13.
  • 14.
    1.Linear Layout 1.2 LinearLayout: Weight • It is used to proportionally assign space to widgets in a view. • You set android:layout_weight to a value (1, 2, 3, …) to indicates what proportion of the free space should go to that widget. Example Both the TextView and the Button widgets have been set as in the previous example. Both have the additional property android:layout_weight="1"whereas the EditText control has android:layout_weight="2“ • Default value is 0 www.sisoft.in 14
  • 15.
    1.Linear Layout 1.4 LinearLayout: Padding • The padding specifies how much space there is between the boundaries of the widget's "cell" and the actual widget contents. • If you want to increase the internal whitespace between the edges of the and its contents, you will want to use the: – android:padding property – or by calling setPadding() at runtime on the widget's Java object. www.sisoft.in 15
  • 16.
    1.4 Linear Layout:Padding and Margin 1.Linear Layout 16www.sisoft.in
  • 17.
    1.Linear Layout • LinearLayout: Internal Margins Using Padding www.sisoft.in 17
  • 18.
    1.Linear Layout • LinearLayout: (External) Margin www.sisoft.in 18
  • 19.
    2. Relative Layout:- Relative Layout places widgets based on their relationship to other widgets in the container and the parent container. A D CB 2.Relative Layout 19www.sisoft.in
  • 20.
  • 21.
    3.Table Layout 3. TableLayout 1.Android's Table Layout allows you to position your widgets in a grid made of identifiable rows and columns. 2.Columns might shrink or stretch to accommodate their contents. 3.TableLayout works in conjunction with Table Row. 4.TableLayout controls the overall behavior of the container, with the widgets themselves positioned into one or more Table Row containers, one per row in the grid. 21www.sisoft.in
  • 22.
    • Table layoutcontains the widgets in rows and columns form A FE B JI G C K H D L 22www.sisoft.in 3. Table Layout
  • 23.
    3.TableLayout <TableLayout - - -- > <TableRow> <TextView android:text="URL:"/> <EditText android:id="@+id/entry" android:layout_span="3" /> </TableRow> <TableRow> ---------------------- </TableRow> </TableLayout> 23www.sisoft.in Table Row Table Row Table Layout
  • 24.
    4. Frame Layout FrameLayout :- • Frame Layout is designed to block out an area on the screen to display a single item. • FrameLayout should be used to hold a single child view, because it can be difficult to organize child views in a way that's scalable to different screen sizes without the children overlapping each other. 24www.sisoft.in
  • 25.
    www.sisoft.in 25 <?xml version="1.0"encoding="utf-8"?> <FrameLayout xmlns:android="http://schemas.android.com/apk/res/android" android:layout_width="fill_parent" android:layout_height="fill_parent"> <ImageView - - - - - /> <TextView - - - - - /> <TextView - - - -/> </FrameLayout> 4. Frame Layout
  • 26.
    5. Absolute Layout AbsoluteLayout :- • A layout that lets you specify exact locations (x/y coordinates) of its children. • Absolute layouts are less flexible and harder to maintain than other types of layouts without absolute positioning 26www.sisoft.in
  • 27.
    5. Absolute Layout <?xmlversion="1.0" encoding="utf-8"?> <AbsoluteLayout android:id="@+id/myAbsoluteLayout“ android:layout_width="fill_parent“ android:layout_height="fill_parent“ xmlns:android="http://schemas.android.com/apk/res/android" > <Button android:id="@+id/myButton“ android:layout_width="wrap_content“ android:layout_height="wrap_content“ android:text="Button“ android:layout_x=“120px“ android:layout_y=“32px"> </Button> </AbsoluteLayout> 27www.sisoft.in
  • 28.
    6. Grid Layout •Android 4.0, or Ice Cream Sandwich (ICS), introduces GridLayout to support rich user interface design. GridLayout is similar to TableLayout and LinearLayout • android.widget.GridLayout places its children in a rectangular grid (in the form of rows and columns) similar to the TableLayout
  • 29.
    6. Grid Layout <?xmlversion="1.0" encoding="utf-8"?> <GridLayout xmlns:android="http://schemas.android.com/apk/res/android" android:layout_width="match_parent" android:layout_height="match_parent" android:columnCount="4" android:rowCount="4" android:orientation="horizontal" > <TextView android:text=" R 1, C 1 " /> <TextView android:text=" R 1, C 2 " /> <TextView android:text=" R 1, C 3 " /> <TextView android:text=" R 1, C 4 " /> <TextView android:text=" R 2, C 1 " /> <TextView android:text=" R 2, C 2 " /> <TextView android:text=" R 2, C 3 " /> <TextView android:text=" R 2, C 4 " /> <TextView android:text=" R 3, C 1 " /> <TextView android:text=" R 3, C 2 " /> <TextView android:text=" R 3, C 3 " /> <TextView android:text=" R 3, C 4 " /> <TextView android:text=" R 4, C 1 " /> <TextView android:text=" R 4, C 2 " /> <TextView android:text=" R 4, C 3 " /> <TextView android:text=" R 4, C 4 " /> </GridLayout>
  • 30.
    6. Grid Layout XMLAttributes • GridLayout supports the XML Attributes defined in android.widget.GridLayout class and in android.widget.GridLayout.LayoutParams android:rowCount, android:columnCount, android:orientation • Create an xml file with GridLayout of 4 x 4 with xml attributes rowCount and columnCount set to 4 and orientation set as horizontal.
  • 31.
    android:layout_gravity : Next, modifythe TextView text data placed at R3, C3 to R3, C3 modify. With this the GridLayout output comes out as shown
  • 32.
    ScrollView •When we havemore data than what can be shown on a single screen you may use the ScrollView control. •It provides a sliding or scrolling access to the data. This way the user can only see part of your layout at one time, but the rest is available via scrolling. • ScrollView only supports vertical scrolling. For horizontal scrolling, use HorizontalScrollView. 32www.sisoft.in
  • 33.
  • 34.
    Each View orViewGroup can have its own set of attributes…but, some are very common Attribute Description layout_width specifies width of View or ViewGroup layout_height specifies height layout_marginTop extra space on top layout_marginBottom extra space on bottom side layout_marginLeft extra space on left side layout_marginRight extra space on right side layout_gravity how child views are positioned layout_weight how much extra space in layout should be allocated to View (only when in LinearLayout or TableView) layout_x x-coordinate layout_y y-coordinate 34www.sisoft.in
  • 35.
    Reusing Layouts -<Include> Tag • Although Android offers a variety of widgets to provide small and re-usable interactive elements, you might also need to re-use larger components that require a special layout • To efficiently reuse complete layouts, you can use the <include/> and <merge/> tags to embed another layout inside the current layout • Create a Reusable Layout: If you already know the layout that you want to reuse, create a new XML file and define the layout. For example, here's a layout that defines a title bar to be included in each activity (titlebar.xml): <FrameLayout xmlns:android="http://schemas.android.com/apk/res/android" android:layout_width=”match_parent” android:layout_height="wrap_content" android:background="@color/titlebar_bg"> <ImageView android:layout_width="wrap_content" android:layout_height="wrap_content" android:src="@drawable/gafricalogo" /> </FrameLayout>
  • 36.
    Include Tag • Usethe <include>tag : Inside the layout to which you want to add the re- usable component, add the <include/> tag For example, here's a layout that includes the title bar from earlier example: <LinearLayout xmlns:android="http://schemas.android.com/apk/res/android" android:orientation="vertical" android:layout_width=”match_parent” android:layout_height=”match_parent” android:background="@color/app_bg" android:gravity="center_horizontal"> <include layout="@layout/titlebar"/> <TextView android:layout_width=”match_parent” android:layout_height="wrap_content" android:text="@string/hello" android:padding="10dp" /> … </LinearLayout>
  • 37.
    <merge> Tag • The<merge /> tag helps eliminate redundant view groups in your view hierarchy when including one layout within another. • For example, if your main layout is a vertical LinearLayout in which two consecutive views can be re-used in multiple layouts, then the re-usable layout in which you place the two views requires its own root view • However, using another LinearLayout as the root for the re-usable layout would result in a vertical LinearLayout inside a vertical LinearLayout. The nested LinearLayout serves no real purpose other than to slow down your UI performance. <merge xmlns:android=http://schemas.android.com/apk/res/android> <Button android:layout_width="fill_parent" android:layout_height="wrap_content" android:text="@string/add"/> <Button android:layout_width="fill_parent" android:layout_height="wrap_content" android:text="@string/delete"/> </merge>
  • 38.
    • To avoidincluding such a redundant view group, you can instead use the <merge> element as the root view for the re-usable layout • Now, when you include this layout in another layout (using the <include/> tag), the system ignores the <merge> element and places the two buttons directly in the layout, in place of the <include/> tag. <merge> Tag
  • 39.
    Attaching Layouts toJava Code 39www.sisoft.in •You must ‘connect’ the XML elements with equivalent objects in your Java activity. This allows you to manipulate the UI with code. XML Layout <xml> ……… ……… </xml> Java code Public class { ……………………. setContentView(R.layout.main) } Gen/package/R.java
  • 40.
    Attaching Layouts toJava Code • Assume the UI in res/layout/main.xml has been created. This layout could be called by an application using the statement setContentView(R.layout.main); • Individual widgets, such as myButton could be accessed by the application using the statement findViewByID(...) as in Button btn= (Button) findViewById(R.id.myButton); • Where R is a class automatically generated to keep track of resources available to the application. In particular R.id... is the collection of widgets defined in the XML layout. www.sisoft.in 40