1. 46 PFM April 2011
I
n this era of recycling and renewable resources,
being green is on the forefront of everyone's
mind. I recently met a client with a hobby that
embraces cast-off materials by turning them into
usable items. During the summer of 2010 Greg
Loskorn came in with an unusual request. He had
six 16"x20" photos of trains that he needed framed
for an art show at the opening of the Tehachapi
Railroad Museum. He wanted them mounted,
matted, glazed,
and fitted, and he
wanted to supply
the frames to me.
This is not an
unheard-of
request; little did
I realize what he
really meant by
“supplying” the
frames.
Greg is a fine
art photographer
who has a passion
for the high desert, railroad, and anything to do
with airplanes. Though he has been photographing
area terrain and attractions for a long time, he had
never exhibited his images in a formal gallery.
Greg, who owns Milepost Imaging in Tehachapi,
CA, is an avid hiker who ventures into the Mojave
Desert for hours following old railroad tracks for
unexpected photographs. On one such trip he
found some buried, deteriorating wood boards that
may have once been a fence used to prevent excess
sand from building up around the tracks. Most of
these planks were cracked, warped, rotten, and very
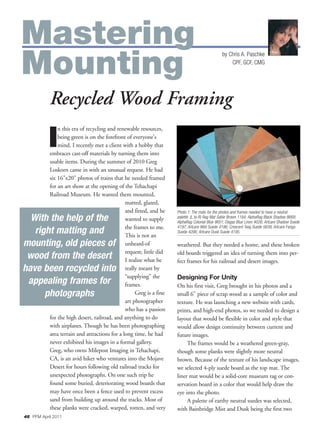
Recycled Wood Framing
Mastering
Mounting
by Chris A. Paschke
CPF, GCF, CMG
weathered. But they needed a home, and these broken
old boards triggered an idea of turning them into per-
fect frames for his railroad and desert images.
Designing For Unity
On his first visit, Greg brought in his photos and a
small 6" piece of scrap wood as a sample of color and
texture. He was launching a new website with cards,
prints, and high-end photos, so we needed to design a
layout that would be flexible in color and style that
would allow design continuity between current and
future images.
The frames would be a weathered green-gray,
though some planks were slightly more neutral
brown. Because of the texture of his landscape images,
we selected 4-ply suede board as the top mat. The
liner mat would be a solid-core museum rag or con-
servation board in a color that would help draw the
eye into the photo.
A palette of earthy neutral suedes was selected,
with Bainbridge Mist and Dusk being the first two
With the help of the
right matting and
mounting, old pieces of
wood from the desert
have been recycled into
appealing frames for
photographs
Photo 1: The mats for the photos and frames needed to have a neutral
palette. (L to R) Rag Mat Sable Brown 1184; AlphaRag Black Shadow 8669;
AlphaRag Colonial Blue 8651; Degas Blue Linen 4026; Artcare Shadow Suede
4197; Artcare Mist Suede 4196; Crescent Twig Suede 5639; Artcare Fango
Suede 4206; Artcare Dusk Suede 4195.
2. 48 PFM April 2011
Photo 2: Mist Suede matting was used on black-
and-white images while Dusk was perfect for the
color photos.
my specifications (22-1/8"x26-1/8"), I was able to mount
the photos, cut the mats, and assemble the package in
preparation for the frames. The glass was not cut until the
frames arrived to verify size for final fitting.
Mounting and Matting
All of these photos were professionally printed by a high-
end lab on matte-finish Endura photo paper. Since control
of orange peel was a primary concern, they were all mount-
ed to 3/16" Bienfang Step 150, a 150°F low temperature,
30-second short duration, heat-activated board with a
smooth surface that is well suited to photographs. On
chosen. Artcare Mist Suede #4196 was
the perfect pale gray-green color to make
the transition from the sand fence frame
to each of the photos (Photo 1). Dusk
Suede #4195 was a perfect match for the
texture and colors of the sandy earth
beneath the tracks and in the engine in
his color images (Photo 2). Brushed
Pewter and Antiqued Copper Precious
Metal paper was selected to wrap 3/16"
foam bevels as a visual spacer between
the top and bottom mats, and all six photos used
Bainbridge Black Shadow #8669 as liners (Photo 3).
Though the wrap may seem incongruous with the earthy,
barnwood-like nature of the photos, it really helped tie all
the elements together.
Frame Criteria
The original sand fence planks averaged 4" wide. Since
Greg loves the fractures, holes, and pits in the wood, he
wanted to keep as much of the original board as possible.
He planed the boards to smooth and level them for sizing,
and then he cut the rabbets on a table saw. The frames
were then mitered to length and joined. Keeping with the
rustic nature, however, he did not fill the corners, holes, or
discolorations. And there were splinters while framing.
Because of the wide nature of the frames, we had to
increase the mat borders to 5" or narrow them to allow for
a contrast between the mats and the frames. We opted for
3" borders for the liner mat and 2-1/4" for the suede top
mat, making the outside dimensions 22"x26" plus 1/8"
allowance. The wrapped bevel uses color to draw the eye
inward from the outer frame to the color and metal of the
engines, helping unify the design. Keeping the mats nar-
rower also allowed the frames and photos to remain the
dominant elements. Since the frames were being built to
Photo 5: Microfiber cloths are perfect for removing
dirt and dust prior to mounting photos. The back of
image and the mount board both need to be wiped.
Photo 6: All assembled mat packages were book
hinged along the long side to the mount board with
the photo.
Photo 7: Drill holes and sun fading provide character for frames made from aban-
doned telephone pole cross arms from the desert.
Photo 3: A sand fence frame was accented with
Brushed Pewter and Copper Gold Precious Metal
paper-wrapped 3/16" foam bevels as a visual spacer
between the top and bottom mats.
Photo 4: Four black-and-white and two color photos
were mounted, with the mats cut and assembled,
awaiting the frames.