
Recommended
Recommended
More Related Content
Similar to P1 Steps in Surveying (1).pdf
Similar to P1 Steps in Surveying (1).pdf (20)
Recently uploaded
Recently uploaded (20)
P1 Steps in Surveying (1).pdf
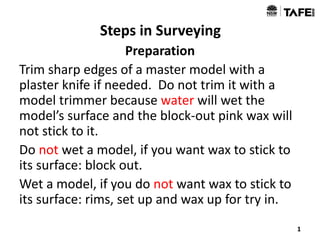
- 1. Steps in Surveying Preparation Trim sharp edges of a master model with a plaster knife if needed. Do not trim it with a model trimmer because water will wet the model’s surface and the block-out pink wax will not stick to it. Do not wet a model, if you want wax to stick to its surface: block out. Wet a model, if you do not want wax to stick to its surface: rims, set up and wax up for try in. 1
- 2. Read Job1 Work Order, mark the clasp type on the master model, 44: L-bar, 34: L-bar 2 Preparation (continued) TAFE TEACHING LABORATORY WORK ORDER DATE: Semester 2, 2012 OPERATOR: Dr. A. Clasp TEETH: SHADE:______________MOULD_____________ JOB TYPE: Mandibular Kennedy Class I (Job 1) DATE/TIME COMMENTS SPECIAL TRAY MMR TRY IN RETRY CASTING FINISH Week 8, Semester 2, 2012 Finish Job 1 and fit to Master Model. RESTS: None CLASPS: 3.4 L-Bar 4.4 L-Bar MAJOR CONNECTOR: Acrylic RECIPROCATION: Acrylic IMMEDIATE EXTRACTIONS: None PATIENTS NAME: Mr B. Partial JOB 1: Mandibular Kennedy Class I
- 3. Analysing master model Place and secure master model on the survey table. 3 For left-hander For right-hander Locking nut: secure model on the survey table Locking nut: change and secure tilt of survey table Suggestion: In order to tilt the survey table easily
- 4. Analysing master model (continued) Adjust the survey table to make the occlusal plane parallel to bench(Zero Tilt). 4 Occlusal plane Occlusal plane parallel to bench-Zero Tilt bench
- 5. Tilt survey table to move the anterior part down, eliminate undesirable undercuts: 3.4, 4.4 – distal surface, this is the anterior-posterior tilt for this case. Analysing master model (continued) 5 3.4-distal surface – undesirable undercut -eliminate 4.4-distal surface – undesirable undercut -eliminate down
- 6. Analysing master model(continued) Using the analysing rod, lightly contact all teeth surfaces and soft tissue surfaces to find out where undercuts are. When analysing tooth, the tip of the rod should be at the level of the free gingival margin : Tooth undercut: Anterior Teeth -lingual surface – no undercut 3.4-distal surface –undesirable undercut 3.4-lingual surface –no undercut 3.4-Buccal surface –desirable undercut (clasp) 4.4-distal surface –undesirable undercut 4.4-lingual surface –undesirable undercut 4.4-Buccal surface –desirable undercut(clasp) Tissue undercut: No tissue undercut 6
- 7. 3.4-distal surface 7 3.4-buccal surface 3.4-langual surface 4.4-distal surface 4.4-langual surface 4.4-buccal surface
- 8. Tilt survey table to move the master model laterally (left side up-right side down or left side down-right side up ) to minimise and equalise desirable undercuts: 3.4, 4.4 – buccal surface, this is the left-right tilt for this case. 8 34-Buccal surface – desirable undercut (L-bar clasp) 44-Buccal surface – desirable undercut (L-bar clasp)
- 9. Determine the path of insertion The master model must stay on the survey table (same plane) until the block out and trim back finished. Then the master model can be removed for duplication 9 Anterior-posterior tilt: decided Left-right tilt: decided
- 10. Tripoding Model After the path of insertion has been decided, it must be recorded for future reference. This procedure is referred to as tripoding. The simplest method of tripoding consists of placing marks at three widely spaced points on the dental model while the vertical arm of the surveyor is held at a fixed vertical position. This will establish three points in the same horizontal plane and permit the model to be accurately repositioned. Tripod marks are scribed into the model so that a model may be taken off the survey table and replaced in the same position as it was originally in. This allows a duplicate model to be positioned in the same survey position (horizontal plane) as the master model was in. The tripod marks must be scribed reasonably deep, so that they will can be identified in the duplicate model. 10
- 11. Tripod master model (continued) 1.Move the analysing rod down until it touches one side of the land area on the model (near retromolar pad). Then lock the rod in this position. 2. Move the locking rod horizontally to anterior area (near midline). 3. Move the locking rod to other side land area on the model (near retromolar pad). 11 Down & touch first Then Lock nut 1 2 3
- 12. Tripod master model (continued) If the locked rod can touch the land area and the anterior part of the master model, then scribe the model at these three points and circle the marks with a permanent marker so the three marks can be identified after duplication. 12 The mark is engraved onto the model using a le- cron carver
- 13. Survey Unlock the vertical arm and replace the analysing rod with the red carbon marker. Run the marker around 3.4, 4.4 – buccal, distal and lingual surfaces and lingual gingival margin of six anterior teeth. When marking survey lines, ensure that the carbon tip follows close to the free gingival margin so that you do not register a false height of contour (survey line). 13 Buccal Distal Lingual & Gingival margin
- 14. The survey instrument draws the survey lines on the model so that we can be sure that no rigid part of a partial denture lies in an undercut. This will affect the path of insertion and removal the denture. If there were undercuts, then the partial denture would not fit into the master model, or if it was forced into the patient’s mouth, it would snap into place and be impossible to remove in the clinic. It should also be noted that oral mucosa can have undercuts present, as well as teeth. Remember to survey the mucosa as well as the teeth on the master model. 14 Survey (continued)
- 15. The denture base (major connector) is entirely marked on the model showing flanges and finishing lines around teeth (food lines in the palate for maxillary model). The rests and clasps are also drawn on. No partial denture can be designed without surveying the master model. 15 Draw design on master model (copy the clinician’s design from work order)
- 16. Draw design on master model (continued) (copy the clinician’s design from work order) 16 1. Draw denture finish line: must above survey line on every tooth 2. Draw clasps: L-bar clasp on 3.4 & 4.4. the smile face: all under survey line
- 17. Block out undesirable undercuts (below survey lines only, not above survey lines) and gingival margins with pink wax 17 Block out (continued)
- 18. As well as the undesirable undercuts being blocked out with wax, the gingival margins of the teeth that will be covered by the denture base are relieved with wax. This is because the pressure of the denture base on the cervical margins can cause pain and ulceration to the patient. During surveying, if the area of the mucosa that a bar clasp arm will cross has an undercut, then this area must be block out. This is because the clasp arm could ulcerate the mucosa, if it comes into contact with mucosa. 18 Block out (continued)
- 19. Cut back block out wax 19 Replace the carbon marker with the wax scraper. Trim the excess pink wax on the distal and lingual surfaces of 3.4 and 4.4 until the scraper contacts the tooth surface. Do not damage the tooth surface. Use a la cron to remove the excess pink wax around the gingival margin.
- 20. 20 Cut back block out wax (continued) The master model after block out and trim back (undesirable undercuts and gingival margin). The master model is ready for duplication, now it can be removed from the survey table