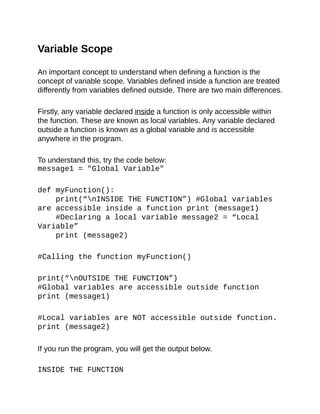
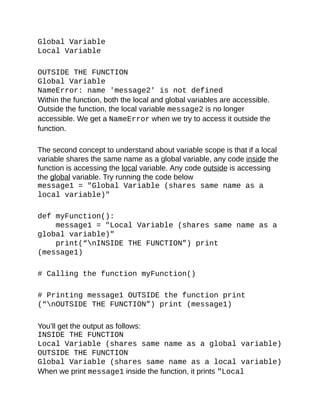
This document provides an overview and table of contents for a book about learning Python programming. The book aims to teach Python to both beginners and experienced coders in an easy to understand manner using carefully chosen examples. It covers topics like installing Python, variables, data types, input/output, control flow, functions, files and a final hands-on project. Code from the project and additional references are available online for readers to download.


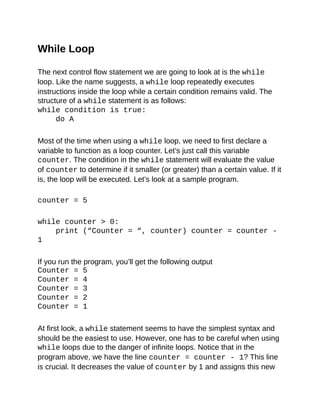
![List
List refers to a collection of data which are normally related. Instead of
storing these data as separate variables, we can store them as a list. For
instance, suppose our program needs to store the age of 5 users. Instead
of storing them as user1Age, user2Age, user3Age, user4Age and
user5Age, it makes more sense to store them as a list.
To declare a list, you write listName = [initial values]. Note
that we use square brackets [ ] when declaring a list. Multiple values are
separated by a comma.
Example:
userAge = [21, 22, 23, 24, 25]
We can also declare a list without assigning any initial values to it. We
simply write listName = []. What we have now is an empty list with
no items in it. We have to use the append() method mentioned below to
add items to the list.
Individual values in the list are accessible by their indexes, and indexes
always start from ZERO, not 1. This is a common practice in almost all
programming languages, such as C and Java. Hence the first value has
an index of 0, the next has an index of 1 and so forth. For instance,
userAge[0] = 21, userAge[1] = 22
Alternatively, you can access the values of a list from the back. The last
item in the list has an index of -1, the second last has an index of -2 and
so forth. Hence, userAge[-1] = 25, userAge[-2] = 24.
You can assign a list, or part of it, to a variable. If you write userAge2 =
userAge, the variable userAge2 becomes [21, 22, 23, 24, 25].](https://image.slidesharecdn.com/learnpythoninonedayandlearnitwellpythonforbeginnerswithhands-onproject-210929042712/85/Learn-python-in-one-day-and-learn-it-well-python-for-beginners-with-hands-on-project-the-only-book-you-need-to-start-coding-in-python-immediately-pdf-drive-33-320.jpg)
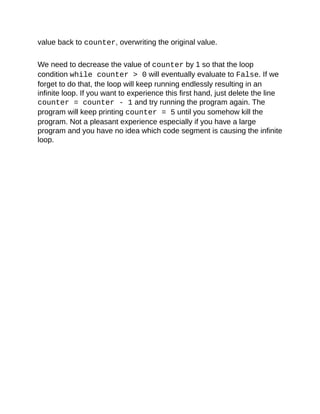
![If you write userAge3 = userAge[2:4], you are assigning items with
index 2 to index 4-1 from the list userAge to the list userAge3. In other
words, userAge3 = [23, 24].
The notation 2:4 is known as a slice. Whenever we use the slice notation
in Python, the item at the start index is always included, but the item at
the end is always excluded. Hence the notation 2:4 refers to items from
index 2 to index 4-1 (i.e. index 3), which is why userAge3 = [23, 24]
and not [23, 24, 25].
The slice notation includes a third number known as the stepper. If we
write userAge4 = userAge[1:5:2], we will get a sub list consisting
of every second number from index 1 to index 5-1 because the stepper is
2. Hence, userAge4 = [22, 24].
In addition, slice notations have useful defaults. The default for the first
number is zero, and the default for the second number is size of the list
being sliced. For instance, userAge[ :4] gives you values from index
0 to index 4-1 while userAge[1: ] gives you values from index 1 to
index 5-1 (since the size of userAge is 5, i.e. userAge has 5 items).
To modify items in a list, we write listName[index of item to be
modified] = new value. For instance, if you want to modify the
second item, you write userAge[1] = 5. Your list becomes userAge
= [21, 5, 23, 24, 25]
To add items, you use the append() function. For instance, if you write
userAge.append(99), you add the value 99 to the end of the list. Your
list is now userAge = [21, 5, 23, 24, 25, 99]
To remove items, you write del listName[index of item to be
deleted]. For instance, if you write del userAge[2], your list now
becomes userAge = [21, 5, 24, 25, 99] (the third item is](https://image.slidesharecdn.com/learnpythoninonedayandlearnitwellpythonforbeginnerswithhands-onproject-210929042712/85/Learn-python-in-one-day-and-learn-it-well-python-for-beginners-with-hands-on-project-the-only-book-you-need-to-start-coding-in-python-immediately-pdf-drive-34-320.jpg)
![deleted)
To fully appreciate the workings of a list, try running the following
program.
#declaring the list, list elements can be of different
data types myList = [1, 2, 3, 4, 5, “Hello”]
#print the entire list.
print(myList)
#You’ll get [1, 2, 3, 4, 5, “Hello”]
#print the third item (recall: Index starts from
zero).
print(myList[2])
#You’ll get 3
#print the last item.
print(myList[-1])
#You’ll get “Hello”
#assign myList (from index 1 to 4) to myList2 and
print myList2
myList2 = myList[1:5]
print (myList2)
#You’ll get [2, 3, 4, 5]
#modify the second item in myList and print the
updated list myList[1] = 20
print(myList)
#You’ll get [1, 20, 3, 4, 5, 'Hello']
#append a new item to myList and print the updated
list myList.append(“How are you”)
print(myList)
#You’ll get [1, 20, 3, 4, 5, 'Hello', 'How are you']](https://image.slidesharecdn.com/learnpythoninonedayandlearnitwellpythonforbeginnerswithhands-onproject-210929042712/85/Learn-python-in-one-day-and-learn-it-well-python-for-beginners-with-hands-on-project-the-only-book-you-need-to-start-coding-in-python-immediately-pdf-drive-35-320.jpg)
![#remove the sixth item from myList and print the
updated list del
myList[5]
print(myList)
#You’ll get [1, 20, 3, 4, 5, 'How are you']
There are a couple more things that you can do with a list. For sample
codes and more examples on working with a list, refer to Appendix B.](https://image.slidesharecdn.com/learnpythoninonedayandlearnitwellpythonforbeginnerswithhands-onproject-210929042712/85/Learn-python-in-one-day-and-learn-it-well-python-for-beginners-with-hands-on-project-the-only-book-you-need-to-start-coding-in-python-immediately-pdf-drive-36-320.jpg)
![Tuple
Tuples are just like lists, but you cannot modify their values. The initial
values are the values that will stay for the rest of the program. An
example where tuples are useful is when your program needs to store
the names of the months of the year.
To declare a tuple, you write tupleName = (initial values).
Notice that we use round brackets ( ) when declaring a tuple. Multiple
values are separated by a comma.
Example:
monthsOfYear = (“Jan”, “Feb”, “Mar”, “Apr”, “May”,
“Jun”, “Jul”, “Aug”, “Sep”, “Oct”, “Nov”, “Dec”)
You access the individual values of a tuple using their indexes, just like
with a list.
Hence, monthsOfYear[0] = “Jan”, monthsOfYear[-1] =
“Dec”.
For more examples of what you can do with a tuple, check out Appendix
C.](https://image.slidesharecdn.com/learnpythoninonedayandlearnitwellpythonforbeginnerswithhands-onproject-210929042712/85/Learn-python-in-one-day-and-learn-it-well-python-for-beginners-with-hands-on-project-the-only-book-you-need-to-start-coding-in-python-immediately-pdf-drive-37-320.jpg)
![Dictionary
Dictionary is a collection of related data PAIRS. For instance, if we want
to store the username and age of 5 users, we can store them in a
dictionary.
To declare a dictionary, you write dictionaryName = {dictionary
key : data}, with the requirement that dictionary keys must be unique
(within one dictionary). That is, you cannot declare a dictionary like this
myDictionary = {“Peter”:38, “John”:51, “Peter”:13}.
This is because “Peter” is used as the dictionary key twice. Note that we
use curly brackets { } when declaring a dictionary. Multiple pairs are
separated by a comma.
Example:
userNameAndAge = {“Peter”:38, “John”:51, “Alex”:13,
“Alvin”:“Not Available”}
You can also declare a dictionary using the dict( ) method. To declare
the userNameAndAge dictionary above, you write
userNameAndAge = dict(Peter = 38, John = 51, Alex =
13, Alvin = “Not Available”)
When you use this method to declare a dictionary, you use round
brackets ( ) instead of curly brackets { } and you do not put quotation
marks for the dictionary keys.
To access individual items in the dictionary, we use the dictionary key,
which is the first value in the {dictionary key : data} pair. For
instance, to get John’s age, you write userNameAndAge[“John”].](https://image.slidesharecdn.com/learnpythoninonedayandlearnitwellpythonforbeginnerswithhands-onproject-210929042712/85/Learn-python-in-one-day-and-learn-it-well-python-for-beginners-with-hands-on-project-the-only-book-you-need-to-start-coding-in-python-immediately-pdf-drive-38-320.jpg)
![You’ll get the value 51.
To modify items in a dictionary, we write
dictionaryName[dictionary key of item to be modified]
= new data. For instance, to modify the “John”:51 pair, we write
userNameAndAge[“John”] = 21. Our dictionary now becomes
userNameAndAge = {“Peter”:38, “John”:21, “Alex”:13,
“Alvin”:“Not Available”}.
We can also declare a dictionary without assigning any initial values to it.
We simply write dictionaryName = { }. What we have now is an
empty dictionary with no items in it.
To add items to a dictionary, we write dictionaryName[dictionary
key] = data. For instance, if we want to add “Joe”:40 to our
dictionary, we write userNameAndAge[“Joe”] = 40. Our dictionary
now becomes userNameAndAge = {“Peter”:38, “John”:21,
“Alex”:13, “Alvin”:“Not Available”, “Joe”:40}
To remove items from a dictionary, we write del
dictionaryName[dictionary key]. For instance, to remove the
“Alex”:13 pair, we write del userNameAndAge[“Alex”]. Our
dictionary now becomes userNameAndAge = {“Peter”:38,
“John”:21, “Alvin”:“Not Available”, “Joe”:40}
Run the following program to see all these in action.
#declaring the dictionary, dictionary keys and data
can be of different data types
myDict = {“One”:1.35, 2.5:”Two Point Five”, 3:”+”,
7.9:2}
#print the entire dictionary](https://image.slidesharecdn.com/learnpythoninonedayandlearnitwellpythonforbeginnerswithhands-onproject-210929042712/85/Learn-python-in-one-day-and-learn-it-well-python-for-beginners-with-hands-on-project-the-only-book-you-need-to-start-coding-in-python-immediately-pdf-drive-39-320.jpg)
![print(myDict)
#You’ll get {2.5: 'Two Point Five', 3: '+', 'One':
1.35, 7.9: 2}
#Note that items in a dictionary are not stored in the
same order as the way you declare them.
#print the item with key = “One”.
print(myDict[“One”])
#You’ll get 1.35
#print the item with key = 7.9.
print(myDict[7.9])
#You’ll get 2
#modify the item with key = 2.5 and print the updated
dictionary
myDict[2.5] = “Two and a Half”
print(myDict)
#You’ll get {2.5: 'Two and a Half', 3: '+', 'One':
1.35, 7.9: 2}
#add a new item and print the updated dictionary
myDict[“New item”] = “I’m new”
print(myDict)
#You’ll get {'New item': 'I’m new', 2.5: 'Two and a
Half', 3: '+', 'One': 1.35, 7.9: 2}
#remove the item with key = “One” and print the
updated dictionary
del myDict[“One”]
print(myDict)
#You’ll get {'New item': 'I’m new', 2.5: 'Two and a
Half', 3: '+', 7.9: 2}
For more examples and sample codes of working with a dictionary, you](https://image.slidesharecdn.com/learnpythoninonedayandlearnitwellpythonforbeginnerswithhands-onproject-210929042712/85/Learn-python-in-one-day-and-learn-it-well-python-for-beginners-with-hands-on-project-the-only-book-you-need-to-start-coding-in-python-immediately-pdf-drive-40-320.jpg)


![For Loop
Next, let us look at the for loop. The for loop executes a block of code
repeatedly until the condition in the for statement is no longer valid.
Looping through an iterable
In Python, an iterable refers to anything that can be looped over, such as
a string, list or tuple. The syntax for looping through an iterable is as
follows:
for a in iterable:
print (a)
Example:
pets = ['cats', 'dogs', 'rabbits', 'hamsters']
for myPets in pets:
print (myPets)
In the program above, we first declare the list pets and give it the
members 'cats', 'dogs', 'rabbits' and 'hamsters'. Next the
statement for myPets in pets: loops through the pets list and
assigns each member in the list to the variable myPets.
The first time the program runs through the for loop, it assigns ‘cats’
to the variable myPets. The statement print (myPets) then prints the
value ‘cats’. The second time the programs loops through the for
statement, it assigns the value ‘dogs’ to myPets and prints the value
‘dogs’. The program continues looping through the list until the end of
the list is reached.](https://image.slidesharecdn.com/learnpythoninonedayandlearnitwellpythonforbeginnerswithhands-onproject-210929042712/85/Learn-python-in-one-day-and-learn-it-well-python-for-beginners-with-hands-on-project-the-only-book-you-need-to-start-coding-in-python-immediately-pdf-drive-55-320.jpg)
![l
o
Looping through a sequence of numbers
To loop through a sequence of numbers, the built-in range() function
comes in handy. The range() function generates a list of numbers and
has the syntax range (start, end, step).
If start is not given, the numbers generated will start from zero.
Note: A useful tip to remember here is that in Python (and most
programming languages), unless otherwise stated, we always start from
zero.
For instance, the index of a list and a tuple starts from zero.
When using the format() method for strings, the positions of
parameters start from zero.
When using the range() function, if start is not given, the numbers
generated start from zero.
If step is not given, a list of consecutive numbers will be generated (i.e.
step = 1). The end value must be provided. However, one weird thing
about the range() function is that the given end value is never part of
the generated list.
For instance,
range(5) will generate the list [0, 1, 2, 3, 4]](https://image.slidesharecdn.com/learnpythoninonedayandlearnitwellpythonforbeginnerswithhands-onproject-210929042712/85/Learn-python-in-one-day-and-learn-it-well-python-for-beginners-with-hands-on-project-the-only-book-you-need-to-start-coding-in-python-immediately-pdf-drive-57-320.jpg)
![range(3, 10) will generate [3, 4, 5, 6, 7, 8, 9]
range(4, 10, 2) will generate [4, 6, 8]
To see how the range() function works in a for statement, try running
the following code:
for i in range(5):
print (i)
You should get
0
1
2
3
4](https://image.slidesharecdn.com/learnpythoninonedayandlearnitwellpythonforbeginnerswithhands-onproject-210929042712/85/Learn-python-in-one-day-and-learn-it-well-python-for-beginners-with-hands-on-project-the-only-book-you-need-to-start-coding-in-python-immediately-pdf-drive-58-320.jpg)
![print ("Unknown error: ", e)
The list below shows the various outputs for different user inputs. >>>
denotes the user input and => denotes the output.
>>> Please enter a number: m => Error: You did not
enter a number
Reason: User entered a string which cannot be cast into an integer. This
is a ValueError. Hence, the statement in the except ValueError
block is displayed.
>>> Please enter a number: 12
>>> Please enter another number: 0
=> Error: Cannot divide by zero
Reason: userInput2 = 0. Since we cannot divide a number by zero,
this is a ZeroDivisionError. The statement in the except
ZeroDivisionError block is displayed.
>>> Please enter a number: 12
>>> Please enter another number: 3
=> The answer is 4.0
=> Unknown error: [Errno 2] No such file or directory:
'missing.txt'
Reason: User enters acceptable values and the line print ("The
answer is ", answer) executes correctly. However, the next line
raises an error as missing.txt is not found. Since this is not a
ValueError or a ZeroDivisionError, the last except block is
executed.
ValueError and ZeroDivisionError are two of the many pre-
defined error types in Python. ValueError is raised when a built-in
operation or function receives a parameter that has the right type but an
inappropriate value. ZeroDivisionError is raised when the program
tries to divide by zero. Other common errors in Python include](https://image.slidesharecdn.com/learnpythoninonedayandlearnitwellpythonforbeginnerswithhands-onproject-210929042712/85/Learn-python-in-one-day-and-learn-it-well-python-for-beginners-with-hands-on-project-the-only-book-you-need-to-start-coding-in-python-immediately-pdf-drive-64-320.jpg)

![Defining Your Own Functions
We can define our own functions in Python and reuse them throughout
the program. The syntax for defining a function is as follows:
def functionName(parameters): code detailing what the
function should do return [expression]
There are two keywords here, def and return.
def tells the program that the indented code from the next line onwards
is part of the function. return is the keyword that we use to return an
answer from the function. There can be more than one return
statements in a function. However, once the function executes a return
statement, the function will exit. If your function does not need to return
any value, you can omit the return statement. Alternatively, you can
write return or return None.
Let us now define our first function. Suppose we want to determine if a
given number is a prime number. Here’s how we can define the function
using the modulus (%) operator we learned in Chapter 3 and the for
loop and if statement we learned in Chapter 6.
def checkIfPrime (numberToCheck): for x in range(2,
numberToCheck): if (numberToCheck%x == 0):
return False return True
In the function above, lines 2 and 3 uses a for loop to divide the given
parameter numberToCheck by all numbers from 2 to numberToCheck
- 1 to determine if the remainder is zero. If the remainder is zero,
numberToCheck is not a prime number. Line 4 will return False and the
function will exit.
If by last iteration of the for loop, none of the division gives a remainder
of zero, the function will reach Line 5, and return True. The function will](https://image.slidesharecdn.com/learnpythoninonedayandlearnitwellpythonforbeginnerswithhands-onproject-210929042712/85/Learn-python-in-one-day-and-learn-it-well-python-for-beginners-with-hands-on-project-the-only-book-you-need-to-start-coding-in-python-immediately-pdf-drive-69-320.jpg)
![Importing Modules
Python comes with a large number of built-in functions. These functions
are saved in files known as modules. To use the built-in codes in Python
modules, we have to import them into our programs first. We do that by
using the import keyword. There are three ways to do it.
The first way is to import the entire module by writing import
moduleName.
For instance, to import the random module, we write import random.
To use the randrange() function in the random module, we write
random.randrange(1, 10).
If you find it too troublesome to write random each time you use the
function, you can import the module by writing import random as r
(where r is any name of your choice). Now to use the randrange()
function, you simply write r.randrange(1, 10).
The third way to import modules is to import specific functions from the
module by writing from moduleName import name1[, name2[, ...
nameN]].
For instance, to import the randrange() function from the random
module, we write from random import randrange. If we want to
import more than one functions, we separate them with a comma. To
import the randrange() and randint() functions, we write from
random import randrange, randint. To use the function now, we
do not have to use the dot notation anymore. Just write randrange(1,
10).](https://image.slidesharecdn.com/learnpythoninonedayandlearnitwellpythonforbeginnerswithhands-onproject-210929042712/85/Learn-python-in-one-day-and-learn-it-well-python-for-beginners-with-hands-on-project-the-only-book-you-need-to-start-coding-in-python-immediately-pdf-drive-74-320.jpg)


![We shall name the two lists operandList and operatorList.
operandList should store five numbers, with 0 as their initial values.
operatorList should store four strings, with ‘ ’ as their initial values.
The dictionary consists of 4 pairs, with integers 1 to 4 as the dictionary
keys, and “+”, “-”, “”, “*” as the data. Let’s call this operatorDict.
[Exercise 4.1: Updating operandList with Random Numbers]
First we need to the replace the initial values of our operandList with
random numbers generated by the randint() function.
The randint() takes in two parameters, start and end, and returns a
random integer N such that start <= N <= end.
For instance, if randint(1, 9) is called, it’ll randomly return an integer
from the numbers 1, 2, 3, 4, 5, 6, 7, 8, 9.
To update our operandList variable with random numbers, we can do
this one by one since operandList only has five members. We can
write
operandList[0] = randint(1, 9) operandList[1] =
randint(1, 9) operandList[2] = randint(1, 9)
operandList[3] = randint(1, 9) operandList[4] =
randint(1, 9)
Each time randint(1, 9) is called, it’ll randomly return an integer from
the numbers 1, 2, 3, 4, 5, 6, 7, 8, 9.
However, this is not the most elegant way of updating our operandList.
Imagine how cumbersome it’ll be if operandList has 1000 members.](https://image.slidesharecdn.com/learnpythoninonedayandlearnitwellpythonforbeginnerswithhands-onproject-210929042712/85/Learn-python-in-one-day-and-learn-it-well-python-for-beginners-with-hands-on-project-the-only-book-you-need-to-start-coding-in-python-immediately-pdf-drive-92-320.jpg)
![The better alternative is to use a for loop.
Try using a for loop to accomplish the same task.
Done? Great!
[Exercise 4.2: Updating operatorList with Mathematical Symbols]
Now that we have the numbers to operate on, we need to randomly
generate the mathematical symbols (+, -, , *) for our questions. To do
that, we’ll use the randint() function and the operatorDict
dictionary.
randint() will generate the dictionary key, which will then be mapped
to the correct operator using the operatorDict dictionary. For instance,
to assign the symbol to operatorList[0], we write
operatorList[0] = operatorDict[randint(1,
4)]
Similar to Exercise 4.1, you should use a for loop to complete this task.
However, there is one problem that makes this exercise harder than
Exercise 4.1.
Recall that in Python, ** stands for exponent (i.e. 2**3 = 2^3)?
The problem is, when we have two consecutive exponent operators in
Python, such as 2**3**2, Python interprets it as 2**(3**2) instead of
(2**3)**2. In the first case, the answer is 2 to the power of 9 (i.e. 29)
which is 512. In the second case, the answer is 8 to the power of 2 (i.e.
82) which is 64. Hence when we present a question like 2**3**2, the user
will get the answer wrong if he interprets it as (2**3)**2.](https://image.slidesharecdn.com/learnpythoninonedayandlearnitwellpythonforbeginnerswithhands-onproject-210929042712/85/Learn-python-in-one-day-and-learn-it-well-python-for-beginners-with-hands-on-project-the-only-book-you-need-to-start-coding-in-python-immediately-pdf-drive-93-320.jpg)
![To prevent this problem, we’re going to modify our code so that we do not
get two consecutive ** signs. In other words, operatorList = [‘+’,
‘+’, ‘-’, ‘**’] is fine but operatorList = [‘+’, ‘-’, ‘**’,
‘**’] is not.
This exercise is the hardest among all the exercises. Try coming up with
a solution to prevent two consecutive ** signs. Once you are done, we
can proceed to Exercise 4.3.
Hint: If you are stuck, you can consider using an if statement within the
for loop.
[Exercise 4.3: Generating a Mathematical Expression]
Now that we have our operators and operands, we are going to try to
generate the mathematical expression as a string. This expression users
the five numbers from our operandList and the four mathematical
symbols from our operatorList to form a question.
We have to declare another variable called questionString and
assign the mathematical expression to questionString. Examples of
questionString include
6 – 2*3 – 2**1
4 + 5 – 2*6 + 1
8 – 0*2 + 5 – 8
Try to generate this expression yourself.
Hint: You can use a for loop to concatenate the individual substrings
from operandList and operatorList to get the mathematical
expression.
[Exercise 4.4: Evaluating the Result]](https://image.slidesharecdn.com/learnpythoninonedayandlearnitwellpythonforbeginnerswithhands-onproject-210929042712/85/Learn-python-in-one-day-and-learn-it-well-python-for-beginners-with-hands-on-project-the-only-book-you-need-to-start-coding-in-python-immediately-pdf-drive-94-320.jpg)
![We should now have a mathematical expression as a string, assigned to
the variable questionString. To evaluate the result of this expression,
we’re going to use a brilliant built-in function that comes with Python,
eval().
eval() interprets a string as a code and executes the code. For
instance, if we write eval(“1+2+4”), we’ll get the number 7.
Hence to evaluate the result of our mathematical expression, we pass in
questionString to the eval() function and assign the result to a new
variable named result.
This exercise is pretty straight forward and can be completed in one step.
[Exercise 4.5: Interacting with the User]
Finally, we’re going to interact with our user. In this exercise, we’ll be
doing a few things:
Step 1: Displaying the question to the user Step 2: Prompting the user for
an answer Step 3: Evaluating the answer, displaying the appropriate
message and returning the user’s score.
For step 1, we need to use a built-in function for manipulating strings. As
mentioned earlier, in Python, the ** symbol stands for exponent. That is,
2**3 = 8. However, to most users, ** has no meaning. Hence if we display
a question as 2**3 + 8 -5, the user will likely be confused. To prevent that,
we’ll replace any ** symbol in questionString with the ^ symbol.
To do that, we’ll use the built-in function replace(). Using it is pretty
straightforward, just write questionString =
questionString.replace("**", "^"). Now you can print the
resulting expression to the user.](https://image.slidesharecdn.com/learnpythoninonedayandlearnitwellpythonforbeginnerswithhands-onproject-210929042712/85/Learn-python-in-one-day-and-learn-it-well-python-for-beginners-with-hands-on-project-the-only-book-you-need-to-start-coding-in-python-immediately-pdf-drive-95-320.jpg)


![Appendix A: Working With Strings
Note: The notation [start, [end]] means start and end are optional
parameters. If only one number is provided as the parameter, it is taken
to be start.
# marks the start of a comment
‘’’ marks the start and end of a multiline comment The actual code is in
monotype font.
=> marks the start of the output
count (sub, [start, [end]])
Return the number of times the substring sub appears in the string.
This function is case-sensitive.
[Example]
# In the examples below, ‘s’ occurs at index 3, 6 and 10
# count the entire string
‘This is a string’.count(‘s’)
=> 3
# count from index 4 to end of string ‘This is a string’.count(‘s’, 4) => 2
# count from index 4 to 10-1
‘This is a string’.count(‘s’, 4, 10 ) => 1
# count ‘T’. There’s only 1 ‘T’ as the function is case sensitive.
‘This is a string’.count(‘T’)
=> 1](https://image.slidesharecdn.com/learnpythoninonedayandlearnitwellpythonforbeginnerswithhands-onproject-210929042712/85/Learn-python-in-one-day-and-learn-it-well-python-for-beginners-with-hands-on-project-the-only-book-you-need-to-start-coding-in-python-immediately-pdf-drive-103-320.jpg)
![endswith (suffix, [start, [end]])
Return True if the string ends with the specified suffix, otherwise return
False.
suffix can also be a tuple of suffixes to look for.
This function is case-sensitive.
[Example]
# ’man’ occurs at index 4 to 6
# check the entire string
‘Postman’.endswith(‘man’)
=> True
# check from index 3 to end of string ‘Postman’.endswith(‘man’, 3)
=> True
# check from index 2 to 6-1
‘Postman’.endswith(‘man’, 2, 6) => False
# check from index 2 to 7-1
‘Postman’.endswith(‘man’, 2, 7) => True
# Using a tuple of suffixes (check from index 2 to 6-1)
‘Postman’.endswith((‘man’, ‘ma’), 2, 6) => True
find/index (sub, [start, [end]])
Return the index in the string where the first occurrence of the substring
sub is found.
find() returns -1 if sub is not found.
index() returns ValueError is sub is not found.
This function is case-sensitive.
[Example]](https://image.slidesharecdn.com/learnpythoninonedayandlearnitwellpythonforbeginnerswithhands-onproject-210929042712/85/Learn-python-in-one-day-and-learn-it-well-python-for-beginners-with-hands-on-project-the-only-book-you-need-to-start-coding-in-python-immediately-pdf-drive-104-320.jpg)
![# check the entire string
‘This is a string’.find(‘s’)
=> 3
# check from index 4 to end of string ‘This is a string’.find(‘s’, 4) => 6
# check from index 7 to 11-1
‘This is a string’.find(‘s’, 7,11 ) => 10
# Sub is not found
'This is a string'.find(‘p’)
=> -1
'This is a string'.index(‘p’)
=> ValueError
isalnum()
Return true if all characters in the string are alphanumeric and there is at
least one character, false otherwise.
Alphanumeric does not include whitespaces.
[Example]
‘abcd1234’.isalnum()
=> True
‘a b c d 1 2 3 4’.isalnum()
=> False
‘abcd’.isalnum()
=> True](https://image.slidesharecdn.com/learnpythoninonedayandlearnitwellpythonforbeginnerswithhands-onproject-210929042712/85/Learn-python-in-one-day-and-learn-it-well-python-for-beginners-with-hands-on-project-the-only-book-you-need-to-start-coding-in-python-immediately-pdf-drive-105-320.jpg)
![‘1234’.isalnum()
=> True
isalpha()
Return true if all characters in the string are alphabetic and there is at
least one character, false otherwise.
[Example]
‘abcd’.isalpha()
=> True
‘abcd1234’.isalpha()
=> False
‘1234’.isalpha()
=> False
‘a b c’.isalpha()
=> False
isdigit()
Return true if all characters in the string are digits and there is at least
one character, false otherwise.
[Example]
‘1234’.isdigit()
=> True](https://image.slidesharecdn.com/learnpythoninonedayandlearnitwellpythonforbeginnerswithhands-onproject-210929042712/85/Learn-python-in-one-day-and-learn-it-well-python-for-beginners-with-hands-on-project-the-only-book-you-need-to-start-coding-in-python-immediately-pdf-drive-106-320.jpg)
![‘abcd1234’.isdigit()
=> False
‘abcd’.isdigit()
=> False
‘1 2 3 4’.isdigit()
=> False
islower()
Return true if all cased characters in the string are lowercase and there is
at least one cased character, false otherwise.
[Example]
‘abcd’.islower()
=> True
‘Abcd’.islower()
=> False
‘ABCD’.islower()
=> False
isspace()
Return true if there are only whitespace characters in the string and there
is at least one character, false otherwise.
[Example]](https://image.slidesharecdn.com/learnpythoninonedayandlearnitwellpythonforbeginnerswithhands-onproject-210929042712/85/Learn-python-in-one-day-and-learn-it-well-python-for-beginners-with-hands-on-project-the-only-book-you-need-to-start-coding-in-python-immediately-pdf-drive-107-320.jpg)
![‘ ’.isspace()
=> True
‘a b’.isspace()
=> False
istitle()
Return true if the string is a titlecased string and there is at least one
character
[Example]
‘This Is A String’.istitle()
=> True
‘This is a string’.istitle()
=> False
isupper()
Return true if all cased characters in the string are uppercase and there
is at least one cased character, false otherwise.
[Example]
‘ABCD’.isupper()
=> True
‘Abcd’.isupper()
=> False
‘abcd’.isupper()](https://image.slidesharecdn.com/learnpythoninonedayandlearnitwellpythonforbeginnerswithhands-onproject-210929042712/85/Learn-python-in-one-day-and-learn-it-well-python-for-beginners-with-hands-on-project-the-only-book-you-need-to-start-coding-in-python-immediately-pdf-drive-108-320.jpg)
![=> False
join()
Return a string in which the parameter provided is joined by a separator.
[Example]
sep = ‘-’
myTuple = (‘a’, ‘b’, ‘c’)
myList = [‘d’, ‘e’, ‘f’]
myString = “Hello World”
sep.join(myTuple)
=> ‘a-b-c’
sep.join(myTuple)
=> ‘d-e-f’
sep.join(myString)
=> ‘H-e-l-l-o- -W-o-r-l-d’’
lower()
Return a copy of the string converted to lowercase.
[Example]
‘Hello Python’.lower()
=> ‘hello python’
replace(old, new[, count])](https://image.slidesharecdn.com/learnpythoninonedayandlearnitwellpythonforbeginnerswithhands-onproject-210929042712/85/Learn-python-in-one-day-and-learn-it-well-python-for-beginners-with-hands-on-project-the-only-book-you-need-to-start-coding-in-python-immediately-pdf-drive-109-320.jpg)
![Return a copy of the string with all occurrences of substring old replaced
by new.
count is optional. If given, only the first count occurrences are replaced.
This function is case-sensitive.
[Example]
# Replace all occurences
‘This is a string’.replace(‘s’, ‘p’) => 'Thip ip a
ptring'
# Replace first 2 occurences
‘This is a string’.replace(‘s’, ‘p’, 2) => 'Thip ip a
string'
split([sep [,maxsplit]])
Return a list of the words in the string, using sep as the delimiter string.
sep and maxsplit are optional.
If sep is not given, whitespace is used as the delimiter.
If maxsplit is given, at most maxsplit splits are done.
This function is case-sensitive.
[Example]
‘’’
Split using comma as the delimiter Notice that there’s a space before the
words ‘is’, ‘a’ and ‘string’ in the output.
‘’’
‘This, is, a, string’.split(‘,’) => ['This', ' is', '
a', ' string']
# Split using whitespace as delimiter ‘This is a string’.split()](https://image.slidesharecdn.com/learnpythoninonedayandlearnitwellpythonforbeginnerswithhands-onproject-210929042712/85/Learn-python-in-one-day-and-learn-it-well-python-for-beginners-with-hands-on-project-the-only-book-you-need-to-start-coding-in-python-immediately-pdf-drive-110-320.jpg)
![=> ['This', 'is', 'a', 'string']
# Only do 2 splits
‘This, is, a, string’.split(‘,’ 2) => ['This', ' is',
' a, string']
splitlines ([keepends])
Return a list of the lines in the string, breaking at line boundaries.
Line breaks are not included in the resulting list unless keepends is given
and true.
[Example]
# Split lines separated by n
‘This is the first line.nThis is the second
line’.splitlines() => ['This is the first line.',
'This is the second line.']
# Split multi line string (e.g. string that uses the ‘’’ mark) ‘’’This is the first
line.
This is the second line.’’’.splitlines() => ['This is
the first line.', 'This is the second line.']
# Split and keep line breaks
'This is the first line.nThis is the second
line.'.splitlines(True) => ['This is the first
line.n', 'This is the second line.']
‘’’This is the first line.
This is the second line.’’’.splitlines(True) => ['This
is the first line.n', 'This is the second line.']
startswith (prefix[, start[, end]])](https://image.slidesharecdn.com/learnpythoninonedayandlearnitwellpythonforbeginnerswithhands-onproject-210929042712/85/Learn-python-in-one-day-and-learn-it-well-python-for-beginners-with-hands-on-project-the-only-book-you-need-to-start-coding-in-python-immediately-pdf-drive-111-320.jpg)
![Return True if string starts with the prefix, otherwise return False.
prefix can also be a tuple of prefixes to look for.
This function is case-sensitive.
[Example]
# ’Post’ occurs at index 0 to 3
# check the entire string
‘Postman’.startswith(‘Post’)
=> True
# check from index 3 to end of string ‘Postman’.startswith(‘Post’, 3) =>
False
# check from index 2 to 6-1
‘Postman’.startswith(‘Post’, 2, 6) => False
# check from index 2 to 6-1
‘Postman’.startswith(‘stm’, 2, 6) => True
# Using a tuple of prefixes (check from index 3 to end of string)
‘Postman’.startswith((‘Post’, ‘tma’), 3) => True
strip ([chars])
Return a copy of the string with the leading and trailing characters char
removed.
If char is not provided, whitespaces will be removed.
This function is case-sensitive.
[Example]](https://image.slidesharecdn.com/learnpythoninonedayandlearnitwellpythonforbeginnerswithhands-onproject-210929042712/85/Learn-python-in-one-day-and-learn-it-well-python-for-beginners-with-hands-on-project-the-only-book-you-need-to-start-coding-in-python-immediately-pdf-drive-112-320.jpg)
![# Strip whitespaces
‘ This is a string ’.strip() => 'This is a string'
# Strip ‘s’. Nothing is removed since ‘s’ is not at the start or end of the
string 'This is a string'.strip('s')
=> 'This is a string'
# Strip ‘g’.
‘This is a string’.strip(‘g’)
=> ‘This is a strin’
upper()
Return a copy of the string converted to uppercase.
[Example]
‘Hello Python’.upper()
=> ‘HELLO PYTHON’](https://image.slidesharecdn.com/learnpythoninonedayandlearnitwellpythonforbeginnerswithhands-onproject-210929042712/85/Learn-python-in-one-day-and-learn-it-well-python-for-beginners-with-hands-on-project-the-only-book-you-need-to-start-coding-in-python-immediately-pdf-drive-113-320.jpg)
![Appendix B: Working With Lists
=> marks the start of the output
append( )
Add item to the end of a list
[Example]
myList = [‘a’, ‘b’, ‘c’, ‘d’]
myList.append(‘e’) print (myList)
=> [‘a’, ‘b’, ‘c’, ‘d’, ‘e’]
del
Remove items from a list
[Example]
myList = [‘a’, ‘b’, ‘c’, ‘d’, ‘e’, ‘f’, ‘g’, ‘h’, ‘i’,
‘j’, ‘k’, ‘l’]
#delete the third item (index = 2) del myList[2]
print (myList)
=> [‘a’, ‘b’, ‘d’, ‘e’, ‘f’, ‘g’, ‘h’, ‘i’, ‘j’, ‘k’, ‘l’]
#delete items from index 1 to 5-1
del myList[1:5]
print (myList)
=> [‘a’, ‘g’, ‘h’, ‘i’, ‘j’, ‘k’, ‘l’]
#delete items from index 0 to 3-1
del myList [ :3]
print (myList)
=> [‘i’, ‘j’, ‘k’, ‘l’]](https://image.slidesharecdn.com/learnpythoninonedayandlearnitwellpythonforbeginnerswithhands-onproject-210929042712/85/Learn-python-in-one-day-and-learn-it-well-python-for-beginners-with-hands-on-project-the-only-book-you-need-to-start-coding-in-python-immediately-pdf-drive-114-320.jpg)
![#delete items from index 2 to end del myList [2:]
print (myList)
=> [‘i’, ‘j’]
extend( )
Combine two lists
[Example]
myList = [‘a’, ‘b’, ‘c’, ‘d’, ‘e’]
myList2 = [1, 2, 3, 4]
myList.extend(myList2) print (myList)
=> [‘a’, ‘b’, ‘c’, ‘d’, ‘e’, 1, 2, 3, 4]
In
Check if an item is in a list
[Example]
myList = [‘a’, ‘b’, ‘c’, ‘d’]
‘c’ in myList
=> True
‘e’ in myList
=> False
insert( )
Add item to a list at a particular position
[Example]](https://image.slidesharecdn.com/learnpythoninonedayandlearnitwellpythonforbeginnerswithhands-onproject-210929042712/85/Learn-python-in-one-day-and-learn-it-well-python-for-beginners-with-hands-on-project-the-only-book-you-need-to-start-coding-in-python-immediately-pdf-drive-115-320.jpg)
![myList = [‘a’, ‘b’, ‘c’, ‘d’, ‘e’]
myList.insert(1, ‘Hi’) print (myList)
=> [‘a’, ‘Hi’, ‘b’, ‘c’, ‘d’, ‘e’]
len( )
Find the number of items in a list
[Example]
myList = [‘a’, ‘b’, ‘c’, ‘d’]
print (len(myList)) => 4
pop( )
Get the value of an item and remove it from the list Requires index of
item as the parameter
[Example]
myList = [‘a’, ‘b’, ‘c’, ‘d’, ‘e’]
#remove the third item member = myList.pop(2) print (member)
=> c
print (myList)
=> [‘a’, ‘b’, ‘d’, ‘e’]
#remove the last item member = myList.pop( ) print (member)
=> e
print (myList)
=> [‘a’, ‘b’, ‘d’]
remove( )](https://image.slidesharecdn.com/learnpythoninonedayandlearnitwellpythonforbeginnerswithhands-onproject-210929042712/85/Learn-python-in-one-day-and-learn-it-well-python-for-beginners-with-hands-on-project-the-only-book-you-need-to-start-coding-in-python-immediately-pdf-drive-116-320.jpg)
![Remove an item from a list. Requires the value of the item as the
parameter.
[Example]
myList = [‘a’, ‘b’, ‘c’, ‘d’, ‘e’]
#remove the item ‘c’
myList.remove(‘c’) print (myList)
=> [‘a’, ‘b’, ‘d’, ‘e’]
reverse()
Reverse the items in a list
[Example]
myList = [1, 2, 3, 4]
myList.reverse()
print (myList)
=> [4, 3, 2, 1]
sort()
Sort a list alphabetically or numerically
[Example]
myList = [3, 0, -1, 4, 6]
myList.sort()
print(myList)
=> [-1, 0, 3, 4, 6]
sorted()](https://image.slidesharecdn.com/learnpythoninonedayandlearnitwellpythonforbeginnerswithhands-onproject-210929042712/85/Learn-python-in-one-day-and-learn-it-well-python-for-beginners-with-hands-on-project-the-only-book-you-need-to-start-coding-in-python-immediately-pdf-drive-117-320.jpg)
![Return a new sorted list without sorting the original list.
Requires a list as the parameter
[Example]
myList = [3, 0, -1, 4, 6]
myList2 = sorted(myList)
#Original list is not sorted print (myList)
=> [3, 0, -1, 4, 6]
#New list is sorted print (myList2)
=> [-1, 0, 3, 4, 6]
Addition Operator: +
Concatenate List
[Example]
myList = [‘a’, ‘b’, ‘c’, ‘d’]
print (myList + [‘e’, ‘f’]) => [‘a’, ‘b’, ‘c’, ‘d’,
‘e’, ‘f’]
print (myList)
=> [‘a’, ‘b’, ‘c’, ‘d’]
Multiplication Operator: *
Duplicate a list and concatenate it to the end of the list
[Example]
myList = [‘a’, ‘b’, ‘c’, ‘d’]
print (myList*3)](https://image.slidesharecdn.com/learnpythoninonedayandlearnitwellpythonforbeginnerswithhands-onproject-210929042712/85/Learn-python-in-one-day-and-learn-it-well-python-for-beginners-with-hands-on-project-the-only-book-you-need-to-start-coding-in-python-immediately-pdf-drive-118-320.jpg)
![=> ['a', 'b', 'c', 'd', 'a', 'b', 'c', 'd', 'a', 'b', 'c', 'd']
print (myList)
=> [‘a’, ‘b’, ‘c’, ‘d’]
Note:
The + and * symbols do not modify the list. The list stays as [‘a’, ‘b’,
‘c’, ‘d’] in both cases.](https://image.slidesharecdn.com/learnpythoninonedayandlearnitwellpythonforbeginnerswithhands-onproject-210929042712/85/Learn-python-in-one-day-and-learn-it-well-python-for-beginners-with-hands-on-project-the-only-book-you-need-to-start-coding-in-python-immediately-pdf-drive-119-320.jpg)
![Appendix C: Working With Tuples
=> marks the start of the output
del
Delete the entire tuple
[Example]
myTuple = (‘a’, ‘b’, ‘c’, ‘d’) del myTuple
print (myTuple) => NameError: name 'myTuple' is not
defined
in
Check if an item is in a tuple
[Example]
myTuple = (‘a’, ‘b’, ‘c’, ‘d’) ‘c’ in myTuple => True
‘e’ in myTuple => False
len( )
Find the number of items in a tuple
[Example]
myTuple = (‘a’, ‘b’, ‘c’, ‘d’) print (len(myTuple)) =>
4
Addition Operator: +](https://image.slidesharecdn.com/learnpythoninonedayandlearnitwellpythonforbeginnerswithhands-onproject-210929042712/85/Learn-python-in-one-day-and-learn-it-well-python-for-beginners-with-hands-on-project-the-only-book-you-need-to-start-coding-in-python-immediately-pdf-drive-120-320.jpg)
![Concatenate Tuples
[Example]
myTuple = (‘a’, ‘b’, ‘c’, ‘d’) print (myTuple + (‘e’,
‘f’)) => (‘a’, ‘b’, ‘c’, ‘d’, ‘e’, ‘f’)
print (myTuple) => (‘a’, ‘b’, ‘c’, ‘d’)
Multiplication Operator: *
Duplicate a tuple and concatenate it to the end of the tuple
[Example]
myTuple = (‘a’, ‘b’, ‘c’, ‘d’) print(myTuple*3) =>
('a', 'b', 'c', 'd', 'a', 'b', 'c', 'd', 'a', 'b',
'c', 'd')
print (myTuple) => (‘a’, ‘b’, ‘c’, ‘d’)
Note: The + and * symbols do not modify the tuple. The tuple stays
as [‘a’, ‘b’, ‘c’, ‘d’] in both cases.](https://image.slidesharecdn.com/learnpythoninonedayandlearnitwellpythonforbeginnerswithhands-onproject-210929042712/85/Learn-python-in-one-day-and-learn-it-well-python-for-beginners-with-hands-on-project-the-only-book-you-need-to-start-coding-in-python-immediately-pdf-drive-121-320.jpg)
![Appendix D: Working With Dictionaries
=> marks the start of the output
clear( )
Removes all elements of the dictionary, returning an empty dictionary
[Example]
dic1 = {1: ‘one’, 2: ‘two’}
print (dic1)
=> {1: 'one', 2: 'two'}
dic1.clear()
print (dic1)
=> { }
del
Delete the entire dictionary
[Example]
dic1 = {1: ‘one’, 2: ‘two’}
del dic1
print (dic1)
=> NameError: name 'dic1' is not defined
get( )
Returns a value for the given key.
If the key is not found, it’ll return the keyword None.
Alternatively, you can state the value to return if the key is not found.
[Example]](https://image.slidesharecdn.com/learnpythoninonedayandlearnitwellpythonforbeginnerswithhands-onproject-210929042712/85/Learn-python-in-one-day-and-learn-it-well-python-for-beginners-with-hands-on-project-the-only-book-you-need-to-start-coding-in-python-immediately-pdf-drive-122-320.jpg)
![dic1 = {1: ‘one’, 2: ‘two’}
dic1.get(1)
=> ‘one’
dic1.get(5)
=> None
dic1.get(5, “Not Found”) => ‘Not Found’
In
Check if an item is in a dictionary
[Example]
dic1 = {1: ‘one’, 2: ‘two’}
# based on the key 1 in dic1
=> True
3 in dic1
=> False
# based on the value ‘one’ in dic1.values() => True
‘three’ in dic1.values() => False
items( )
Returns a list of dictionary’s pairs as tuples
[Example]](https://image.slidesharecdn.com/learnpythoninonedayandlearnitwellpythonforbeginnerswithhands-onproject-210929042712/85/Learn-python-in-one-day-and-learn-it-well-python-for-beginners-with-hands-on-project-the-only-book-you-need-to-start-coding-in-python-immediately-pdf-drive-123-320.jpg)
![dic1 = {1: ‘one’, 2: ‘two’}
dic1.items()
=> dict_items([(1, 'one'), (2, 'two')])
keys( )
Returns list of the dictionary's keys
[Example]
dic1 = {1: ‘one’, 2: ‘two’}
dic1.keys()
=> dict_keys([1, 2])
len( )
Find the number of items in a dictionary
[Example]
dic1 = {1: ‘one’, 2: ‘two’}
print (len(dic1)) => 2
update( )
Adds one dictionary’s key-values pairs to another. Duplicates are
removed.
[Example]
dic1 = {1: ‘one’, 2: ‘two’}
dic2 = {1: ‘one’, 3: ‘three’}
dic1.update(dic2) print (dic1)
=> {1: 'one', 2: 'two', 3: 'three'}
print (dic2) #no change => {1: ‘one’, 3: ‘three’}](https://image.slidesharecdn.com/learnpythoninonedayandlearnitwellpythonforbeginnerswithhands-onproject-210929042712/85/Learn-python-in-one-day-and-learn-it-well-python-for-beginners-with-hands-on-project-the-only-book-you-need-to-start-coding-in-python-immediately-pdf-drive-124-320.jpg)
![values( )
Returns list of the dictionary's values
[Example]
dic1 = {1: ‘one’, 2: ‘two’}
dic1.values()
=> dict_values(['one', 'two'])](https://image.slidesharecdn.com/learnpythoninonedayandlearnitwellpythonforbeginnerswithhands-onproject-210929042712/85/Learn-python-in-one-day-and-learn-it-well-python-for-beginners-with-hands-on-project-the-only-book-you-need-to-start-coding-in-python-immediately-pdf-drive-125-320.jpg)
![Appendix E: Project Answers
Exercise 1
from random import randint
from os import remove, rename
Exercise 2
def getUserScore(userName):
try:
input = open('userScores.txt', 'r')
for line in input:
content = line.split(',')
if content[0] == userName:
input.close()
return content[1]
input.close()
return "-1"
except IOError:
print ("nFile userScores.txt not found. A new
file will be created.") input =
open('userScores.txt', 'w')
input.close()
return "-1"
Exercise 3
def updateUserPoints(newUser, userName, score):
if newUser:
input = open('userScores.txt', 'a')
input.write(‘n’ + userName + ', ' + score)
input.close()](https://image.slidesharecdn.com/learnpythoninonedayandlearnitwellpythonforbeginnerswithhands-onproject-210929042712/85/Learn-python-in-one-day-and-learn-it-well-python-for-beginners-with-hands-on-project-the-only-book-you-need-to-start-coding-in-python-immediately-pdf-drive-126-320.jpg)
![else:
input = open('userScores.txt', 'r')
output = open('userScores.tmp', 'w')
for line in input:
content = line.split(',')
if content[0] == userName:
content[1] = score
line = content[0] + ', ' + content[1] +
'n'
output.write(line)
input.close()
output.close()
remove('userScores.txt')
rename('userScores.tmp', 'userScores.txt')
Exercise 4
def generateQuestion():
operandList = [0, 0, 0, 0, 0]
operatorList = ['', '', '', '']
operatorDict = {1:' + ', 2:' - ', 3:'', 4:'*'}
for index in range(0, 5):
operandList[index] = randint(1, 9)
for index in range(0, 4):
if index > 0 and operatorList[index-1] !=
'**': operator = operatorDict[randint(1, 4)]
else: operator =
operatorDict[randint(1, 3)]](https://image.slidesharecdn.com/learnpythoninonedayandlearnitwellpythonforbeginnerswithhands-onproject-210929042712/85/Learn-python-in-one-day-and-learn-it-well-python-for-beginners-with-hands-on-project-the-only-book-you-need-to-start-coding-in-python-immediately-pdf-drive-127-320.jpg)
![operatorList[index] = operator
questionString = str(operandList[0])
for index in range(1, 5):
questionString = questionString +
operatorList[index-1] + str(operandList[index])
result = eval(questionString)
questionString = questionString.replace("**", "^")
print ('n' + questionString)
userResult = input('Answer: ')
while True:
try:
if int(userResult) == result:
print ("So Smart") return 1
else: print ("Sorry, wrong
answer. The correct answer is", result)
return 0
except Exception as e: print ("You did
not enter a number. Please try again.")
userResult = input('Answer: ')
[Explanation for Exercise 4.2]
Starting from the second item (i.e. index = 1) in operatorList, the line
if index > 0 and operatorList[index-1] != '**': checks if
the previous item in operatorList is the ‘**’ symbol..
If it is not, the statement operator = operatorDict[randint(1,
4)] will execute. Since the range given to the randint function is 1 to
4, the numbers 1, 2, 3 or 4 will be generated. Hence, the symbols ‘+’, ‘-’, ‘’
or ‘*’ will be assigned to the variable operator.](https://image.slidesharecdn.com/learnpythoninonedayandlearnitwellpythonforbeginnerswithhands-onproject-210929042712/85/Learn-python-in-one-day-and-learn-it-well-python-for-beginners-with-hands-on-project-the-only-book-you-need-to-start-coding-in-python-immediately-pdf-drive-128-320.jpg)
![However, if the previous symbol is ‘**’, the else statement (operator =
operatorDict[randint(1, 3)]) will execute. In this case, the range
given to the randint function is from 1 to 3. Hence, the ‘**’ symbol,
which has a key of 4 in operatorDict will NOT be assigned to the
operator variable.
Exercise 5
try:
import myPythonFunctions as m
userName = input('''Please enter your user name or
create a new one if this is the first time you are
running the program: ''')
userScore = int(m.getUserScore(userName))
if userScore == -1:
newUser = True userScore = 0
else:
newUser = False
userChoice = 0
while userChoice != '-1':
userScore += m.generateQuestion() print
("Current Score = ", userScore) userChoice =
input("Press Enter To Continue or -1 to Exit: ")
m.updateUserPoints(newUser, userName,
str(userScore))
except Exception as e:
print ("An unexpected error occurred. Program will
be exited.")](https://image.slidesharecdn.com/learnpythoninonedayandlearnitwellpythonforbeginnerswithhands-onproject-210929042712/85/Learn-python-in-one-day-and-learn-it-well-python-for-beginners-with-hands-on-project-the-only-book-you-need-to-start-coding-in-python-immediately-pdf-drive-129-320.jpg)
![Challenge Yourself
You only need to change the function generateQuestion() for all the
challenges. Here’s the suggested solution.
def generateQuestion():
operandList = [0, 0, 0, 0, 0]
operatorList = ['', '', '', '']
operatorDict = {1:' + ', 2:' - ', 3:'', 4:'/',
5:'*'}
result = 500001
while result > 50000 or result < -50000: for index
in range(0, 5): operandList[index] = randint(1,
9)
for index in range(0, 4): if index > 0
and operatorList[index-1] != '**':
operator = operatorDict[randint(1, 4)]
else: operator =
operatorDict[randint(1, 5)]
operatorList[index] = operator
'''
Randomly generate the positions of ( and )
E.g. If openBracket = 2, the ( symbol will be
placed in front of the third number If
closeBracket = 3, the ) symbol will be placed
behind the fourth number Since the closing
bracket cannot be before the opening bracket,
we have to generate the position for the
closing bracket from openBracket + 1 onwards
'''
openBracket = randint(0, 3) closeBracket =
randint(openBracket+1, 4)](https://image.slidesharecdn.com/learnpythoninonedayandlearnitwellpythonforbeginnerswithhands-onproject-210929042712/85/Learn-python-in-one-day-and-learn-it-well-python-for-beginners-with-hands-on-project-the-only-book-you-need-to-start-coding-in-python-immediately-pdf-drive-130-320.jpg)
![if openBracket == 0: questionString =
'(' + str(operandList[0]) else: questionString =
str(operandList[0])
for index in range(1, 5): if index ==
openBracket: questionString =
questionString + operatorList[index-1] + '(' +
str(operandList[index]) elif index ==
closeBracket: questionString =
questionString + operatorList[index-1] +
str(operandList[index]) + ')'
else: questionString =
questionString + operatorList[index-1] +
str(operandList[index])
result = round(eval(questionString), 2)
#End of While Loop
questionString = questionString.replace("**", "^")
print ('n' + questionString)
userResult = input('Answer (correct to 2 d.p. if
not an integer): ')
while True:
try:
if float(userResult) == result:
print ("So Smart") return 1
else: print ("Sorry, wrong
answer. The correct answer is", result)
return 0
except Exception as e: print ("You did
not enter a number. Please try again.")
userResult = input('Answer (correct to 2 d.p. if
not an integer): ')](https://image.slidesharecdn.com/learnpythoninonedayandlearnitwellpythonforbeginnerswithhands-onproject-210929042712/85/Learn-python-in-one-day-and-learn-it-well-python-for-beginners-with-hands-on-project-the-only-book-you-need-to-start-coding-in-python-immediately-pdf-drive-131-320.jpg)


![제 23회 보아즈(BOAZ) 빅데이터 컨퍼런스 - [MBOAX] : ABSA를 활용한 소비자 반응 분석 기반 운영 효율화 대시보드 설계](https://cdn.slidesharecdn.com/ss_thumbnails/3-1boaz23rdconferencemboax-260203102709-9d519923-thumbnail.jpg?width=640&height=640&fit=bounds)


