Tutorial Membuat aplikasiSwipe
1. Buat File Baru Android Application Project,
Tentukan nama Aplikasi dan Project, kemudian klik next
Tunggu sampai proses berikutnya,
2.
Langkah berikutnya adalahmengkonfigurasi Icon Launcher
Langkah berikutnya membuat Activity, pilih blank activity, klik next
3.
Biarkan Nama Activitydefault seperti gambar berikut, klik tombol Finish
2. Buat Beberapa Buah Filel XML dengan Cara Klik pada Layout dan Pilih New ->android xml File
Lalu beri nama file xml contoh: halaman1
4.
Lakukan langkah inisampai tiga kali sehingga kita mendapatkan tiga buah file xml yaitu halaman1,
halaman2 dan halaman3.
Kemudian untuk masing masing file xml isi kan code berikut ini.
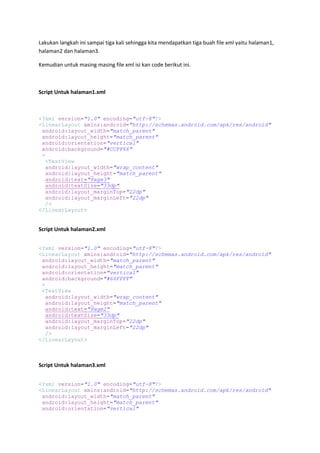
Script Untuk halaman1.xml
<?xml version="1.0" encoding="utf-8"?>
<LinearLayout xmlns:android="http://schemas.android.com/apk/res/android"
android:layout_width="match_parent"
android:layout_height="match_parent"
android:orientation="vertical"
android:background="#CCFF66"
>
<TextView
android:layout_width="wrap_content"
android:layout_height="match_parent"
android:text="Page3"
android:textSize="33dp"
android:layout_marginTop="22dp"
android:layout_marginLeft="22dp"
/>
</LinearLayout>
Script Untuk halaman2.xml
<?xml version="1.0" encoding="utf-8"?>
<LinearLayout xmlns:android="http://schemas.android.com/apk/res/android"
android:layout_width="match_parent"
android:layout_height="match_parent"
android:orientation="vertical"
android:background="#66FFFF"
>
<TextView
android:layout_width="wrap_content"
android:layout_height="match_parent"
android:text="Page2"
android:textSize="33dp"
android:layout_marginTop="22dp"
android:layout_marginLeft="22dp"
/>
</LinearLayout>
Script Untuk halaman3.xml
<?xml version="1.0" encoding="utf-8"?>
<LinearLayout xmlns:android="http://schemas.android.com/apk/res/android"
android:layout_width="match_parent"
android:layout_height="match_parent"
android:orientation="vertical"