Download to read offline


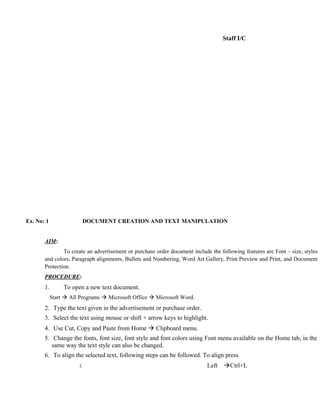

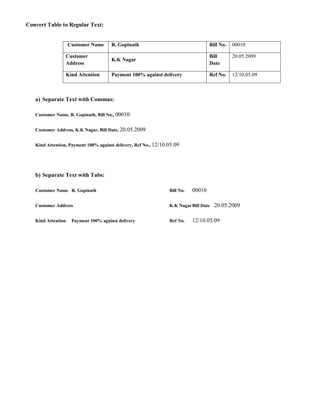
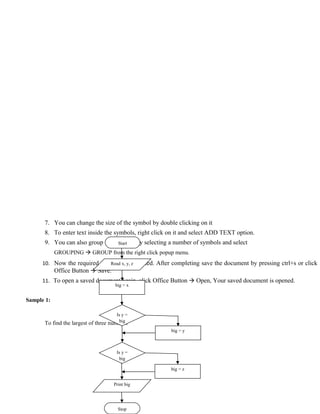
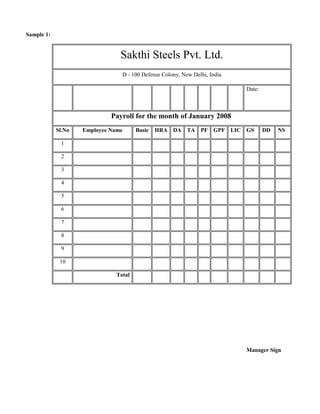
![Ex. No: 2 TABLE CREATION, TABLE FORMATTING AND CONVERSION
AIM:
To create a table for an employee details, use table formatting and conversions.
PROCEDURE:
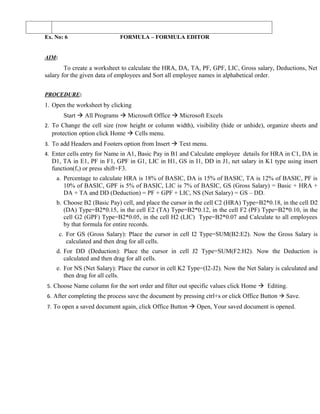
1. Open a new text document.
START ALL PROGRAMS MICROSOFT OFFICE MICROSOFT OFFICE WORD.
2. To insert Header and Footer, click Insert Header/Footer menu. Enter a header/footer that repeats on
all pages in your document.
3. To insert a table, click on Insert Table menu. Enter the number of rows and columns required, on the
text box that appears on the screen. Now a table with specified number of rows and columns is created.
4. To insert another rows and columns, highlight any blank rows/columns by choosing Layout
Rows/Columns from menu. Click on the icon repeatedly, another blank row/column would automatically
inserted.
5. Select the cells of table where formula appears in that Layout Date menu. The formula dialog box
contains formula and number formats.
6. For example, create table with the column for Employee Name, Basic Pay, DA, HRA and Total Salary,
enter the given data in the created table for 5 employees and calculate the following using formula.
a. To find the Total Salary for each employee using the formula [=SUM (LEFT)].
b. To find the Grand Salary, calculate the sum of all Total Salary using the formula [=SUM
(ABOVE)].
c. To find the Maximum and Minimum of Total Salary using the formula
[=MAX (ABOVE)] or [=MIN (ABOVE)].
7. To split cell, select the split cell option from the Layout Merge menu. The dialog box appears and then
enters your choice to split cell.
8. To merge cell, highlight the cell and select the merge cell option from the Layout Merge menu.
9. To convert the table to text and vice versa, select a table/text in a document. Choose the convert – Table
to Text/Text to Table option from Layout Date menu.
10. The Autofit option in the Table menu is used to specify the automatic column and row width and is also
useful for distributing the rows and columns evenly.
11. After completing the process save the document by pressing ctrl+s or click
Office Button Save.
12. To open a saved document again, click Office Button Open, Your saved document is opened.](https://image.slidesharecdn.com/labcf-120906234519-phpapp01/85/Lab-cf-14-320.jpg)

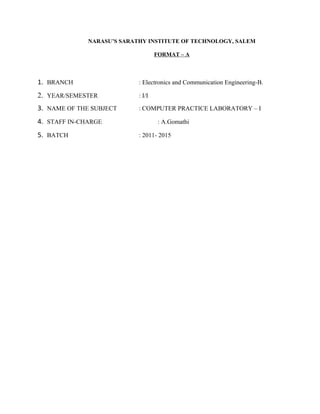
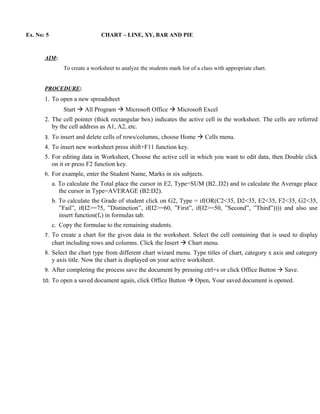
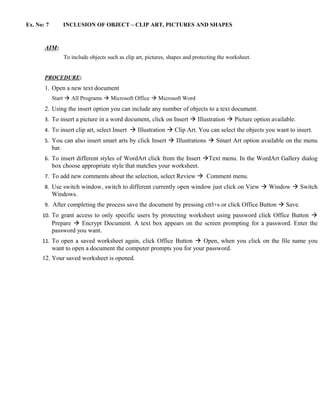
![Yes
No
Sample 2:
The find the length of the String
Start
Read x, y, z
For len=0; str[len]!
=’/0’; len++
Print len
Stop](https://image.slidesharecdn.com/labcf-120906234519-phpapp01/85/Lab-cf-22-320.jpg)


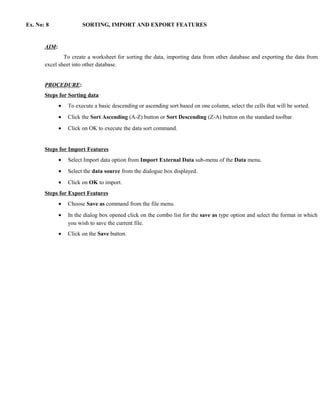

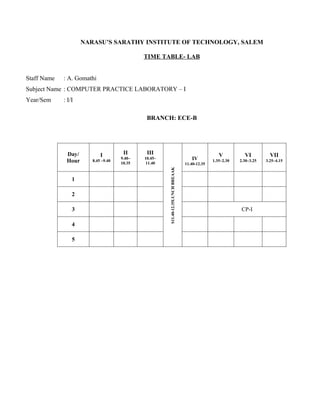
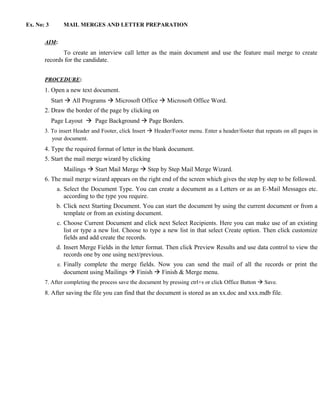
![Ex. No: 11 STRING MANIPULATION
AIM:
To write a C program to perform string manipulation function like string concatenation, comparison,
find the length and string copy without using library functions.
ALGORITHM:
Step 1: Start
Step 2: Declare character array string1[n], string2[n], string3[n]
Step 3: Set a infinite loop and Create a menu driven to perform string manipulation function
Step 4: Enter a choice and Perform string copy, string compare, string concatenation and string length
Step 5: Print the result
Step 8: Stop
DESCRIPTION:
The program string manipulation includes all the string operations like
a) String copy: The string copy use to one string to another. It assigns the contents of each character from
string2 to string1 until null character occurrence and place null character ‘0’ at the end of destination
string1. For example,
Read the string1: lotus
The copied string is lotus
b) String compare: The string comparison compares string1 and string2 for their equality, if both are equal
then print “The strings are equal” or print “The strings are not equal”. Here each array character from one
string can be checked for equality with another string until null character ‘0’ is read. For example,
Read the string1: piece
Read the string2: peace
The given two strings are not equal
c) String concatenation: The string concatenation forms string1 and string2 together. The concatenation
string can be obtained by adding each character from the string1 into string3 after finished this then add
string2 each character into string3 and place null character ‘0’ at the end of the string3. For example,
Read the string1: good
Read the string2: day
The concatenated string is good day
d) String length: The string length counts the number of character presented in the string arrays until null
character is read. For example,
Read a string1: rose
The length of rose is 4](https://image.slidesharecdn.com/labcf-120906234519-phpapp01/85/Lab-cf-34-320.jpg)
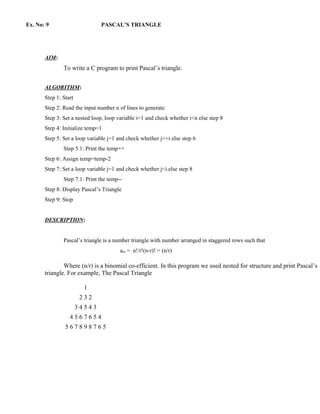
![Ex. No: 12 SORTING ALPHABETICAL ORDER
AIM:
To write a C program to arrange names in alphabetical order.
ALGORITHM:
Step 1: Start
Step 2: Declare character array name[n][m] and temp[n]
Step 3: Read n number alphabet to sort and Initialize name[n]
Step 4: Set a nested loop variable i=1 and j=i+1 to iterate
Step 5: Compare element and do swapping,
Step 5.1: temp=name[i]
Step 5.2: name[i]=name[j]
Step 5.3: name[j]=temp
Step 6: Print the sorted array name[n]
Step 7: Stop
DESCRIPTION:
Arranging the names in the ascending/descending order using string sorting. Each string is read using a
scanf() function with %s format. The alphabet of each name is checked according to the alphabetical order. The order
is checked by comparing each name by strcmp() function and if it gives greater than zero comparison result then we
use strcpy() function to swap variable with another variable. Print the sorted list of name. For example,
Read unsorted array of items:
London Delhi Chennai Paris Bombay
Print sorted alphabetical List:
Bombay Chennai Delhi London Paris](https://image.slidesharecdn.com/labcf-120906234519-phpapp01/85/Lab-cf-35-320.jpg)
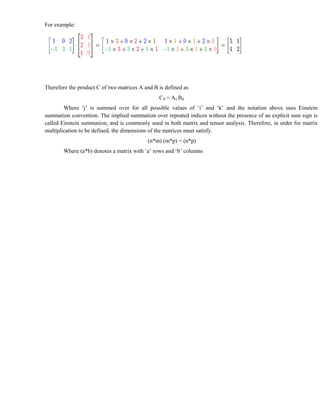
![Ex. No: 13 MATRIX MULTIPLICATION
AIM:
To write a ‘C’ program to perform matrix multiplication.
ALGORITHM:
Step 1: Start
Step 2: Declare two dimensional array for the matrix A, matrix B and matrix C
Step 3: Read the size and elements for the row and column of the A matrix and B
matrix
Step 4: Set a nested for loop to iterate and calculate C[i][j]=C[i][j]+A[i][k]*B[k][j]
i.e., row size of first matrix A and columns size of matrix B
Step 5: Print the elements of the matrix A and matrix B in matrix form
Step 6: Print the resultant matrix C
Step 7: Stop
DESCRIPTION:
This is the most often used and most important way to multiply matrices. It is defined between two matrices
only if the number of columns of the first matrix is the same as the number of rows of the second matrix.
Formally, for
,
then
where the elements of A.B are given by
for each pair i and j with 1 ≤ i ≤ m and 1 ≤ j ≤ p. The algebraic system of "matrix units" summarizes the abstract
properties of this kind of multiplication.](https://image.slidesharecdn.com/labcf-120906234519-phpapp01/85/Lab-cf-36-320.jpg)

![Ex. No: 15 SEQUENTIAL AND BINARY SEARCH
AIM:
To write a C program to perform Sequential and Binary Search using function.
ALGORITHM 1:
Step 1: Start
Step 2: Read the size and number into array arr[n]
Step 3: Create and call function seq(arr[n],n)
Step 3.1: Set a loop variable i and iterate n times
Step 3.2: Check if(k=arr[i]) print element found in position, assign x=2
Step 3.3: Check if(x=1) print not found
Step 4: Print the element position found or not in the array arr[n]
Step 5: Stop
ALGORITHM 2:
Step 1: Start
Step 2: Read the size and number into array arr[n]
Step 3: Create and call function bin(arr[n],n)
Step 3.1: Set a while loop and evaluate (first<=1)
Step 3.2: Calculate middle=(first+last)/2
Step 3.3: Check if(key<arr[middle])calculate last=middle-1
Step 3.4: Else if(key>arr[middle])calculate first = middle +1
Step 4: Print the element position found or not in the array arr[n]
Step 5: Stop
DESCRIPTION:
a) Sequential Search
Linear search, also known as sequential search, means starting at the beginning of the data and
checking each item in turn until either the desired item is found or the end of the data is reached. This is the
simplest known technique for searching an array for a particular data element and scans the element one by
one until the end of array. If search is successful then it will return the location of element, otherwise it will
return the element not found. For example, Find the key element 3 in the array arr[9].](https://image.slidesharecdn.com/labcf-120906234519-phpapp01/85/Lab-cf-39-320.jpg)
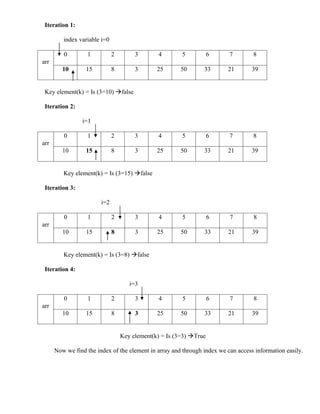
![b) Binary Search
The binary search is the simpler and faster than the linear search. Binary search is called so became
on each search the array to be searched is divided into parts, one of which is ignored as it will not contain
the required element.
The condition for binary search is that all the data should be in sorted array. We compare the
element with middle element of the array. If it is less than the middle element then we search it in the left
portion of the array and if it is greater than the middle element then search will be in the right portion of the
array. Now we will take that portion only for search and compare with middle element of that portion. This
process will be in iteration until we find element or middle element has no left or right portion to search. For
example, Find the key element 49 in the array arr[10].
Iteration 1:
First=0 Middle=(0+9)/2=4 Last=9
0 1 2 3 4 5 6 7 8 9
arr
10 18 19 20 25 30 49 57 64 72
Iteration 2:
First=5 Middle=(5+9)/2=7 Last=9
0 1 2 3 4 5 6 7 8 9
arr
10 18 19 20 25 30 49 57 64 72
Iteration 3:
First=5 Last=9
0 1 2 3 4 5 6 7 8 9
arr
10 18 19 20 25 30 49 57 64 72
Middle=(5+7)/2=6
Key element
Now we find the index of the element in array and through index we can access information easily.](https://image.slidesharecdn.com/labcf-120906234519-phpapp01/85/Lab-cf-41-320.jpg)

Here are the steps to create an advertisement document with text formatting and alignment features in Microsoft Word: 1. Open a new Word document and type the text for the advertisement. 2. Select portions of text and change the font, size, style, and color using the Font options on the Home tab. 3. Add paragraph alignments like left, right, and center by highlighting paragraphs and clicking the appropriate alignment button or using Ctrl+L, Ctrl+R, Ctrl+E shortcuts. 4. Insert bullets and numbering by selecting text and clicking the Bullets or Numbering buttons in the Paragraph group on the Home tab. 5. Add images or graphics from the online WordArt gallery by inserting them from the


