This document provides instructions for adjusting the shift mechanism on tm4493 tractors from 6100 to 6600 models. It involves the following steps:
1. Place the shifter shafts in the neutral position.
2. Adjust the shifter forks using threaded pins until they are centered in relation to the shift collars.
3. Move the shifter forks to all positions and ensure smooth shifting without binding or overlap between positions. Tighten locknuts on threaded pins to complete the adjustment.
Mc cormick fxl techno tier 3 (2008 2009) - rp54 - f 80 gexl tractor service r...fusjefjjskekmem
This document contains parts listings and technical specifications for components of an engine. It includes identification numbers, part names, serial numbers and other technical details for over 100 individual engine parts, including cylinders, pistons, gears, shafts, gaskets and other components. The parts are associated with a 54.5kw engine that meets Tier 3 emissions standards from 2008-2009.
Mc cormick fxl techno tier 2 (2003 2008) - rp52 - f105 fgexl tractor service ...fusjefjjskekmem
This document contains parts listings and component information for engine repair and replacement. It includes listings of parts kits for engine overhauls, short blocks, cylinder heads, connecting rods, pistons, crankshafts, camshafts and other components. Each part includes the reference number, description, replacement code if applicable, and repair operation code indicating whether it is for replacement or overhaul.
Mc cormick fxl techno tier 2 (2003 2008) - rp52 - f85 fgexl tractor service r...fusjefjjskekmem
This document provides component part numbers and descriptions for engine repairs and replacements. It includes kits for replacing engine parts between specific serial numbers, as well as individual replacement parts like pistons, rods, bearings, gaskets, plugs, and other engine components. Repair codes indicate whether components should be replaced or overhauled.
Mc cormick fxl techno tier 2 (2003 2008) - rp52 - f80 fge tractor service rep...fusjefjjskekmem
This document contains parts lists and technical specifications for components of Perkins diesel engines. It includes items like cylinders, crankshafts, pistons, rods, valves, pumps, and other engine parts. Repair and replacement times are provided for some items. Component images and part numbers are referenced throughout.
Mc cormick fxl techno tier 2 (2003 2008) - rp52 - f75 fgexl tractor service r...fusjefjjskekmem
This document provides component part information for the repair and replacement of engine parts. It includes lists of components with identification numbers, replacement part numbers, and other technical specifications. Components listed include pistons, rods, bearings, gaskets, pumps, gears, valves and other engine parts. Replacement part kits and overhaul kits are also specified for various engine components.
Mc cormick fxl techno tier 2 (2003 2008) - rp52 - f70 fge tractor service rep...fusjefjjskekmem
This document contains parts lists and repair instructions for engine components. It lists individual parts, part numbers, quantities needed and repair/replacement instructions. It provides details on repairs, overhauls and replacements for the engine, including the cylinder head, crankshaft, pistons, valves, camshaft and other internal components.
Mc cormick f top restyling (2010 ) - rp55 - f100gexl tractor service repair ...fusjefjjskekmem
This document provides parts information for various engine components. It includes descriptions of parts, part numbers, serial number ranges and replacement part numbers. Images show diagrams of engine assemblies and components with corresponding part numbers and other technical details. The document also indicates if parts are for replacement or are not serviced individually.
Komatsu d575 a 2 dozer bulldozer service repair manual (sn 10001 and up)fusjefjjskekmem
This shop manual provides maintenance and repair instructions for the D575A-2 machine model. The manual contains information on machine structure and function, testing and adjusting procedures, disassembly and assembly instructions, and maintenance standards. It summarizes that the D575A-2 mounts the SA12V170-1 engine and refers technicians to the engine manual for more details on the engine. It provides safety notices and precautions for working on the machine.
Komatsu d475 a 2 dozer bulldozer service repair manual (sn 10201 and up)fusjefjjskekmem
This document provides instructions for removing and installing various components of an engine, including the torque converter cooler assembly, fuel injection pump assembly, water pump assembly, turbocharger assembly, aftercooler core assembly, nozzle holder assembly, cylinder head assembly, fuel tank assembly, radiator assembly, and radiator guard assembly. The document contains detailed steps and diagrams to guide the removal and installation of each component. Safety precautions are provided, such as draining fluids, securing moving parts, and noting component weights. Tightening specifications and adjustment procedures are referenced for proper reinstallation of parts.
Komatsu d65 wx 16 dozer bulldozer service repair manual sn 80001 and upfusjefjjskekmem
The document is a shop manual that provides specifications, maintenance procedures, and troubleshooting information for Bulldozer models D65EX-16, D65PX-16, and D65WX-16. It contains sections on the engine and cooling system, power train, undercarriage, hydraulic system, electrical system, and troubleshooting codes. The manual includes diagrams, specifications, maintenance standards, and step-by-step instructions for repairs and adjustments.
Komatsu d65 wx 15e0 dozer bulldozer service repair manual sn 69001 and upfusjefjjskekmem
This document provides specifications and maintenance information for Bulldozer models D65EX, D65PX, and D65WX-15E0. It includes sections on specifications, structure and function, maintenance standards, testing and adjusting procedures, and troubleshooting. Serial numbers for the models start at 69001. The document contains diagrams, specifications, technical data, and instructions for servicing and repairing components of the bulldozers.
Komatsu d65 px 16 dozer bulldozer service repair manual sn 80001 and upfusjefjjskekmem
This document provides a table of contents for a shop manual covering a bulldozer including models D65EX-16, D65PX-16, and D65WX-16. The table of contents lists sections on specifications and technical data, engine and cooling systems, power train, undercarriage, frames, and hydraulic systems. It includes subsections on components such as transmissions, valves, pumps, and motors. Serial numbers for the models are provided starting from 80001.
Komatsu d65 px 15e0 dozer bulldozer service repair manual sn 69001 and upfusjefjjskekmem
This document provides an index and table of contents for a shop manual covering Bulldozer models D65EX, D65PX, and D65WX-15E0. The index lists over 30 sections that make up the manual, covering topics like specifications, engine and cooling systems, power train, undercarriage, hydraulic systems, and work equipment. Serial number ranges for the covered models are provided.
Komatsu d65 px 12 dozer bulldozer service repair manual sn 65275 and upfusjefjjskekmem
1) This shop manual provides instructions for servicing a Komatsu D65EX/PX-12 excavator.
2) The D65EX/PX-12 uses the SA6D125E-3 engine. The engine shop manual should be consulted for engine service.
3) Proper safety precautions must be followed when servicing equipment, including wearing protective equipment, blocking the machine, and lowering attachments to the ground.
Komatsu d65 ex 16 dozer bulldozer service repair manual sn 80001 and upfusjefjjskekmem
The document is a shop manual that provides specifications, maintenance procedures, and troubleshooting information for Bulldozer models D65EX-16, D65PX-16, and D65WX-16. It contains sections on the engine and cooling system, power train, undercarriage, hydraulic system, electrical system, and troubleshooting. The manual includes specification drawings, component diagrams, valve locations and functions, testing and adjusting procedures, failure code tables, and fuse locations.
Komatsu d65 ex 15e0 dozer bulldozer service repair manual sn 69001 and upfusjefjjskekmem
This document provides specifications and maintenance information for Bulldozer models D65EX, D65PX, and D65WX-15E0. It includes sections on specifications, structure and function, maintenance standards, testing and adjusting procedures, and troubleshooting. Serial numbers for the models start at 69001. The document contains diagrams, specifications, technical data, and instructions for servicing and repair.
Komatsu d65 ex 12 dozer bulldozer service repair manual sn 65209 and upfusjefjjskekmem
1) This shop manual provides instructions for servicing a Komatsu D65EX/PX-12 excavator.
2) The D65EX/PX-12 uses the SA6D125E-3 engine, with engine service details covered in a separate manual.
3) Proper safety precautions must be followed when servicing equipment, including the use of protective equipment and blocking of moving parts.
John deere 6130 d (tier 0 tier 3stage iiia) tractors service repair technic...fusjefjjskekmem
The document provides instructions for removing and installing a final drive assembly on a tractor. It involves draining the oil, removing mounting hardware and brackets, using lifting equipment to remove the assembly, cleaning and applying sealant to mating surfaces, and reinstalling the assembly. Inspection and replacement of worn parts is also specified. The process is completed by refilling the oil and checking the level.
John deere 6125 d (tier 0 tier 3stage iiia) tractors service repair technic...fusjefjjskekmem
This document provides instructions for splitting a tractor into front and rear sections. Key steps include: blocking the wheels, removing the cab or operator station, draining fluids, disconnecting hydraulic lines, and installing lifting brackets to separate the front and rear sections using a lifting device. Safety precautions such as using support stands are noted. The process is reversed to rejoin the sections.
John deere 6115 d (tier 0 tier 3stage iiia) tractors service repair technic...fusjefjjskekmem
This document provides instructions for splitting a tractor into front and rear sections. Key steps include: blocking the wheels, removing the cab or operator station, draining fluids, disconnecting hydraulic lines, and installing lifting brackets to separate the front and rear sections using a lifting device. Safety precautions such as using support stands are noted. The process is reversed to rejoin the sections.
John deere 6110 d (tier 0 tier 3stage iiia) tractors service repair technic...fusjefjjskekmem
The document provides instructions for removing and installing a final drive assembly on a tractor. It involves draining the oil, removing mounting hardware and brackets, using lifting equipment to remove the assembly, cleaning and applying sealant to mating surfaces, and reinstalling the assembly. Inspection and replacement of worn parts is also specified. The process is completed by refilling the oil and checking the level.
John deere 6100 d (tier 0 tier 3stage iiia) tractors service repair technic...fusjefjjskekmem
The document provides instructions for removing and installing a final drive assembly on a tractor. It involves draining the oil, removing mounting hardware and brackets, using lifting equipment to remove the assembly, cleaning and applying sealant to mating surfaces, and reinstalling the assembly. Inspection and replacement of worn parts is also specified. The process is completed by refilling the oil and checking the level.
John deere 6100 tractors service repair technical manual (tm4493)fusjefjjskekmem
This document provides instructions for adjusting the shift mechanism on tm4493 tractors from 6100 to 6600 models. It involves the following steps:
1. Place the shifter shafts in the neutral position.
2. Adjust the shifter forks using threaded pins until they are centered in relation to the shift collars.
3. Move the shifter forks to all positions and ensure smooth shifting without binding or overlap between positions. Tighten locknuts on threaded pins to complete the adjustment.
John deere 4700 compact utility tractor service repair manualfusjefjjskekmem
The document is a technical manual for John Deere compact utility tractors models 4500, 4600, and 4700. It contains sections on specifications, component locations, system schematics, theory of operation, troubleshooting charts, diagnostics, tests and adjustments, and repair procedures. The manual is organized so that all information about a particular system is kept together. It provides repair and maintenance technicians with the information needed to service these tractor models.
John deere 4600 compact utility tractor service repair manualfusjefjjskekmem
The document is a technical manual for John Deere compact utility tractors models 4500, 4600, and 4700. It contains sections on specifications, component locations, system schematics, theory of operation, troubleshooting charts, diagnostics, tests and adjustments, and repair procedures. The manual is organized so that all information about a particular system is kept together. It provides repair and maintenance technicians with the information needed to service these tractor models.
John deere 4500 compact utility tractor service repair manualfusjefjjskekmem
This technical manual provides information for servicing John Deere 4500, 4600, and 4700 compact utility tractors. It contains sections on specifications, component locations, theory of operation, troubleshooting, tests and adjustments, and repair procedures. The manual is organized so that all information about a particular system is together. It includes safety information, diagrams, specifications, testing procedures, and instructions for repairing engine systems.
John deere 4410 compact utility tractor service repair manualfusjefjjskekmem
1. Check that the engine is cool before adjusting valve clearance.
2. Remove the rocker arm cover and locate the inspection hole to view the flywheel.
3. Use a flat-blade screwdriver to rotate the flywheel clockwise until the number one piston is at top dead center of the compression stroke.
4. Check the clearance between the valve stem and the rocker arm using a feeler gauge. Adjust as needed by loosening the lock nut and turning the adjusting screw.
Daewoo doosan dx300 lc excavator operation and maintenance manualfusjefjjskekmem
1. The document provides safety information and warnings for operating and maintaining an excavator.
2. Key safety warnings include avoiding contact with high voltage power lines, securing front windows properly before opening, reading instructions carefully before adjusting track tension or handling accumulators and batteries, and ensuring all persons are clear before operating the excavator.
3. The location of various safety labels on the excavator are identified, and operators are instructed to keep labels legible and replace any missing or damaged labels.
Welcome to ASP Cranes, your trusted partner for crane solutions in Raipur, Chhattisgarh! With years of experience and a commitment to excellence, we offer a comprehensive range of crane services tailored to meet your lifting and material handling needs.
At ASP Cranes, we understand the importance of reliable and efficient crane operations in various industries, from construction and manufacturing to logistics and infrastructure development. That's why we strive to deliver top-notch solutions that enhance productivity, safety, and cost-effectiveness for our clients.
Our services include:
Crane Rental: Whether you need a crawler crane for heavy lifting or a hydraulic crane for versatile operations, we have a diverse fleet of well-maintained cranes available for rent. Our rental options are flexible and can be customized to suit your project requirements.
Crane Sales: Looking to invest in a crane for your business? We offer a wide selection of new and used cranes from leading manufacturers, ensuring you find the perfect equipment to match your needs and budget.
Crane Maintenance and Repair: To ensure optimal performance and safety, regular maintenance and timely repairs are essential for cranes. Our team of skilled technicians provides comprehensive maintenance and repair services to keep your equipment running smoothly and minimize downtime.
Crane Operator Training: Proper training is crucial for safe and efficient crane operation. We offer specialized training programs conducted by certified instructors to equip operators with the skills and knowledge they need to handle cranes effectively.
Custom Solutions: We understand that every project is unique, which is why we offer custom crane solutions tailored to your specific requirements. Whether you need modifications, attachments, or specialized equipment, we can design and implement solutions that meet your needs.
At ASP Cranes, customer satisfaction is our top priority. We are dedicated to delivering reliable, cost-effective, and innovative crane solutions that exceed expectations. Contact us today to learn more about our services and how we can support your project in Raipur, Chhattisgarh, and beyond. Let ASP Cranes be your trusted partner for all your crane needs!
Implementing ELDs or Electronic Logging Devices is slowly but surely becoming the norm in fleet management. Why? Well, integrating ELDs and associated connected vehicle solutions like fleet tracking devices lets businesses and their in-house fleet managers reap several benefits. Check out the post below to learn more.
Expanding Access to Affordable At-Home EV Charging by Vanessa WarheitForth
Vanessa Warheit, Co-Founder of EV Charging for All, gave this presentation at the Forth Addressing The Challenges of Charging at Multi-Family Housing webinar on June 11, 2024.
Ever been troubled by the blinking sign and didn’t know what to do?
Here’s a handy guide to dashboard symbols so that you’ll never be confused again!
Save them for later and save the trouble!
What Could Be Behind Your Mercedes Sprinter's Power Loss on Uphill RoadsSprinter Gurus
Unlock the secrets behind your Mercedes Sprinter's uphill power loss with our comprehensive presentation. From fuel filter blockages to turbocharger troubles, we uncover the culprits and empower you to reclaim your vehicle's peak performance. Conquer every ascent with confidence and ensure a thrilling journey every time.
EV Charging at MFH Properties by Whitaker JamiesonForth
Whitaker Jamieson, Senior Specialist at Forth, gave this presentation at the Forth Addressing The Challenges of Charging at Multi-Family Housing webinar on June 11, 2024.
Understanding Catalytic Converter Theft:
What is a Catalytic Converter?: Learn about the function of catalytic converters in vehicles and why they are targeted by thieves.
Why are They Stolen?: Discover the valuable metals inside catalytic converters (such as platinum, palladium, and rhodium) that make them attractive to criminals.
Steps to Prevent Catalytic Converter Theft:
Parking Strategies: Tips on where and how to park your vehicle to reduce the risk of theft, such as parking in well-lit areas or secure garages.
Protective Devices: Overview of various anti-theft devices available, including catalytic converter locks, shields, and alarms.
Etching and Marking: The benefits of etching your vehicle’s VIN on the catalytic converter or using a catalytic converter marking kit to make it traceable and less appealing to thieves.
Surveillance and Monitoring: Recommendations for using security cameras and motion-sensor lights to deter thieves.
Statistics and Insights:
Theft Rates by Borough: Analysis of data to determine which borough in NYC experiences the highest rate of catalytic converter thefts.
Recent Trends: Current trends and patterns in catalytic converter thefts to help you stay aware of emerging hotspots and tactics used by thieves.
Benefits of This Presentation:
Awareness: Increase your awareness about catalytic converter theft and its impact on vehicle owners.
Practical Tips: Gain actionable insights and tips to effectively prevent catalytic converter theft.
Local Insights: Understand the specific risks in different NYC boroughs, helping you take targeted preventive measures.
This presentation aims to equip you with the knowledge and tools needed to protect your vehicle from catalytic converter theft, ensuring you are prepared and proactive in safeguarding your property.
John deere 6200 tractors service repair technical manual (tm4493)
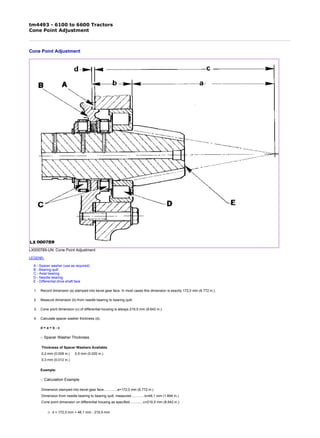
1. tm4493 - 6100 to 6600 Tractors
Cone Point Adjustment
LX000789-UN: Cone Point Adjustment
LEGEND:
A - Spacer washer (use as required)
B - Bearing quill
C - Axial bearing
D - Needle bearing
E - Differential drive shaft face
1. Record dimension (a) stamped into bevel gear face. In most cases this dimension is exactly 172,0 mm (6.772 in.).
2. Measure dimension (b) from needle bearing to bearing quill.
3. Cone point dimension (c) of differential housing is always 219,5 mm (8.642 in.).
4. Calculate spacer washer thickness (d).
d = a + b - c
-: Spacer Washer Thickness
Example:
-: Calculation Example
d = 172,0 mm + 48,1 mm - 219,5 mm
Thickness of Spacer Washers Available
0,2 mm (0.008 in.) 0,5 mm (0.020 in.)
0,3 mm (0.012 in.)
Dimension stamped into bevel gear face..............a=172,0 mm (6.772 in.)
Dimension from needle bearing to bearing quill, measured..............b=48,1 mm (1.894 in.)
Cone point dimension on differential housing as specified..............c=219,5 mm (8.642 in.)
1/11
2020/7/11file:///C:/ProgramData/Service%20ADVISOR/Temp/tm4493_LXOUOE00392...
2. d = 0,6 mm
d = 6.772 in. + 1.894 in. - 8.642 in.
d = 0.024 in.
In the example two 0,3 mm (0.012 in.) spacer washers have to be used.
LX000790-UN: Locking Latch and Taper Roller Bearing Cup
Press taper roller bearing cup (B) into bearing quill.
Install locking latch (A).
LX000791-UN: Tighten Screws and Bolt
Attach bearing quill.
Tighten screws (A and C) and bolt (B) to 55 N·m (40 lb-ft).
LX000792-UN: Install Shifter Shaft Housing
Install shifter shaft housing (A).
LX000793-UN: Install Spacer and Snap Ring
Install spacer [Older tractors only] (A).
2/11
2020/7/11file:///C:/ProgramData/Service%20ADVISOR/Temp/tm4493_LXOUOE00392...
3. Install snap ring (B).
LX000794-UN: Front Wheel Drive Gear and Snap Ring
Install front wheel drive gear (A) and snap ring (B).
LX009123-UN: Check Axial Play
Check axial play of front wheel drive gear.
NOTE:
Front wheel drive gear axial play must be less than 0.1 mm (0.004 in.).
If axial play is not correct, use a different size snap ring to install the front wheel drive gear.
-: Snap Ring Thickness
LX000795-UN: Install Thrust Washer and Snap Ring
Install thrust washer and gear of range A (A).
Install snap ring (B).
Thickness of Snap Rings Available
2.0 mm (0.079 in.) 2.2 mm (0.087 in.)
2.1 mm (0.083 in.) 2.3 mm (0.091 in.)
3/11
2020/7/11file:///C:/ProgramData/Service%20ADVISOR/Temp/tm4493_LXOUOE00392...
4. LX000796-UN: Install Synchronizer Unit and Snap Ring
Install synchronizer unit (B) and snap ring (A).
NOTE:
Axial play of synchronizer unit must be less than 0.1 mm (0.004 in.).
-: Snap Ring Thickness
LX000797-UN: Check Gear Axial Play
Check axial play of gear for range A.
IMPORTANT:
When measuring axial play, use both hands to guide the gear onto the shaft. Make sure the gear is straight (i.e. not skewed).
NOTE:
Axial play of gear must be 0.15 to 0.6 mm (0.006 to 0.024 in.).
If axial play is not correct, use a different size thrust washer to install gear of range A.
-: Thrust Washer Thickness
LX000798-UN: Snap Ring, Thrust Washer and Gear
Install gear of range B (C) and thrust washer (B).
Thickness of Snap Rings Available
2.0 mm (0.079 in.) 2.2 mm (0.087 in.)
2.1 mm (0.083 in.) 2.3 mm (0.091 in.)
Thickness of Thrust Washers Available
3.65 mm (0.144 in.) 3.95 mm (0.156 in.)
3.80 mm (0.150 in.)
4/11
2020/7/11file:///C:/ProgramData/Service%20ADVISOR/Temp/tm4493_LXOUOE00392...
5. Install snap ring (A).
IMPORTANT:
When measuring axial play, use both hands to guide the gear onto the shaft. Make sure the gear is straight (i.e. not skewed).
NOTE:
Axial play of gear must be 0.15 to 0.6 mm (0.006 to 0.024 in.).
-: Thrust Washer Thickness
IMPORTANT:
Up to transmission serial no. 157465, snap ring (A) had a thickness of 2.0 mm (0.079 in.). When repairing, put additional washer L112108 on the outside
of the snap ring.
LX000799-UN: Install Snap Ring and Thrust Washer
Install thrust washer and gear of range C (B).
Install snap ring (A).
LX000800-UN: Install Synchronizer Unit & Snap Ring
Install synchronizer unit (B) and snap ring (A).
NOTE:
Axial play of synchronizer unit must be less than 0.1 mm (0.004 in.).
-: Snap Ring Thickness
Thickness of Thrust Washers Available
3.65 mm (0.144 in.) 3.95 mm (0.156 in.)
3.80 mm (0.150 in.)
Thickness of Snap Rings Available
2.0 mm (0.079 in.) 2.2 mm (0.087 in.)
2.1 mm (0.083 in.) 2.3 mm (0.091 in.)
5/11
2020/7/11file:///C:/ProgramData/Service%20ADVISOR/Temp/tm4493_LXOUOE00392...
6. LX000801-UN: Check Gear Axial Play
Check axial play of gear for range C.
IMPORTANT:
When measuring axial play, use both hands to guide the gear onto the shaft. Make sure the gear is straight (i.e. not skewed).
NOTE:
Axial play of gear must be 0.15 to 0.6 mm (0.006 to 0.024 in.).
If axial play is not correct, use a different size thrust washer to install gear of range C.
-: Thrust Washer Thickness
LX000802-UN: Install Gear, Thrust Washer & Snap Ring
Install gear of range D (C) with connecting ring.
Install thrust washer (B) and snap ring (A).
IMPORTANT:
When measuring axial play, use both hands to guide the gear onto the shaft. Make sure the gear is straight (i.e. not skewed).
NOTE:
Axial play of gear must be 0.15 to 0.6 mm (0.006 to 0.024 in.).
-: Thrust Washer Thickness
Thickness of Thrust Washers Available
3.65 mm (0.144 in.) 3.95 mm (0.156 in.)
3.80 mm (0.150 in.)
Thickness of Thrust Washers Available
3.65 mm (0.144 in.) 3.95 mm (0.156 in.)
3.80 mm (0.150 in.)
6/11
2020/7/11file:///C:/ProgramData/Service%20ADVISOR/Temp/tm4493_LXOUOE00392...
7. LX000803-UN: Range Transmission Assembly
LEGEND:
A - Ball
B - Shaft
C - Bushing
D - Cap screw (2 used)
E - Cap screw
F - Thrust washer
G - Double gear
H - Needle race
I - Thrust washer
J - Needle race
K - Spacer bushing
L - Double gear
M - Bolt
N - Idler gear housing
O - Shaft
Assemble idler gear housing [ 15- and 18-gear versions (SyncroPlus) or 20 and 24-gear versions (PowrQuad) ] .
LX000804-UN: Tighten Cap Screws
Install idler gear housing [ 15- and 18-gear versions (SyncroPlus) or 20 and 24-gear versions (PowrQuad) ] .
Tighten cap screws to 55 N·m (40 lb-ft).
7/11
2020/7/11file:///C:/ProgramData/Service%20ADVISOR/Temp/tm4493_LXOUOE00392...
8. LX009122-UN: Shifter Shafts and Shifter Forks
LEGEND:
A - Shifter shaft (ranges A and B)
B - Shifter fork (ranges A and B)
C - Shifter fork (ranges C and D)
D - Shifter shaft (ranges C and D)
Install shifter shafts and shifter forks.
LX009124-UN: Taper Roller Bearing Cones
Press taper roller bearing cones (A) and (B) onto drive shaft.
LX009121-UN: Install Drive Shaft and Spring
Install drive shaft (B).
Connect spring (A) of parking lock.
8/11
2020/7/11file:///C:/ProgramData/Service%20ADVISOR/Temp/tm4493_LXOUOE00392...
9. LX009359-UN: Install Parking Lock Shifter Cam
LEGEND:
A - Lever
B - Spring
C - Seal ring
D - Bushing (2 used)
E - Spring pin
F - Shifter cam
G - Spacer washer (thickness as required)
H - Axial bearing assy.
Install parking lock shifter cam in the transmission housing. Use a 1.6 mm (0.063 in.) spacer washer (G) (recommended average setting).
LX1016989-UN: Install Shifter Shaft & Stop Assy.
Referring to the exploded view, assemble and install the fwd/rev. shifter shaft (A) and stop assembly (B; if equipped).
LX009125-UN: Install Transmission Housing
Install transmission housing.
9/11
2020/7/11file:///C:/ProgramData/Service%20ADVISOR/Temp/tm4493_LXOUOE00392...
10. Tighten cap screws.
LX009360-UN: Parking lock disengaged
LX009361-UN: Parking lock engaged, play
Check play of parking lock shifter cam as follows:
1. Engage parking lock. Turn shifter cam to end point, then back 10 degrees so that the cam is no longer touching.
2. Attach dial gauge to shifter cam. Use a suitable lever or screwdriver to press the locking latch against the teeth of front wheel drive gear and measure the play of
the shifter cam.
3. Play must be between 0.25 and 0.60 mm (0.010 and 0.024 in.).
4. If play is excessive, the transmission housing must removed once more and a larger spacer washer used (see “Install parking lock shifter cam”). If play is
insufficient, a smaller spacer washer must be used.
-: Space Washer Thickness
LX009126-UN: Install Taper Roller Bearing Cup
LEGEND:
A - Snap ring (thickness as required)
B - Taper roller bearing cup
Item Measurement Specification
Grade 8.8 Cap Screw Torque 90 N·m (65 lb-ft)
Grade 10.9 Cap Screw Torque 120 N·m (90 lb-ft)
Thickness of Spacer Washer Available
1.2 mm (0.047 in.) 1.7 mm (0.067 in.)
1.3 mm (0.051 in.) 1.8 mm (0.071 in.)
1.4 mm (0.055 in.) 1.9 mm (0.075 in.)
1.5 mm (0.059 in.) 2.0 mm (0.079 in.)
1.6 mm (0.063 in.)
10/11
2020/7/11file:///C:/ProgramData/Service%20ADVISOR/Temp/tm4493_LXOUOE00392...
11. C - Needle bearing
D - Cap screw [ Later tractor series have 2 cap screws]
Install taper roller bearing cup (B) of drive shaft and needle bearing (C) of differential drive shaft.
LX009127-UN: Check Drive Shaft Axial Play
Check axial play of drive shaft.
NOTE:
Axial play of drive shaft must be less than 0.1 mm (0.004 in.).
If axial play is not correct, use a different size snap ring to install the taper roller bearing cup.
-: Snap Ring Thickness
LX009128-UN: Tighten Cap Screw
Tighten cap screw to 30 N·m (22 lb-ft).
LX013472-UN: Countersunk Screw
Coat the thread on countersunk screw [ 12-gear version (SyncroPlus) and 16-gear version (Power Reverser or PowrQuad) only] (A) with LOCTITE® E 648 (L41860) and
tighten it to 25 N·m (18 lb-ft).
Thickness of Snap Rings Available
2.0 mm (0.079 in.) 2.2 mm (0.087 in.)
2.1 mm (0.083 in.) 2.3 mm (0.091 in.)
LOCTITE is a trademark of Loctite Corp. LX,5030 009469-19-1997/06/01
11/11
2020/7/11file:///C:/ProgramData/Service%20ADVISOR/Temp/tm4493_LXOUOE00392...
12. tm4493 - 6100 to 6600 Tractors
Adjusting Shift Mechanism
1. Place shifter shafts in neutral position.
2.
LX000810-UN: Threaded Pins
Adjust shifter forks by means of threaded pins (A) until they are centered in relation to shift collars.
3. Move shifter forks to all positions.
NOTE:
Make sure that shifter forks do not rub laterally on shift collars in any shift position.
4. Tighten threaded pins to 40 N·m (30 lb-ft).
5. Recheck adjustment.
LX,RDTG 002138-19-1996/04/01
1/1
2020/7/11file:///C:/ProgramData/Service%20ADVISOR/Temp/tm4493_LXOUOE00392...
13. tm4493 - 6100 to 6600 Tractors
Final Assembly
Final Assembly
1. Install front wheel drive clutch, see Section 56, Group 10.
2. If equipped, install option transmission or creeper transmission, see Group 00.
3. SyncroPlus™ : Install PERMA-CLUTCH 2™ and gear transmission. See Group 00.
PowrQuad™ : Install PowrQuad™ module. See Group 00.
Install forward/reverse linkage. See Section 55, Group 05.
4. Install differential, see Section 56, Group 15.
5. Install final drives, see Section 56, Group 00.
6. Install PTO, see Section 56, Group 00.
LX009129-UN: Tighten Cap Screws
Install shift cover.
Tighten cap screws to 30 N·m (22 lb-ft).
SyncroPlus is a trademark of Deere & Company.
PERMA-CLUTCH 2 is a trademark of Deere & Company.
PowrQuad is a trademark of Deere & Company. LX,RDTG 002139-19-1994/06/01
1/1
2020/7/11file:///C:/ProgramData/Service%20ADVISOR/Temp/tm4493_LXOUOE00392...
14. tm4493 - 6100 to 6600 Tractors
Special or Essential Tools
NOTE:
Order tools according to information given in the U.S. SERVICEGARD™ Catalog or in the European
Microfiche Tool Catalog (MTC).
Tilting
device.......KJD10178
Tilting the cab up and
down
KJD10178-UN: KJD10178
Universal support stand
[ Additionally required:
1 commercial 12 ton
jack] .......JT05725
Supporting tractor during
rear wheel removal.
JT05725-UN: JT05725
Puller.......KJD10173
Removal and installation
1/2
2020/7/11file:///C:/ProgramData/Service%20ADVISOR/Temp/tm4493_LXOUOE00392...
15. of PTO drive shaft and
pump drive shaft
KJD10173-UN: KJD10173
Lifting eye.......JD-244-1
Removal and installation
of tractor components
LX002476-UN: JD-244-1
Lifting eye.......JD-244-2
Removal and installation
of tractor components
LX002297-UN: JD-244-2
SERVICEGARD is a trademark of Deere & Company. LX,CRA50 002753-19-1993/10/01
2/2
2020/7/11file:///C:/ProgramData/Service%20ADVISOR/Temp/tm4493_LXOUOE00392...
16. tm4493 - 6100 to 6600 Tractors
Dealer-Manufactured Special Tools
See also Section 99, Group 05.
LX1016738-UN: Lifting Device
Lifting device for clutch housing and PowrReverser™ module.
PowrReverser is a trademark of Deere & Company. LX,5100 012015-19-1997/06/01
1/1
2020/7/11file:///C:/ProgramData/Service%20ADVISOR/Temp/tm4493_LXOUOE00392...
17. tm4493 - 6100 to 6600 Tractors
Specifications
Specifications
Item Measurement Specification
U.j. shaft to drive flange, corrugated-
head screws
Torque 135 N·m (100 lb-ft)
PowrReverser™ module to gear
transmission, cap screws
Torque 50 N·m (35 lb-ft)
Clutch bowden cable support to
clutch housing, cap screws
Torque 11 N·m (8 lb-ft)
Suction line of transmission oil pump
to clutch housing, hex. socket
screws
Torque 18 N·m (13.3 lb-ft)
Rear wheel to rear axle
Tractors with flanged axle, cap
screws
Torque 500 N·m (370 lb-ft)
Transmission oil, 6100 - 6400
Tractors
Capacity 52 L (13.7 U.S.gal.) approx.
See Section 10, Group 05.
PowrReverser is a trademark of Deere & Company. LX,5100 012013-19-1997/06/01
1/1
2020/7/11file:///C:/ProgramData/Service%20ADVISOR/Temp/tm4493_LXOUOE00392...
18. tm4493 - 6100 to 6600 Tractors
Removing the PowrReverser™ Module
LX1016498-UN: PowrReverser Module
LX002206-UN: Tilt Operator's Cab
For tilting the operator's cab, see Section 90, Groups 00 and 01.
1/4
2020/7/11file:///C:/ProgramData/Service%20ADVISOR/Temp/tm4493_LXOUOE00392...
19. LX007211-UN: Remove Oil Drain Plugs
Pull out swinging drawbar to the rear.
Remove oil drain plugs (A) and (B). Drain transmission oil into a suitable container.
Capacity: oil and filter change approx. 52 L (13.7 U.S. gal.)
Refer to Section 10, Group 05 for the precise oil capacity.
LX002223-UN: Remove Plug
Remove plug (A).
LX002599-UN: PTO Drive Shaft and Puller
Pull PTO drive shaft (A) and then pump drive shaft out of housing by means of puller KJD10173 (B).
LX1016495-UN: Remove Bracket
Remove bracket (A).
2/4
2020/7/11file:///C:/ProgramData/Service%20ADVISOR/Temp/tm4493_LXOUOE00392...
20. LX1015880-UN: Oil Cooler Hoses
Disconnect oil cooler hoses (A) and (B) where they meet the Power Reverser module.
LX007768-UN: Remove Cap Screws
Take out cap screws (A) and (B), and remove the u.j. shaft.
See also Section 56, Group 05.
LX1016742-UN: Disconnect Cables and Plugs
Disconnect cables and plugs (A) to (D).
LX1016736-UN: Remove Screws, Suction Line and Linkage
Take out screws (A) and pull suction line (B) out of the differential housing.
NOTE:
Trap the oil as it emerges from the suction line.
Disengage forward/reverse linkage (C).
3/4
2020/7/11file:///C:/ProgramData/Service%20ADVISOR/Temp/tm4493_LXOUOE00392...
21. Thank you very much for
your reading. Please Click
Here. Then Get COMPLETE
MANUAL. NO WAITING
NOTE:
If there is no response to
click on the link above,
please download the PDF
document first and then
click on it.
22. LX1016740-UN: Remove Return Hose
Remove return hose (A).
LX1016737-UN: Remove Pressure Line
Remove pressure line (A).
LX1016496-UN: Install Lifting Device and Cap Screw
Install lifting device (A) as shown, and secure it with cap screw (B). Attach lifting tackle.
LX1016739-UN: Remove Screws from Housing Flange
Take screws (A) out of the housing flange and remove the PowrReverser™ module.
NOTE:
Screw (B) remains in place.
PowrReverser is a trademark of Deere & Company. LX,5100 012021-19-1997/06/01
4/4
2020/7/11file:///C:/ProgramData/Service%20ADVISOR/Temp/tm4493_LXOUOE00392...
23. tm4493 - 6100 to 6600 Tractors
Installing the PowrReverser™ Module
Clean the sealing surfaces thoroughly and install a new flange seal.
Attach the lifting device and tackle to the PowrReverser™ module.
LX1016741-UN: Install Cap Screws
Install the PowrReverser™ module. Install cap screws (A) and tighten them to 50 N·m (35 lb-ft).
LX1016736-UN: Suction Line, Screws and Linkage
Put new seals on the suction line (B), and install the suction line on the PowrReverser™ module and differential housing.
Tighten screws (A) to 18 N·m (13.3 lb-ft).
Adjust and install forward/reverse linkage (C). See Group 05 in this Section.
For installation of u.j. shaft, refer to Section 56, Group 05.
For further assembly, reverse disassembly procedure.
Install oil drain plugs, fill with transmission oil, and check the oil level.
Tilt down the operator's cab. See Section 90.
Check all the functions of the tractor. If necessary, rectify any faults as described in the Technical Manual.
1/2
2020/7/11file:///C:/ProgramData/Service%20ADVISOR/Temp/tm4493_LXOUOE00392...
24. tm4493 - 6100 to 6600 Tractors
Removing and Installing the Gear Transmission
NOTE:
To remove or install the gear transmission, see Section 50, Group 00 ( SyncroPlus™ transmission).
NOTE:
See Group 15 in this Section for measuring the gaps at the connecting ring.
SyncroPlus is a trademark of Deere & Company. LX,5100 012068-19-1997/06/01
1/1
2020/7/11file:///C:/ProgramData/Service%20ADVISOR/Temp/tm4493_LXOUOE00392...