What is MERNStack?
• MERN = MongoDB + Express.js + React + Node.js
• A Full Stack JavaScript Framework
• Used for building modern web applications
• Frontend + Backend + Database all use JavaScript
4.
How does theMERN Stack
Works?
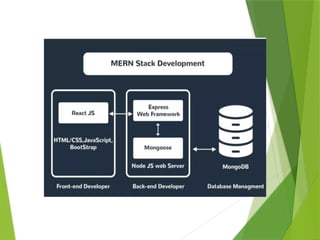
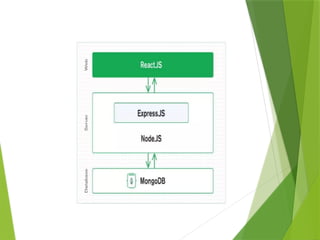
The MERN architecture allows you to easily
construct a 3-tier architecture (frontend, backend,
database) entirely using Javascript and JSON.
6.
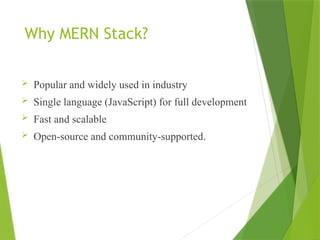
Why MERN Stack?
Popular and widely used in industry
Single language (JavaScript) for full development
Fast and scalable
Open-source and community-supported.
7.
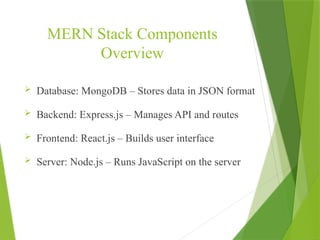
MERN Stack Components
Overview
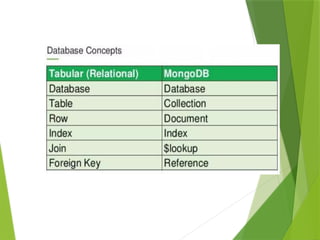
Database: MongoDB – Stores data in JSON format
Backend: Express.js – Manages API and routes
Frontend: React.js – Builds user interface
Server: Node.js – Runs JavaScript on the server
8.
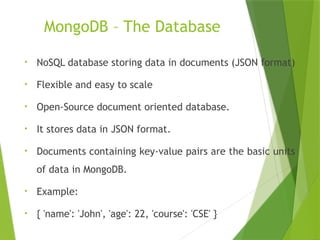
MongoDB – TheDatabase
• NoSQL database storing data in documents (JSON format)
• Flexible and easy to scale
• Open-Source document oriented database.
• It stores data in JSON format.
• Documents containing key-value pairs are the basic units
of data in MongoDB.
• Example:
• { 'name': 'John', 'age': 22, 'course': 'CSE' }
10.
Why MongoDB?
• Fast-Being a document-oriented database, easy to index
documents. Therefore, a faster response.
• Scalability- Large data can be handled by dividing it into several
machines.
• Use of Javascript– MongoDB uses JavaScript which is the
biggest advantage.
• Schema Less– Any type of data in a separate document.
• Simple Environment Setup– It's really simple to set up
MongoDB.
11.
Node.js – TheServer
Environment
Runs JavaScript on the Server.
It is free & open source written in C++.
Handles backend logic and APIs
Node.js allows you to run Javascript on the Server
Example:
const http = require('http');
http.createServer((req,res)=>res.end('Hello Node!')).listen(3000);
12.
Where to useNode.js?
Back-end Services such as APIs.
Highly scalable, data intensive and real time apps.
It is used to create Single Page Applications.
13.
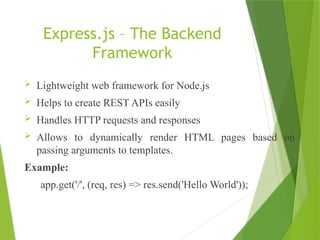
Express.js – TheBackend
Framework
Lightweight web framework for Node.js
Helps to create REST APIs easily
Handles HTTP requests and responses
Allows to dynamically render HTML pages based on
passing arguments to templates.
Example:
app.get('/', (req, res) => res.send('Hello World'));
14.
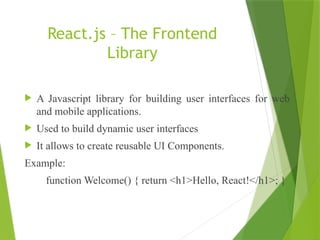
React.js – TheFrontend
Library
A Javascript library for building user interfaces for web
and mobile applications.
Used to build dynamic user interfaces
It allows to create reusable UI Components.
Example:
function Welcome() { return <h1>Hello, React!</h1>; }
15.
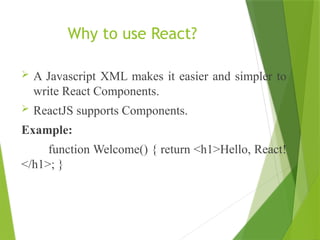
Why to useReact?
A Javascript XML makes it easier and simpler to
write React Components.
ReactJS supports Components.
Example:
function Welcome() { return <h1>Hello, React!
</h1>; }
16.
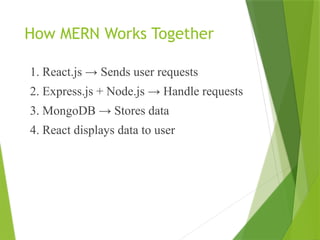
How MERN WorksTogether
1. React.js → Sends user requests
2. Express.js + Node.js → Handle requests
3. MongoDB → Stores data
4. React displays data to user
17.
Setting Up theDevelopment
Environment
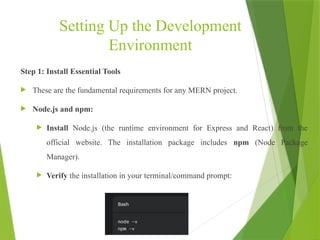
Step 1: Install Essential Tools
These are the fundamental requirements for any MERN project.
Node.js and npm:
Install Node.js (the runtime environment for Express and React) from the
official website. The installation package includes npm (Node Package
Manager).
Verify the installation in your terminal/command prompt:
18.
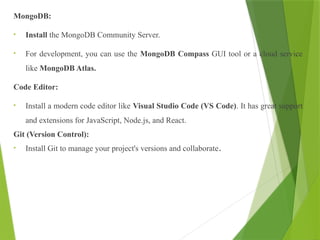
MongoDB:
• Install theMongoDB Community Server.
• For development, you can use the MongoDB Compass GUI tool or a cloud service
like MongoDB Atlas.
Code Editor:
• Install a modern code editor like Visual Studio Code (VS Code). It has great support
and extensions for JavaScript, Node.js, and React.
Git (Version Control):
• Install Git to manage your project's versions and collaborate.
19.
Step 2: Createthe Project Structure
Create a main project folder and separate folders for your backend and
frontend code.
1. Create Root Directory: Open your terminal and run the following
commands:
20.
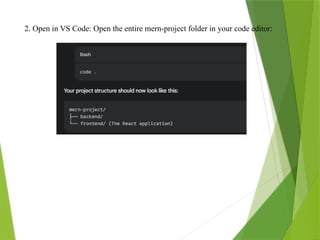
2. Open inVS Code: Open the entire mern-project folder in your code editor:
21.
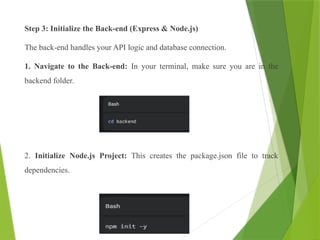
Step 3: Initializethe Back-end (Express & Node.js)
The back-end handles your API logic and database connection.
1. Navigate to the Back-end: In your terminal, make sure you are in the
backend folder.
2. Initialize Node.js Project: This creates the package.json file to track
dependencies.
22.
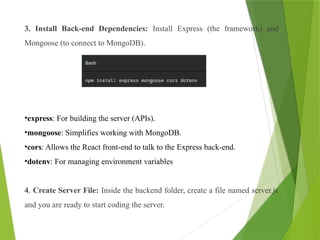
3. Install Back-endDependencies: Install Express (the framework) and
Mongoose (to connect to MongoDB).
•express: For building the server (APIs).
•mongoose: Simplifies working with MongoDB.
•cors: Allows the React front-end to talk to the Express back-end.
•dotenv: For managing environment variables
4. Create Server File: Inside the backend folder, create a file named server.js
and you are ready to start coding the server.
23.
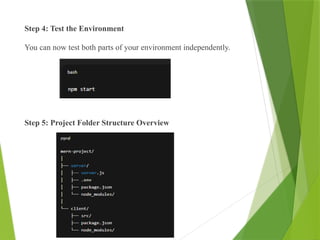
Step 4: Testthe Environment
You can now test both parts of your environment independently.
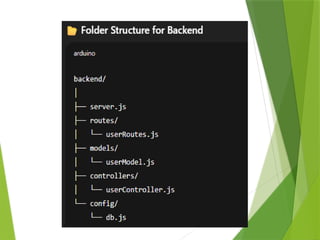
Step 5: Project Folder Structure Overview
24.
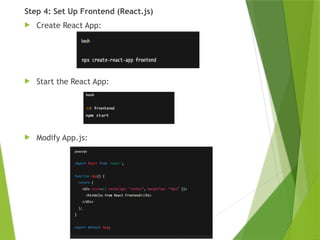
CREATING A BASICMERN APPLICATION SKELETON
Let’s create a simple “Hello MERN” app step-by-step.
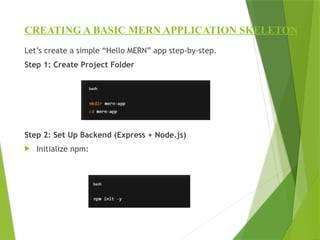
Step 1: Create Project Folder
Step 2: Set Up Backend (Express + Node.js)
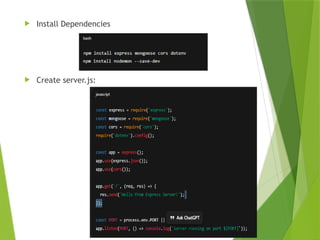
Initialize npm:
Example – Student
ManagementApp
Frontend: React form for student details
Backend: Express API to save data
Database: MongoDB collection 'students'
31.
Advantages of MERNStack
Full JavaScript ecosystem
Fast development
JSON everywhere
Strong community support
32.
Challenges in MERN
Requires JavaScript expertise
Setup complexity
State management in React can be tricky
INTRODUCTION
Backend developmentis the process of building the server-side logic of a
web application — the part that:
Handles data processing and business logic,
Connects to databases,
Responds to client requests (from frontend apps).
In the MERN stack, the backend is powered by:
Node.js – Server-side runtime,
Express.js – Framework for creating APIs,
MongoDB – Database for storing data.
37.
BUILDING A BACKENDWITH NODE.JS AND
EXPRESS.JS
What is Node.js?
Node.js is a JavaScript runtime environment that allows running
JavaScript code outside the browser.
Built on Google Chrome’s V8 engine.
Enables non-blocking I/O operations, which makes it efficient and
scalable.
38.
BUILDING A BACKENDWITH NODE.JS AND
EXPRESS.JS
What is Node.js?
Node.js is a JavaScript runtime environment that allows running
JavaScript code outside the browser.
Built on Google Chrome’s V8 engine.
Enables non-blocking I/O operations, which makes it efficient and
scalable.
39.
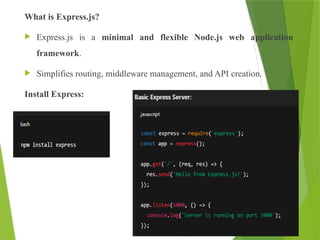
What is Express.js?
Express.js is a minimal and flexible Node.js web application
framework.
Simplifies routing, middleware management, and API creation.
Install Express:
41.
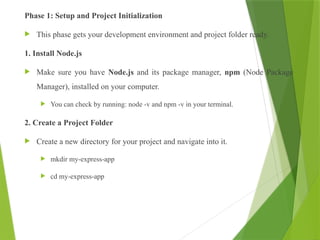
Phase 1: Setupand Project Initialization
This phase gets your development environment and project folder ready.
1. Install Node.js
Make sure you have Node.js and its package manager, npm (Node Package
Manager), installed on your computer.
You can check by running: node -v and npm -v in your terminal.
2. Create a Project Folder
Create a new directory for your project and navigate into it.
mkdir my-express-app
cd my-express-app
42.
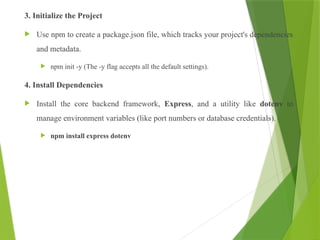
3. Initialize theProject
Use npm to create a package.json file, which tracks your project's dependencies
and metadata.
npm init -y (The -y flag accepts all the default settings).
4. Install Dependencies
Install the core backend framework, Express, and a utility like dotenv to
manage environment variables (like port numbers or database credentials).
npm install express dotenv
43.
Phase 2: CoreServer Setup
This phase creates the main server file and starts the server.
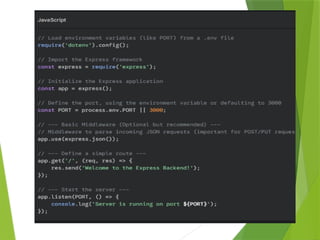
5. Create the Server File
Create the main file for your application, usually named server.js or app.js.
touch server.js
6. Configure and Start the Server (server.js)
Open server.js and add the following basic code:
45.
7. Create theEnvironment File
Create a file named .env in the root of your project folder to store configuration
settings.
touch .env
In .env, add: PORT=5000 (or your preferred port).
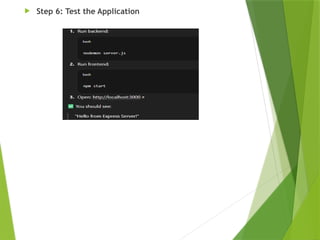
8. Run the Server
Start your server using Node.js:
node server.js
You should see the message: Server is running on port 5000.
Now, open your browser and navigate to http://localhost:5000/ to see the
"Welcome to the Express Backend!" message
46.
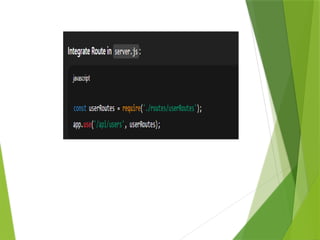
Phase 3: Modularizingwith Routes
For any real application, you need to separate your routes (APIs) into their own
files.
9. Create a Routes Directory and File
Create a folder named routes.
Inside routes, create a file for a specific resource, e.g., userRoutes.js.
mkdir routes
touch routes/userRoutes.js
10. Define Routes (userRoutes.js)
In routes/userRoutes.js, define the API endpoints for the resource:
48.
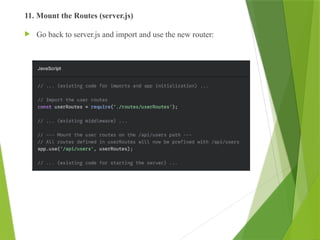
11. Mount theRoutes (server.js)
Go back to server.js and import and use the new router:
49.
12. Test theAPI
Restart your server (node server.js).
You can now test your new API endpoints:
GET http://localhost:5000/api/users should return the list of users.
Use a tool like Postman or cURL to send a POST request to the same URL with a
JSON body to test the creation route.
50.
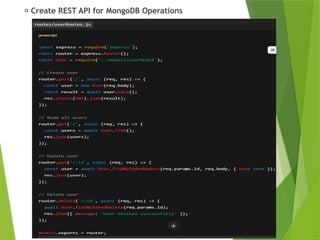
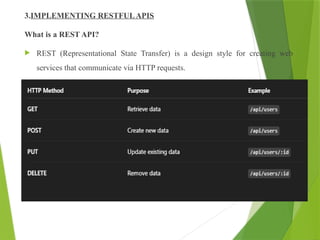
3.IMPLEMENTING RESTFULAPIS
What isa REST API?
REST (Representational State Transfer) is a design style for creating web
services that communicate via HTTP requests.
51.
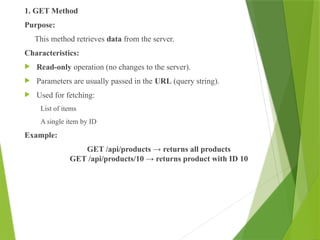
1. GET Method
Purpose:
Thismethod retrieves data from the server.
Characteristics:
Read-only operation (no changes to the server).
Parameters are usually passed in the URL (query string).
Used for fetching:
List of items
A single item by ID
Example:
GET /api/products → returns all products
GET /api/products/10 → returns product with ID 10
52.
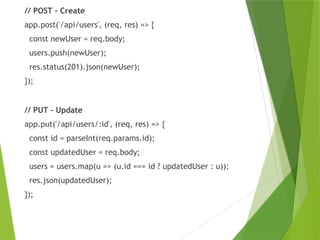
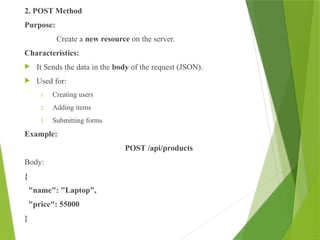
2. POST Method
Purpose:
Createa new resource on the server.
Characteristics:
It Sends the data in the body of the request (JSON).
Used for:
1. Creating users
2. Adding items
3. Submitting forms
Example:
POST /api/products
Body:
{
"name": "Laptop",
"price": 55000
}
53.
3. PUT Method
Purpose:
Updatean existing resource completely.
Characteristics:
Replaces the entire resource with the new data.
Used for updating:
1. Entire user details
2. Entire product details
Example:
PUT /api/products/10
Body:
{
"name": "Laptop",
"price": 53000
}
54.
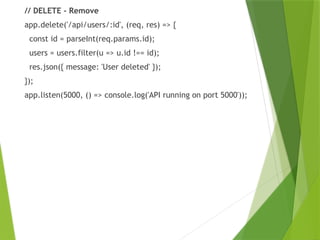
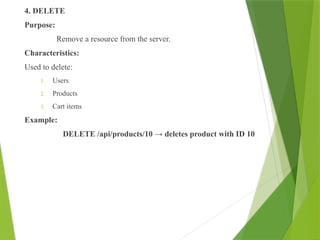
4. DELETE
Purpose:
Remove aresource from the server.
Characteristics:
Used to delete:
1. Users
2. Products
3. Cart items
Example:
DELETE /api/products/10 → deletes product with ID 10
55.
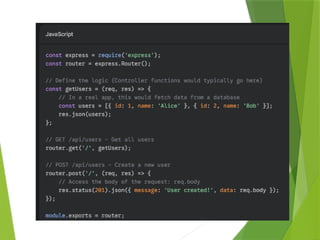
Create a SimpleREST API with Express
const express = require('express');
const app = express();
app.use(express.json());
let users = [
{ id: 1, name: 'Alice' },
{ id: 2, name: 'Bob' }
];
// GET - Read
app.get('/api/users', (req, res) => {
res.json(users);
});
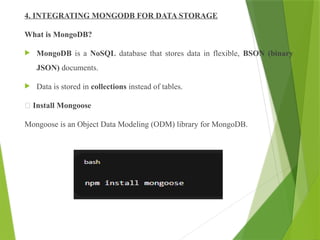
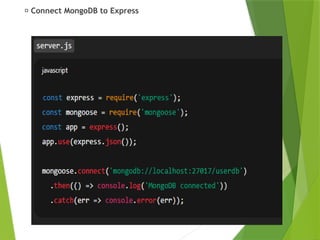
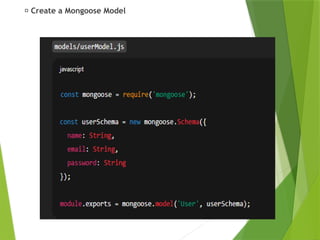
4. INTEGRATING MONGODBFOR DATA STORAGE
What is MongoDB?
MongoDB is a NoSQL database that stores data in flexible, BSON (binary
JSON) documents.
Data is stored in collections instead of tables.
🔸 Install Mongoose
Mongoose is an Object Data Modeling (ODM) library for MongoDB.
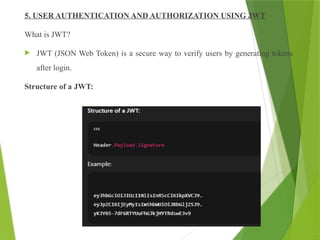
5. USER AUTHENTICATIONAND AUTHORIZATION USING JWT
What is JWT?
JWT (JSON Web Token) is a secure way to verify users by generating tokens
after login.
Structure of a JWT:
64.
Install JWT Package
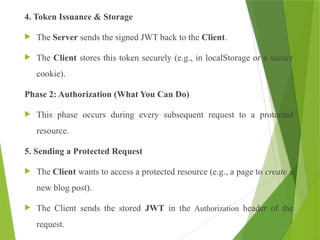
Phase1: Authentication (Who You Are)
This phase establishes the user's identity and issues the JWT.
1. Login Request
The Client sends the user's credentials (username and password) to the
Server's login endpoint.
65.
2. Verification &Identity Check
The Server verifies the credentials against the database.
Upon success, the Server looks up the user's roles and permissions
(e.g., "admin," "editor," or "standard_user").
3. JWT Generation (The Digital ID Card)
The Server creates the JWT, embedding the user's Identity (like
the User ID) and their Permissions/Roles into the token's Payload.
Example Payload: {"user_id": 101, "role": "editor"}
The Server then Signs the JWT with a secret key to make it
tamper-proof.
66.
4. Token Issuance& Storage
The Server sends the signed JWT back to the Client.
The Client stores this token securely (e.g., in localStorage or a secure
cookie).
Phase 2: Authorization (What You Can Do)
This phase occurs during every subsequent request to a protected
resource.
5. Sending a Protected Request
The Client wants to access a protected resource (e.g., a page to create a
new blog post).
The Client sends the stored JWT in the Authorization header of the
request.
67.
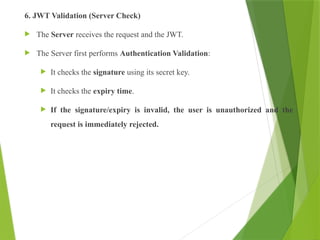
6. JWT Validation(Server Check)
The Server receives the request and the JWT.
The Server first performs Authentication Validation:
It checks the signature using its secret key.
It checks the expiry time.
If the signature/expiry is invalid, the user is unauthorized and the
request is immediately rejected.
68.
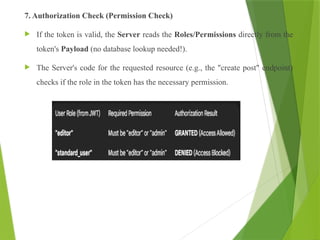
7. Authorization Check(Permission Check)
If the token is valid, the Server reads the Roles/Permissions directly from the
token's Payload (no database lookup needed!).
The Server's code for the requested resource (e.g., the "create post" endpoint)
checks if the role in the token has the necessary permission.
69.
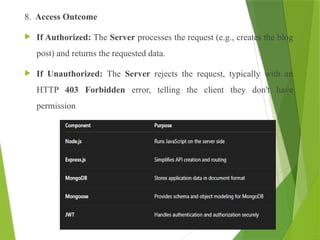
8. Access Outcome
If Authorized: The Server processes the request (e.g., creates the blog
post) and returns the requested data.
If Unauthorized: The Server rejects the request, typically with an
HTTP 403 Forbidden error, telling the client they don't have
permission


![Create a Simple REST API with Express
const express = require('express');
const app = express();
app.use(express.json());
let users = [
{ id: 1, name: 'Alice' },
{ id: 2, name: 'Bob' }
];
// GET - Read
app.get('/api/users', (req, res) => {
res.json(users);
});](https://image.slidesharecdn.com/introductiontomernstackdevelopment-copy-251125062848-92c7e63f/85/Introduction_to_MERN_Stack_Development-Copy-pptx-55-320.jpg)