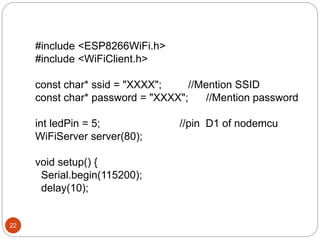
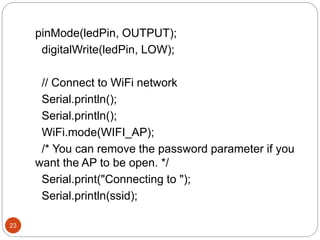
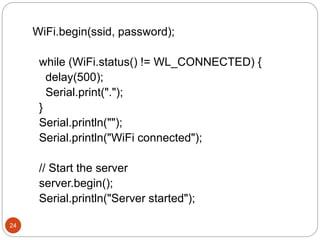
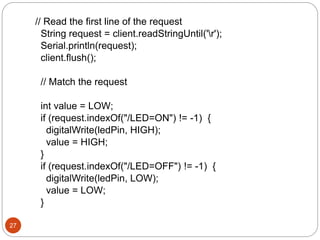
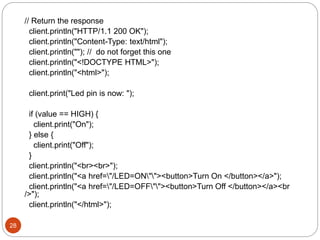
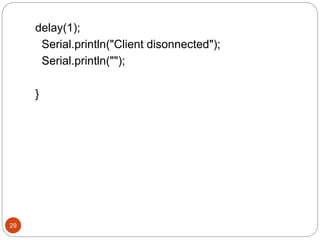
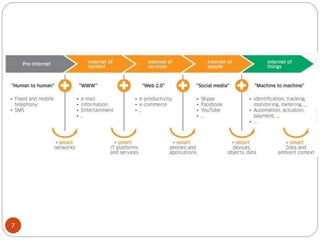
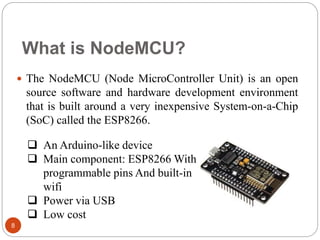
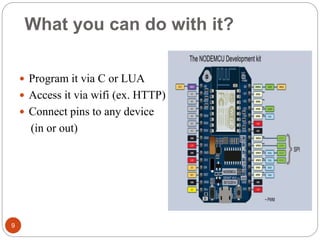
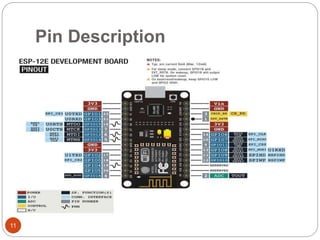
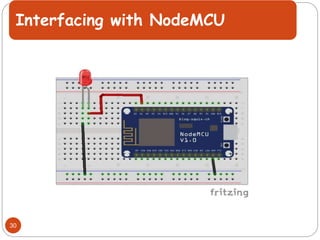
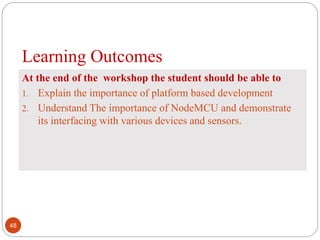
NODEMC
U
1
3
4
We will now have connectivity for anything. From
any time, any place connectivity for anyone!!!
5
Various Names, One Concept
For over a decade after the introduction of the term
Internet-of-Things,different organizations and
working groups have been providing various
definitions.
• M2M (Machine to Machine)
• “Internet of Everything” (Cisco Systems)
• “World Size Web” (Bruce Schneier)
• “Skynet” (Terminator movie)
• Cloud of Things
• Web of Things
6
7
What is NodeMCU?
 The NodeMCU (Node MicroController Unit) is an open
source software and hardware development environment
that is built around a very inexpensive System-on-a-Chip
(SoC) called the ESP8266.
 An Arduino-like device
 Main component: ESP8266 With
programmable pins And built-in
wifi
 Power via USB
 Low cost
8
What you can do with it?
 Program it via C or LUA
 Access it via wifi (ex. HTTP)
 Connect pins to any device
(in or out)
9
Main Component
10
Pin Description
11
ESP8266 Block Diagram
Figure : ESP8266EX Block Diagram
12
Types of ESP8266
13
Download and install the Arduino Software
14
Programming an Arduino
• The Arduino software
consists of a development
environment (IDE) and the
core libraries.
• The IDE is written in Java
and based on
the processing environment.
• The core libraries are
written in C and C++ and
compiled using avr-gcc
compiler.
15
Arduino environment
16
Program Structure
Setup( )
{
// A function that runs once at the start of a program and is used to
set //pinMode or initialize serial communication
}
loop( )
{
// This function includes the code to be executed continuously – reading
inputs, //triggering outputs, etc.
// This function is the core of all Arduino programs and does the bulk of
the //work.
}
17
BREAD BOARD
18
Nodemcu assembling on Breadboard
19
LED (Light emitting diode)
20
Activity 1.1
Type : Team of 2 Duration : 20 Minutes
Single LED blink program using web
.
Anode of LED Cathode of
LED
21
#include <ESP8266WiFi.h>
#include <WiFiClient.h>
const char* ssid = "XXXX"; //Mention SSID
const char* password = "XXXX"; //Mention password
int ledPin = 5; //pin D1 of nodemcu
WiFiServer server(80);
void setup() {
Serial.begin(115200);
delay(10);
22
pinMode(ledPin, OUTPUT);
digitalWrite(ledPin, LOW);
// Connect to WiFi network
Serial.println();
Serial.println();
WiFi.mode(WIFI_AP);
/* You can remove the password parameter if you
want the AP to be open. */
Serial.print("Connecting to ");
Serial.println(ssid);
23
WiFi.begin(ssid, password);
while (WiFi.status() != WL_CONNECTED) {
delay(500);
Serial.print(".");
}
Serial.println("");
Serial.println("WiFi connected");
// Start the server
server.begin();
Serial.println("Server started");
24
// Print the IP address
Serial.print("Use this URL to connect: ");
Serial.print("http://");
Serial.print(WiFi.localIP());
Serial.println("/");
}
25
void loop()
{
// Check if a client has connected
WiFiClient client = server.available();
if (!client)
{
return;
}
// Wait until the client sends some data
Serial.println("new client");
while (!client.available())
{
delay(1);
}
26
// Read the first line of the request
String request = client.readStringUntil('r');
Serial.println(request);
client.flush();
// Match the request
int value = LOW;
if (request.indexOf("/LED=ON") != -1) {
digitalWrite(ledPin, HIGH);
value = HIGH;
}
if (request.indexOf("/LED=OFF") != -1) {
digitalWrite(ledPin, LOW);
value = LOW;
}
27
// Return the response
client.println("HTTP/1.1 200 OK");
client.println("Content-Type: text/html");
client.println(""); // do not forget this one
client.println("<!DOCTYPE HTML>");
client.println("<html>");
client.print("Led pin is now: ");
if (value == HIGH) {
client.print("On");
} else {
client.print("Off");
}
client.println("<br><br>");
client.println("<a href="/LED=ON""><button>Turn On </button></a>");
client.println("<a href="/LED=OFF""><button>Turn Off </button></a><br
/>");
client.println("</html>");
28
delay(1);
Serial.println("Client disonnected");
Serial.println("");
}
29
Interfacing with NodeMCU
30
Activity 1.2
Type : Team of 2 Duration : 20 Minutes
Two LEDs blink program using web
31
#include <ESP8266WiFi.h>
#include <WiFiClient.h>
const char* ssid = "xxxx"; //Mention SSID
const char* password = "xxxx"; //Mention password
int ledPin = 5; //pin D2 of nodemcu
int ledPin1 = 4; //pin D1 of nodemcu
WiFiServer server(80);
void setup() {
Serial.begin(115200);
delay(10);
pinMode(ledPin1, OUTPUT);
pinMode(ledPin, OUTPUT);
digitalWrite(ledPin, LOW);
32
// Connect to WiFi network
Serial.println();
Serial.println();
WiFi.mode(WIFI_AP);
/* You can remove the password parameter if you want the AP to be open. */
Serial.print("Connecting to ");
Serial.println(ssid);
WiFi.begin(ssid, password);
while (WiFi.status() != WL_CONNECTED) {
delay(500);
Serial.print(".");
}
Serial.println("");
Serial.println("WiFi connected");
// Start the server
server.begin();
Serial.println("Server started");
33
// Print the IP address
Serial.print("Use this URL to connect: ");
Serial.print("http://");
Serial.print(WiFi.localIP());
Serial.println("/");
}
void loop()
{
// Check if a client has connected
WiFiClient client = server.available();
34
if (!client)
{
return;
}
// Wait until the client sends some data
Serial.println("new client");
while (!client.available())
{
delay(1);
}
// Read the first line of the request
String request = client.readStringUntil('r');
Serial.println(request);
client.flush();
35
// Match the request
int value = LOW;
if (request.indexOf("/LED=ON") != -1) {
digitalWrite(ledPin, HIGH);
value = HIGH;
}
if (request.indexOf("/LED=OFF") != -1) {
digitalWrite(ledPin, LOW);
value = LOW;
}
if (request.indexOf("/LED1=ON") != -1) {
digitalWrite(ledPin1, HIGH);
value = HIGH;
}
if (request.indexOf("/LED1=OFF") != -1) {
digitalWrite(ledPin1, LOW);
value = LOW;
}
36
// Return the response
client.println("HTTP/1.1 200 OK");
client.println("Content-Type: text/html");
client.println(""); // do not forget this one
client.println("<!DOCTYPE HTML>");
client.println("<html>");
client.print("Led pin is now: ");
if (value == HIGH) {
client.print("On");
} else {
client.print("Off");
}
37
client.println("<br><br>");
client.println("<a href="/LED=ON""><button>Turn On
</button></a>");
client.println("<a href="/LED=OFF""><button>Turn Off
</button></a><br />");
client.println("<br><br>");
client.println("<a href="/LED1=ON""><button>Turn On1
</button></a>");
client.println("<a href="/LED1=OFF""><button>Turn Off1
</button></a><br />");
client.println("</html>");
delay(1);
Serial.println("Client disonnected");
Serial.println("");
}
38
Serial communication
What is serial communication ?
39
The word serial means "one after the other."
 What is Baud rate ?
Number of symbols transferred per sec
40
Serial Display Functions
 Serial.begin(baud_rate)
//baud rate(characters per sec) between computer and
board is typically 9600 although you can work with
other speeds by changing settings of COM Port
 Serial.print(value),
//value could be any data and even string
 Serial.println(value)
//print in new line
41
Eg. Print INDIA on serial monitor
void setup( )
{
Serial.begin(9600);// 9600 is default baud rate of serial com
port of a computer
}
void loop( )
{
Serial.println(“INDIA”); // Send the value “INDIA”
}
42
Serial Monitor
43
Activity 1.3
Type : Team of 2 Duration : 20 Minutes
Wi-Fi Network Scanning by NodeMCU
44
#include <ESP8266WiFi.h>
void setup()
{
Serial.begin(115200); // Set WiFi to station mode
WiFi.mode(WIFI_STA);
WiFi.disconnect();
delay(100);
Serial.println("Setup done");
}
void loop()
{
Serial.println("scan start");
int n = WiFi.scanNetworks(); // WiFi.scanNetworks will
return the number of networksfound
Serial.println("scan done");
45
if (n == 0)
Serial.println("no networks found");
else
{
Serial.print(n);
Serial.println(" networks found");
for (int i = 0; i < n; ++i)
{
// Print SSID and RSSI for each network found
Serial.print(i + 1);
Serial.print(": ");
Serial.print(WiFi.SSID(i));
Serial.print(" (");
Serial.print(WiFi.RSSI(i));
Serial.print(")");
Serial.println((WiFi.encryptionType(i) == ENC_TYPE_NONE) ? " " :
"*");
delay(10);
}
46
}
Serial.println("");
delay(5000);
}
47
Learning Outcomes
At the end of the workshop the student should be able to
1. Explain the importance of platform based development
2. Understand The importance of NodeMCU and demonstrate
its interfacing with various devices and sensors.
48
For more information contact:
amarjeetsinght@gmail.com
linkedin.com/in/amarjeetsingh-thakur-54915955
49
50

Introduction to Node MCU

  • 1.
  • 2.
  • 3.
  • 4.
    We will nowhave connectivity for anything. From any time, any place connectivity for anyone!!! 5
  • 5.
    Various Names, OneConcept For over a decade after the introduction of the term Internet-of-Things,different organizations and working groups have been providing various definitions. • M2M (Machine to Machine) • “Internet of Everything” (Cisco Systems) • “World Size Web” (Bruce Schneier) • “Skynet” (Terminator movie) • Cloud of Things • Web of Things 6
  • 6.
  • 7.
    What is NodeMCU? The NodeMCU (Node MicroController Unit) is an open source software and hardware development environment that is built around a very inexpensive System-on-a-Chip (SoC) called the ESP8266.  An Arduino-like device  Main component: ESP8266 With programmable pins And built-in wifi  Power via USB  Low cost 8
  • 8.
    What you cando with it?  Program it via C or LUA  Access it via wifi (ex. HTTP)  Connect pins to any device (in or out) 9
  • 9.
  • 10.
  • 11.
    ESP8266 Block Diagram Figure: ESP8266EX Block Diagram 12
  • 12.
  • 13.
    Download and installthe Arduino Software 14
  • 14.
    Programming an Arduino •The Arduino software consists of a development environment (IDE) and the core libraries. • The IDE is written in Java and based on the processing environment. • The core libraries are written in C and C++ and compiled using avr-gcc compiler. 15
  • 15.
  • 16.
    Program Structure Setup( ) { //A function that runs once at the start of a program and is used to set //pinMode or initialize serial communication } loop( ) { // This function includes the code to be executed continuously – reading inputs, //triggering outputs, etc. // This function is the core of all Arduino programs and does the bulk of the //work. } 17
  • 17.
  • 18.
    Nodemcu assembling onBreadboard 19
  • 19.
  • 20.
    Activity 1.1 Type :Team of 2 Duration : 20 Minutes Single LED blink program using web . Anode of LED Cathode of LED 21
  • 21.
    #include <ESP8266WiFi.h> #include <WiFiClient.h> constchar* ssid = "XXXX"; //Mention SSID const char* password = "XXXX"; //Mention password int ledPin = 5; //pin D1 of nodemcu WiFiServer server(80); void setup() { Serial.begin(115200); delay(10); 22
  • 22.
    pinMode(ledPin, OUTPUT); digitalWrite(ledPin, LOW); //Connect to WiFi network Serial.println(); Serial.println(); WiFi.mode(WIFI_AP); /* You can remove the password parameter if you want the AP to be open. */ Serial.print("Connecting to "); Serial.println(ssid); 23
  • 23.
    WiFi.begin(ssid, password); while (WiFi.status()!= WL_CONNECTED) { delay(500); Serial.print("."); } Serial.println(""); Serial.println("WiFi connected"); // Start the server server.begin(); Serial.println("Server started"); 24
  • 24.
    // Print theIP address Serial.print("Use this URL to connect: "); Serial.print("http://"); Serial.print(WiFi.localIP()); Serial.println("/"); } 25
  • 25.
    void loop() { // Checkif a client has connected WiFiClient client = server.available(); if (!client) { return; } // Wait until the client sends some data Serial.println("new client"); while (!client.available()) { delay(1); } 26
  • 26.
    // Read thefirst line of the request String request = client.readStringUntil('r'); Serial.println(request); client.flush(); // Match the request int value = LOW; if (request.indexOf("/LED=ON") != -1) { digitalWrite(ledPin, HIGH); value = HIGH; } if (request.indexOf("/LED=OFF") != -1) { digitalWrite(ledPin, LOW); value = LOW; } 27
  • 27.
    // Return theresponse client.println("HTTP/1.1 200 OK"); client.println("Content-Type: text/html"); client.println(""); // do not forget this one client.println("<!DOCTYPE HTML>"); client.println("<html>"); client.print("Led pin is now: "); if (value == HIGH) { client.print("On"); } else { client.print("Off"); } client.println("<br><br>"); client.println("<a href="/LED=ON""><button>Turn On </button></a>"); client.println("<a href="/LED=OFF""><button>Turn Off </button></a><br />"); client.println("</html>"); 28
  • 28.
  • 29.
  • 30.
    Activity 1.2 Type :Team of 2 Duration : 20 Minutes Two LEDs blink program using web 31
  • 31.
    #include <ESP8266WiFi.h> #include <WiFiClient.h> constchar* ssid = "xxxx"; //Mention SSID const char* password = "xxxx"; //Mention password int ledPin = 5; //pin D2 of nodemcu int ledPin1 = 4; //pin D1 of nodemcu WiFiServer server(80); void setup() { Serial.begin(115200); delay(10); pinMode(ledPin1, OUTPUT); pinMode(ledPin, OUTPUT); digitalWrite(ledPin, LOW); 32
  • 32.
    // Connect toWiFi network Serial.println(); Serial.println(); WiFi.mode(WIFI_AP); /* You can remove the password parameter if you want the AP to be open. */ Serial.print("Connecting to "); Serial.println(ssid); WiFi.begin(ssid, password); while (WiFi.status() != WL_CONNECTED) { delay(500); Serial.print("."); } Serial.println(""); Serial.println("WiFi connected"); // Start the server server.begin(); Serial.println("Server started"); 33
  • 33.
    // Print theIP address Serial.print("Use this URL to connect: "); Serial.print("http://"); Serial.print(WiFi.localIP()); Serial.println("/"); } void loop() { // Check if a client has connected WiFiClient client = server.available(); 34
  • 34.
    if (!client) { return; } // Waituntil the client sends some data Serial.println("new client"); while (!client.available()) { delay(1); } // Read the first line of the request String request = client.readStringUntil('r'); Serial.println(request); client.flush(); 35
  • 35.
    // Match therequest int value = LOW; if (request.indexOf("/LED=ON") != -1) { digitalWrite(ledPin, HIGH); value = HIGH; } if (request.indexOf("/LED=OFF") != -1) { digitalWrite(ledPin, LOW); value = LOW; } if (request.indexOf("/LED1=ON") != -1) { digitalWrite(ledPin1, HIGH); value = HIGH; } if (request.indexOf("/LED1=OFF") != -1) { digitalWrite(ledPin1, LOW); value = LOW; } 36
  • 36.
    // Return theresponse client.println("HTTP/1.1 200 OK"); client.println("Content-Type: text/html"); client.println(""); // do not forget this one client.println("<!DOCTYPE HTML>"); client.println("<html>"); client.print("Led pin is now: "); if (value == HIGH) { client.print("On"); } else { client.print("Off"); } 37
  • 37.
    client.println("<br><br>"); client.println("<a href="/LED=ON""><button>Turn On </button></a>"); client.println("<ahref="/LED=OFF""><button>Turn Off </button></a><br />"); client.println("<br><br>"); client.println("<a href="/LED1=ON""><button>Turn On1 </button></a>"); client.println("<a href="/LED1=OFF""><button>Turn Off1 </button></a><br />"); client.println("</html>"); delay(1); Serial.println("Client disonnected"); Serial.println(""); } 38
  • 38.
    Serial communication What isserial communication ? 39
  • 39.
    The word serialmeans "one after the other."  What is Baud rate ? Number of symbols transferred per sec 40
  • 40.
    Serial Display Functions Serial.begin(baud_rate) //baud rate(characters per sec) between computer and board is typically 9600 although you can work with other speeds by changing settings of COM Port  Serial.print(value), //value could be any data and even string  Serial.println(value) //print in new line 41
  • 41.
    Eg. Print INDIAon serial monitor void setup( ) { Serial.begin(9600);// 9600 is default baud rate of serial com port of a computer } void loop( ) { Serial.println(“INDIA”); // Send the value “INDIA” } 42
  • 42.
  • 43.
    Activity 1.3 Type :Team of 2 Duration : 20 Minutes Wi-Fi Network Scanning by NodeMCU 44
  • 44.
    #include <ESP8266WiFi.h> void setup() { Serial.begin(115200);// Set WiFi to station mode WiFi.mode(WIFI_STA); WiFi.disconnect(); delay(100); Serial.println("Setup done"); } void loop() { Serial.println("scan start"); int n = WiFi.scanNetworks(); // WiFi.scanNetworks will return the number of networksfound Serial.println("scan done"); 45
  • 45.
    if (n ==0) Serial.println("no networks found"); else { Serial.print(n); Serial.println(" networks found"); for (int i = 0; i < n; ++i) { // Print SSID and RSSI for each network found Serial.print(i + 1); Serial.print(": "); Serial.print(WiFi.SSID(i)); Serial.print(" ("); Serial.print(WiFi.RSSI(i)); Serial.print(")"); Serial.println((WiFi.encryptionType(i) == ENC_TYPE_NONE) ? " " : "*"); delay(10); } 46
  • 46.
  • 47.
    Learning Outcomes At theend of the workshop the student should be able to 1. Explain the importance of platform based development 2. Understand The importance of NodeMCU and demonstrate its interfacing with various devices and sensors. 48
  • 48.
    For more informationcontact: amarjeetsinght@gmail.com linkedin.com/in/amarjeetsingh-thakur-54915955 49
  • 49.