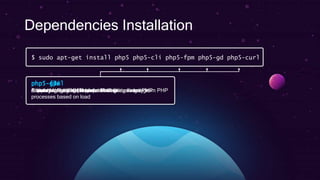
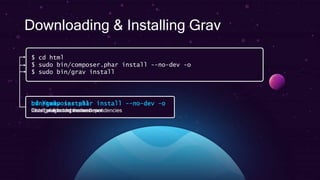
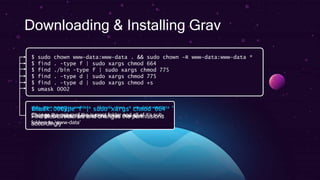
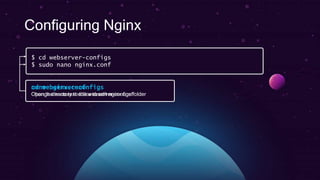
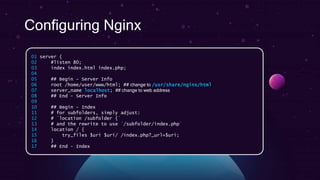
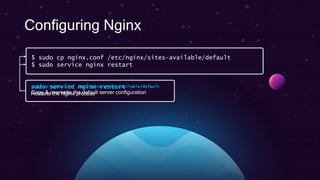
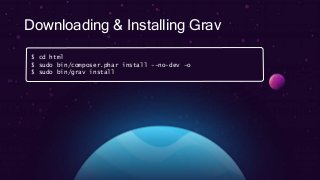
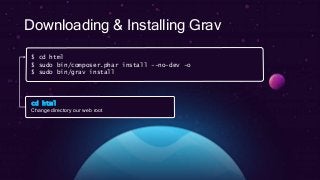
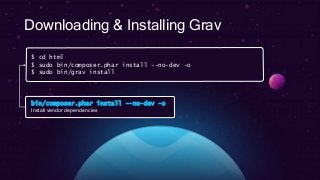
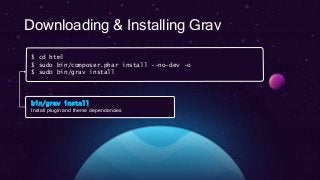
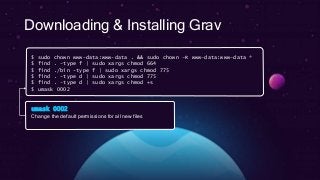
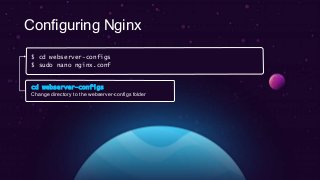
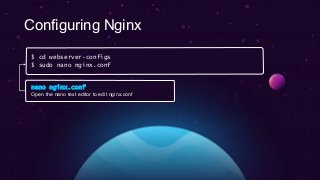
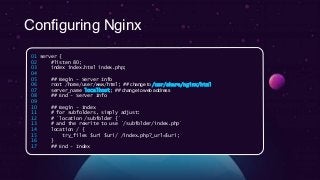
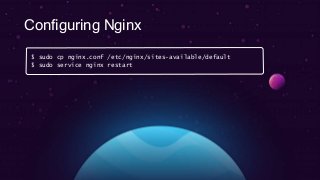
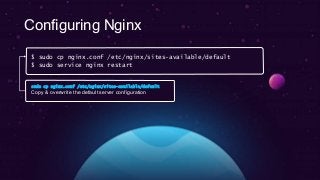
Installing Grav
with Nginx on Ubuntu 14.04
Dependencies Installation
• A web server
• PHP 5.5.9 or higher
o gd
o curl
o openssl
o zip
o mbstring
o xml
Dependencies Installation
• A web server
• PHP 5.5.9 or higher
o gd
o curl
Dependencies Installation
$ sudo apt-get install php5 php5-cli php5-fpm php5-gd php5-curl
Dependencies Installation
$ sudo apt-get install php5 php5-cli php5-fpm php5-gd php5-curl
php5
A widely-used general purpose scripting language
Dependencies Installation
$ sudo apt-get install php5 php5-cli php5-fpm php5-gd php5-curl
php5-cli
Command line interpreter for PHP
Dependencies Installation
$ sudo apt-get install php5 php5-cli php5-fpm php5-gd php5-curl
php5-fpm
Stands for ‘FastCGI Process Manager’, scales PHP
processes based on load
Dependencies Installation
$ sudo apt-get install php5 php5-cli php5-fpm php5-gd php5-curl
php5-gd
Supports graphics manipulation abilities directly from PHP
Dependencies Installation
$ sudo apt-get install php5 php5-cli php5-fpm php5-gd php5-curl
php5-curl
A library for getting files from servers
Dependencies Installation
$ sudo apt-get install nginx git-core
Dependencies Installation
$ sudo apt-get install nginx git-core
nginx
High performance web and reverse proxy server
Dependencies Installation
$ sudo apt-get install nginx git-core
git-core
A popular distributed version control system
Downloading & Installing Grav
$ cd /usr/share/nginx/
$ sudo rm –rf html
$ sudo git clone –b master https://github.com/getgrav/grav.git html
Downloading & Installing Grav
$ cd /usr/share/nginx/
$ sudo rm –rf html
$ sudo git clone –b master https://github.com/getgrav/grav.git html
cd /usr/share/nginx
Change directory to the directory above our web root
Apache Users: cd /var/www/
Downloading & Installing Grav
$ cd /usr/share/nginx/
$ sudo rm –rf html
$ sudo git clone –b master https://github.com/getgrav/grav.git html
sudo rm –rf html
Remove the existing web root
Downloading & Installing Grav
$ cd /usr/share/nginx/
$ sudo rm –rf html
$ sudo git clone –b master https://github.com/getgrav/grav.git html
sudo git clone –b branch master https://git.../grav.git html
Clone the master branch (latest release) of Grav from
Github and place the contents in the webroot
Downloading & Installing Grav
$ cd html
$ sudo bin/composer.phar install --no-dev -o
$ sudo bin/grav install
Downloading & Installing Grav
$ cd html
$ sudo bin/composer.phar install --no-dev -o
$ sudo bin/grav install
cd html
Change directory our web root
Downloading & Installing Grav
$ cd html
$ sudo bin/composer.phar install --no-dev -o
$ sudo bin/grav install
bin/composer.phar install --no-dev -o
Install vendor dependencies
Downloading & Installing Grav
$ cd html
$ sudo bin/composer.phar install --no-dev -o
$ sudo bin/grav install
bin/grav install
Install plugin and theme dependencies
Downloading & Installing Grav
$ sudo chown www-data:www-data . && sudo chown –R www-data:www-data *
$ find . -type f | sudo xargs chmod 664
$ find ./bin -type f | sudo xargs chmod 775
$ find . -type d | sudo xargs chmod 775
$ find . -type d | sudo xargs chmod +s
$ umask 0002
Downloading & Installing Grav
$ sudo chown www-data:www-data . && sudo chown –R www-data:www-data *
$ find . -type f | sudo xargs chmod 664
$ find ./bin -type f | sudo xargs chmod 775
$ find . -type d | sudo xargs chmod 775
$ find . -type d | sudo xargs chmod +s
$ umask 0002
sudo chown www-data:www-data . && sudo chown –R www-data:www-data *
Change the group of the current folder and all of it’s sub-
folders to ‘www-data’
Downloading & Installing Grav
$ sudo chown www-data:www-data . && sudo chown –R www-data:www-data *
$ find . -type f | sudo xargs chmod 664
$ find ./bin -type f | sudo xargs chmod 775
$ find . -type d | sudo xargs chmod 775
$ find . -type d | sudo xargs chmod +s
$ umask 0002
find . –type f | sudo xargs chmod 664
Find files/directories and changes the permissions
accordingly
Downloading & Installing Grav
$ sudo chown www-data:www-data . && sudo chown –R www-data:www-data *
$ find . -type f | sudo xargs chmod 664
$ find ./bin -type f | sudo xargs chmod 775
$ find . -type d | sudo xargs chmod 775
$ find . -type d | sudo xargs chmod +s
$ umask 0002
umask 0002
Change the default permissions for all new files
Configuring Nginx
$ cd webserver-configs
$ sudo nano nginx.conf
Configuring Nginx
$ cd webserver-configs
$ sudo nano nginx.conf
cd webserver-configs
Change directory to the webserver-configs folder
nano nginx.conf
Open the nano text editor to edit nginx.conf
Configuring Nginx
$ cd webserver-configs
$ sudo nano nginx.conf
Configuring Nginx
01 server {
02 #listen 80;
03 index index.html index.php;
04
05 ## Begin - Server Info
06 root /home/user/www/html; ## change to /usr/share/nginx/html
07 server_name localhost; ## change to web address
08 ## End - Server Info
09
10 ## Begin - Index
11 # for subfolders, simply adjust:
12 # `location /subfolder {`
13 # and the rewrite to use `/subfolder/index.php`
14 location / {
15 try_files $uri $uri/ /index.php?_url=$uri;
16 }
17 ## End - Index
Configuring Nginx
$ sudo cp nginx.conf /etc/nginx/sites-available/default
$ sudo service nginx restart
Configuring Nginx
$ sudo cp nginx.conf /etc/nginx/sites-available/default
$ sudo service nginx restart
sudo cp nginx.conf /etc/nginx/sites-available/default
Copy & overwrite the default server configuration
sudo service nginx restart
Restarts the Nginx process
Configuring Nginx
$ sudo cp nginx.conf /etc/nginx/sites-available/default
$ sudo service nginx restart
Grav is Installed
@gsumpster
learn.getgrav.org

Installing GravCMS

  • 1.
  • 2.
    Dependencies Installation • Aweb server • PHP 5.5.9 or higher o gd o curl o openssl o zip o mbstring o xml
  • 3.
    Dependencies Installation • Aweb server • PHP 5.5.9 or higher o gd o curl
  • 4.
    Dependencies Installation $ sudoapt-get install php5 php5-cli php5-fpm php5-gd php5-curl
  • 5.
    Dependencies Installation $ sudoapt-get install php5 php5-cli php5-fpm php5-gd php5-curl php5 A widely-used general purpose scripting language
  • 6.
    Dependencies Installation $ sudoapt-get install php5 php5-cli php5-fpm php5-gd php5-curl php5-cli Command line interpreter for PHP
  • 7.
    Dependencies Installation $ sudoapt-get install php5 php5-cli php5-fpm php5-gd php5-curl php5-fpm Stands for ‘FastCGI Process Manager’, scales PHP processes based on load
  • 8.
    Dependencies Installation $ sudoapt-get install php5 php5-cli php5-fpm php5-gd php5-curl php5-gd Supports graphics manipulation abilities directly from PHP
  • 9.
    Dependencies Installation $ sudoapt-get install php5 php5-cli php5-fpm php5-gd php5-curl php5-curl A library for getting files from servers
  • 10.
    Dependencies Installation $ sudoapt-get install nginx git-core
  • 11.
    Dependencies Installation $ sudoapt-get install nginx git-core nginx High performance web and reverse proxy server
  • 12.
    Dependencies Installation $ sudoapt-get install nginx git-core git-core A popular distributed version control system
  • 13.
    Downloading & InstallingGrav $ cd /usr/share/nginx/ $ sudo rm –rf html $ sudo git clone –b master https://github.com/getgrav/grav.git html
  • 14.
    Downloading & InstallingGrav $ cd /usr/share/nginx/ $ sudo rm –rf html $ sudo git clone –b master https://github.com/getgrav/grav.git html cd /usr/share/nginx Change directory to the directory above our web root Apache Users: cd /var/www/
  • 15.
    Downloading & InstallingGrav $ cd /usr/share/nginx/ $ sudo rm –rf html $ sudo git clone –b master https://github.com/getgrav/grav.git html sudo rm –rf html Remove the existing web root
  • 16.
    Downloading & InstallingGrav $ cd /usr/share/nginx/ $ sudo rm –rf html $ sudo git clone –b master https://github.com/getgrav/grav.git html sudo git clone –b branch master https://git.../grav.git html Clone the master branch (latest release) of Grav from Github and place the contents in the webroot
  • 17.
    Downloading & InstallingGrav $ cd html $ sudo bin/composer.phar install --no-dev -o $ sudo bin/grav install
  • 18.
    Downloading & InstallingGrav $ cd html $ sudo bin/composer.phar install --no-dev -o $ sudo bin/grav install cd html Change directory our web root
  • 19.
    Downloading & InstallingGrav $ cd html $ sudo bin/composer.phar install --no-dev -o $ sudo bin/grav install bin/composer.phar install --no-dev -o Install vendor dependencies
  • 20.
    Downloading & InstallingGrav $ cd html $ sudo bin/composer.phar install --no-dev -o $ sudo bin/grav install bin/grav install Install plugin and theme dependencies
  • 21.
    Downloading & InstallingGrav $ sudo chown www-data:www-data . && sudo chown –R www-data:www-data * $ find . -type f | sudo xargs chmod 664 $ find ./bin -type f | sudo xargs chmod 775 $ find . -type d | sudo xargs chmod 775 $ find . -type d | sudo xargs chmod +s $ umask 0002
  • 22.
    Downloading & InstallingGrav $ sudo chown www-data:www-data . && sudo chown –R www-data:www-data * $ find . -type f | sudo xargs chmod 664 $ find ./bin -type f | sudo xargs chmod 775 $ find . -type d | sudo xargs chmod 775 $ find . -type d | sudo xargs chmod +s $ umask 0002 sudo chown www-data:www-data . && sudo chown –R www-data:www-data * Change the group of the current folder and all of it’s sub- folders to ‘www-data’
  • 23.
    Downloading & InstallingGrav $ sudo chown www-data:www-data . && sudo chown –R www-data:www-data * $ find . -type f | sudo xargs chmod 664 $ find ./bin -type f | sudo xargs chmod 775 $ find . -type d | sudo xargs chmod 775 $ find . -type d | sudo xargs chmod +s $ umask 0002 find . –type f | sudo xargs chmod 664 Find files/directories and changes the permissions accordingly
  • 24.
    Downloading & InstallingGrav $ sudo chown www-data:www-data . && sudo chown –R www-data:www-data * $ find . -type f | sudo xargs chmod 664 $ find ./bin -type f | sudo xargs chmod 775 $ find . -type d | sudo xargs chmod 775 $ find . -type d | sudo xargs chmod +s $ umask 0002 umask 0002 Change the default permissions for all new files
  • 25.
    Configuring Nginx $ cdwebserver-configs $ sudo nano nginx.conf
  • 26.
    Configuring Nginx $ cdwebserver-configs $ sudo nano nginx.conf cd webserver-configs Change directory to the webserver-configs folder
  • 27.
    nano nginx.conf Open thenano text editor to edit nginx.conf Configuring Nginx $ cd webserver-configs $ sudo nano nginx.conf
  • 28.
    Configuring Nginx 01 server{ 02 #listen 80; 03 index index.html index.php; 04 05 ## Begin - Server Info 06 root /home/user/www/html; ## change to /usr/share/nginx/html 07 server_name localhost; ## change to web address 08 ## End - Server Info 09 10 ## Begin - Index 11 # for subfolders, simply adjust: 12 # `location /subfolder {` 13 # and the rewrite to use `/subfolder/index.php` 14 location / { 15 try_files $uri $uri/ /index.php?_url=$uri; 16 } 17 ## End - Index
  • 29.
    Configuring Nginx $ sudocp nginx.conf /etc/nginx/sites-available/default $ sudo service nginx restart
  • 30.
    Configuring Nginx $ sudocp nginx.conf /etc/nginx/sites-available/default $ sudo service nginx restart sudo cp nginx.conf /etc/nginx/sites-available/default Copy & overwrite the default server configuration
  • 31.
    sudo service nginxrestart Restarts the Nginx process Configuring Nginx $ sudo cp nginx.conf /etc/nginx/sites-available/default $ sudo service nginx restart
  • 32.

Editor's Notes

  • #2 Hi guys, so today we’re going to be installing the Grav CMS on Ubuntu. For this tutorial, we’re going to use Nginx as our web server.
  • #3 First, we need to set up our environment for Grav. Grav doesn’t require much, it requires a web server & PHP. So, let’s go ahead and install PHP and its modules, so, here are the modules you need. Most of these already come with PHP by default 14.04, however, we still need to install gd and curl.
  • #4 First, we need to set up our environment for Grav. Grav doesn’t require much, it requires a web server & PHP. So, let’s go ahead and install PHP and its modules, so, here are the modules you need. Most of these already come with PHP by default 14.04, however, we still need to install gd and curl.
  • #5 To install PHP and it’s modules, we’re going to run this command. While everything is downloading and installing, I’m going to quickly go over what each package is and what it does. First, we have PHP, this is language itself. Then we have php5-cli, php-cli provides a command line interpreter for us to test php files, it’s useful to have around and that’s why I included here. After that we have php5-fpm, fpm stands for fastcgi process manager, this manages php proccess and works with our web server to handle load. php-gd allows us to manipulate graphics directly from php And finally php-curl allows us to download files with a variety of different protocols
  • #6 To install PHP and it’s modules, we’re going to run this command. While everything is downloading and installing, I’m going to quickly go over what each package is and what it does. First, we have PHP, this is language itself. Then we have php5-cli, php-cli provides a command line interpreter for us to test php files, it’s useful to have around and that’s why I included here. After that we have php5-fpm, fpm stands for fastcgi process manager, this manages php proccess and works with our web server to handle load. php-gd allows us to manipulate graphics directly from php And finally php-curl allows us to download files with a variety of different protocols
  • #7 To install PHP and it’s modules, we’re going to run this command. While everything is downloading and installing, I’m going to quickly go over what each package is and what it does. First, we have PHP, this is language itself. Then we have php5-cli, php-cli provides a command line interpreter for us to test php files, it’s useful to have around and that’s why I included here. After that we have php5-fpm, fpm stands for fastcgi process manager, this manages php proccess and works with our web server to handle load. php-gd allows us to manipulate graphics directly from php And finally php-curl allows us to download files with a variety of different protocols
  • #8 To install PHP and it’s modules, we’re going to run this command. While everything is downloading and installing, I’m going to quickly go over what each package is and what it does. First, we have PHP, this is language itself. Then we have php5-cli, php-cli provides a command line interpreter for us to test php files, it’s useful to have around and that’s why I included here. After that we have php5-fpm, fpm stands for fastcgi process manager, this manages php proccess and works with our web server to handle load. php-gd allows us to manipulate graphics directly from php And finally php-curl allows us to download files with a variety of different protocols
  • #9 To install PHP and it’s modules, we’re going to run this command. While everything is downloading and installing, I’m going to quickly go over what each package is and what it does. First, we have PHP, this is language itself. Then we have php5-cli, php-cli provides a command line interpreter for us to test php files, it’s useful to have around and that’s why I included here. After that we have php5-fpm, fpm stands for fastcgi process manager, this manages php proccess and works with our web server to handle load. php-gd allows us to manipulate graphics directly from php And finally php-curl allows us to download files with a variety of different protocols
  • #10 To install PHP and it’s modules, we’re going to run this command. While everything is downloading and installing, I’m going to quickly go over what each package is and what it does. First, we have PHP, this is language itself. Then we have php5-cli, php-cli provides a command line interpreter for us to test php files, it’s useful to have around and that’s why I included here. After that we have php5-fpm, fpm stands for fastcgi process manager, this manages php proccess and works with our web server to handle load. php-gd allows us to manipulate graphics directly from php And finally php-curl allows us to download files with a variety of different protocols
  • #11 OK, now that we have PHP and it’s modules installed, let’s go ahead and get out web server installed. We’re using Nginx here, you can use any web server you’d like really, but I chose to use Nginx because it’s fast and works well with Grav almost out of the box. We’re also going to go ahead and install git, we’re going to use git to download grav itself, and then grav uses git to download plugins and themes from Github.
  • #12 OK, now that we have PHP and it’s modules installed, let’s go ahead and get out web server installed. We’re using Nginx here, you can use any web server you’d like really, but I chose to use Nginx because it’s fast and works well with Grav almost out of the box. We’re also going to go ahead and install git, we’re going to use git to download grav itself, and then grav uses git to download plugins and themes from Github.
  • #13 OK, now that we have PHP and it’s modules installed, let’s go ahead and get out web server installed. We’re using Nginx here, you can use any web server you’d like really, but I chose to use Nginx because it’s fast and works well with Grav almost out of the box. We’re also going to go ahead and install git, we’re going to use git to download grav itself, and then grav uses git to download plugins and themes from Github.
  • #14 Now that we’ve installed all of the dependencies for Grav, we can now go ahead and install Grav itself, so go ahead and navigate to the directory above your web root, by default for nginx, that’ll be /usr/share/nginx. The reason we are navigating to the directory above is that we’re going to go ahead and delete our web root and replace it with Grav instead. You don’t have to run Grav in your web root if you don’t want to, you can run in a sub folder and there’s more information on doing that in Grav’s documentation. Go ahead and clone Grav’s master branch into a folder called html
  • #15 Now that we’ve installed all of the dependencies for Grav, we can now go ahead and install Grav itself, so go ahead and navigate to the directory above your web root, by default for nginx, that’ll be /usr/share/nginx. The reason we are navigating to the directory above is that we’re going to go ahead and delete our web root and replace it with Grav instead. You don’t have to run Grav in your web root if you don’t want to, you can run in a sub folder and there’s more information on doing that in Grav’s documentation. Go ahead and clone Grav’s master branch into a folder called html
  • #16 Now that we’ve installed all of the dependencies for Grav, we can now go ahead and install Grav itself, so go ahead and navigate to the directory above your web root, by default for nginx, that’ll be /usr/share/nginx. The reason we are navigating to the directory above is that we’re going to go ahead and delete our web root and replace it with Grav instead. You don’t have to run Grav in your web root if you don’t want to, you can run in a sub folder and there’s more information on doing that in Grav’s documentation. Go ahead and clone Grav’s master branch into a folder called html
  • #17 Now that we’ve installed all of the dependencies for Grav, we can now go ahead and install Grav itself, so go ahead and navigate to the directory above your web root, by default for nginx, that’ll be /usr/share/nginx. The reason we are navigating to the directory above is that we’re going to go ahead and delete our web root and replace it with Grav instead. You don’t have to run Grav in your web root if you don’t want to, you can run in a sub folder and there’s more information on doing that in Grav’s documentation. Go ahead and clone Grav’s master branch into a folder called html
  • #18 Now that we’ve cloned grav into a folder, we can go ahead and jump into that folder with `cd html` and we can install Grav’s vendor dependencies with sudo bin/composer.phar install --no-dev -o After you’ve done that, we are going to download Grav’s theme and plugins dependencies with sudo bin/grav install.
  • #19 Now that we’ve cloned grav into a folder, we can go ahead and jump into that folder with `cd html` and we can install Grav’s vendor dependencies with sudo bin/composer.phar install --no-dev -o After you’ve done that, we are going to download Grav’s theme and plugins dependencies with sudo bin/grav install.
  • #20 Now that we’ve cloned grav into a folder, we can go ahead and jump into that folder with `cd html` and we can install Grav’s vendor dependencies with sudo bin/composer.phar install --no-dev -o After you’ve done that, we are going to download Grav’s theme and plugins dependencies with sudo bin/grav install.
  • #21 Now that we’ve cloned grav into a folder, we can go ahead and jump into that folder with `cd html` and we can install Grav’s vendor dependencies with sudo bin/composer.phar install --no-dev -o After you’ve done that, we are going to download Grav’s theme and plugins dependencies with sudo bin/grav install.
  • #22 Now we get to the ‘really exciting bit’, setting up our permissions. This is a bit of a complex topic, so make sure you typed the commands properly, if you don’t want to write all of this out, these commands, along with all the other commands are in the description of this video, and in the article on my website. The first command changes the ownership of the directory we’re in and all files and directories within it. After that, the next four commands are going to search for files matching the parameters given and set the permissions accordingly, if you’re interested in exactly what this is doing, the documentation for troubleshooting permissions goes into more detail. And finally, we use umask to set the file permissions for all future files.
  • #23 Now we get to the ‘really exciting bit’, setting up our permissions. This is a bit of a complex topic, so make sure you typed the commands properly, if you don’t want to write all of this out, these commands, along with all the other commands are in the description of this video, and in the article on my website. The first command changes the ownership of the directory we’re in and all files and directories within it. After that, the next four commands are going to search for files matching the parameters given and set the permissions accordingly, if you’re interested in exactly what this is doing, the documentation for troubleshooting permissions goes into more detail. And finally, we use umask to set the file permissions for all future files.
  • #24 Now we get to the ‘really exciting bit’, setting up our permissions. This is a bit of a complex topic, so make sure you typed the commands properly, if you don’t want to write all of this out, these commands, along with all the other commands are in the description of this video, and in the article on my website. The first command changes the ownership of the directory we’re in and all files and directories within it. After that, the next four commands are going to search for files matching the parameters given and set the permissions accordingly, if you’re interested in exactly what this is doing, the documentation for troubleshooting permissions goes into more detail. And finally, we use umask to set the file permissions for all future files.
  • #25 Now we get to the ‘really exciting bit’, setting up our permissions. This is a bit of a complex topic, so make sure you typed the commands properly, if you don’t want to write all of this out, these commands, along with all the other commands are in the description of this video, and in the article on my website. The first command changes the ownership of the directory we’re in and all files and directories within it. After that, the next four commands are going to search for files matching the parameters given and set the permissions accordingly, if you’re interested in exactly what this is doing, the documentation for troubleshooting permissions goes into more detail. And finally, we use umask to set the file permissions for all future files.
  • #26 We’re almost there, our last step, configuring nginx, go ahead and navigate to the webserver-configs folder and open nginx.conf with your preferred editor, we’re going to use Nano here because it’s easy to use.
  • #27 We’re almost there, our last step, configuring nginx, go ahead and navigate to the webserver-configs folder and open nginx.conf with your preferred editor, we’re going to use Nano here because it’s easy to use.
  • #28 We’re almost there, our last step, configuring nginx, go ahead and navigate to the webserver-configs folder and open nginx.conf with your preferred editor, we’re going to use Nano here because it’s easy to use.
  • #29 Now that you have the file open, you should see this config file, we only need to edit two things in here, the root and the server name. Go ahead and change the root to our web root which is /usr/share/nginx/html and change the server name to your web address, if you’re developing on your local machine, localhost is fine. When you’re done editing go ahead and hit control + x, hit y and then enter to save the file.
  • #30 Now we’re going to overwrite the default nginx configuration and put our edited file in it’s place, we’re going to do this by using ‘sudo cp nginx.conf’ and then the directory to the configuration files for nginx, by default this will be ‘/etc/nginx/sites-available/’ and the file we’re going to overwriting is called default. Once you’ve gone ahead and done that, we’re going to restart nginx.
  • #31 Now we’re going to overwrite the default nginx configuration and put our edited file in it’s place, we’re going to do this by using ‘sudo cp nginx.conf’ and then the directory to the configuration files for nginx, by default this will be ‘/etc/nginx/sites-available/’ and the file we’re going to overwriting is called default. Once you’ve gone ahead and done that, we’re going to restart nginx.
  • #32 Now we’re going to overwrite the default nginx configuration and put our edited file in it’s place, we’re going to do this by using ‘sudo cp nginx.conf’ and then the directory to the configuration files for nginx, by default this will be ‘/etc/nginx/sites-available/’ and the file we’re going to overwriting is called default. Once you’ve gone ahead and done that, we’re going to restart nginx.
  • #33 Congratulations! You’ve installed Grav! Check out the documentation for a basic tutorial on how to use Grav which can be found at learn.getgrav.org, that’s also linked in the description. If you have any problems, let me know by commenting below or tweeting me at @gsumpster. Hope this was helpful, if you are looking for more tutorials on Grav, definitely subscribe here and follow me on Twitter.