SlideShare a Scribd company logo
How to Share a LinkedIn Event with Your Contacts

1. Open up your LinkedIn account and at the top toolbar you will see the final tab say “More”


2. Click on the “More” tab, and you will see a drop down Menu which will list “Events”


3. Click “Events”, which will take you to the Events Home Page. This will list the Events that your Connections are
   attending. In the Search box on the right, type in “Cleared Job Fair” and click Search
4. You will see a listing of all the events that have “cleared job fair” somewhere in the description. Click on the
   “Cleared Job Fair”


5. This will take you to the separate list of the Cleared Job Fair. Many of you have already click on “Attending” so
   that this shows up on your LinkedIn profile – which is great! Now click on “Share” at the bottom of the event
   description.


                                                                                    st
                                                                               The 1 step with this
                                                                               page is to mark you are
                                                                               attending and it will
                                                                               show up on your profile


                            nd
                           2 step is to
                           “Share”


6. This will open up a Message box with a standard message in the Message box. You will want to do a few things:
       a. First “unclick” at the bottom where is says “ Allow Recipients to See Each Other’s Names and Email
            Addresses”
       b. Next add in a Personal greeting such as “ I am looking forward to another great day at the Cleared Job
            Fair” or “We have such a great time at our Cleared Job Fairs, looking forward to seeing you there” and
            add this into the standard message in the message box.
       c. Click the “LinkedIn” icon to the right of the address box to open up your contact list.
Click to open
                                                                                        up Contacts


                                                               Add in your
                                                               message


                                                            Unclick


7. Once your Contacts screen is open, you can scroll through your contacts and select which Contacts get the
   message. Once you click a box, the contact will be added to the “To” box for your message. You can select up to
   50 contacts per message. Once you reach 50, you will click “Finished”. This will take you back to the Message
   and you click “Send”

   After 50 contacts, you will have to start the process over again.

                            Scroll thru your
                            contacts
8. After you click “Finished”, you will come back to the Send message screen. Again be sure that the box at the
   bottom which says “Allow recipients to see each other’s names and email addresses” is unchecked. And then hit
   Send Message”


                                           Hit “Send
                                           Message” and you
                                           are done!


                                      Be sure this box is
                                      unchecked

More Related Content

More from donnae2763

2013 ClearedJobs.Net pricing schedule
2013 ClearedJobs.Net pricing schedule2013 ClearedJobs.Net pricing schedule
2013 ClearedJobs.Net pricing scheduledonnae2763
 
Ndw ffsp regional fy 2013 tap etap schedule
Ndw ffsp regional fy 2013 tap etap scheduleNdw ffsp regional fy 2013 tap etap schedule
Ndw ffsp regional fy 2013 tap etap scheduledonnae2763
 
Celinda appelby from hp advice from recruiter
Celinda appelby from hp   advice from recruiterCelinda appelby from hp   advice from recruiter
Celinda appelby from hp advice from recruiterdonnae2763
 
Cjn job fair 2013 schedulebenefits
Cjn job fair 2013 schedulebenefitsCjn job fair 2013 schedulebenefits
Cjn job fair 2013 schedulebenefitsdonnae2763
 
Silly Self Sabotage
Silly Self SabotageSilly Self Sabotage
Silly Self Sabotage
donnae2763
 
2012 Cleared Job Fair Schedule
2012 Cleared Job Fair Schedule2012 Cleared Job Fair Schedule
2012 Cleared Job Fair Schedule
donnae2763
 
Getting “Cleared” for Launch GovCon Webinar Kathleen Smith
Getting “Cleared” for Launch GovCon Webinar Kathleen SmithGetting “Cleared” for Launch GovCon Webinar Kathleen Smith
Getting “Cleared” for Launch GovCon Webinar Kathleen Smith
donnae2763
 
Cleared Job Fair Jobseeker Handbook
Cleared Job Fair Jobseeker HandbookCleared Job Fair Jobseeker Handbook
Cleared Job Fair Jobseeker Handbook
donnae2763
 
Getting that next Job
Getting that next Job Getting that next Job
Getting that next Job
donnae2763
 

More from donnae2763 (9)

2013 ClearedJobs.Net pricing schedule
2013 ClearedJobs.Net pricing schedule2013 ClearedJobs.Net pricing schedule
2013 ClearedJobs.Net pricing schedule
 
Ndw ffsp regional fy 2013 tap etap schedule
Ndw ffsp regional fy 2013 tap etap scheduleNdw ffsp regional fy 2013 tap etap schedule
Ndw ffsp regional fy 2013 tap etap schedule
 
Celinda appelby from hp advice from recruiter
Celinda appelby from hp   advice from recruiterCelinda appelby from hp   advice from recruiter
Celinda appelby from hp advice from recruiter
 
Cjn job fair 2013 schedulebenefits
Cjn job fair 2013 schedulebenefitsCjn job fair 2013 schedulebenefits
Cjn job fair 2013 schedulebenefits
 
Silly Self Sabotage
Silly Self SabotageSilly Self Sabotage
Silly Self Sabotage
 
2012 Cleared Job Fair Schedule
2012 Cleared Job Fair Schedule2012 Cleared Job Fair Schedule
2012 Cleared Job Fair Schedule
 
Getting “Cleared” for Launch GovCon Webinar Kathleen Smith
Getting “Cleared” for Launch GovCon Webinar Kathleen SmithGetting “Cleared” for Launch GovCon Webinar Kathleen Smith
Getting “Cleared” for Launch GovCon Webinar Kathleen Smith
 
Cleared Job Fair Jobseeker Handbook
Cleared Job Fair Jobseeker HandbookCleared Job Fair Jobseeker Handbook
Cleared Job Fair Jobseeker Handbook
 
Getting that next Job
Getting that next Job Getting that next Job
Getting that next Job
 

How to Share a LinkedIn Event with Your Contacts

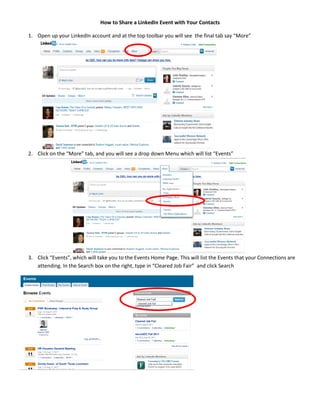
  • 1. How to Share a LinkedIn Event with Your Contacts 1. Open up your LinkedIn account and at the top toolbar you will see the final tab say “More” 2. Click on the “More” tab, and you will see a drop down Menu which will list “Events” 3. Click “Events”, which will take you to the Events Home Page. This will list the Events that your Connections are attending. In the Search box on the right, type in “Cleared Job Fair” and click Search
  • 2. 4. You will see a listing of all the events that have “cleared job fair” somewhere in the description. Click on the “Cleared Job Fair” 5. This will take you to the separate list of the Cleared Job Fair. Many of you have already click on “Attending” so that this shows up on your LinkedIn profile – which is great! Now click on “Share” at the bottom of the event description. st The 1 step with this page is to mark you are attending and it will show up on your profile nd 2 step is to “Share” 6. This will open up a Message box with a standard message in the Message box. You will want to do a few things: a. First “unclick” at the bottom where is says “ Allow Recipients to See Each Other’s Names and Email Addresses” b. Next add in a Personal greeting such as “ I am looking forward to another great day at the Cleared Job Fair” or “We have such a great time at our Cleared Job Fairs, looking forward to seeing you there” and add this into the standard message in the message box. c. Click the “LinkedIn” icon to the right of the address box to open up your contact list.
  • 3. Click to open up Contacts Add in your message Unclick 7. Once your Contacts screen is open, you can scroll through your contacts and select which Contacts get the message. Once you click a box, the contact will be added to the “To” box for your message. You can select up to 50 contacts per message. Once you reach 50, you will click “Finished”. This will take you back to the Message and you click “Send” After 50 contacts, you will have to start the process over again. Scroll thru your contacts
  • 4. 8. After you click “Finished”, you will come back to the Send message screen. Again be sure that the box at the bottom which says “Allow recipients to see each other’s names and email addresses” is unchecked. And then hit Send Message” Hit “Send Message” and you are done! Be sure this box is unchecked