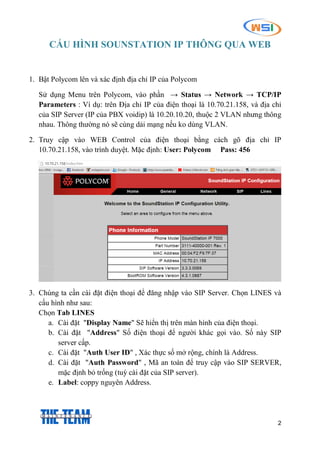
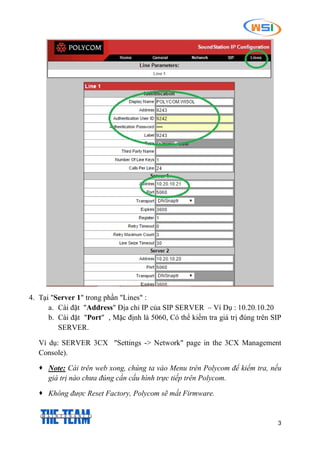
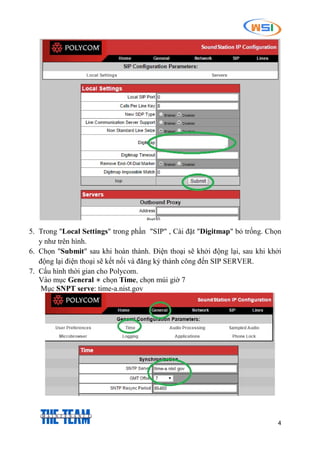
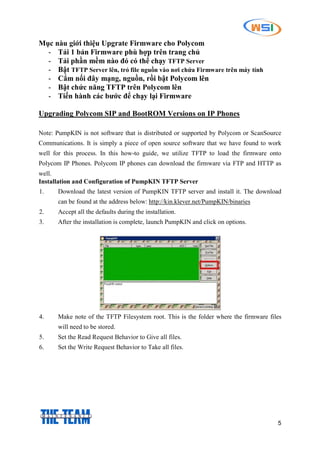
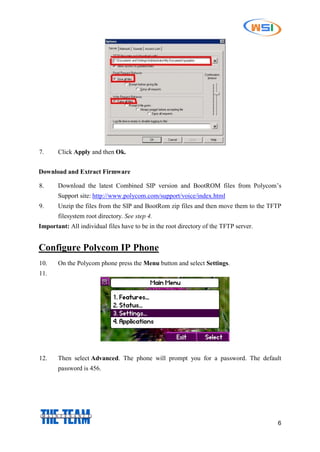
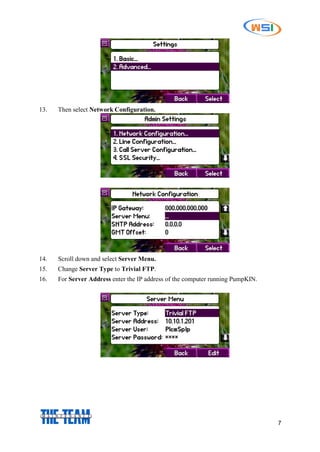
1
POLYCOM
WorldStar International J.S.C
R1103, 11F, Vigrlacera B/D, No1, Thang Long Str., Me Tri, Nam Tu Liem, HN
www.worldstar.com.vn
2
CẤU HÌNH SOUNSTATION IP THÔNG QUA WEB
1. Bật Polycom lên và xác định địa chỉ IP của Polycom
Sử dụng Menu trên Polycom, vào phần → Status → Network → TCP/IP
Parameters : Ví dụ: trên Địa chỉ IP của điện thoại là 10.70.21.158, và địa chỉ
của SIP Server (IP của PBX voidip) là 10.20.10.20, thuộc 2 VLAN nhưng thông
nhau. Thông thường nó sẽ cùng dải mạng nếu ko dùng VLAN.
2. Truy cập vào WEB Control của điện thoại bằng cách gõ địa chỉ IP
10.70.21.158, vào trình duyệt. Mặc định: User: Polycom Pass: 456
3. Chúng ta cần cài đặt điện thoại để đăng nhập vào SIP Server. Chọn LINES và
cấu hình như sau:
Chọn Tab LINES
a. Cài đặt "Display Name" Sẽ hiển thị trên màn hình của điện thoại.
b. Cài đặt "Address" Số điện thoại để người khác gọi vào. Số này SIP
server cấp.
c. Cài đặt "Auth User ID" , Xác thực số mở rộng, chính là Address.
d. Cài đặt "Auth Password" , Mã an toàn để truy cập vào SIP SERVER,
mặc định bỏ trống (tuỳ cài đặt của SIP server).
e. Label: coppy nguyên Address.
3
4. Tại "Server 1" trong phần "Lines" :
a. Cài đặt "Address" Địa chỉ IP của SIP SERVER – Ví Dụ : 10.20.10.20
b. Cài đặt "Port" , Mặc định là 5060, Có thể kiểm tra giá trị đúng trên SIP
SERVER.
Ví dụ: SERVER 3CX "Settings -> Network" page in the 3CX Management
Console).
 Note: Cài trên web xong, chúng ta vào Menu trên Polycom để kiểm tra, nếu
giá trị nào chưa đúng cần cấu hình trực tiếp trên Polycom.
 Không được Reset Factory, Polycom sẽ mất Firmware.
4
5. Trong "Local Settings" trong phần "SIP" , Cài đặt "Digitmap" bỏ trống. Chọn
y như trên hình.
6. Chọn "Submit" sau khi hoàn thành. Điện thoại sẽ khởi động lại, sau khi khởi
động lại điện thoại sẽ kết nối và đăng ký thành công đến SIP SERVER.
7. Cấu hình thời gian cho Polycom.
Vào mục General  chọn Time, chọn múi giờ 7
Mục SNPT serve: time-a.nist.gov
5
Mục nàu giới thiệu Upgrate Firmware cho Polycom
- Tải 1 bản Firmware phù hợp trên trang chủ
- Tải phần mềm nào đó có thể chạy TFTP Server
- Bật TFTP Server lên, trỏ file nguồn vào nơi chứa Firmware trên máy tính
- Cắm nối đây mạng, nguồn, rồi bật Polycom lên
- Bật chức năng TFTP trên Polycom lên
- Tiến hành các bước để chạy lại Firmware
Upgrading Polycom SIP and BootROM Versions on IP Phones
Note: PumpKIN is not software that is distributed or supported by Polycom or ScanSource
Communications. It is simply a piece of open source software that we have found to work
well for this process. In this how-to guide, we utilize TFTP to load the firmware onto
Polycom IP Phones. Polycom IP phones can download the firmware via FTP and HTTP as
well.
Installation and Configuration of PumpKIN TFTP Server
1. Download the latest version of PumpKIN TFTP server and install it. The download
can be found at the address below: http://kin.klever.net/PumpKIN/binaries
2. Accept all the defaults during the installation.
3. After the installation is complete, launch PumpKIN and click on options.
4. Make note of the TFTP Filesystem root. This is the folder where the firmware files
will need to be stored.
5. Set the Read Request Behavior to Give all files.
6. Set the Write Request Behavior to Take all files.
6
7. Click Apply and then Ok.
Download and Extract Firmware
8. Download the latest Combined SIP version and BootROM files from Polycom’s
Support site: http://www.polycom.com/support/voice/index.html
9. Unzip the files from the SIP and BootRom zip files and then move them to the TFTP
filesystem root directory. See step 4.
Important: All individual files have to be in the root directory of the TFTP server.
Configure Polycom IP Phone
10. On the Polycom phone press the Menu button and select Settings.
11.
12. Then select Advanced. The phone will prompt you for a password. The default
password is 456.
7
13. Then select Network Configuration.
14. Scroll down and select Server Menu.
15. Change Server Type to Trivial FTP.
16. For Server Address enter the IP address of the computer running PumpKIN.
8
17. Press the back button a couple of times until you get to the below screen.
18. When you click Save Config the phone will automatically reboot then download and
install the firmware during the boot process.

Cấu Hình Sounstation IP

  • 1.
    1 POLYCOM WorldStar International J.S.C R1103,11F, Vigrlacera B/D, No1, Thang Long Str., Me Tri, Nam Tu Liem, HN www.worldstar.com.vn
  • 2.
    2 CẤU HÌNH SOUNSTATIONIP THÔNG QUA WEB 1. Bật Polycom lên và xác định địa chỉ IP của Polycom Sử dụng Menu trên Polycom, vào phần → Status → Network → TCP/IP Parameters : Ví dụ: trên Địa chỉ IP của điện thoại là 10.70.21.158, và địa chỉ của SIP Server (IP của PBX voidip) là 10.20.10.20, thuộc 2 VLAN nhưng thông nhau. Thông thường nó sẽ cùng dải mạng nếu ko dùng VLAN. 2. Truy cập vào WEB Control của điện thoại bằng cách gõ địa chỉ IP 10.70.21.158, vào trình duyệt. Mặc định: User: Polycom Pass: 456 3. Chúng ta cần cài đặt điện thoại để đăng nhập vào SIP Server. Chọn LINES và cấu hình như sau: Chọn Tab LINES a. Cài đặt "Display Name" Sẽ hiển thị trên màn hình của điện thoại. b. Cài đặt "Address" Số điện thoại để người khác gọi vào. Số này SIP server cấp. c. Cài đặt "Auth User ID" , Xác thực số mở rộng, chính là Address. d. Cài đặt "Auth Password" , Mã an toàn để truy cập vào SIP SERVER, mặc định bỏ trống (tuỳ cài đặt của SIP server). e. Label: coppy nguyên Address.
  • 3.
    3 4. Tại "Server1" trong phần "Lines" : a. Cài đặt "Address" Địa chỉ IP của SIP SERVER – Ví Dụ : 10.20.10.20 b. Cài đặt "Port" , Mặc định là 5060, Có thể kiểm tra giá trị đúng trên SIP SERVER. Ví dụ: SERVER 3CX "Settings -> Network" page in the 3CX Management Console).  Note: Cài trên web xong, chúng ta vào Menu trên Polycom để kiểm tra, nếu giá trị nào chưa đúng cần cấu hình trực tiếp trên Polycom.  Không được Reset Factory, Polycom sẽ mất Firmware.
  • 4.
    4 5. Trong "LocalSettings" trong phần "SIP" , Cài đặt "Digitmap" bỏ trống. Chọn y như trên hình. 6. Chọn "Submit" sau khi hoàn thành. Điện thoại sẽ khởi động lại, sau khi khởi động lại điện thoại sẽ kết nối và đăng ký thành công đến SIP SERVER. 7. Cấu hình thời gian cho Polycom. Vào mục General  chọn Time, chọn múi giờ 7 Mục SNPT serve: time-a.nist.gov
  • 5.
    5 Mục nàu giớithiệu Upgrate Firmware cho Polycom - Tải 1 bản Firmware phù hợp trên trang chủ - Tải phần mềm nào đó có thể chạy TFTP Server - Bật TFTP Server lên, trỏ file nguồn vào nơi chứa Firmware trên máy tính - Cắm nối đây mạng, nguồn, rồi bật Polycom lên - Bật chức năng TFTP trên Polycom lên - Tiến hành các bước để chạy lại Firmware Upgrading Polycom SIP and BootROM Versions on IP Phones Note: PumpKIN is not software that is distributed or supported by Polycom or ScanSource Communications. It is simply a piece of open source software that we have found to work well for this process. In this how-to guide, we utilize TFTP to load the firmware onto Polycom IP Phones. Polycom IP phones can download the firmware via FTP and HTTP as well. Installation and Configuration of PumpKIN TFTP Server 1. Download the latest version of PumpKIN TFTP server and install it. The download can be found at the address below: http://kin.klever.net/PumpKIN/binaries 2. Accept all the defaults during the installation. 3. After the installation is complete, launch PumpKIN and click on options. 4. Make note of the TFTP Filesystem root. This is the folder where the firmware files will need to be stored. 5. Set the Read Request Behavior to Give all files. 6. Set the Write Request Behavior to Take all files.
  • 6.
    6 7. Click Applyand then Ok. Download and Extract Firmware 8. Download the latest Combined SIP version and BootROM files from Polycom’s Support site: http://www.polycom.com/support/voice/index.html 9. Unzip the files from the SIP and BootRom zip files and then move them to the TFTP filesystem root directory. See step 4. Important: All individual files have to be in the root directory of the TFTP server. Configure Polycom IP Phone 10. On the Polycom phone press the Menu button and select Settings. 11. 12. Then select Advanced. The phone will prompt you for a password. The default password is 456.
  • 7.
    7 13. Then selectNetwork Configuration. 14. Scroll down and select Server Menu. 15. Change Server Type to Trivial FTP. 16. For Server Address enter the IP address of the computer running PumpKIN.
  • 8.
    8 17. Press theback button a couple of times until you get to the below screen. 18. When you click Save Config the phone will automatically reboot then download and install the firmware during the boot process.