Downloaded 315 times
![SYLLABUS
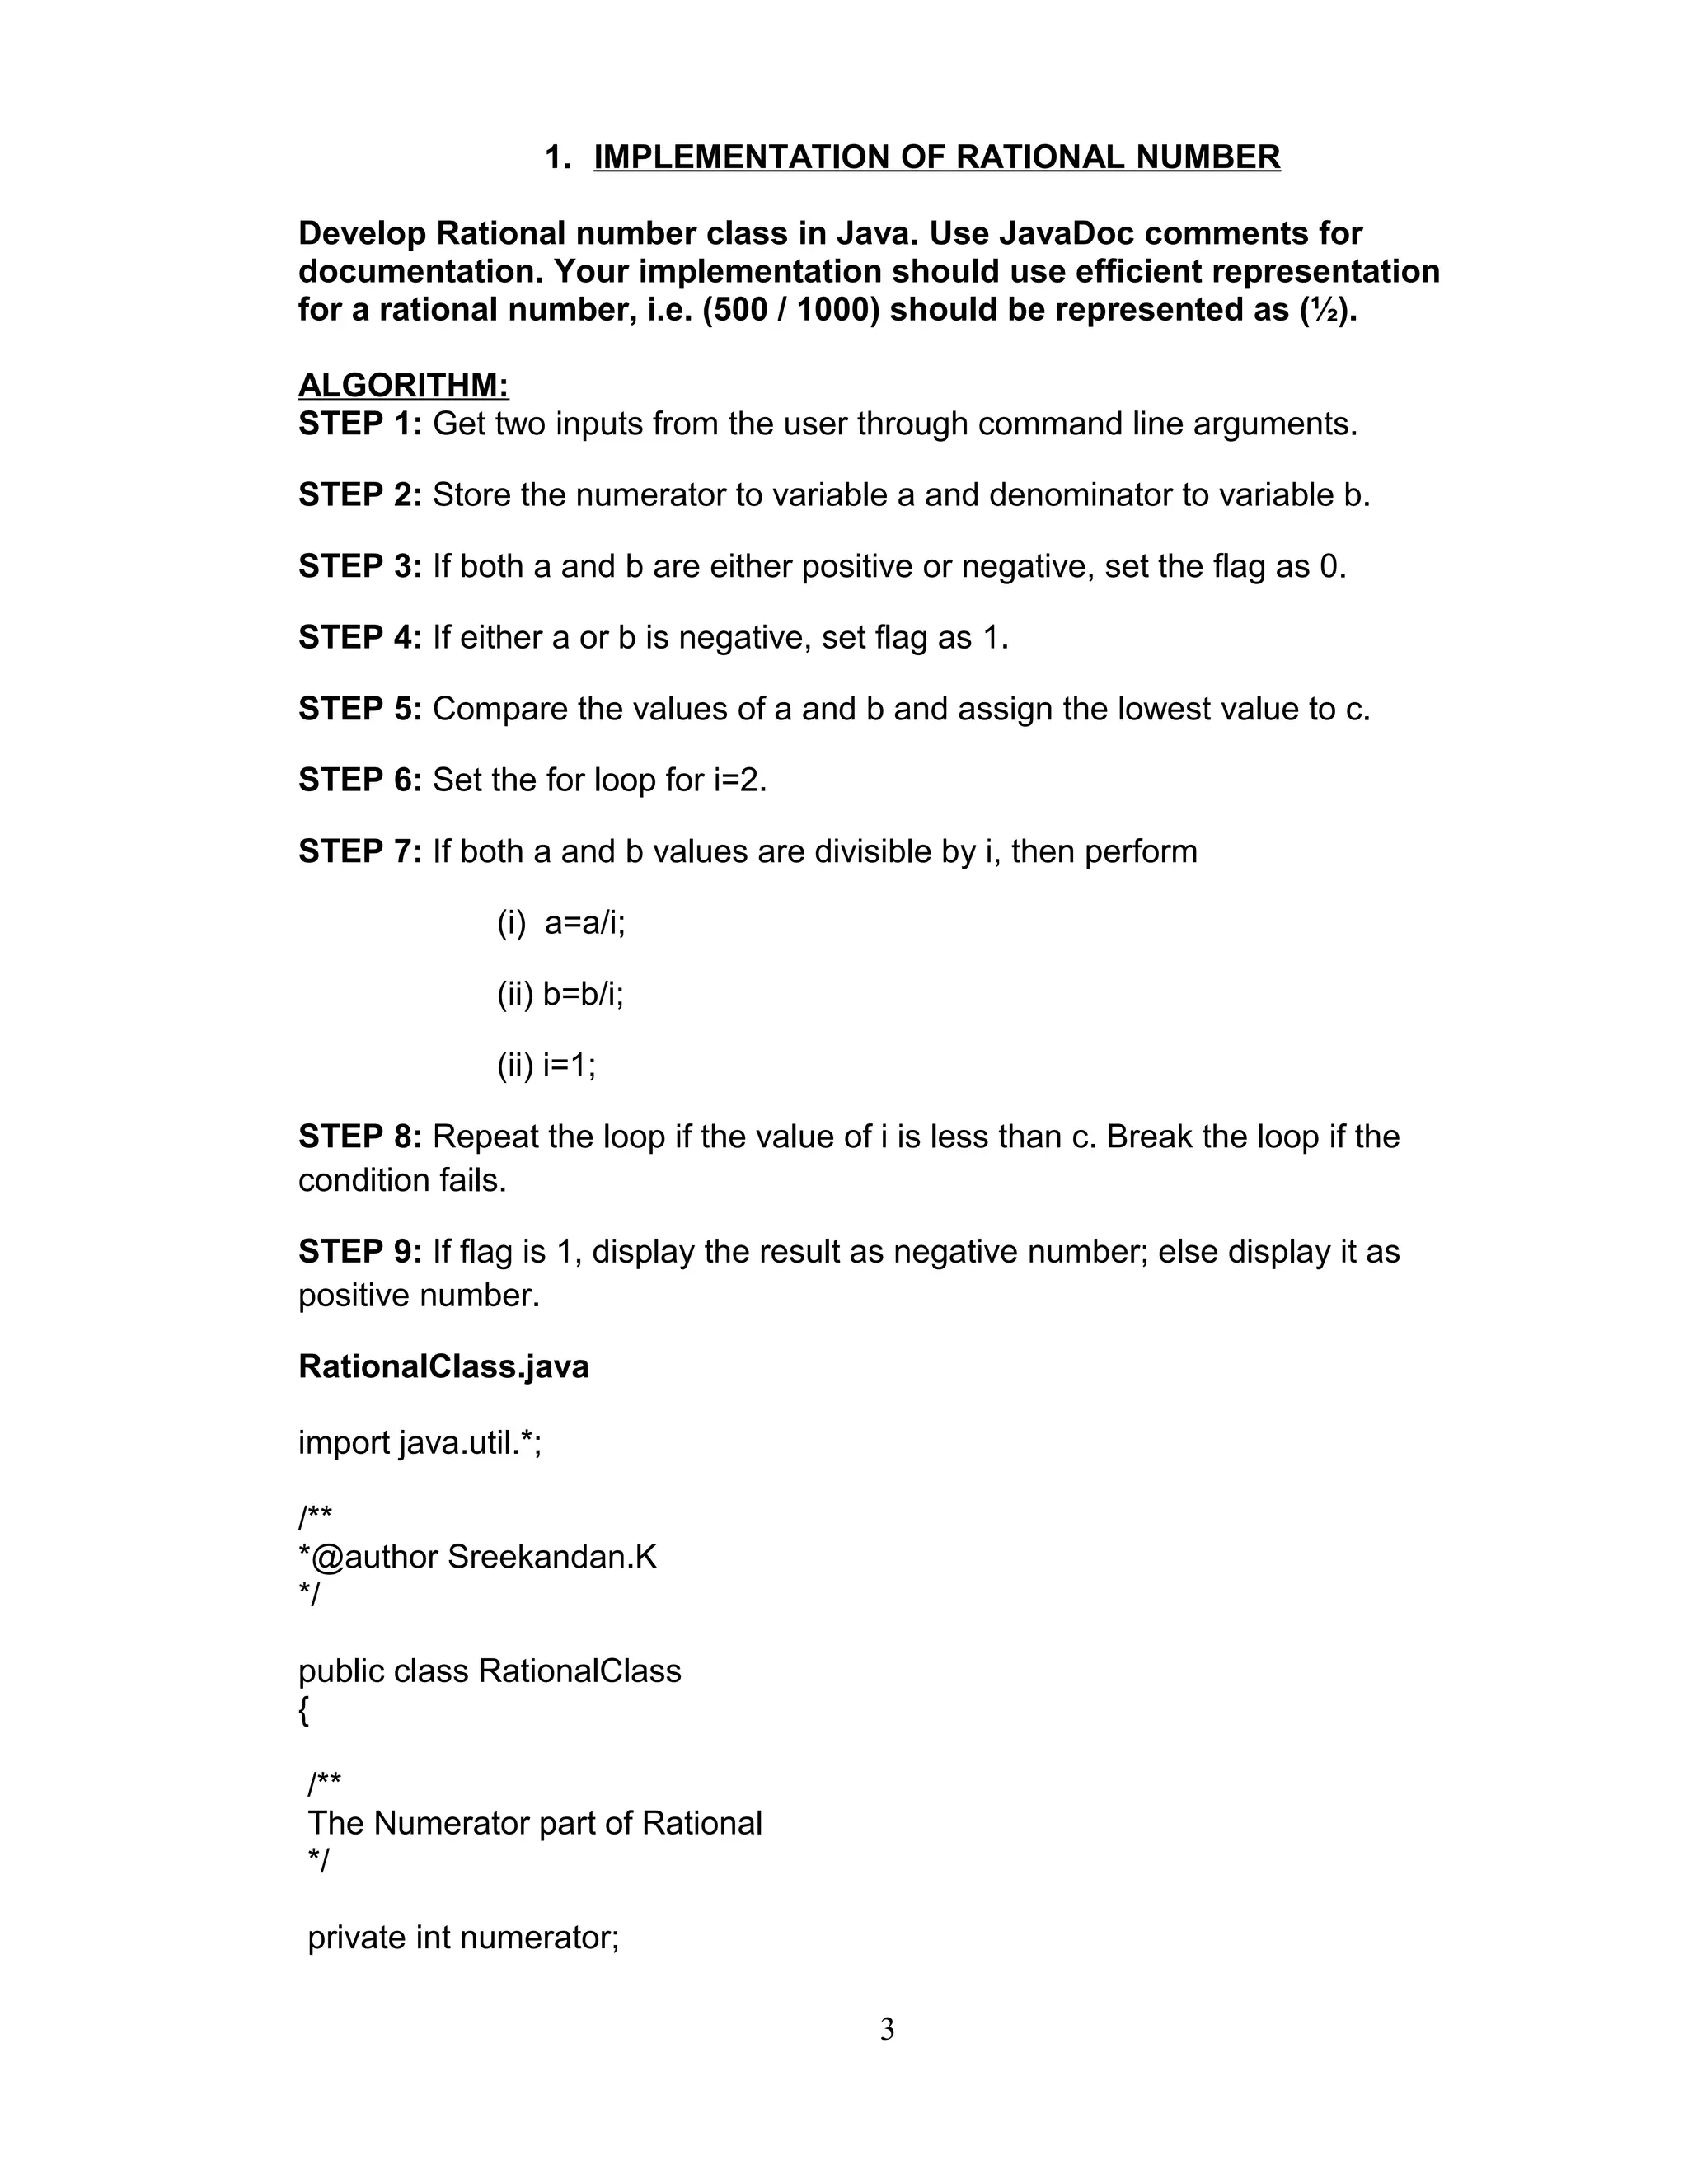
1. Develop Rational number class in Java. Use Java Doc comments for
documentation. Your implementation should use efficient representation
for a rational number, i.e. (500 / 1000) should be represented as (½).
2. Develop Date class in Java similar to the one available in java.util
package. Use Java Doc comments.
3. Implement Lisp-like list in Java. Write basic operations such as 'car',
'cdr', and 'cons'. If L is a list [3, 0, 2, 5], L.car () returns 3, while L.cdr()
returns [0,2,5].
4. Design a Java interface for ADT Stack. Develop two different classes
that implement this interface, one using array and the other using linked-
list. Provide necessary exception handling in both the implementations.
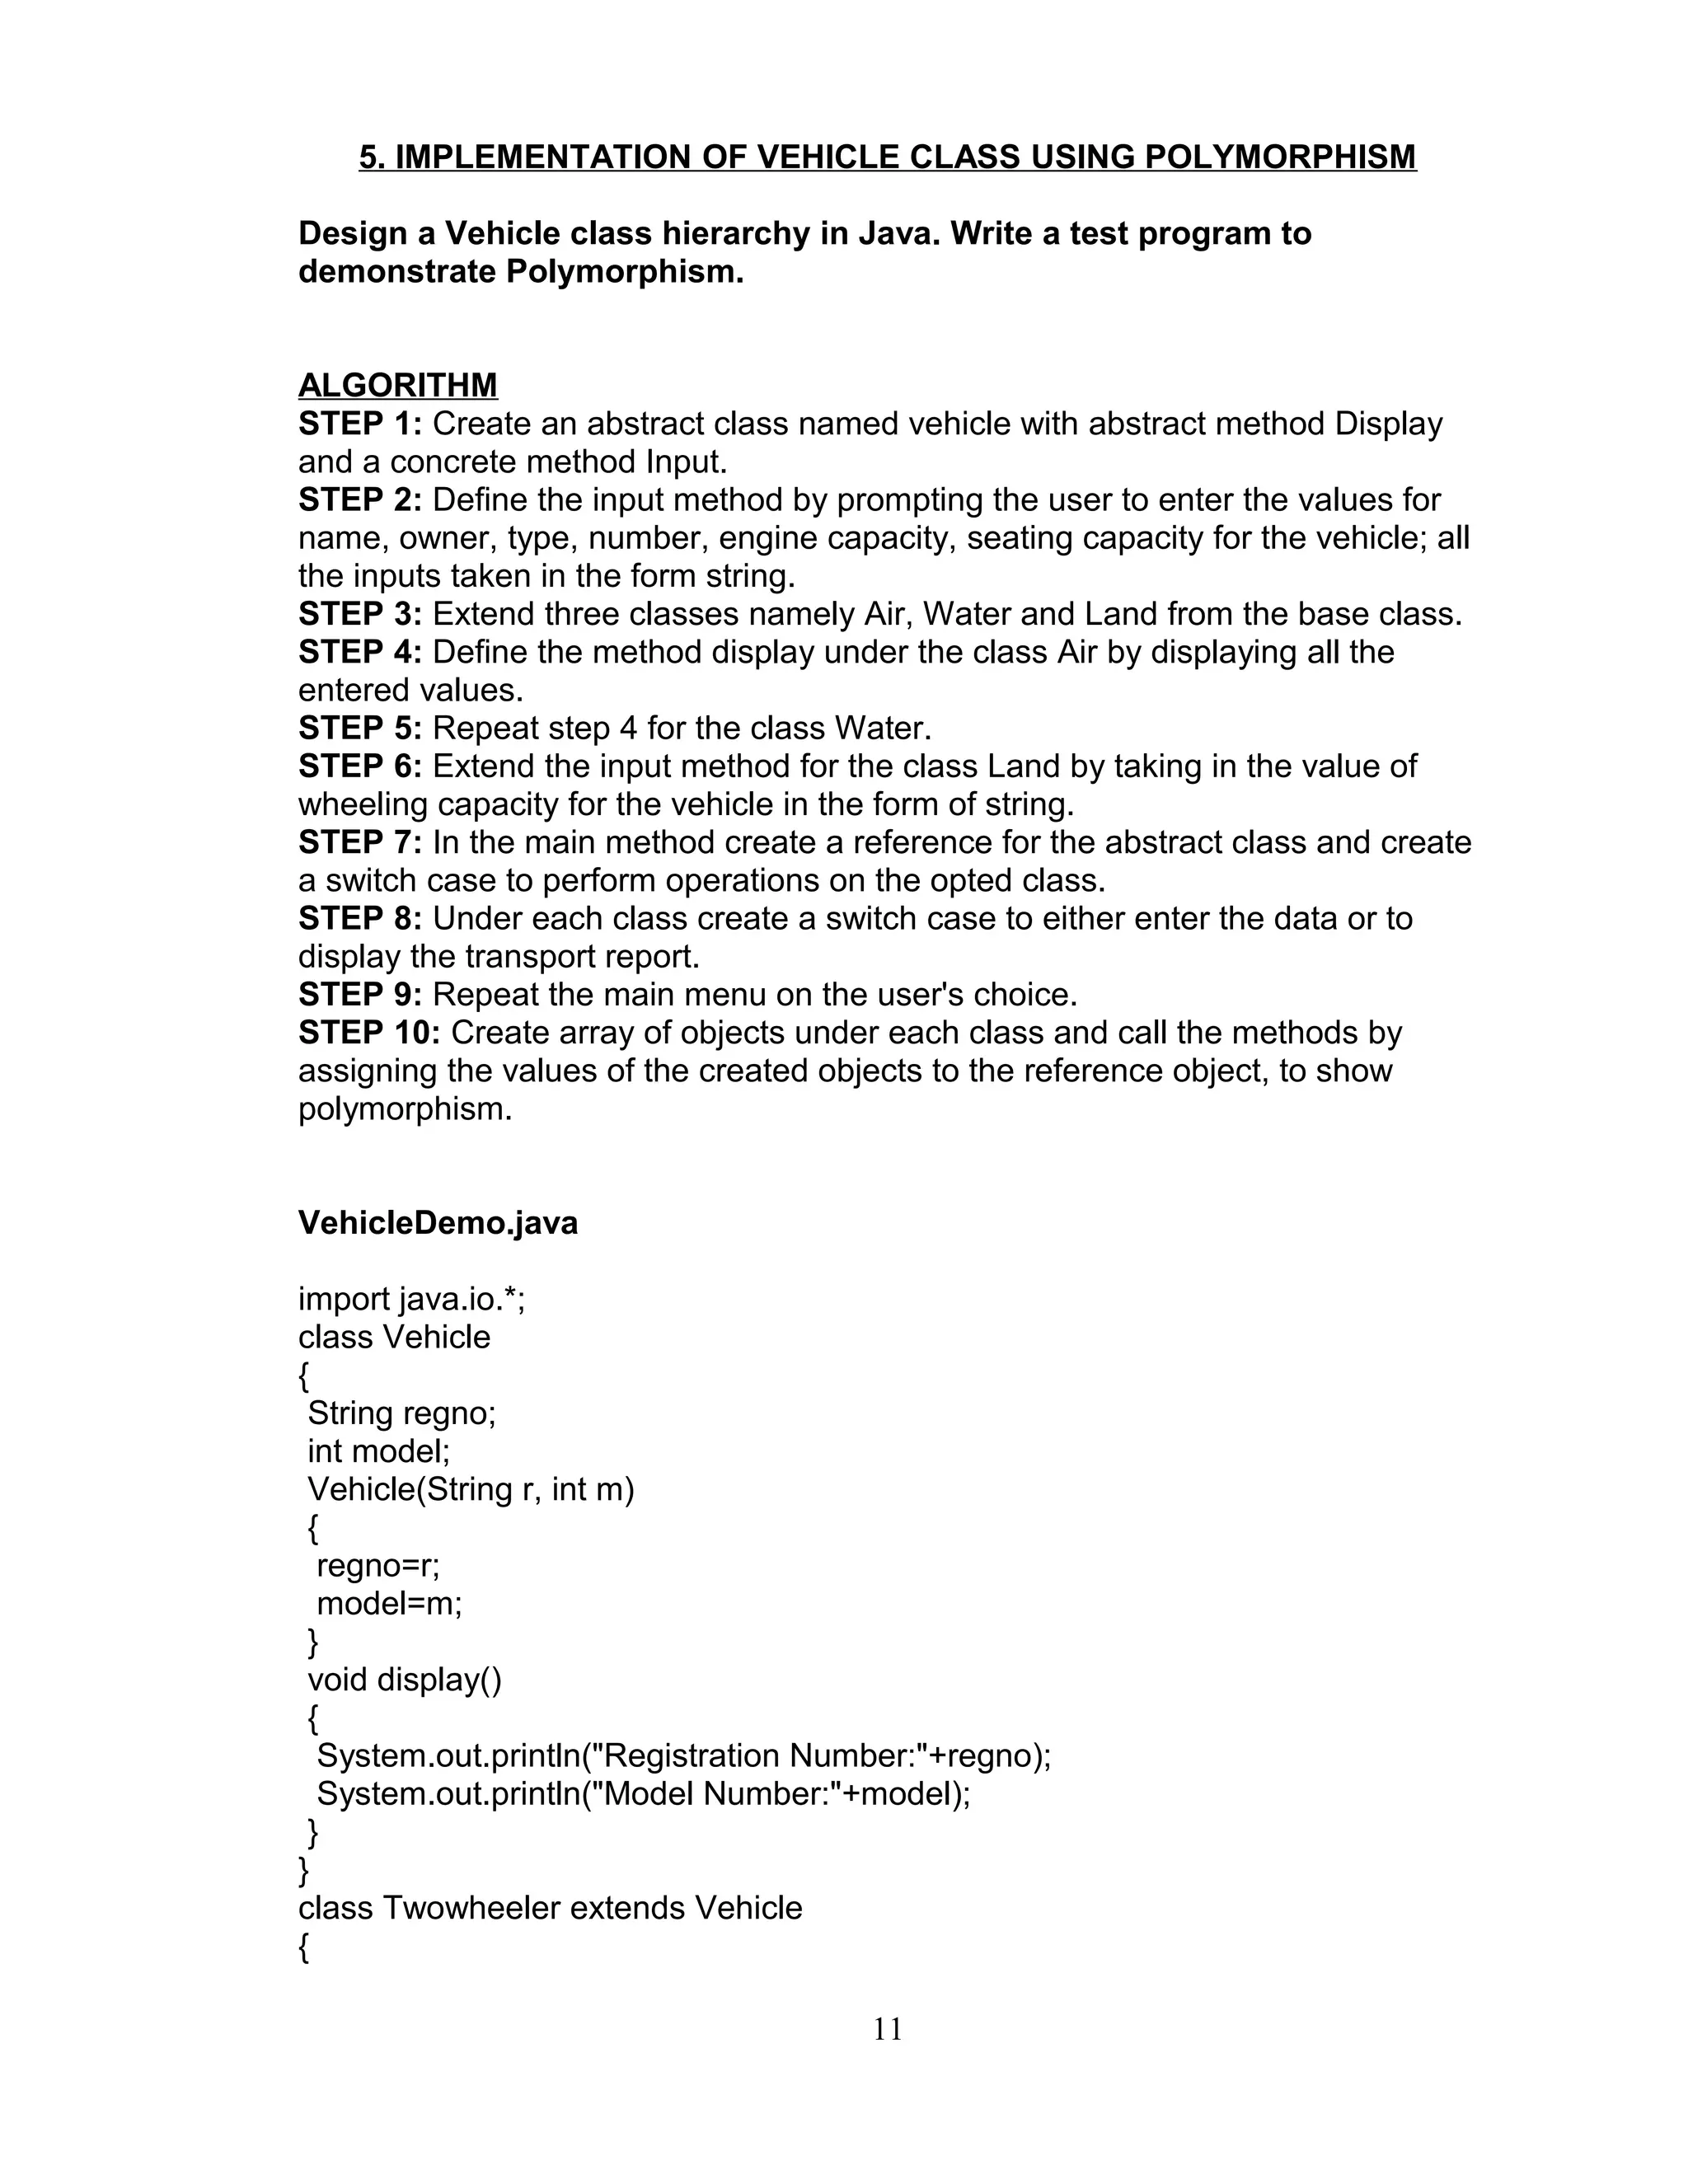
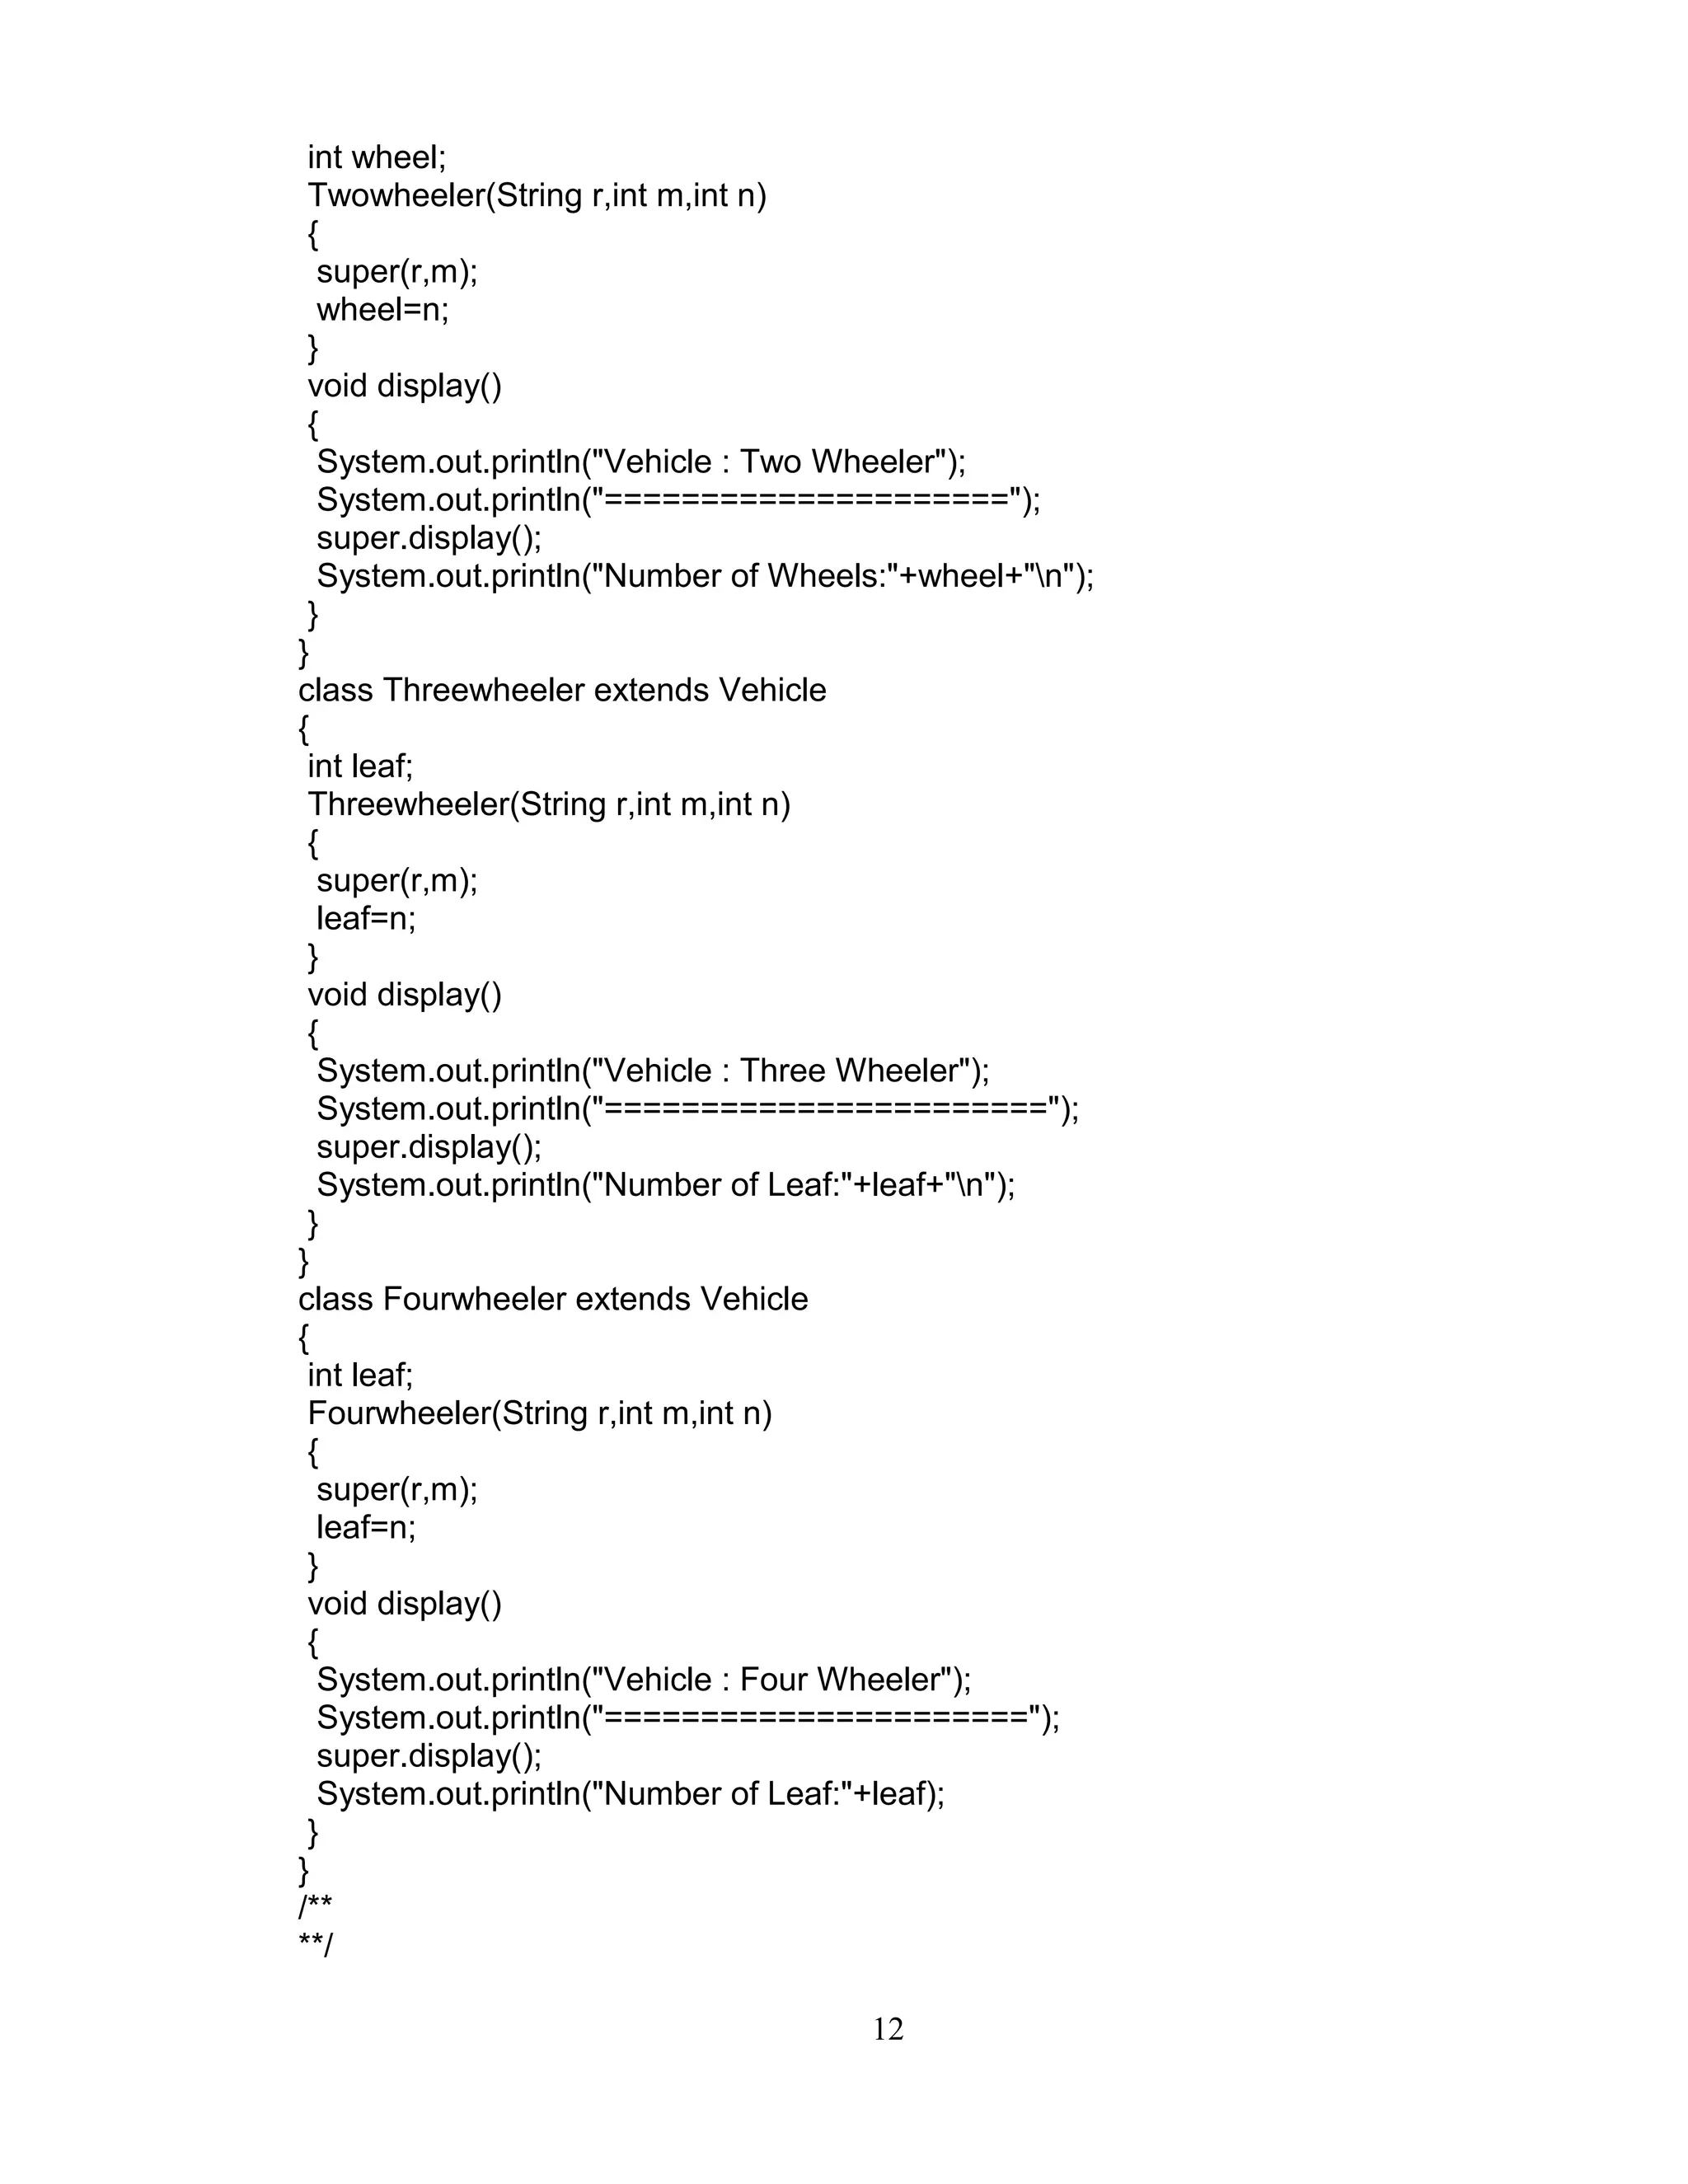
5. Design a Vehicle class hierarchy in Java. Write a test program to
demonstrate polymorphism.
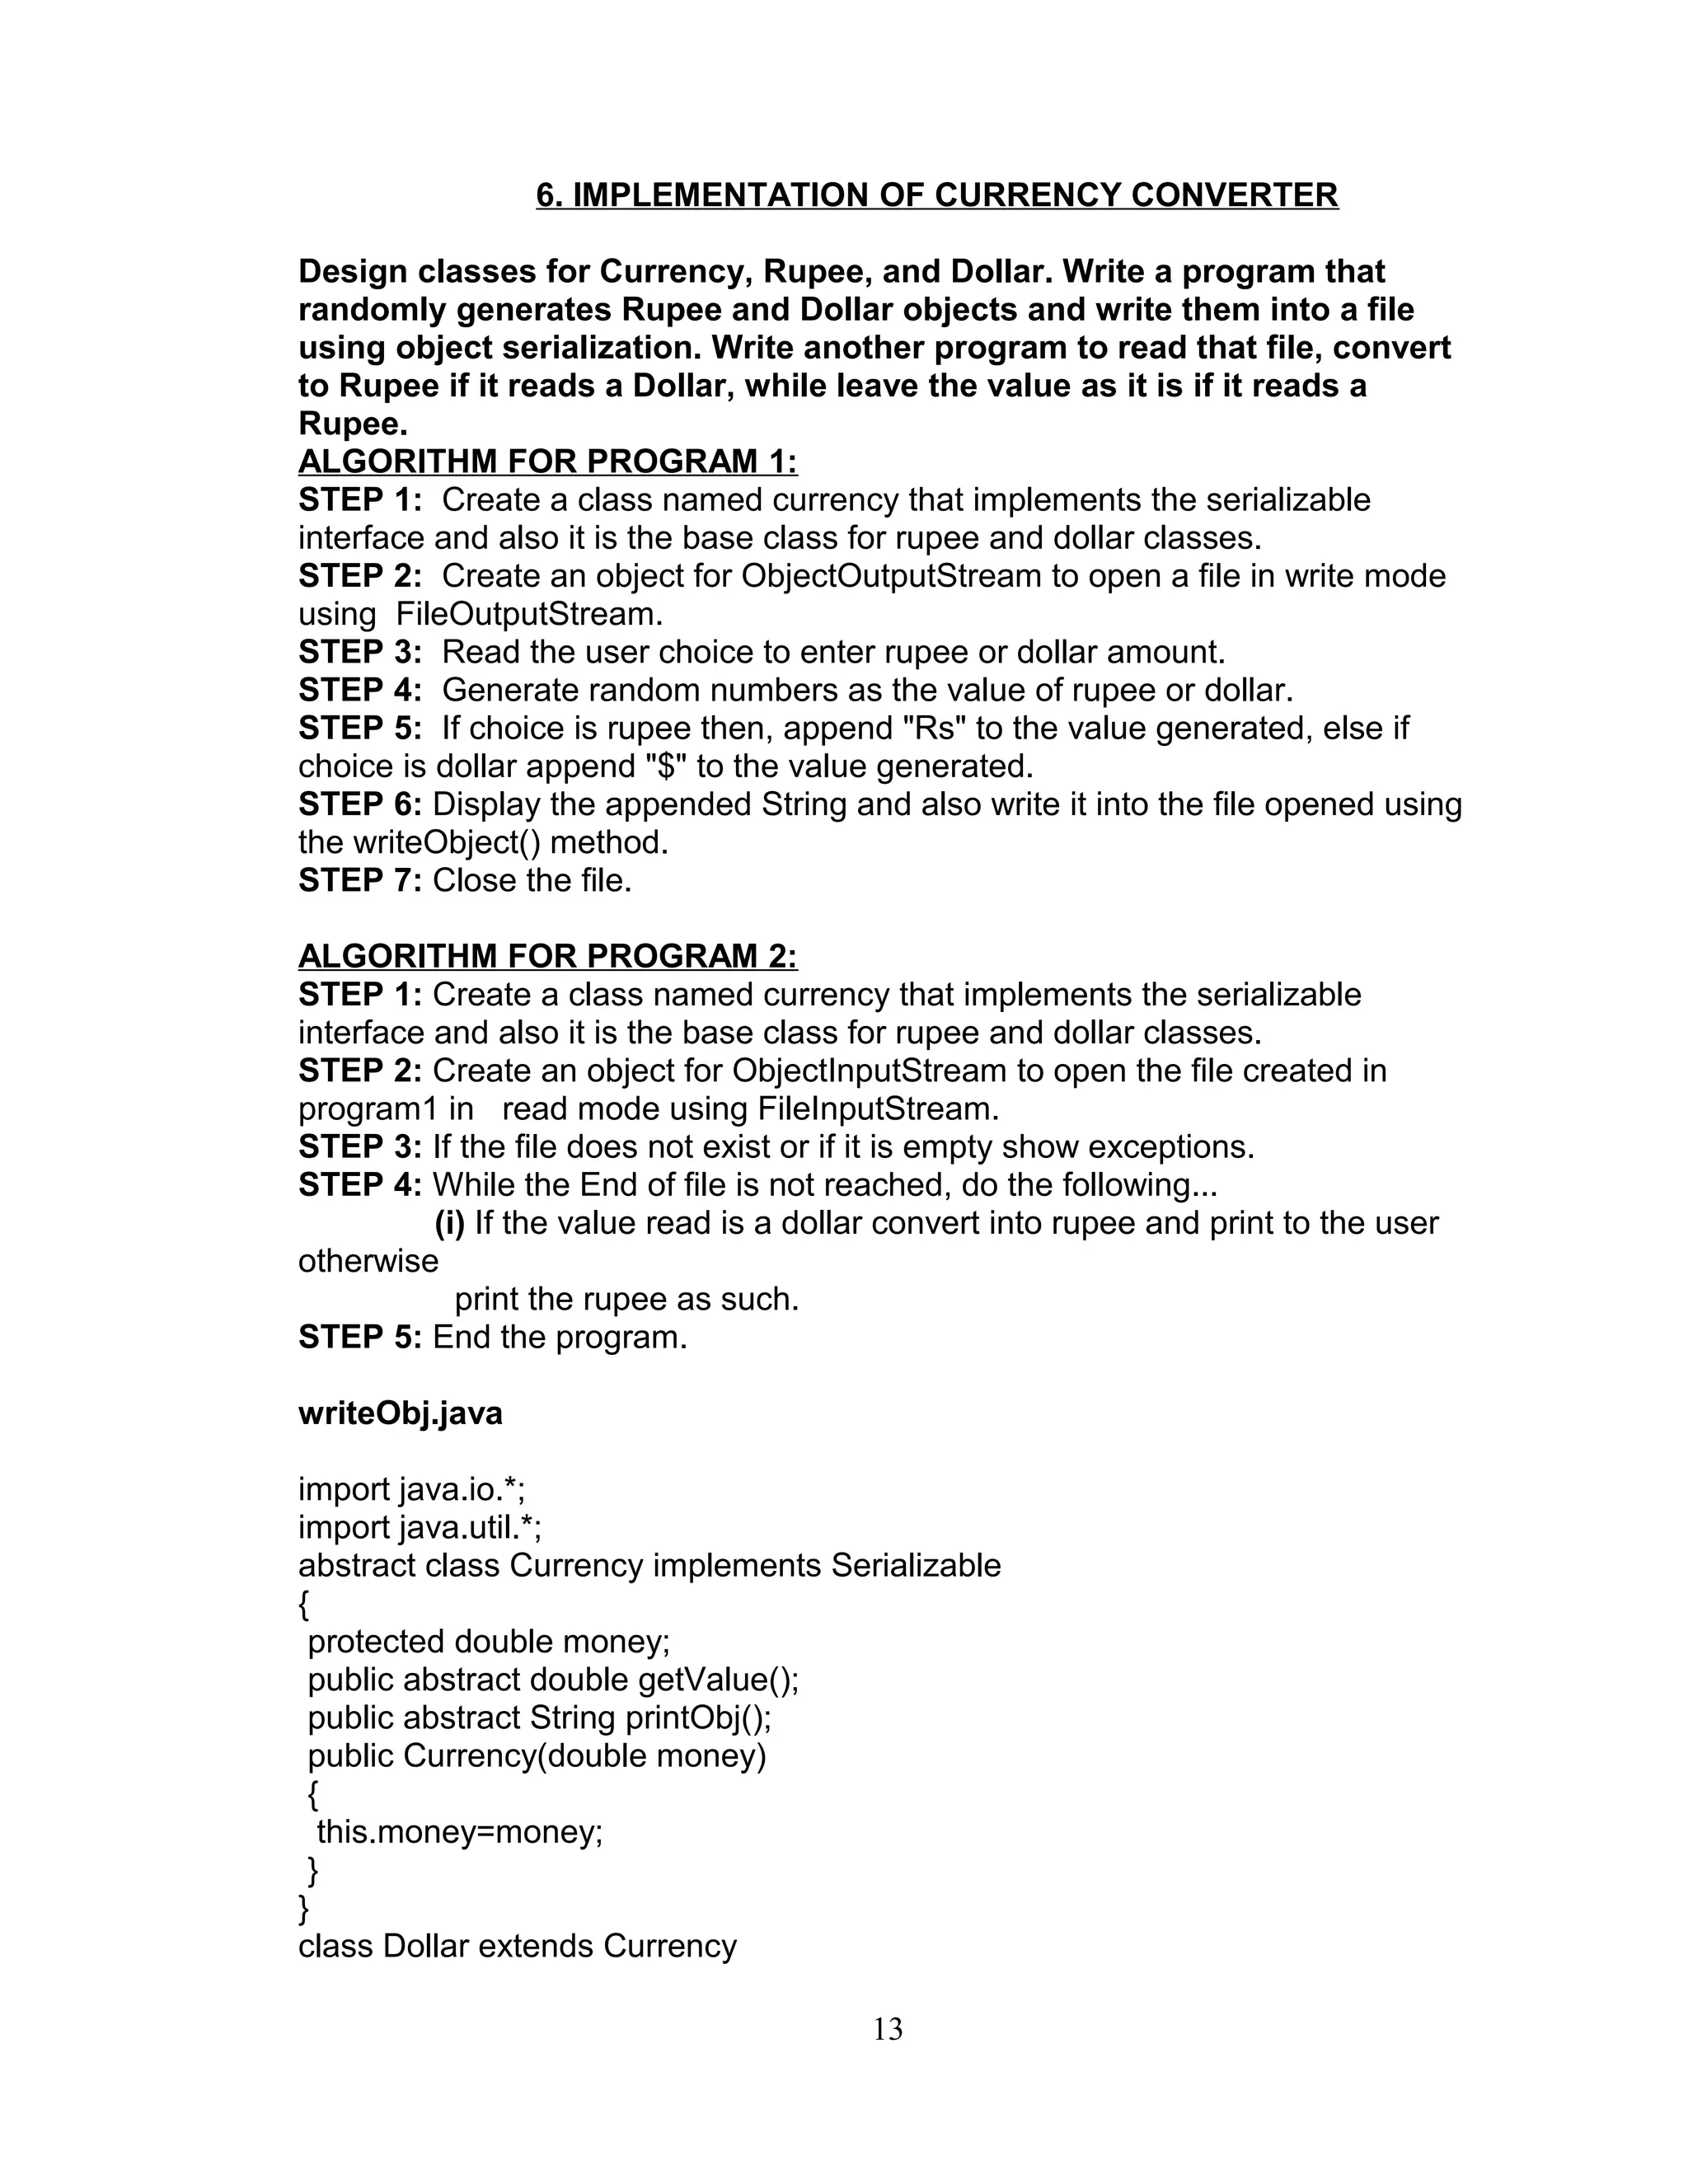
6. Design classes for Currency, Rupee, and Dollar. Write a program that
randomly generates Rupee and Dollar objects and write them into a file
using object serialization. Write another program to read that file, convert
to Rupee if it reads a Dollar, and while leave the value as it is if it reads a
Rupee.
7. Design a scientific calculator using event-driven programming paradigm
of Java.
8. Write a multi-threaded Java program to print all numbers below 100,000
that are both prime and Fibonacci number (some examples are 2, 3, 5,
13, etc.). Design a thread that generates prime numbers below 100,000
and writes them into a pipe. Design another thread that generates
Fibonacci numbers and writes them to another pipe. The main thread
should read both the pipes to identify numbers common to both.
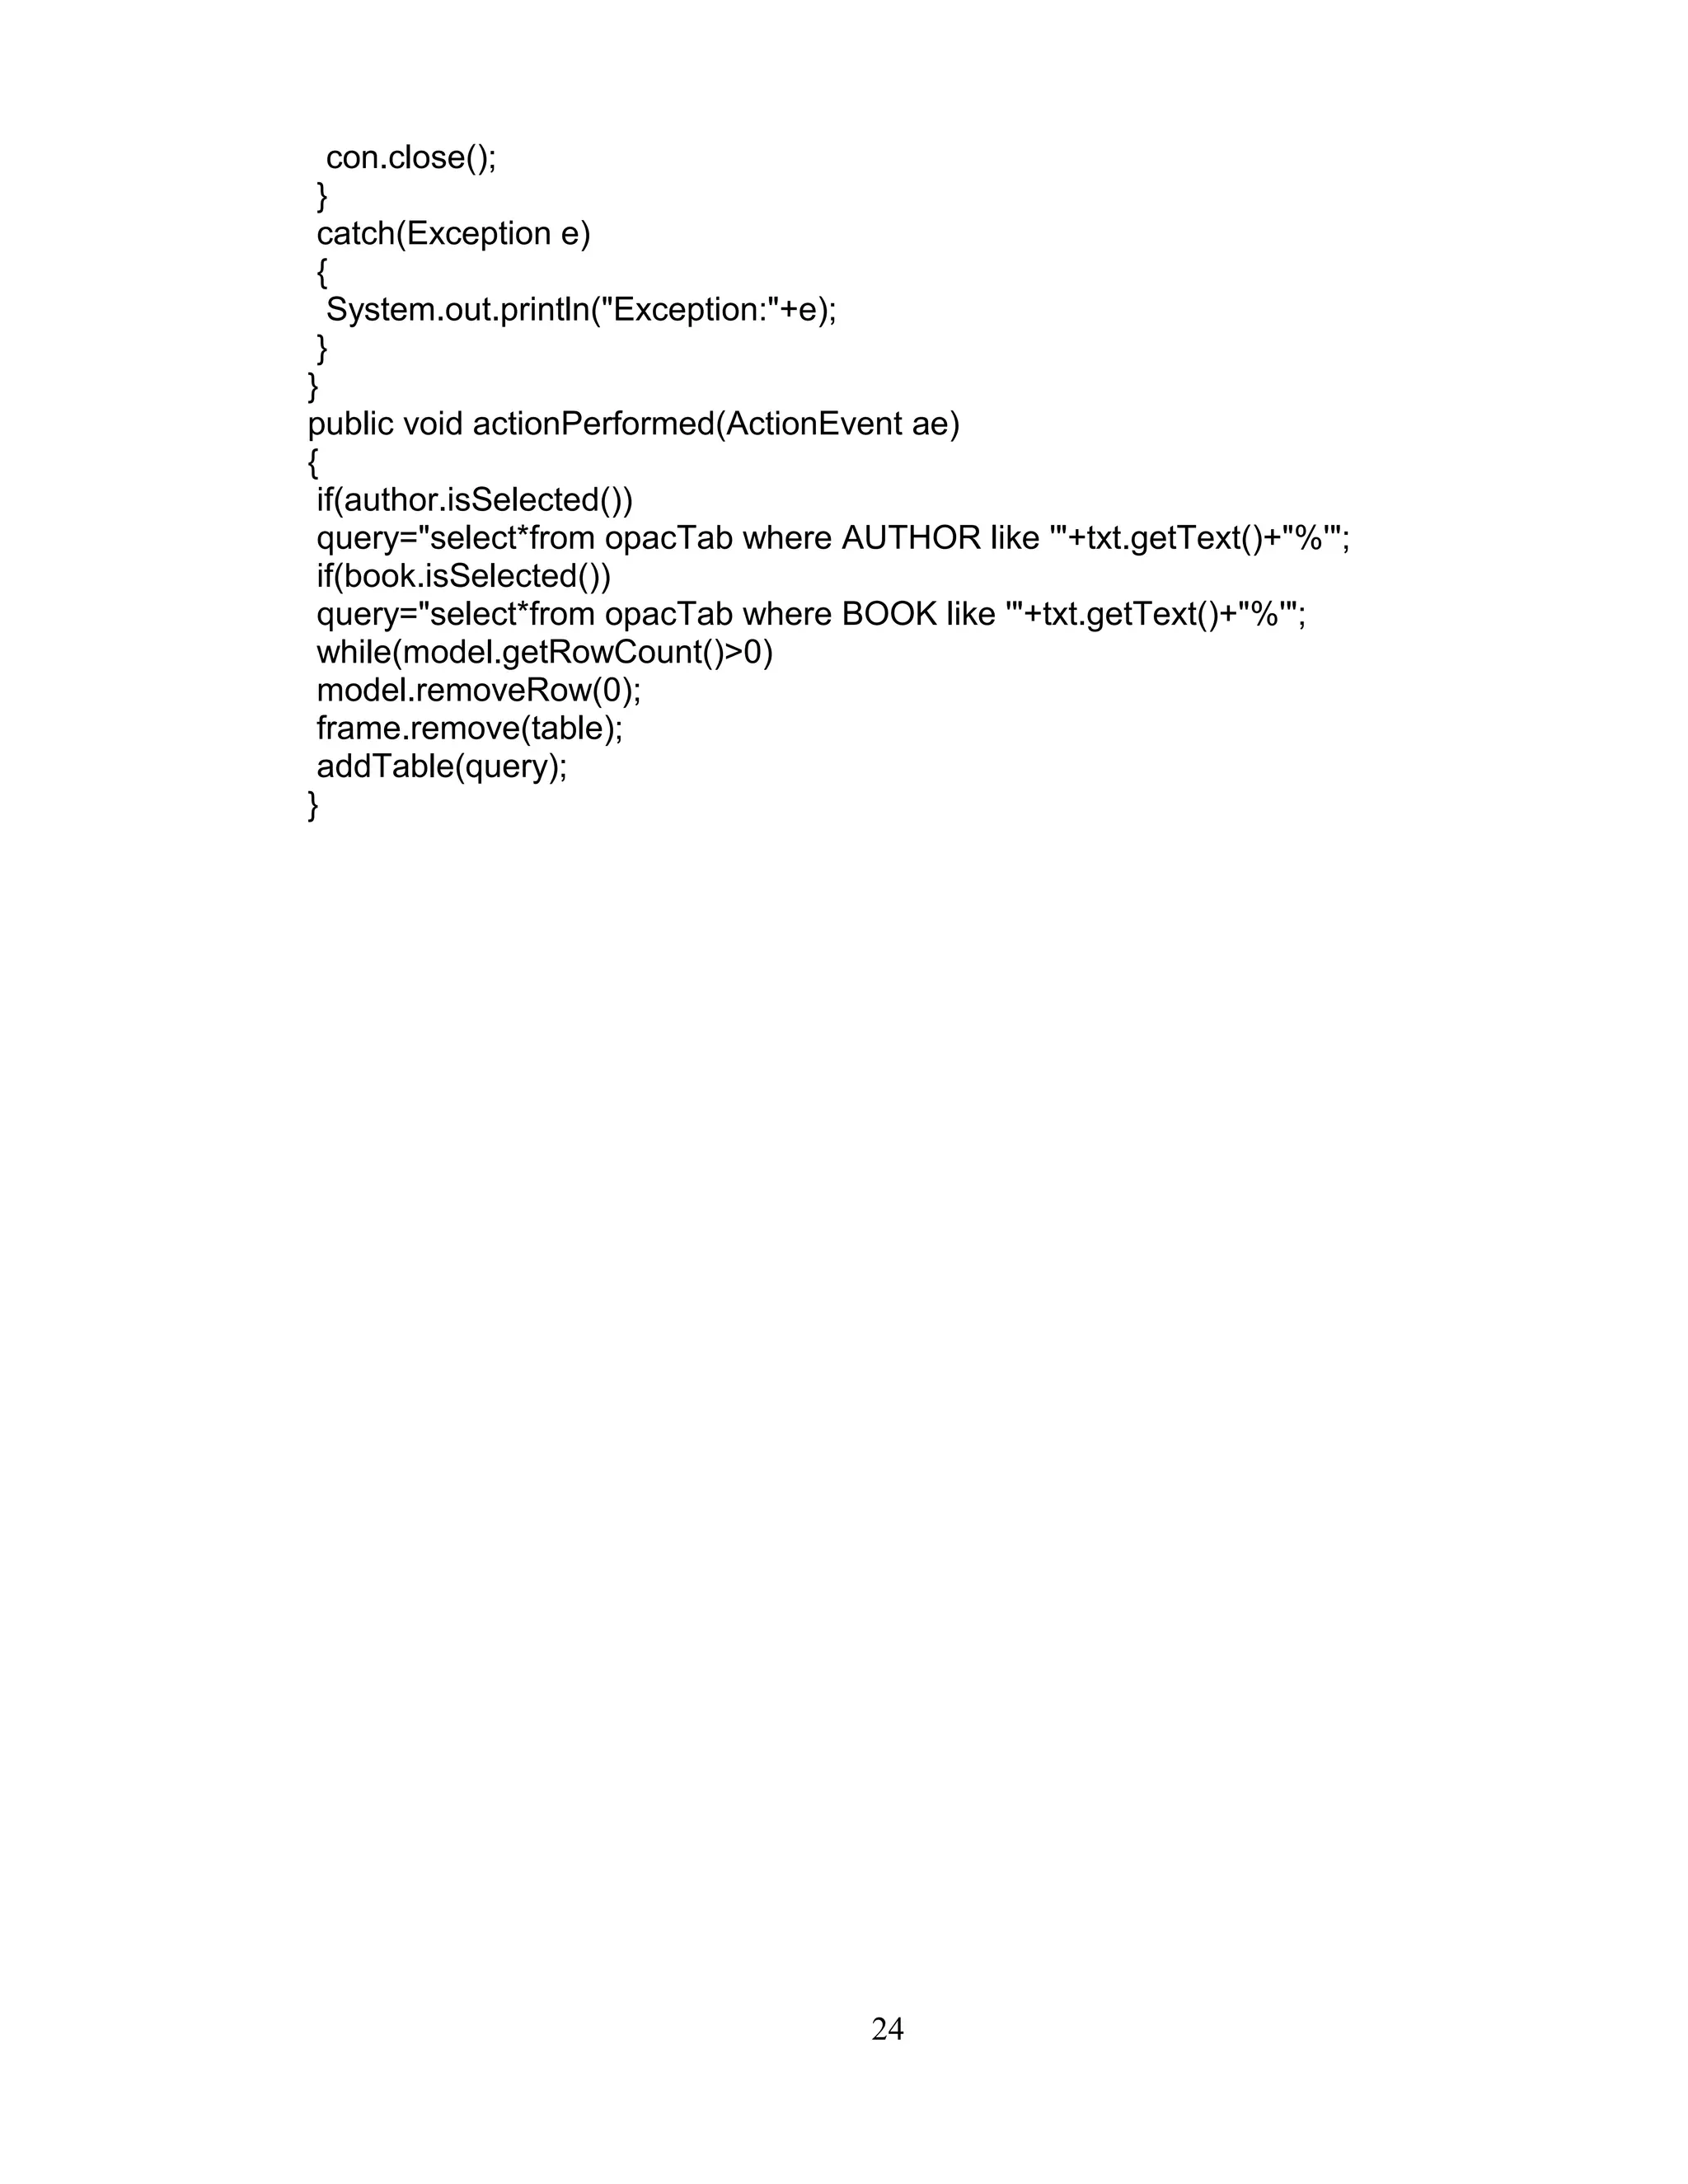
9. Develop a simple OPAC system for library using even-driven and
concurrent programming paradigms of Java. Use JDBC to connect to a
back-end database.
10.Develop multi-threaded echo server and a corresponding GUI client in
Java.
11.[Mini-Project] Develop a programmer's editor in Java that supports
syntax-highlighting, compilation support, debugging support, etc.
2](https://image.slidesharecdn.com/cs2306javalabmanualupdated-140625085143-phpapp02/75/CS2309-JAVA-LAB-MANUAL-2-2048.jpg)
![if(d==0)
return n;
else
return gcd(d,n%d);
}
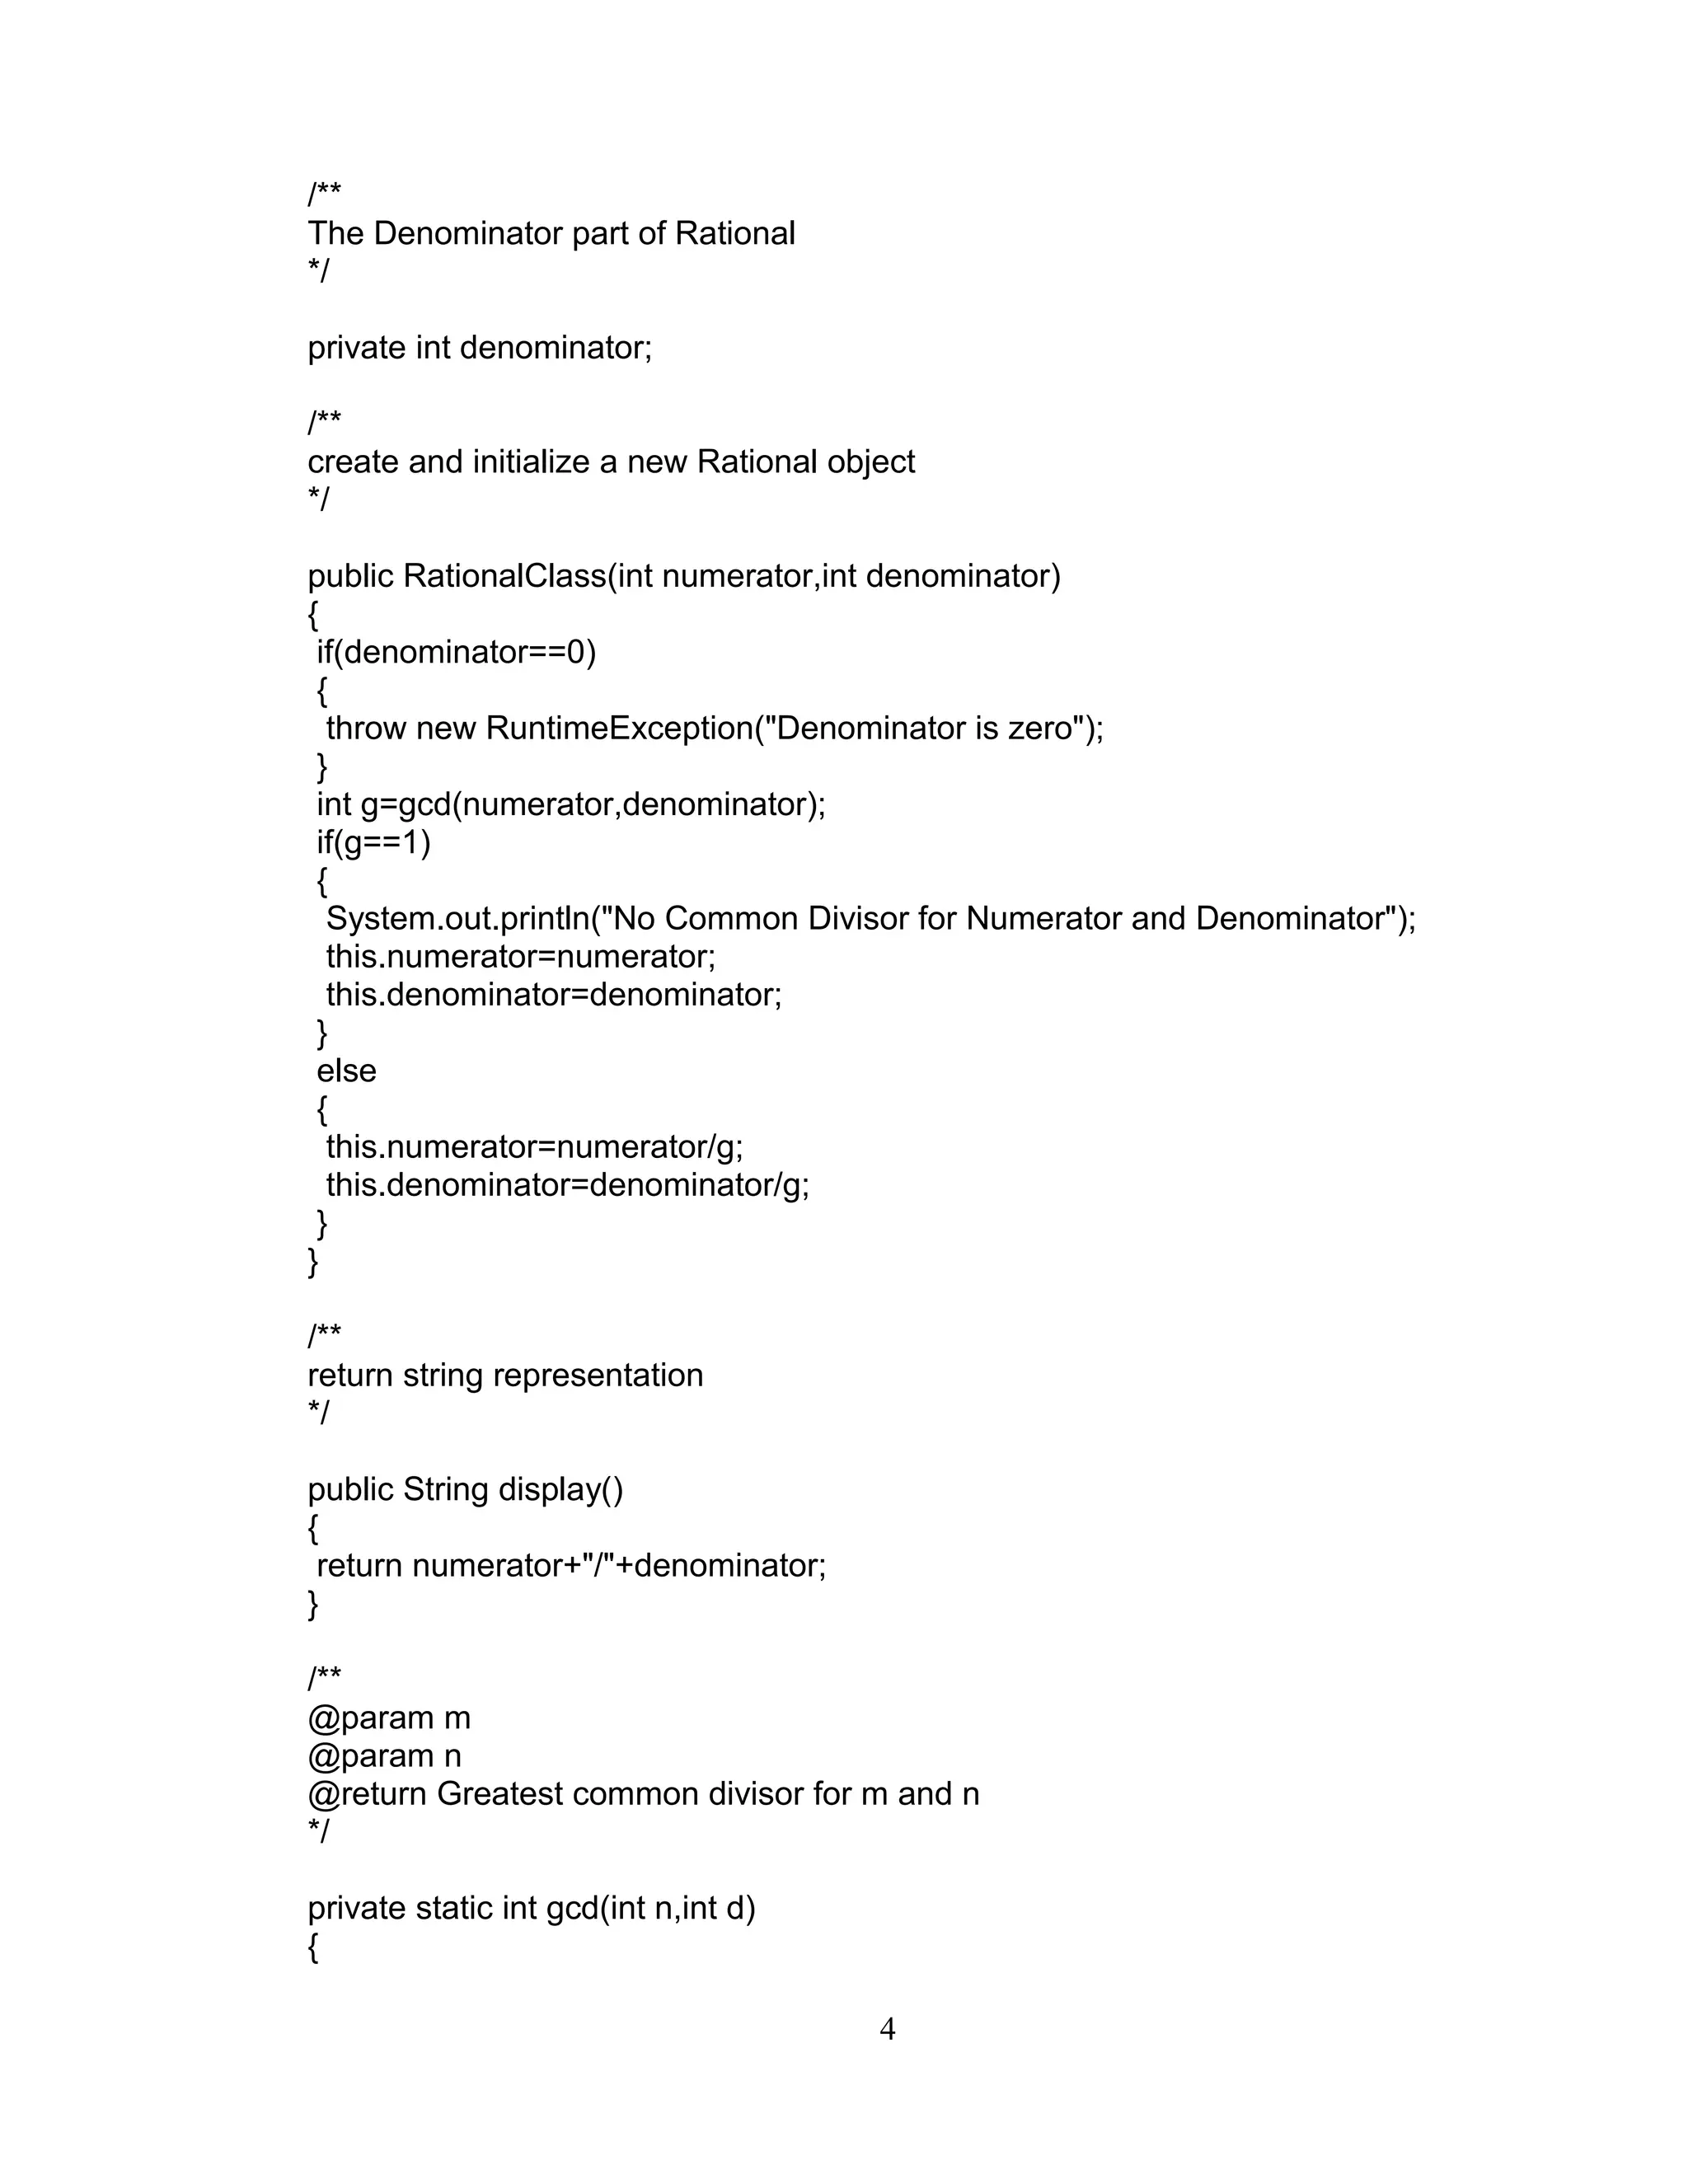
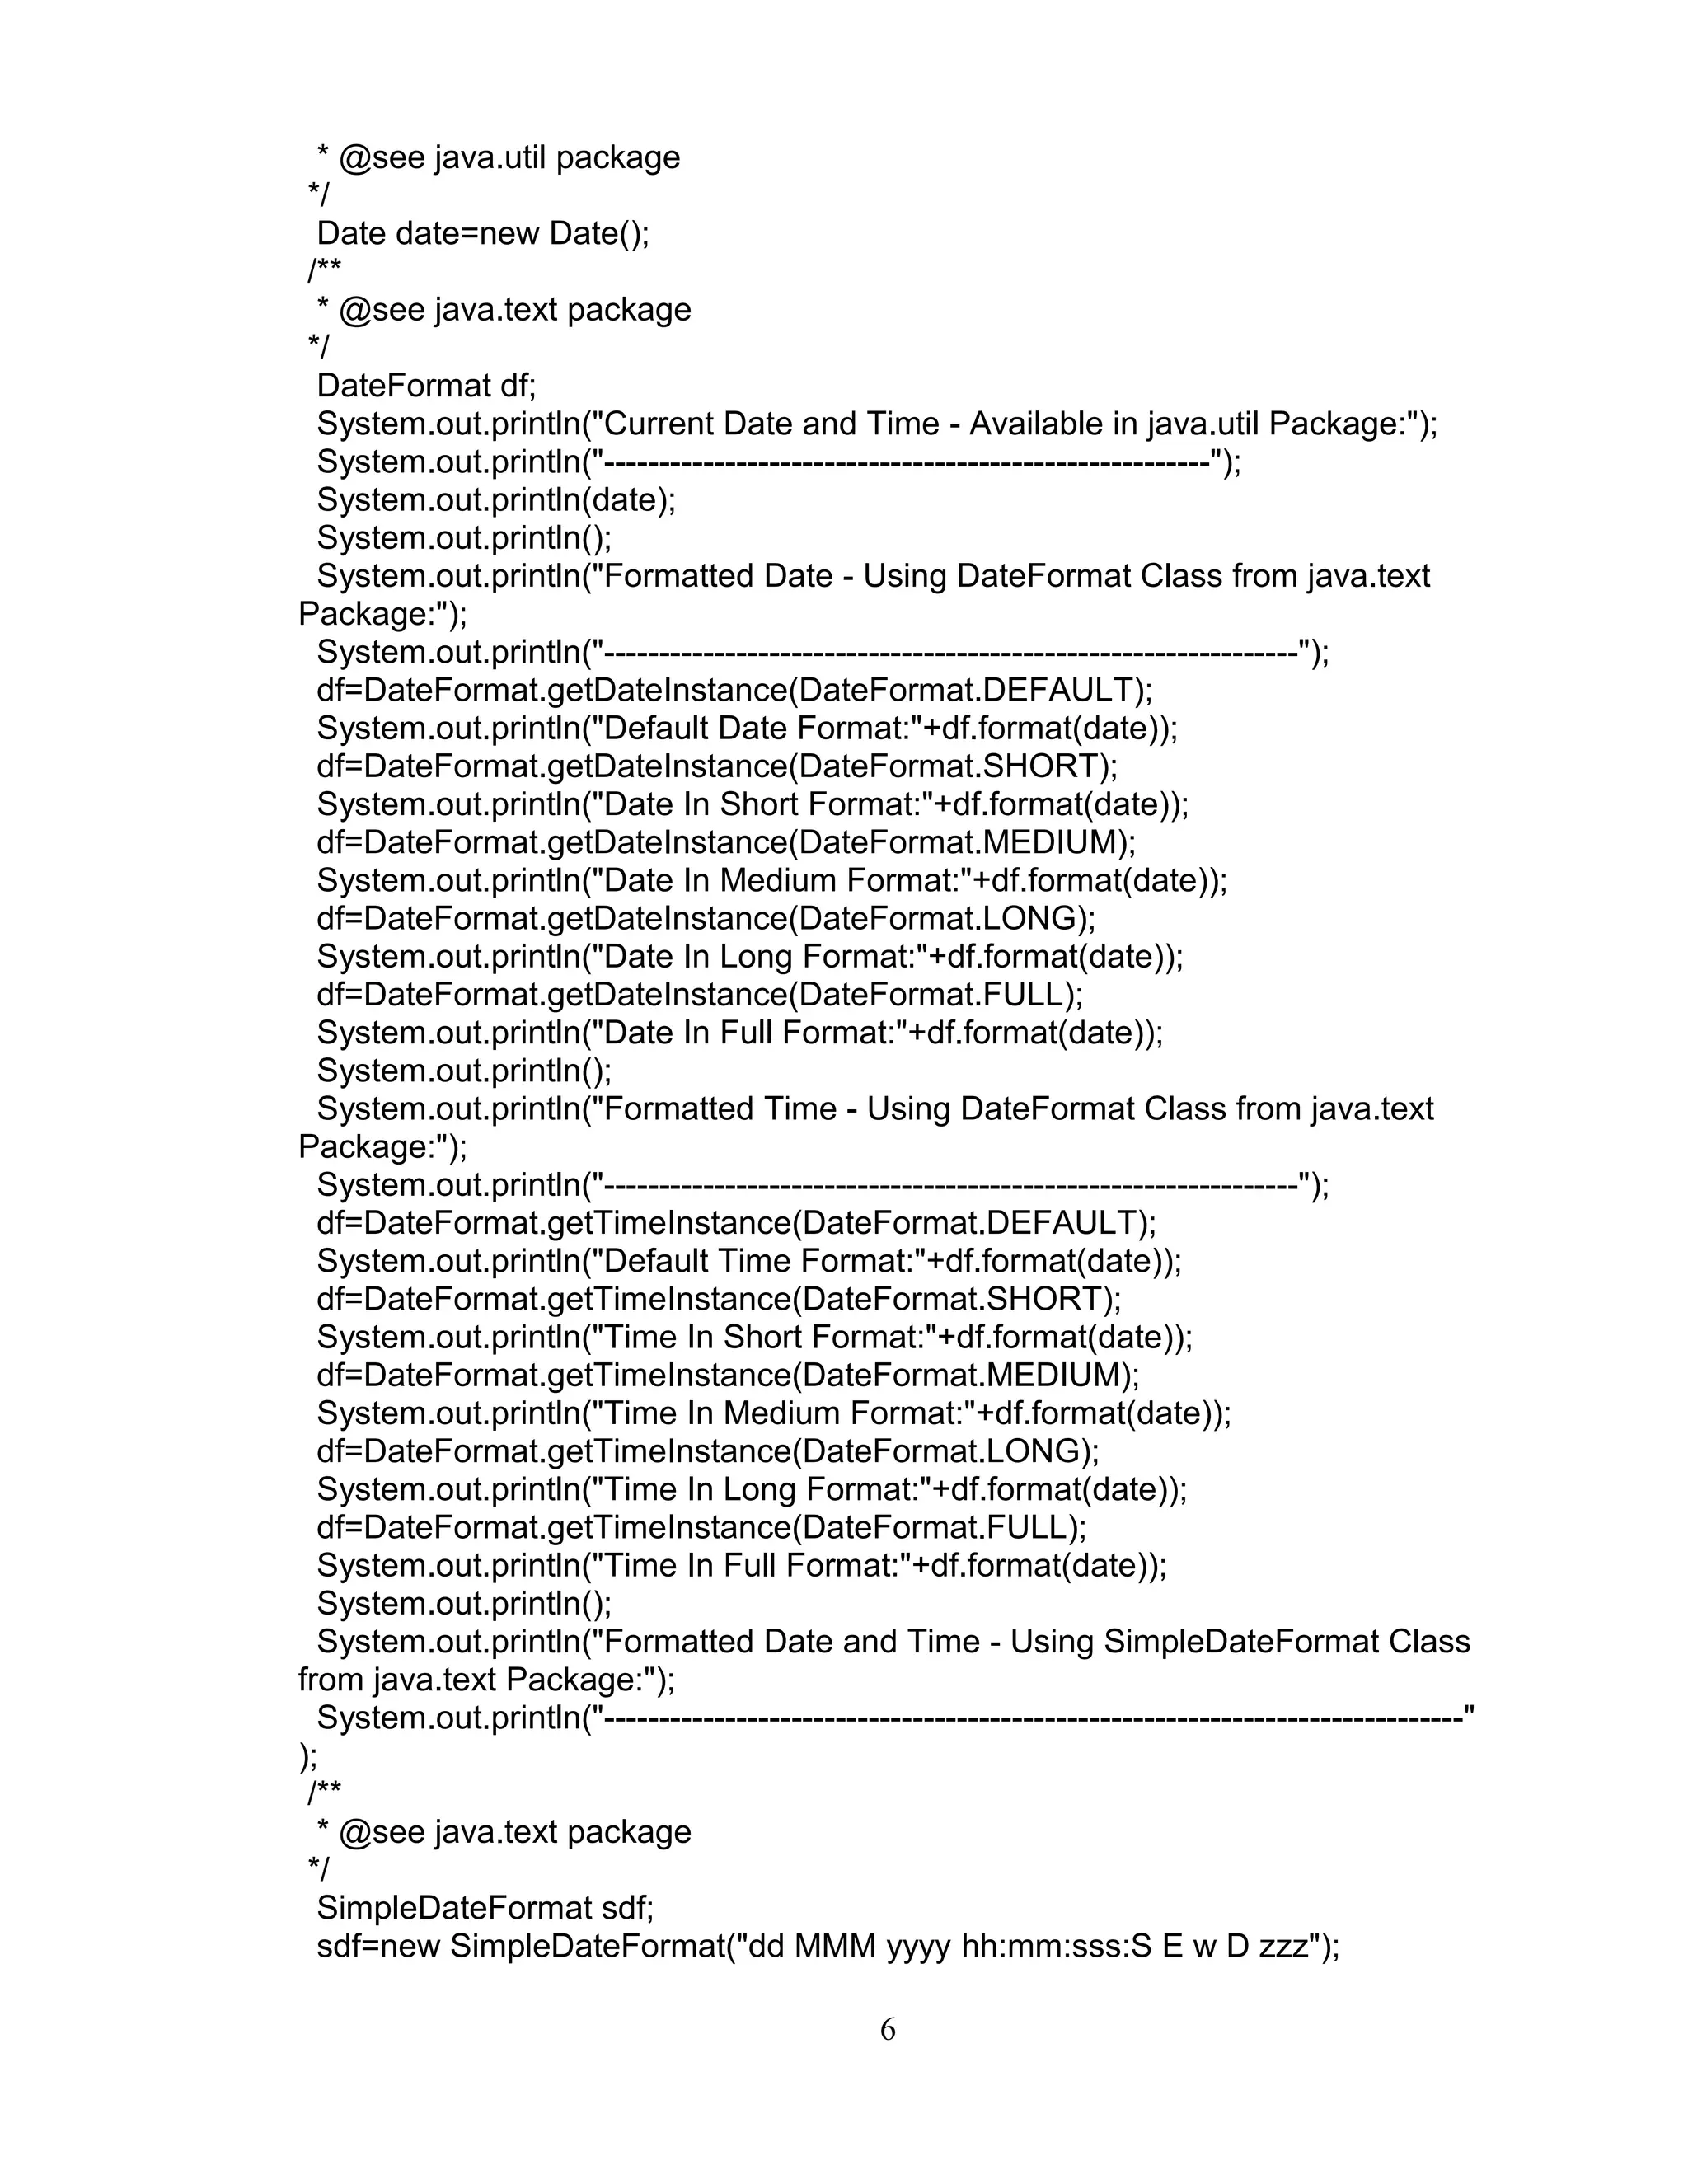
2. IMPLEMENTATION OF DATE SERVER
Develop Date class in Java similar to the one available in java.util package.
Use Java Doc comments.
ALGORITHM:
STEP 1: Create a package which consists of constructors with the following
arguments:
i) Default
ii)Taking 3 arguments year, day and month
iii)Taking 5 arguments year, day, month, hours and minutes
iv)Taking 6 arguments year, day, month, hour, minutes and seconds
STEP 2: Get the year, month, date, hours, minutes, seconds using the
getYear(), getMonth(), getDate(), getHours(), getMinutes(), getSeconds()
methods.
STEP 3: Set all these details using set methods.
STEP 4: After()-the after() method returns true if the current date comes after
the specified date else it returns false
STEP 5: Before()-the before()method returns true if the current date comes
before the specified date else it returns false
STEP 6: Compare()-the compare() method compares the current date with the
specified date and returns 0 if it is equal,if after it returns 1 and if before it
returns -1.
DateFormatDemo.java
import java.text.*;
import java.util.*;
/**
*Class DateFormatDemo formats the date and time by using java.text package
*
*/
public class DateFormatDemo
{
public static void main(String args[])
{
/**
5](https://image.slidesharecdn.com/cs2306javalabmanualupdated-140625085143-phpapp02/75/CS2309-JAVA-LAB-MANUAL-5-2048.jpg)

![3. IMPLEMENTATION OF LISP-LIKE LIST
Implement Lisp-like list in Java. Write basic operations such as 'car', 'cdr',
and 'cons'. If L is a list [3, 0, 2, 5], L.car() returns 3, while L.cdr() returns
[0,2,5].
ALGORITHM
STEP 1: Create a node of a list having data part and link part.
STEP 2: Create a menu having the following choices : insert, car, cdr, adjoin
and display.
STEP 3: Read the choice from the user and call the respective m ethods.
STEP 4: Create another class which implements the same interface to
implement the concept of stack through linked list.
INSERT
STEP 1: Create an object of node and append to the list.
CAR
STEP 1: Return the first node data.
CDR
STEP 1: Return all the node (data part) in the list except the first node.
ADJOIN
STEP 1: Check if the node to be inserted is already present in the list, if not
present append to the list.
LispOperation.java
import java.util.*;
/**
*
*/
class Lisp
{
public Vector car(Vector v)
{
Vector elt=new Vector();
elt.addElement(v.elementAt(0));
return elt;
}
public Vector cdr(Vector v)
{
Vector elt=new Vector();
for(int i=1;i<v.size();i++)
elt.addElement(v.elementAt(i));
return elt;
}
public Vector cons(int x, Vector v)
{
v.insertElementAt(x,0);
return v;
}
}
8](https://image.slidesharecdn.com/cs2306javalabmanualupdated-140625085143-phpapp02/75/CS2309-JAVA-LAB-MANUAL-8-2048.jpg)
![4. IMPLEMENTATION OF STACK
Design a Java interface for ADT Stack. Develop two different classes that
implement this interface, one using array and the other using linked-list.
Provide necessary exception handling in both the implementations.
ALGORITHM
STEP 1: Create an interface which consists of three methods namely PUSH,
POP and DISPLAY
STEP 2: Create a class which implements the above interface to implement the
concept of stack through Array
STEP 3: Define all the methods of the interface to push any element, to pop the
top element and to display the elements present in the stack.
STEP 4: Create another class which implements the same interface to
implement the concept of stack through linked list.
STEP 5: Repeat STEP 4 for the above said class also.
STEP 6: In the main class, get the choice from the user to choose whether array
implementation or linked list implementation of the stack.
STEP 7: Call the methods appropriately according to the choices made by the
user in the previous step.
STEP 8: Repeat step 6 and step 7 until the user stops his/her execution
StackADT.java
import java.io.*;
import java.util.*;
interface stackInterface
{
int n=50;
public void pop();
public void push();
public void display();
}
class stack implements stackInterface
{
int arr[]=new int[n];
int top=-1;
Scanner in=new Scanner(System.in);
public void push()
{
try
{
System.out.println("Enter The Element of Stack");
int elt=in.nextInt();
arr[++top]=elt;
}
catch (Exception e)
{
9](https://image.slidesharecdn.com/cs2306javalabmanualupdated-140625085143-phpapp02/75/CS2309-JAVA-LAB-MANUAL-9-2048.jpg)
![System.out.println("e");
}
}
public void pop()
{
int pop=arr[top];
top--;
System.out.println("Popped Element Is:"+pop);
}
public void display()
{
if(top<0)
{
System.out.println("Stack Is Empty");
return;
}
else
{
String str=" ";
for(int i=0;i<=top;i++)
str=str+" "+arr[i];
System.out.println("Stack Elements Are:"+str);
}
}
}
/**
*
*/
10](https://image.slidesharecdn.com/cs2306javalabmanualupdated-140625085143-phpapp02/75/CS2309-JAVA-LAB-MANUAL-10-2048.jpg)

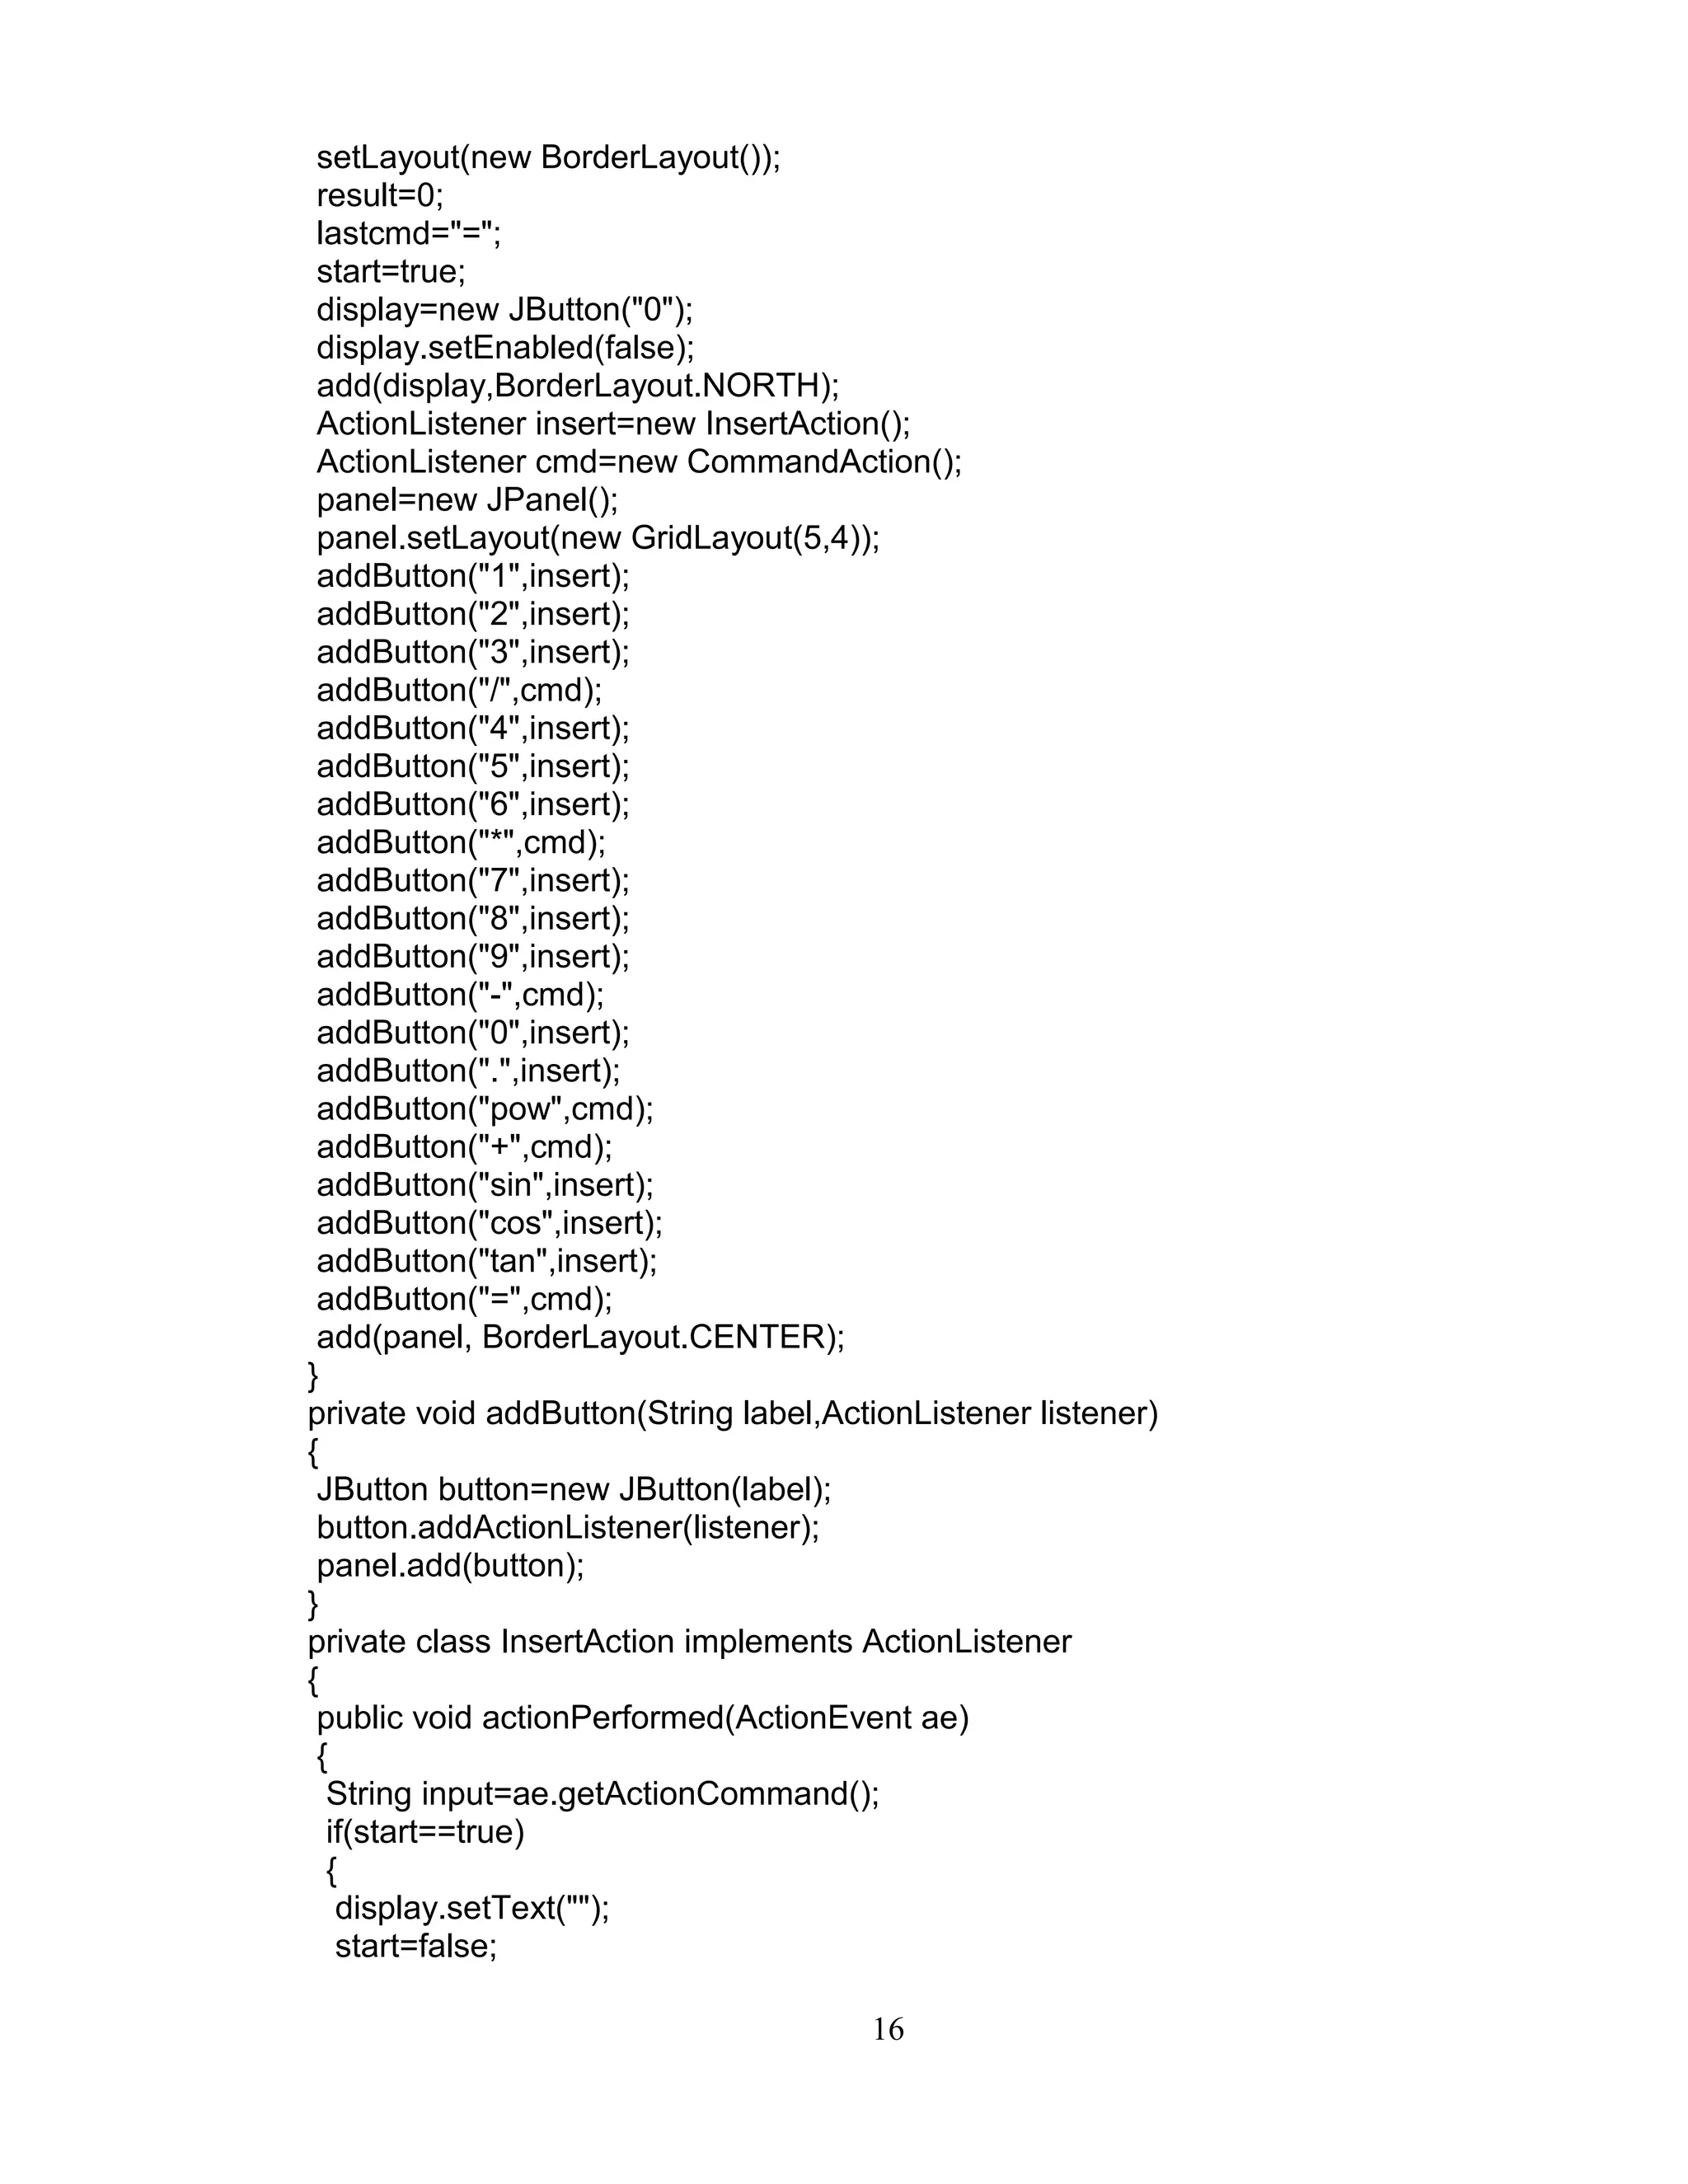
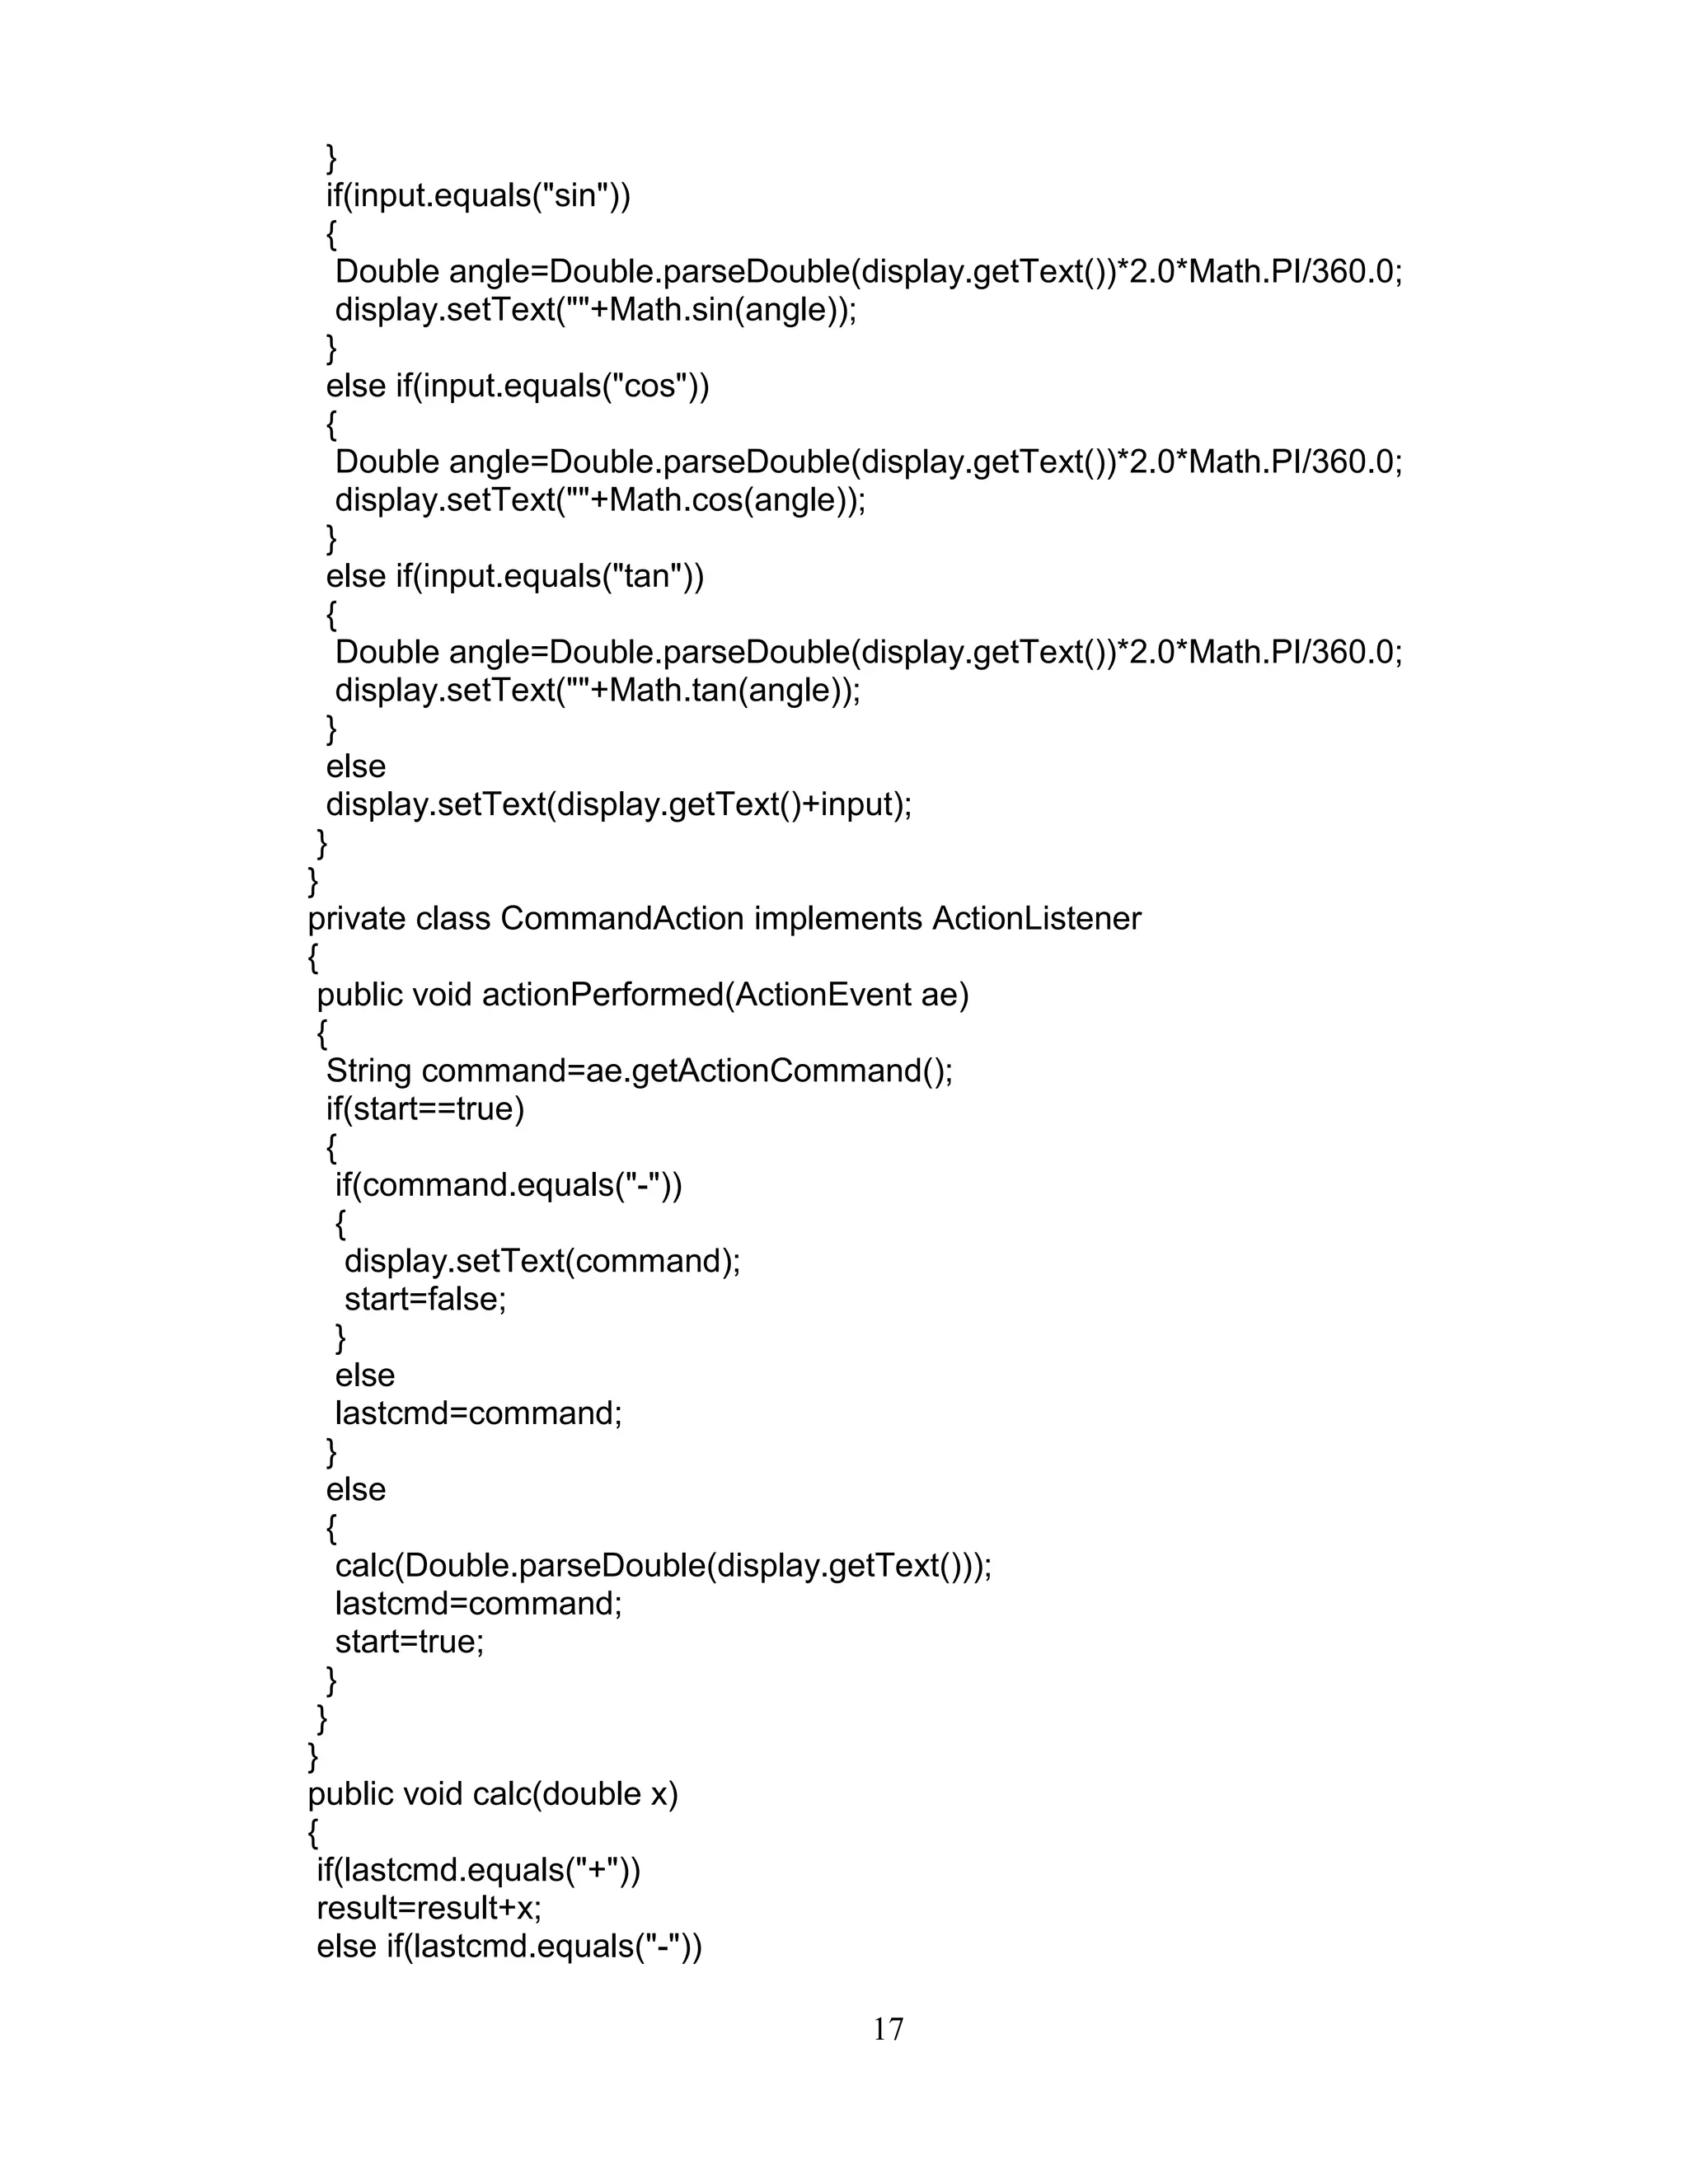
![7. IMPLEMENTATION OF CALCULATOR
Develop a scientific calculator using even-driven programming paradigm
of Java.
ALGORITHM:
STEP 1: Create a panel consisting of Buttons for various scientific operations.
STEP 2: Create Button actions.
STEP 3: Place the panel onto a frame.
STEP 4: Associate each Button click with the corresponding actionlistener.
SimpleCalculator.java
import java.awt.*;
import java.awt.event.*;
import javax.swing.*;
import java.lang.*;
/**
*
*/
public class SimpleCalculator
{
public static void main(String[] args)
{
CalcFrame cf=new CalcFrame();
cf.setDefaultCloseOperation(JFrame.EXIT_ON_CLOSE);
cf.setVisible(true);
}
}
class CalcFrame extends JFrame
{
public CalcFrame()
{
setTitle("CALCULATOR");
CalcPanel panel=new CalcPanel();
add(panel);
pack();
}
}
class CalcPanel extends JPanel
{
JButton display;
JPanel panel;
double result;
String lastcmd;
boolean start;
public CalcPanel()
{
15](https://image.slidesharecdn.com/cs2306javalabmanualupdated-140625085143-phpapp02/75/CS2309-JAVA-LAB-MANUAL-15-2048.jpg)
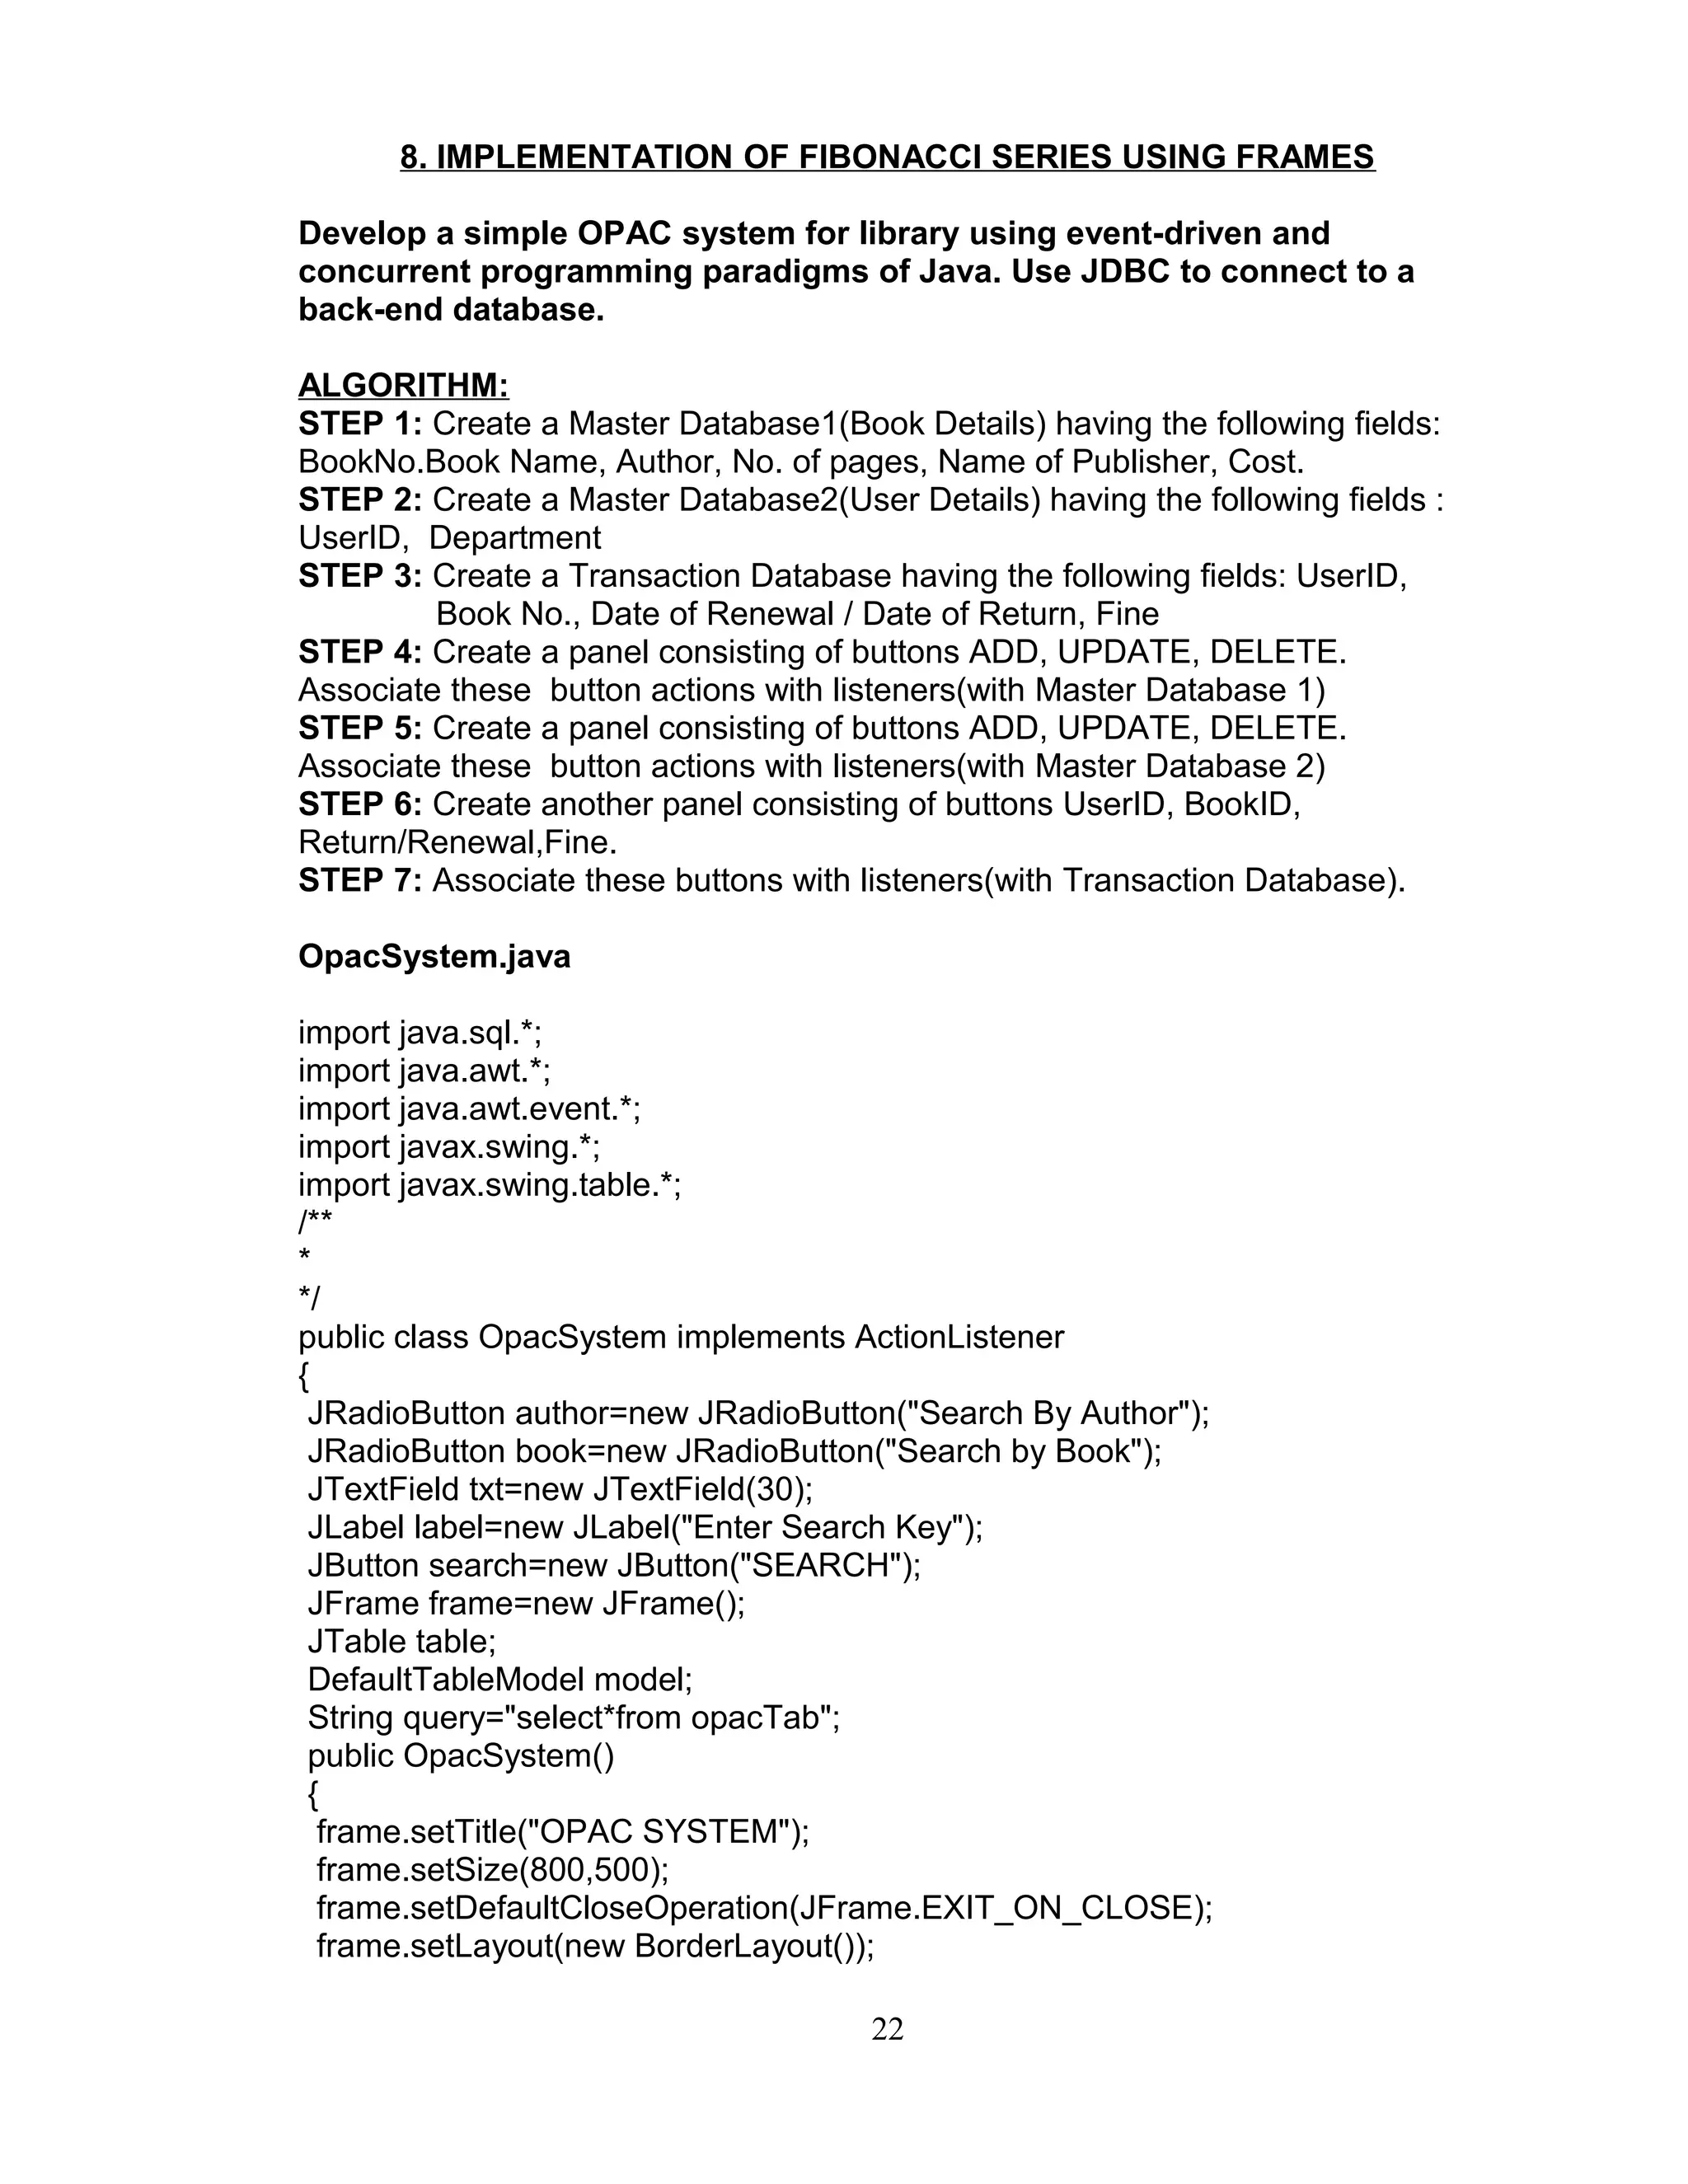
![JPanel p1=new JPanel();
p1.setLayout(new FlowLayout());
p1.add(label);
p1.add(txt);
ButtonGroup bg=new ButtonGroup();
bg.add(author);
bg.add(book);
JPanel p2=new JPanel();
p2.setLayout(new FlowLayout());
p2.add(author);
p2.add(book);
p2.add(search);
search.addActionListener(this);
JPanel p3=new JPanel();
p3.setLayout(new BorderLayout());
p3.add(p1,BorderLayout.NORTH);
p3.add(p2,BorderLayout.CENTER);
frame.add(p3,BorderLayout.NORTH);
addTable(query);
frame.setVisible(true);
}
public void addTable(String str)
{
try
{
Class.forName("sun.jdbc.odbc.JdbcOdbcDriver");
Connection con=DriverManager.getConnection("jdbc:odbc:opacDS");
Statement stmt=con.createStatement();
ResultSet rs=stmt.executeQuery(str);
ResultSetMetaData rsmd=rs.getMetaData();
int cols=rsmd.getColumnCount();
model=new DefaultTableModel(1,cols);
table=new JTable(model);
String[] tabledata=new String[cols];
int i=0;
while(i<cols)
{
tabledata[i]=rsmd.getColumnName(i+1);
i++;
}
model.addRow(tabledata);
while(rs.next())
{
for(i=0;i<cols;i++)
tabledata[i]=rs.getObject(i+1).toString();
model.addRow(tabledata);
}
frame.add(table,BorderLayout.CENTER);
23](https://image.slidesharecdn.com/cs2306javalabmanualupdated-140625085143-phpapp02/75/CS2309-JAVA-LAB-MANUAL-23-2048.jpg)
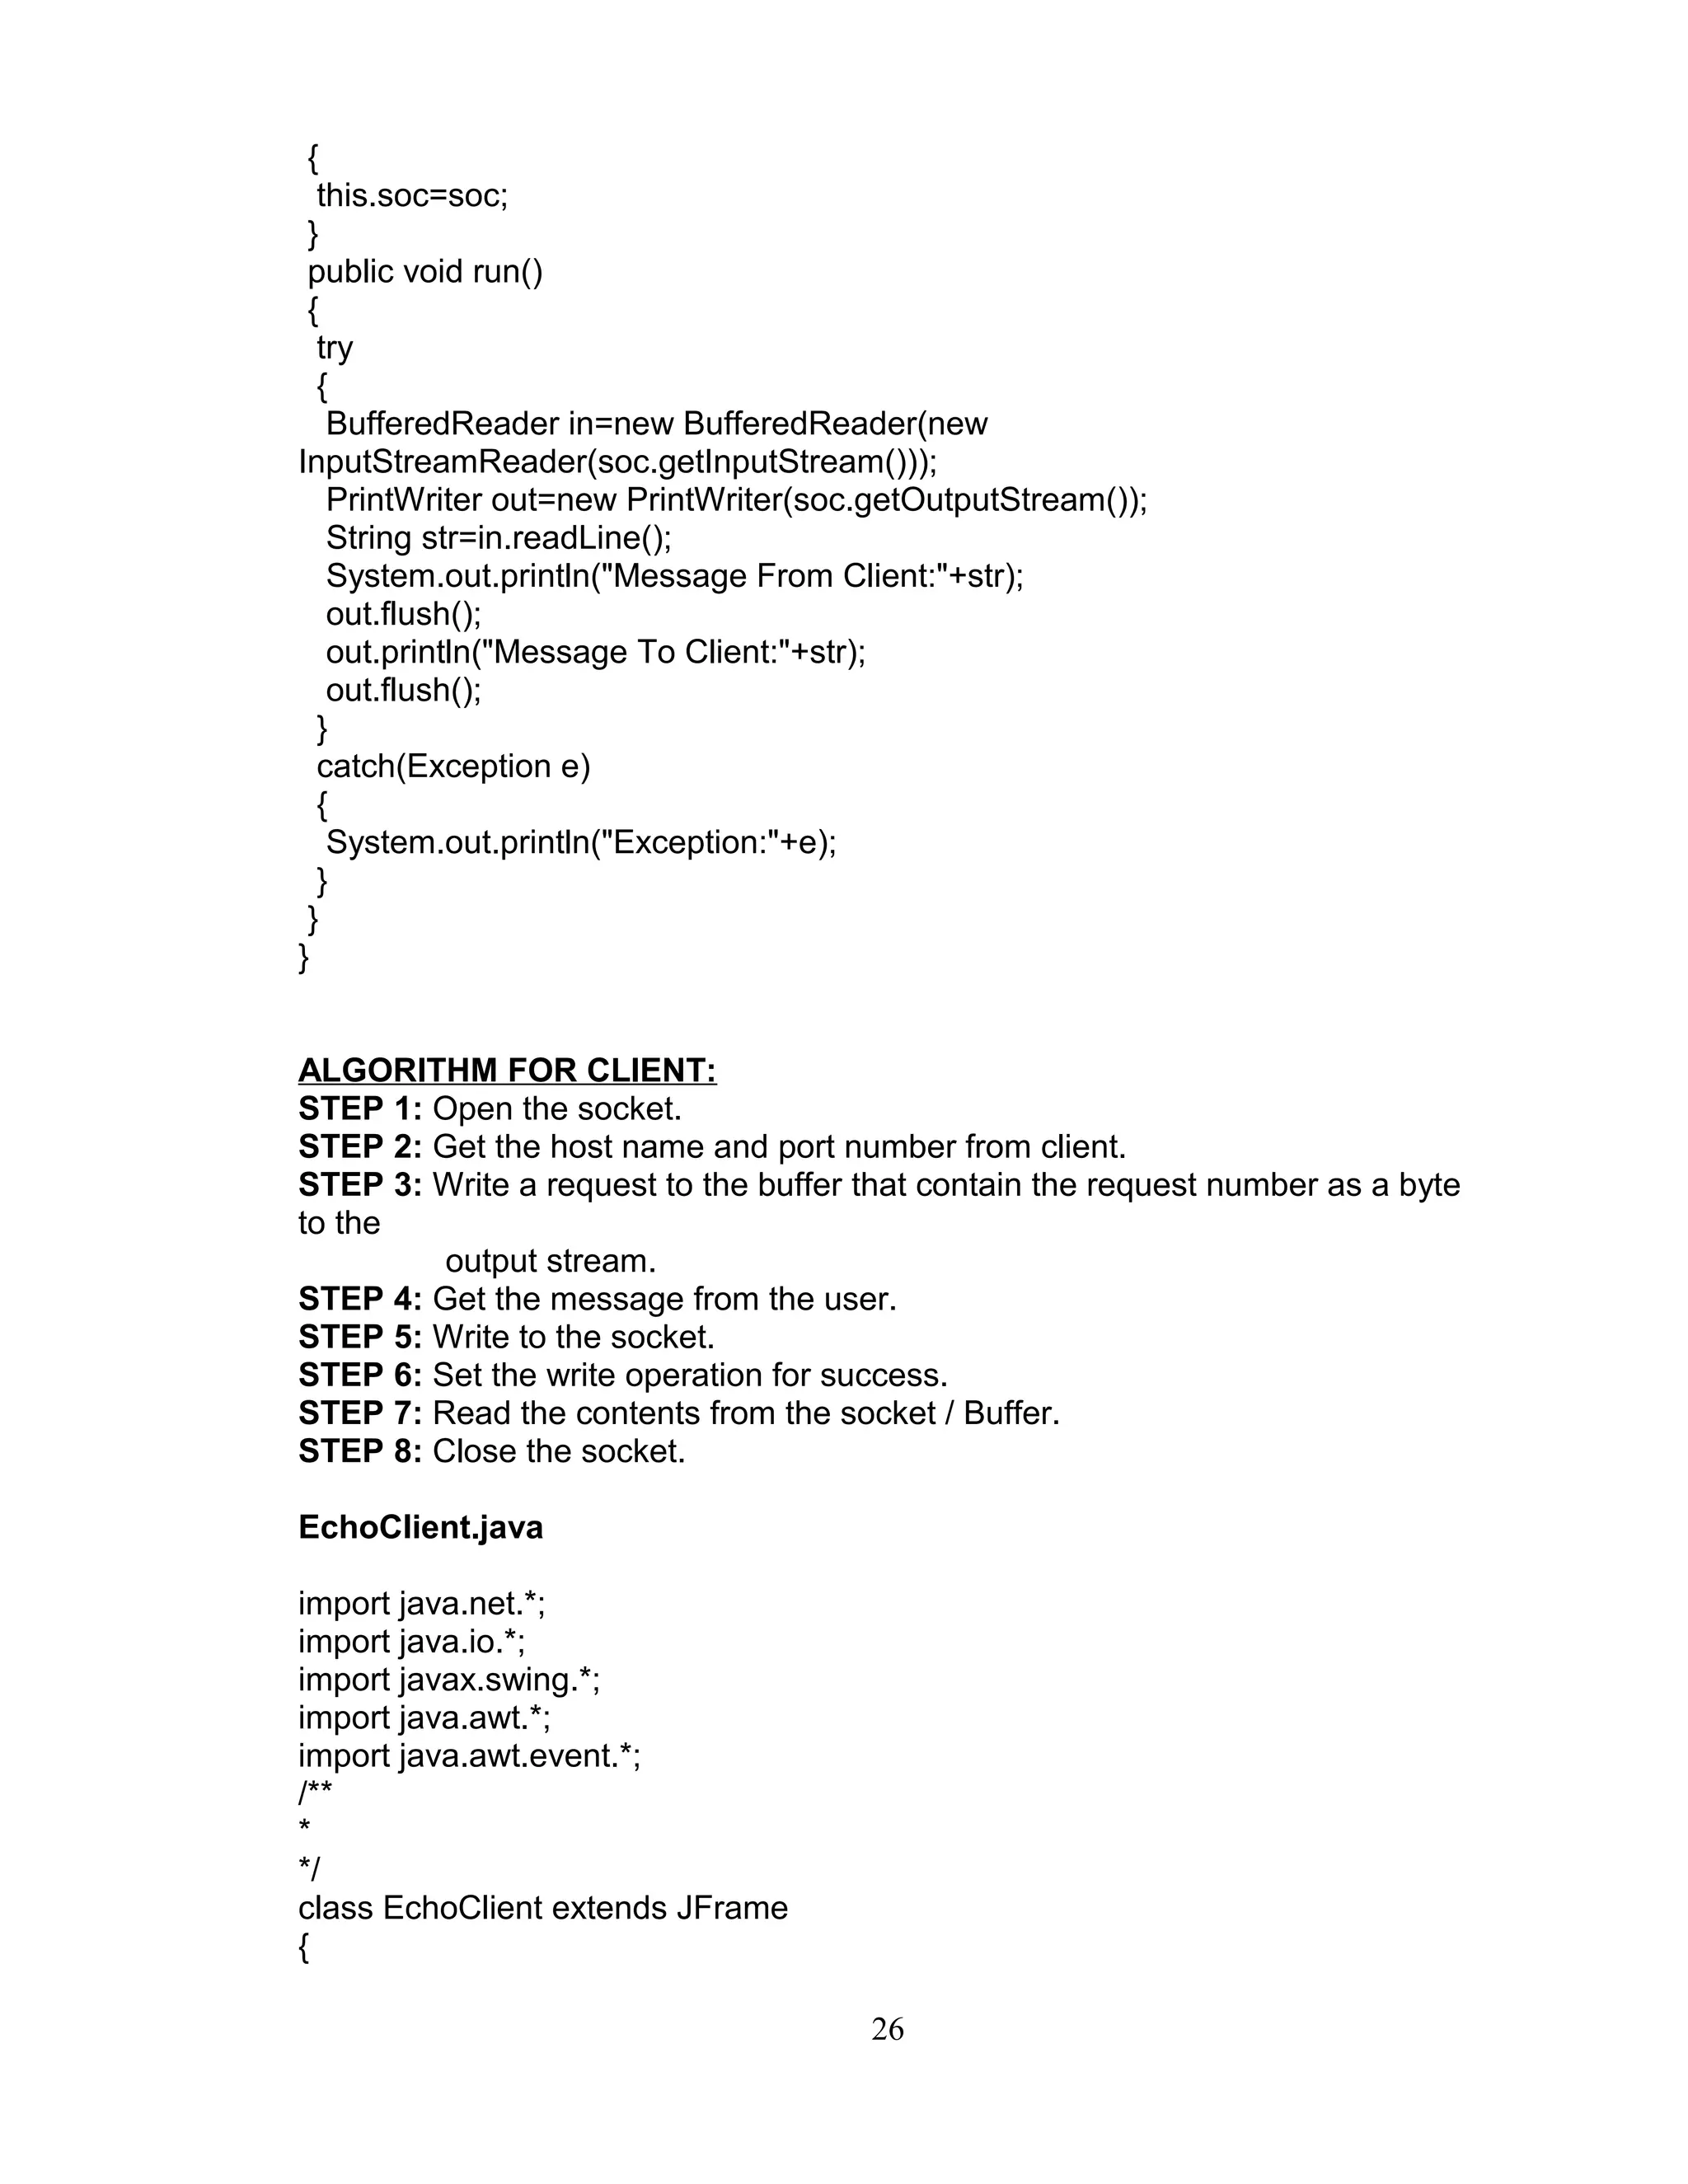
![10. IMPLEMENTATION OF MULTITHREADED
ECHO SERVER & ECHO CLIENT
Develop multi-threaded echo server and a corresponding GUI client in
Java.
ALGORITHM FOR SERVER:
STEP 1: Establish the connection of socket.
STEP 2: Assign the local Protocol address to the socket.
STEP 3: Move the socket from closed to listener state and provide maximum no.
of Connections.
STEP 4: Create a new socket connection using client address.
STEP 5: Read the data from the socket.
STEP 6: Write the data into socket.
STEP 7: Close the socket.
EchoServer.java
import java.io.*;
import java.net.*;
/**
*
*/
public class EchoServer
{
public static void main(String [] args)
{
System.out.println("Server Started....");
try
{
ServerSocket ss=new ServerSocket(300);
while(true)
{
Socket s= ss.accept();
Thread t = new ThreadedServer(s);
t.start();
}
}
catch(Exception e)
{
System.out.println("Error: " + e);
}
}
}
class ThreadedServer extends Thread
{
Socket soc;
public ThreadedServer(Socket soc)
25](https://image.slidesharecdn.com/cs2306javalabmanualupdated-140625085143-phpapp02/75/CS2309-JAVA-LAB-MANUAL-25-2048.jpg)
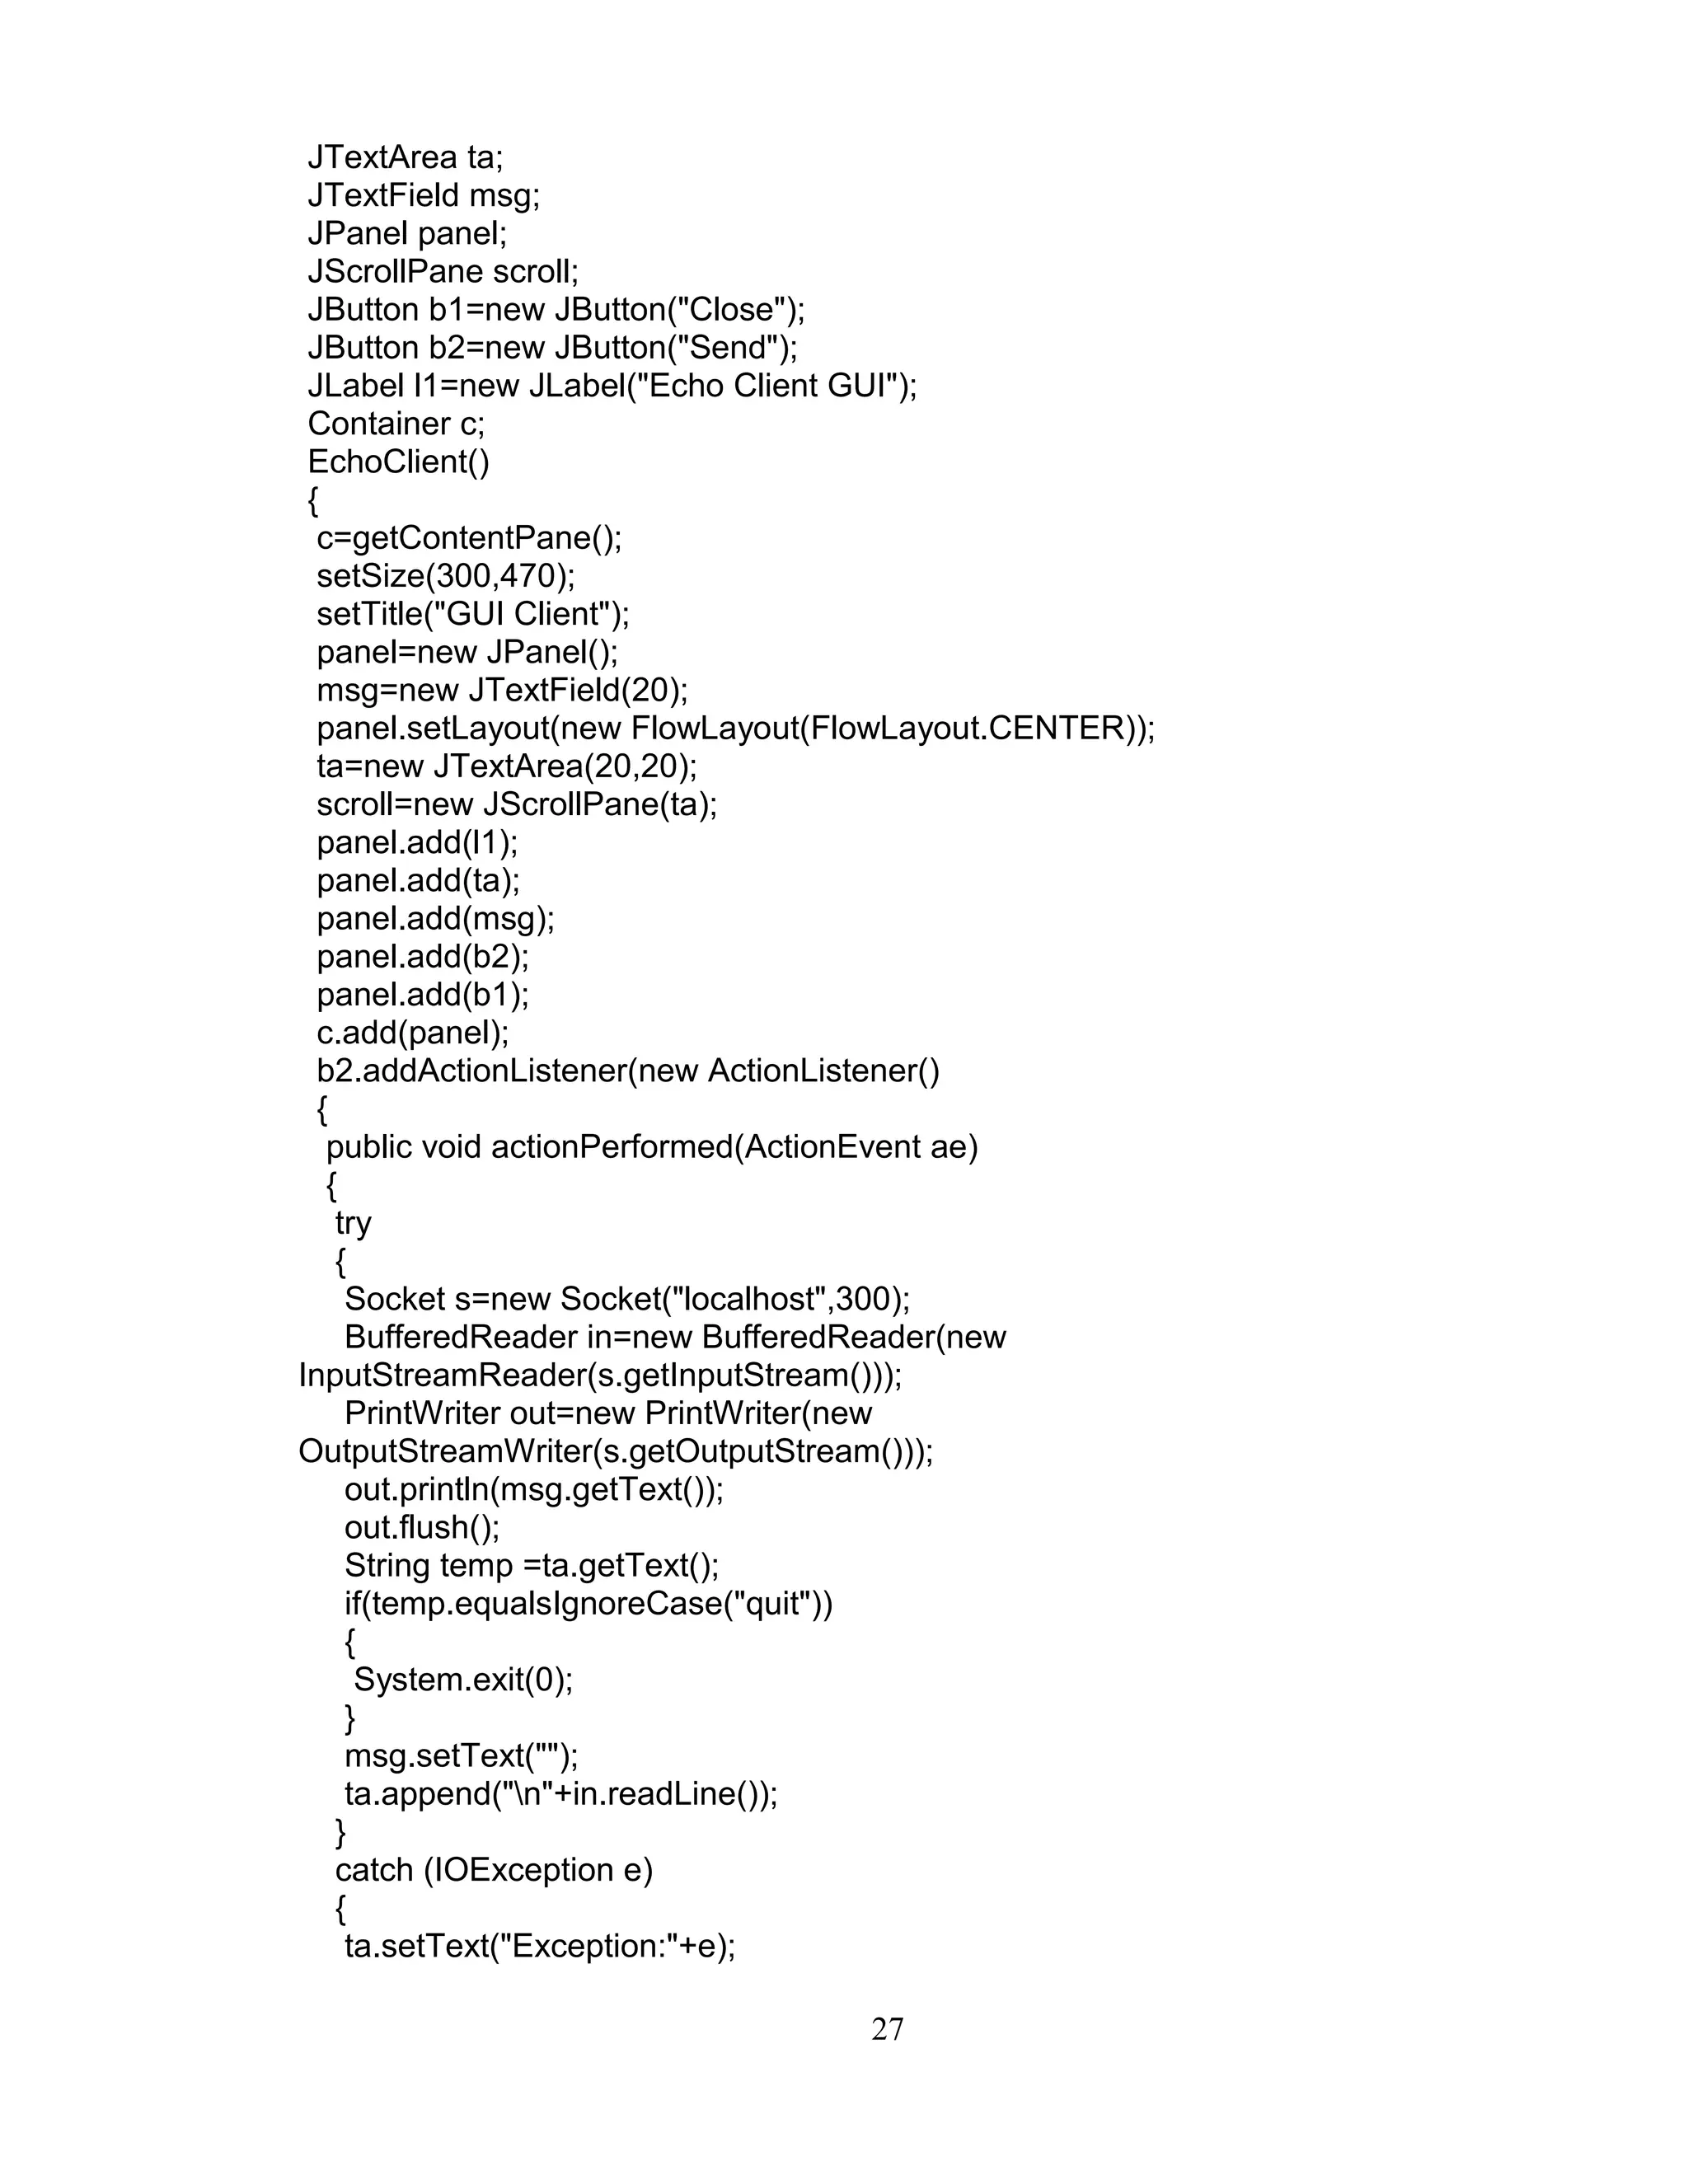
![}
}
});
b1.addActionListener(new ActionListener()
{
public void actionPerformed(ActionEvent e)
{
System.exit(0);
}
});
}
public static void main(String args[])
{
EchoClient frame=new EchoClient();
frame.setDefaultCloseOperation(JFrame.EXIT_ON_CLOSE);
frame.setVisible(true);
}
}
28](https://image.slidesharecdn.com/cs2306javalabmanualupdated-140625085143-phpapp02/75/CS2309-JAVA-LAB-MANUAL-28-2048.jpg)


The document provides the syllabus for a Java lab course. It outlines 11 programming assignments that students must complete, including developing classes for rational numbers, dates, Lisp-like lists, stacks, vehicles, currency conversion, and a scientific calculator. It provides sample code and algorithms for implementing a rational number class, date class, Lisp list operations, stack data structure using arrays and linked lists, vehicle class hierarchy demonstrating polymorphism, currency classes for serialization, and a basic calculator using event-driven GUI programming.


![Exercise1[5points]Create the following classe](https://cdn.slidesharecdn.com/ss_thumbnails/exercise15pointscreatethefollowingclasse-220925022752-e1fd85b8-thumbnail.jpg?width=640&height=640&fit=bounds)