The document provides maintenance instructions for periodic maintenance of an XCITING 400i scooter. It details procedures for servicing the air filter, spark plugs, brake fluid, engine oil, and other components. The air filter is to be cleaned or replaced according to the maintenance schedule. Brake fluid should be inspected after 3,000 miles and flushed every 12 months or 6,000 miles. Engine oil is to be changed every 6,000 miles, using the specified fully synthetic 5W-50 oil. Other components like valves, belts, filters and fluids are also to be inspected and serviced periodically.
2009 Polaris Outlaw 90 Service Repair Manualjdnnnd efjmdd
This is the Highly Detailed factory service repair manual for the2009 POLARIS OUTLAW 90, this Service Manual has detailed illustrations as well as step by step instructions,It is 100 percents complete and intact. they are specifically written for the do-it-yourself-er as well as the experienced mechanic.2009 POLARIS OUTLAW 90 Service Repair Workshop Manual provides step-by-step instructions based on the complete dis-assembly of the machine. It is this level of detail, along with hundreds of photos and illustrations, that guide the reader through each service and repair procedure. Complete download comes in pdf format which can work under all PC based windows operating system and Mac also, All pages are printable. Using this repair manual is an inexpensive way to keep your vehicle working properly.
Service Repair Manual Covers:
General Information
Maintenance
Engine / Transmission
Fuel System
Body / Suspension / Steering
Brakes
CVT System
Electrical
Wire Diagram
File Format: PDF
Compatible: All Versions of Windows & Mac
Language: English
Requirements: Adobe PDF Reader
NO waiting, Buy from responsible seller and get INSTANT DOWNLOAD, Without wasting your hard-owned money on uncertainty or surprise! All pages are is great to have2009 POLARIS OUTLAW 90 Service Repair Workshop Manual.
Looking for some other Service Repair Manual,please check:
https://www.aservicemanualpdf.com/
Thanks for visiting!
This is the Highly Detailed factory service repair manual for the1999 TOYOTA COROLLA, this Service Manual has detailed illustrations as well as step by step instructions,It is 100 percents complete and intact. they are specifically written for the do-it-yourself-er as well as the experienced mechanic.1999 TOYOTA COROLLA Service Repair Workshop Manual provides step-by-step instructions based on the complete dis-assembly of the machine. It is this level of detail, along with hundreds of photos and illustrations, that guide the reader through each service and repair procedure. Complete download comes in pdf format which can work under all PC based windows operating system and Mac also, All pages are printable. Using this repair manual is an inexpensive way to keep your vehicle working properly.
Service Repair Manual Covers:
Maintenance
Engine
Control System
Mechanical
Fuel Service Specifications
Emission Control
Intake Exhaust Cooling
Lube
Ignition Starting Charging
Auto Transmission Clutch
Manual Transmission
Transfer Propeller Shaft
Drive Shaft
Differential
Axle Suspension
Tire & Wheel
Brake Control
Brake
Parking Brake
Steering Column
Power Steering
Air Condition
Suppl Restraint System
Seat Belt
Engine Immobilizer
Cruise Control
Wiper & Washer
Door Lock
Meter Audio/Visual
Horn
Windshield/Glass Mirror
Instrument Panel
Seat
Engine Hood/ Door
Exterior & Interior
Electrical
Multiplex/ Can Communication
And much more
File Format: PDF
Compatible: All Versions of Windows & Mac
Language: English
Requirements: Adobe PDF Reader
NO waiting, Buy from responsible seller and get INSTANT DOWNLOAD, Without wasting your hard-owned money on uncertainty or surprise! All pages are is great to have1999 TOYOTA COROLLA Service Repair Workshop Manual.
Looking for some other Service Repair Manual,please check:
https://www.aservicemanualpdf.com/
Thanks for visiting!
8
PERKINS 4.99M DIESEL ENGINE Service Repair Manualjknmms ekdms
This is the Highly Detailed factory service repair manual for thePERKINS 4.99M DIESEL ENGINE, this Service Manual has detailed illustrations as well as step by step instructions,It is 100 percents complete and intact. they are specifically written for the do-it-yourself-er as well as the experienced mechanic.PERKINS 4.99M DIESEL ENGINE Service Repair Workshop Manual provides step-by-step instructions based on the complete dis-assembly of the machine. It is this level of detail, along with hundreds of photos and illustrations, that guide the reader through each service and repair procedure. Complete download comes in pdf format which can work under all PC based windows operating system and Mac also, All pages are printable. Using this repair manual is an inexpensive way to keep your vehicle working properly.
Service Repair Manual Covers:
Engine Views
Technical Data
Operating and Maintenance
Fault Finding
Cylinder Head
Pistons and Connecting Rods
Crankshaft and Main Bearings
Cylinder Block and Liners
Timing Case and Drive
Timing
Lubricating System
Cooling System
Fuel System and Air Cleaners
Flywheel and Flywheel Housing
Ancillaries
Lubricating Oil Data
Approved Service Tools
File Format: PDF
Compatible: All Versions of Windows & Mac
Language: English
Requirements: Adobe PDF Reader
NO waiting, Buy from responsible seller and get INSTANT DOWNLOAD, Without wasting your hard-owned money on uncertainty or surprise! All pages are is great to havePERKINS 4.99M DIESEL ENGINE Service Repair Workshop Manual.
Looking for some other Service Repair Manual,please check:
https://www.aservicemanualpdf.com/
Thanks for visiting!
8
Are the X-Men Marvel or DC An In-Depth Exploration.pdfXtreame HDTV
The world of comic books is vast and filled with iconic characters, gripping storylines, and legendary rivalries. Among the most famous groups of superheroes are the X-Men. Created in the early 1960s, the X-Men have become a cultural phenomenon, featuring in comics, animated series, and blockbuster movies. A common question among newcomers to the comic book world is: Are the X-Men Marvel or DC? This article delves into the history, creators, and significant moments of the X-Men to provide a comprehensive answer.
Tom Selleck Net Worth: A Comprehensive Analysisgreendigital
Over several decades, Tom Selleck, a name synonymous with charisma. From his iconic role as Thomas Magnum in the television series "Magnum, P.I." to his enduring presence in "Blue Bloods," Selleck has captivated audiences with his versatility and charm. As a result, "Tom Selleck net worth" has become a topic of great interest among fans. and financial enthusiasts alike. This article delves deep into Tom Selleck's wealth, exploring his career, assets, endorsements. and business ventures that contribute to his impressive economic standing.
Follow us on: Pinterest
Early Life and Career Beginnings
The Foundation of Tom Selleck's Wealth
Born on January 29, 1945, in Detroit, Michigan, Tom Selleck grew up in Sherman Oaks, California. His journey towards building a large net worth began with humble origins. , Selleck pursued a business administration degree at the University of Southern California (USC) on a basketball scholarship. But, his interest shifted towards acting. leading him to study at the Hills Playhouse under Milton Katselas.
Minor roles in television and films marked Selleck's early career. He appeared in commercials and took on small parts in T.V. series such as "The Dating Game" and "Lancer." These initial steps, although modest. laid the groundwork for his future success and the growth of Tom Selleck net worth. Breakthrough with "Magnum, P.I."
The Role that Defined Tom Selleck's Career
Tom Selleck's breakthrough came with the role of Thomas Magnum in the CBS television series "Magnum, P.I." (1980-1988). This role made him a household name and boosted his net worth. The series' popularity resulted in Selleck earning large salaries. leading to financial stability and increased recognition in Hollywood.
"Magnum P.I." garnered high ratings and critical acclaim during its run. Selleck's portrayal of the charming and resourceful private investigator resonated with audiences. making him one of the most beloved television actors of the 1980s. The success of "Magnum P.I." played a pivotal role in shaping Tom Selleck net worth, establishing him as a major star.
Film Career and Diversification
Expanding Tom Selleck's Financial Portfolio
While "Magnum, P.I." was a cornerstone of Selleck's career, he did not limit himself to television. He ventured into films, further enhancing Tom Selleck net worth. His filmography includes notable movies such as "Three Men and a Baby" (1987). which became the highest-grossing film of the year, and its sequel, "Three Men and a Little Lady" (1990). These box office successes contributed to his wealth.
Selleck's versatility allowed him to transition between genres. from comedies like "Mr. Baseball" (1992) to westerns such as "Quigley Down Under" (1990). This diversification showcased his acting range. and provided many income streams, reinforcing Tom Selleck net worth.
Television Resurgence with "Blue Bloods"
Sustaining Wealth through Consistent Success
In 2010, Tom Selleck began starring as Frank Reagan i
Maximizing Your Streaming Experience with XCIPTV- Tips for 2024.pdfXtreame HDTV
In today’s digital age, streaming services have become an integral part of our entertainment lives. Among the myriad of options available, XCIPTV stands out as a premier choice for those seeking seamless, high-quality streaming. This comprehensive guide will delve into the features, benefits, and user experience of XCIPTV, illustrating why it is a top contender in the IPTV industry.
Skeem Saam in June 2024 available on ForumIsaac More
Monday, June 3, 2024 - Episode 241: Sergeant Rathebe nabs a top scammer in Turfloop. Meikie is furious at her uncle's reaction to the truth about Ntswaki.
Tuesday, June 4, 2024 - Episode 242: Babeile uncovers the truth behind Rathebe’s latest actions. Leeto's announcement shocks his employees, and Ntswaki’s ordeal haunts her family.
Wednesday, June 5, 2024 - Episode 243: Rathebe blocks Babeile from investigating further. Melita warns Eunice to stay clear of Mr. Kgomo.
Thursday, June 6, 2024 - Episode 244: Tbose surrenders to the police while an intruder meddles in his affairs. Rathebe's secret mission faces a setback.
Friday, June 7, 2024 - Episode 245: Rathebe’s antics reach Kganyago. Tbose dodges a bullet, but a nightmare looms. Mr. Kgomo accuses Melita of witchcraft.
Monday, June 10, 2024 - Episode 246: Ntswaki struggles on her first day back at school. Babeile is stunned by Rathebe’s romance with Bullet Mabuza.
Tuesday, June 11, 2024 - Episode 247: An unexpected turn halts Rathebe’s investigation. The press discovers Mr. Kgomo’s affair with a young employee.
Wednesday, June 12, 2024 - Episode 248: Rathebe chases a criminal, resorting to gunfire. Turf High is rife with tension and transfer threats.
Thursday, June 13, 2024 - Episode 249: Rathebe traps Kganyago. John warns Toby to stop harassing Ntswaki.
Friday, June 14, 2024 - Episode 250: Babeile is cleared to investigate Rathebe. Melita gains Mr. Kgomo’s trust, and Jacobeth devises a financial solution.
Monday, June 17, 2024 - Episode 251: Rathebe feels the pressure as Babeile closes in. Mr. Kgomo and Eunice clash. Jacobeth risks her safety in pursuit of Kganyago.
Tuesday, June 18, 2024 - Episode 252: Bullet Mabuza retaliates against Jacobeth. Pitsi inadvertently reveals his parents’ plans. Nkosi is shocked by Khwezi’s decision on LJ’s future.
Wednesday, June 19, 2024 - Episode 253: Jacobeth is ensnared in deceit. Evelyn is stressed over Toby’s case, and Letetswe reveals shocking academic results.
Thursday, June 20, 2024 - Episode 254: Elizabeth learns Jacobeth is in Mpumalanga. Kganyago's past is exposed, and Lehasa discovers his son is in KZN.
Friday, June 21, 2024 - Episode 255: Elizabeth confirms Jacobeth’s dubious activities in Mpumalanga. Rathebe lies about her relationship with Bullet, and Jacobeth faces theft accusations.
Monday, June 24, 2024 - Episode 256: Rathebe spies on Kganyago. Lehasa plans to retrieve his son from KZN, fearing what awaits.
Tuesday, June 25, 2024 - Episode 257: MaNtuli fears for Kwaito’s safety in Mpumalanga. Mr. Kgomo and Melita reconcile.
Wednesday, June 26, 2024 - Episode 258: Kganyago makes a bold escape. Elizabeth receives a shocking message from Kwaito. Mrs. Khoza defends her husband against scam accusations.
Thursday, June 27, 2024 - Episode 259: Babeile's skillful arrest changes the game. Tbose and Kwaito face a hostage crisis.
Friday, June 28, 2024 - Episode 260: Two women face the reality of being scammed. Turf is rocked by breaking
Meet Crazyjamjam - A TikTok Sensation | Blog EternalBlog Eternal
Crazyjamjam, the TikTok star everyone's talking about! Uncover her secrets to success, viral trends, and more in this exclusive feature on Blog Eternal.
Source: https://blogeternal.com/celebrity/crazyjamjam-leaks/
From Slave to Scourge: The Existential Choice of Django Unchained. The Philos...Rodney Thomas Jr
#SSAPhilosophy #DjangoUnchained #DjangoFreeman #ExistentialPhilosophy #Freedom #Identity #Justice #Courage #Rebellion #Transformation
Welcome to SSA Philosophy, your ultimate destination for diving deep into the profound philosophies of iconic characters from video games, movies, and TV shows. In this episode, we explore the powerful journey and existential philosophy of Django Freeman from Quentin Tarantino’s masterful film, "Django Unchained," in our video titled, "From Slave to Scourge: The Existential Choice of Django Unchained. The Philosophy of Django Freeman!"
From Slave to Scourge: The Existential Choice of Django Unchained – The Philosophy of Django Freeman!
Join me as we delve into the existential philosophy of Django Freeman, uncovering the profound lessons and timeless wisdom his character offers. Through his story, we find inspiration in the power of choice, the quest for justice, and the courage to defy oppression. Django Freeman’s philosophy is a testament to the human spirit’s unyielding drive for freedom and justice.
Don’t forget to like, comment, and subscribe to SSA Philosophy for more in-depth explorations of the philosophies behind your favorite characters. Hit the notification bell to stay updated on our latest videos. Let’s discover the principles that shape these icons and the profound lessons they offer.
Django Freeman’s story is one of the most compelling narratives of transformation and empowerment in cinema. A former slave turned relentless bounty hunter, Django’s journey is not just a physical liberation but an existential quest for identity, justice, and retribution. This video delves into the core philosophical elements that define Django’s character and the profound choices he makes throughout his journey.
Link to video: https://youtu.be/GszqrXk38qk
As a film director, I have always been awestruck by the magic of animation. Animation, a medium once considered solely for the amusement of children, has undergone a significant transformation over the years. Its evolution from a rudimentary form of entertainment to a sophisticated form of storytelling has stirred my creativity and expanded my vision, offering limitless possibilities in the realm of cinematic storytelling.
In the vast landscape of cinema, stories have been told, retold, and reimagined in countless ways. At the heart of this narrative evolution lies the concept of a "remake". A successful remake allows us to revisit cherished tales through a fresh lens, often reflecting a different era's perspective or harnessing the power of advanced technology. Yet, the question remains, what makes a remake successful? Today, we will delve deeper into this subject, identifying the key ingredients that contribute to the success of a remake.
From the Editor's Desk: 115th Father's day Celebration - When we see Father's day in Hindu context, Nanda Baba is the most vivid figure which comes to the mind. Nanda Baba who was the foster father of Lord Krishna is known to provide love, care and affection to Lord Krishna and Balarama along with his wife Yashoda; Letter’s to the Editor: Mother's Day - Mother is a precious life for their children. Mother is life breath for her children. Mother's lap is the world happiness whose debt can never be paid.
Panchayat Season 3 - Official Trailer.pdfSuleman Rana
The dearest series "Panchayat" is set to make a victorious return with its third season, and the fervor is discernible. The authority trailer, delivered on May 28, guarantees one more enamoring venture through the country heartland of India.
Jitendra Kumar keeps on sparkling as Abhishek Tripathi, the city-reared engineer who ends up functioning as the secretary of the Panchayat office in the curious town of Phulera. His nuanced depiction of a young fellow exploring the difficulties of country life while endeavoring to adjust to his new environmental factors has earned far and wide recognition.
Neena Gupta and Raghubir Yadav return as Manju Devi and Brij Bhushan Dubey, separately. Their dynamic science and immaculate acting rejuvenate the hardships of town administration. Gupta's depiction of the town Pradhan with an ever-evolving outlook, matched with Yadav's carefully prepared exhibition, adds profundity and credibility to the story.
New Difficulties and Experiences
The trailer indicates new difficulties anticipating the characters, as Abhishek keeps on wrestling with his part in the town and his yearnings for a superior future. The series has reliably offset humor with social editorial, and Season 3 looks ready to dig much more profound into the intricacies of rustic organization and self-awareness.
Watchers can hope to see a greater amount of the enchanting and particular residents who have become fan top picks. Their connections and the one of a kind cut of-life situations give a reviving and interesting portrayal of provincial India, featuring the two its appeal and its difficulties.
A Mix of Humor and Heart
One of the signs of "Panchayat" is its capacity to mix humor with sincere narrating. The trailer features minutes that guarantee to convey giggles, as well as scenes that pull at the heartstrings. This equilibrium has been a critical calculate the show's prosperity, resounding with crowds across different socioeconomics.
Creation Greatness
The creation quality remaining parts first rate, with the beautiful setting of Phulera town filling in as a scenery that upgrades the narrating. The meticulousness in portraying provincial life, joined with sharp composition and solid exhibitions, guarantees that "Panchayat" keeps on hanging out in the packed web series scene.
Expectation and Delivery
As the delivery date draws near, expectation for "Panchayat" Season 3 is at a record-breaking high. The authority trailer has previously created critical buzz, with fans enthusiastically anticipating the continuation of Abhishek Tripathi's excursion and the new undertakings that lie ahead in Phulera.
All in all, the authority trailer for "Panchayat" Season 3 recommends that watchers are in for another drawing in and engaging ride. Yet again with its charming characters, convincing story, and ideal mix of humor and show, the new season is set to enamor crowds. Write in your schedules and prepare to get back to the endearing universe of "Panchayat."
Scandal! Teasers June 2024 on etv Forum.co.zaIsaac More
Monday, 3 June 2024
Episode 47
A friend is compelled to expose a manipulative scheme to prevent another from making a grave mistake. In a frantic bid to save Jojo, Phakamile agrees to a meeting that unbeknownst to her, will seal her fate.
Tuesday, 4 June 2024
Episode 48
A mother, with her son's best interests at heart, finds him unready to heed her advice. Motshabi finds herself in an unmanageable situation, sinking fast like in quicksand.
Wednesday, 5 June 2024
Episode 49
A woman fabricates a diabolical lie to cover up an indiscretion. Overwhelmed by guilt, she makes a spontaneous confession that could be devastating to another heart.
Thursday, 6 June 2024
Episode 50
Linda unwittingly discloses damning information. Nhlamulo and Vuvu try to guide their friend towards the right decision.
Friday, 7 June 2024
Episode 51
Jojo's life continues to spiral out of control. Dintle weaves a web of lies to conceal that she is not as successful as everyone believes.
Monday, 10 June 2024
Episode 52
A heated confrontation between lovers leads to a devastating admission of guilt. Dintle's desperation takes a new turn, leaving her with dwindling options.
Tuesday, 11 June 2024
Episode 53
Unable to resort to violence, Taps issues a verbal threat, leaving Mdala unsettled. A sister must explain her life choices to regain her brother's trust.
Wednesday, 12 June 2024
Episode 54
Winnie makes a very troubling discovery. Taps follows through on his threat, leaving a woman reeling. Layla, oblivious to the truth, offers an incentive.
Thursday, 13 June 2024
Episode 55
A nosy relative arrives just in time to thwart a man's fatal decision. Dintle manipulates Khanyi to tug at Mo's heartstrings and get what she wants.
Friday, 14 June 2024
Episode 56
Tlhogi is shocked by Mdala's reaction following the revelation of their indiscretion. Jojo is in disbelief when the punishment for his crime is revealed.
Monday, 17 June 2024
Episode 57
A woman reprimands another to stay in her lane, leading to a damning revelation. A man decides to leave his broken life behind.
Tuesday, 18 June 2024
Episode 58
Nhlamulo learns that due to his actions, his worst fears have come true. Caiphus' extravagant promises to suppliers get him into trouble with Ndu.
Wednesday, 19 June 2024
Episode 59
A woman manages to kill two birds with one stone. Business doom looms over Chillax. A sobering incident makes a woman realize how far she's fallen.
Thursday, 20 June 2024
Episode 60
Taps' offer to help Nhlamulo comes with hidden motives. Caiphus' new ideas for Chillax have MaHilda excited. A blast from the past recognizes Dintle, not for her newfound fame.
Friday, 21 June 2024
Episode 61
Taps is hungry for revenge and finds a rope to hang Mdala with. Chillax's new job opportunity elicits mixed reactions from the public. Roommates' initial meeting starts off on the wrong foot.
Monday, 24 June 2024
Episode 62
Taps seizes new information and recruits someone on the inside. Mary's new job
Hollywood Actress - The 250 hottest galleryZsolt Nemeth
Hollywood Actress amazon album eminent worldwide media, female-singer, actresses, alhletina-woman, 250 collection.
Highest and photoreal-print exclusive testament PC collage.
Focused television virtuality crime, novel.
The sheer afterlife of the work is activism-like hollywood-actresses point com.
173 Illustrate, 250 gallery, 154 blog, 120 TV serie logo, 17 TV president logo, 183 active hyperlink.
HD AI face enhancement 384 page plus Bowker ISBN, Congress LLCL or US Copyright.
1.
2. Periodic Maintenance > Periodic Maintenance Chart
XCITING 400i
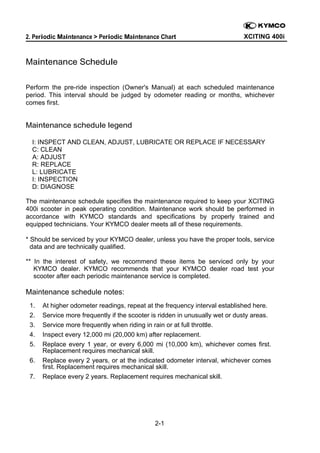
Maintenance Schedule
Perform the pre-ride inspection (Owner's Manual) at each scheduled maintenance
period. This interval should be judged by odometer reading or months, whichever
comes first.
Maintenance schedule legend
I: INSPECT AND CLEAN, ADJUST, LUBRICATE OR REPLACE IF NECESSARY
C: CLEAN
A: ADJUST
R: REPLACE
L: LUBRICATE
I: INSPECTION
D: DIAGNOSE
The maintenance schedule specifies the maintenance required to keep your XCITING
400i scooter in peak operating condition. Maintenance work should be performed in
accordance with KYMCO standards and specifications by properly trained and
equipped technicians. Your KYMCO dealer meets all of these requirements.
* Should be serviced by your KYMCO dealer, unless you have the proper tools, service
data and are technically qualified.
** In the interest of safety, we recommend these items be serviced only by your
KYMCO dealer. KYMCO recommends that your KYMCO dealer road test your
scooter after each periodic maintenance service is completed.
Maintenance schedule notes:
1.
2.
3.
4.
5.
6.
7.
At higher odometer readings, repeat at the frequency interval established here.
Service more frequently if the scooter is ridden in unusually wet or dusty areas.
Service more frequently when riding in rain or at full throttle.
Inspect every 12,000 mi (20,000 km) after replacement.
Replace every 1 year, or every 6,000 mi (10,000 km), whichever comes first.
Replacement requires mechanical skill.
Replace every 2 years, or at the indicated odometer interval, whichever comes
first. Replacement requires mechanical skill.
Replace every 2 years. Replacement requires mechanical skill.
2-1
2.
XCITING 400i
2. Periodic Maintenance > Periodic Maintenance Chart
FREQUENCY
WHICHEVER
COMES FIRST
ODOMETER READING
X 1000km
Note
5
10
15
20
25
30
35
40
X 1000mi
ITEM
1
0.6
3
6
9
12
15
18
22
24
1
6
12
18
24
30
36
42
46
R
R
R
R
R
R
R
R
Month
*
AIR CLEANER
SPARK PLUGS
I
R
I
R
I
R
I
R
*
THROTTLE OPERATION
I
I
I
I
I
I
I
I
*
VALVE CLEARANCE
I
A
I
A
I
A
I
A
*
FUEL LINE
CRANKCASE BREATHER
*
ENGINE OIL
*
ENGINE OIL SCREEN
*
ENGINE OIL FILTER
*
ENGINE IDLE SPEED
*
TRANSMISSION FLUID
Note5
*
DRIVE BELT
Note4
**
CLUTCH SHOE WEAR
BRAKE FLUID
Note2
I
I
I
I
C
C
C
C
C
C
C
C
C
R
R
R
R
R
R
R
R
R
C
Note3
R
C
R
C
R
C
R
R
R
R
R
R
R
R
R
R
D
I
D
D
R
R
D
R
R
R
I
I
I
R
I
I
I
I
I
R
I
I
R
I
R
I
R
I
R
BRAKE PAD WEAR
I
I
I
I
I
I
I
I
BRAKE SYSTEM
I
I
I
I
I
I
I
I
*
BRAKE LIGHT SWITCH
I
I
I
I
I
I
I
I
**
STEERING BEARINGS
I
I
I
I
I
I
I
I
*
HEADLIGHT AIM
I
I
I
I
I
I
I
I
*
NUTS, BOLTS,
I
I
I
I
I
I
I
I
**
WHEELS/TIRES
I
I
I
I
I
I
I
I
**
COOLANT
Note7
FASTENERS
**
INJECTOR
**
I
CLUTCH SHOE WEAR
I
I
I
I
R
I
C
D
C
D
C
D
C
I
2-2
I
D
Note6
I
I
I
3.
2. Periodic Maintenance > Air Filter Servicing
XCITING 400i
Air Filter Servicing
Replace the air filter according to the Maintenance Schedule, and more often in
exceptionally rainy or dusty areas.
Removal
Remove the 8 air filter cover screws with a #2 Phillips screwdriver.
Remove the air filter cover.
2‐3
4.
2. Periodic Maintenance > Air Filter Servicing
XCITING 400i
Remove the 7 air filter bolts with an 8 mm socket or a #2 Phillips
screwdriver.
Remove the air filter from the airbox. Discard the air filter in favor
of a new item.
Caution:
• The air cleaner element has a viscous type paper element. Do not clean it with
compressed air.
• Be sure to install the air cleaner element and cover securely.
2‐4
5.
2. Periodic Maintenance > Air Filter Servicing
Installation
Fit the new air filter into place.
Insert the 7 air filter bolts. Tighten the air filter bolts securely with
an 8 mm socket or a #2 Phillips screwdriver.
2‐5
XCITING 400i
6.
2. Periodic Maintenance > Air Filter Servicing
Install the air filter cover.
Install the 8 air filter cover screws and tighten them securely with
a #2 Phillips screwdriver.
2‐6
XCITING 400i
7.
XCITING 400i
2. Periodic Maintenance > Brake Fluid
Brake Fluid
The KYMCO XCITING 400i uses DOT 4 brake fluid that should be
inspected after 3,000 mi (5,000 km) of use. It should be flushed and bled
every 12 months, 6,000 mi (10,000 km), whenever the brakes feel spongy,
or if the brake system has been taken apart and rebuilt. Always use fresh
brake fluid from a tightly sealed container.
SAFETY FIRST: Protective gloves and eyewear are recommended at this
point.
Warning: Brake fluid is very caustic and can damage paint, chrome and
plastic. Wipe up any spills immediately.
Inspection
Turn the handlebars until the top of the master cylinder reservoir
is level with the ground. Do this for both master cylinder
reservoirs and check the level of brake fluid.
2‐7
8.
XCITING 400i
2. Periodic Maintenance > Brake Fluid
Draining
The brake bleeding process is the same for the front and rear brakes.
Remove the two master cylinder cover screws with a #2 Phillips head
screwdriver.
Remove the master cylinder cover, plastic piece and rubber diaphragm.
Clean and inspect the rubber diaphragm for tears or other damage.
Replace as necessary.
2‐8
9.
XCITING 400i
2. Periodic Maintenance > Brake Fluid
Pull off the rubber cap over the bleeder valve and crack open
the bleeder valve on the brake caliper using an 8 mm wrench.
This valve is usually very tight so use a box end wrench or a 6
point socket and ratchet to prevent rounding off the head.
Snug the bleeder valve back down.
Open the valve and remove the old brake fluid with a Mighty -Vac or a
similar device.
2‐9
10.
XCITING 400i
2. Periodic Maintenance > Brake Fluid
Bleeding
Place a length of 6 mm inside diameter clear hose on the
bleeder valve and place the other end in a suitable container.
A spare battery vent hose works well for this job.
Fill the brake fluid with the proper type from a fresh, newly
opened container.
2‐10
11.
XCITING 400i
2. Periodic Maintenance > Brake Fluid
Pump the brake lever several times and hold the lever in.
While holding the lever in, crack open the bleeder valve. The
front brake lever will travel all the way to the grip and brake
fluid and/or air will come out of the bleeder valve into the 6 mm
hose. Tighten the bleeder valve before releasing the front
brake lever. Pump the lever several times again and repeat the
process.
Be certain to check the master cylinder reservoir occasionally
to make sure the reservoir doesn't run dry. Add more brake
fluid as necessary. Continue this process until clean brake fluid
comes out of the bleeder valve and there are no air bubbles.
The brake lever should feel firm.
Tighten the bleeder valve to specification and push its rubber
cover over the nipple.
(Air Bleeder Valve Torque: 7.5 N-m or 5.5 lb-ft)
Make sure the reservoir has the proper amount of fluid.
2‐11
12.
XCITING 400i
2. Periodic Maintenance > Brake Fluid
Place the rubber diaphragm, plastic piece and cover over the reservoir.
Thread in the reservoir cover screws and tighten them securely with a
#2 Phillips screwdriver.
2‐12
13.
XCITING 400i
2. PeriodicMaintenance > Compression Test
Engine Compression Test
SAFETY FIRST: Protective gloves and eyewear are recommended at this point.
Before testing the compression make sure the cylinder head bolts are tightened
securely and the valve clearance is specification.
Thread a compression tester into the spark plug hole hand tight.
Hold the throttle all the way open. Crank the engine with the
starter motor until the needle on the gauge stops rising. Do not
crank the engine more than a few seconds.
Cylinder compression
15 kg/cm2
228 ± 28.4 psi
Low compression is an indication of excessive engine wear, possibly worn rings or
poorly sealing valves, or maybe a tight valve with not enough valve clearance. High
compression is possibly an indication of excessive carbon buildup on the piston or
performance modifications.
Install the spark plug.
2‐13
14. 2. Periodic Maintenance > Engine Oil
XCITING 400i
Engine Oil
SAFETY FIRST: Protective gloves and eyewear are recommended at this point.
Caution: Hot engine oil can burn. Avoid letting used motor oil contact exposed skin.
TROUBLESHOOTING
Oil level too low
1. Natural oil consumption
2. Oil leaks
3. Worn or poorly installed piston rings
4. Worn valve guide or seal
Poor lubrication pressure
1. Oil level too low
2. Clogged filter or oil passages
3. No use the specified oil
Oil Specifications
Use a fully synthetic quality 4-stroke engine oil to ensure longer service
life of the scooter. Only use oils that have a SJ rating above per the API
service classification.
Engine oil viscosity : SAE 5W-50
2‐14
15. 2. Periodic Maintenance > Engine Oil
XCITING 400i
If these viscosities are not available, select an alternative engine oil
according to the chart shown above.
Engine oil capacity
At disassembly
At change
1.5 Liter
1.3 Liter
Inspection
Oil Level
Check the engine oil level each day before operating the scooter.
Place the motorcycle upright on level ground for engine oil level check.
Run the engine for 2 ~ 3 minutes and check the oil level after the engine is
stopped for 2 ~ 3 minutes.
2‐15
16. 2. Periodic Maintenance > Engine Oil
XCITING 400i
The oil filler cap/dipstick is located on the right side of the engine.
Remove the oil filler cap/dipstick and wipe off the oil. Inspect the
O-ring and replace it as needed. Insert the dipstick in without
threading it in. Remove the dipstick and check the oil level.
2‐16
17. 2. Periodic Maintenance > Engine Oil
XCITING 400i
The level must be maintained between the upper (1) and lower level (2)
marks on the oil filler cap/dipstick.
If the oil level is at or below the lower mark add more of the
same type and brand of oil to the engine through the oil filler
hole. If the oil level is to high remove the drain plug and the
excess oil.
Servicing
Draining
Warm the engine as with the inspection, this will heat the engine and
allow the oil to drain out faster and more completely. The vehicle should
be on level ground. Stop the engine.
Caution: Hot engine oil can burn. Avoid letting used motor oil contact
exposed skin.
2‐17
18. 2. Periodic Maintenance > Engine Oil
XCITING 400i
Place an oil pan under the engine. The oil drain bolt is located
on the left side of the engine.
Loosen the engine oil drain bolt with a 17 mm socket. Remove
the bolt and allow the oil to drain into the pan.
2‐18
19. 2. Periodic Maintenance > Engine Oil
XCITING 400i
Discard the old sealing washer.
Remove the oil filler cap to allow for faster oil draining. Inspect
the oil filler cap O-ring and replace it as needed.
2‐19
20. 2. Periodic Maintenance > Engine Oil
XCITING 400i
When the oil has drained completely Install the drain bolt with a
new sealing washer. Tighten the drain bolt to specification with
a 17 mm socket.
Torque
Item
Qty
Oil Drain bolt
1
kgf-m
lb-ft
2.5
18.08
Remarks
New sealing washer
Strainer Screen
Remove the oil strainer screen bolt with a 17 mm socket.
Inspect the strainer screen bolt O-ring and replace it as needed.
2‐20
21. 2. Periodic Maintenance > Engine Oil
XCITING 400i
Remove the oil strainer screen.
Remove the O-rings from the oil strainer screen and inspect
them. Replace the O-rings if they are in poor condition. Inspect
the oil strainer screen for debris and damage. Clean it with a
high flash point solvent and compressed air. Metal debris in the
strainer screen can be an indicator of engine wear or damage.
2‐21
22. 2. Periodic Maintenance > Engine Oil
XCITING 400i
Return the O-rings to the oil strainer screen and install it into the left
side of the engine. Tighten the oil strainer screen cap to
specification with a 17 mm socket.
Item
Engine oil strainer cap
Qty
1
Torque
kgf-m
1.0
lb-ft
7.2
Filter Replacement
The oil filter compartment is located on the bottom of the engine
below the oil filler cap/dipstick. Ready an oil drain pan to catch
any remaining engine oil.
2‐22
23. 2. Periodic Maintenance > Engine Oil
XCITING 400i
Loosen the oil filter cap with a 24 mm socket.
Remove the oil filter cap with spring and take out the used oil filter.
2‐23
24. 2. Periodic Maintenance > Engine Oil
XCITING 400i
Inspect the oil filter cap O-ring and spring. Replace the items if they are
in poor condition.
Install the spring to the oil filter cap. Apply a light coat of engine oil to the
oil filter cap O-ring.
2‐24
25. 2. Periodic Maintenance > Engine Oil
XCITING 400i
Pour a small amount of fresh engine oil into the oil filter. Insert
the oil filter into place with the rubber seal side facing up.
Install the oil filter cap with spring. Makes sure the spring fits
against the filter correctly. Tighten the oil filter cap securely with
a 24 mm socket.
2‐25
26. 2. Periodic Maintenance > Engine Oil
XCITING 400i
Filling
Add the oil to the engine through the oil filler/dipstick hole.
Use a fully synthetic quality 4-stroke engine oil to ensure longer service
life of the scooter. Only use oils that have a SJ rating above per the API
service classification.
Engine oil viscosity : SAE 5W-50
Engine oil capacity
At disassembly
At change
1.5 Liter
1.3 Liter
2‐26
27.
2. Periodic Maintenance > General Lubrication
XCITING 400i
General Lubrication
SAFETY FIRST: Protective gloves and eyewear are recommended at this point.
The frame lubrication points are listed below. Use general purpose
grease. Apply clean engine oil or grease to cables and movable parts
not specified. This will avoid abnormal noise and increase the durability
of the motorcycle.
Front Wheel Axle
Side Stand Pivot
Center Stand Pivot
Rear Wheel axle
2‐27
28. XCITING 400i
2. Periodic Maintenance > Hose Inspection
Hose Inspection
Inspect the breather hose for damage and deterioration.
Inspect the fuel hose for damage and deterioration.
2‐28
29. XCITING 400i
2. Periodic Maintenance > Spark Plug
Spark Plug
SAFETY FIRST: Protective gloves and eyewear are recommended at this point.
Removal
The spark plug is located on the left side of the cylinder.
Remove the spark plug wire off of the spark plug.
2‐29
30. XCITING 400i
2. Periodic Maintenance > Spark Plug
Remove the spark plug with a spark plug with a 5/8 in socket.
Spark plug
NGK-CR7E
Inspection
Always check the gap of the spark plug before installation. If the gap
needs to be adjusted bend the ground electrode carefully. Inspect the
color of the porcelain nose of the spark plug. The color of the spark plug
can indicate how the mixture is burning. A white colored plug shows a
lean mixture, where a dark plug shows a rich mixture. Do not hesitate to
replace a spark plug. Always replace a spark plug if any part of it is
damaged.
Spark plug gap
0.6 - 0.7 mm
2‐30
31. XCITING 400i
2. Periodic Maintenance > Spark Plug
Installation
Thread the spark plug by hand before using a socket to tighten.
Torque to specification with a 5/8" spark plug socket. Do not
over tighten the spark plug. The cylinder head is made out of
soft metal, and it can be easily damaged.
Item
Torque
Spark plug
17.2 N-m (1.5 - 2 ft-lb, 10.84 - 14.47 kgf-m)
Install the spark plug wire over the plug.
2‐31
32.
XCITING 400i
2. Periodic Maintenance > Steering
Steering
SAFETY FIRST: Protective gloves and eyewear are recommended at this
point.
Inspection
Raise the front wheel off the ground and check that the steering
handlebar rotates freely. If the handlebar moves unevenly, binds, or has
vertical movement, adjust the steering head bearing.
2‐32
33. XCITING 400i
2. Periodic Maintenance > Suspension
Suspension
SAFETY FIRST: Protective gloves and eyewear are recommended at this point.
Front Suspension
Check the action of the front shock absorbers by compressing them
several times. Check the entire shock absorber assembly for oil leaks,
looseness or damage.
2‐33
34. XCITING 400i
2. Periodic Maintenance > Suspension
Pre-Load Setting
Each shock absorber on the scooter has 5 spring preload adjustment
positions for different load or riding conditions.
Position 1 is for light loads and smooth road conditions. Position 3 to 5
increase spring preload for stiffer rear suspension and can be used
when the scooters heavily loaded. Be certain to adjust both shock
absorbers to the same spring preload positions.
Use a pin spanner to adjust the rear shock spring preload. The shock
absorbers are adjustable for pre-load. There are 5 settings. Position 1
is the softest and 5 is the stiffest.
Caution: Always adjust the shock absorber pre-load position in
sequence (1-2-3-4-5 or 5-4-3-2-1). Attempting to adjust directly from 1
to 5 or 5 to 1 may damage the shock absorber. (Pre-Load Standard
Setting: Position 3)
2‐34
35. XCITING 400i
2. PeriodicMaintenance > Tires
Tires
SAFETY FIRST: Protective gloves and eyewear are recommended at this point.
Check tires before each ride for wear and air pressure.
Check tire air pressure before riding when tires are cold.
Solo riding
Cold inflation tire
Dual riding
pressure
Front
Rear
Front
Rear
2.00 kg/cm2(28.4 psi)
2.25 kg/cm2(32 psi)
2.00 kg/cm2(28.4 psi)
2.25 kg/cm2(32 psi)
2‐35
36. XCITING 400i
2. PeriodicMaintenance > Tires
Replace tires if the tread depth reaches the wear mark or fails to meet
the minimum tread depth.
Tires
Front wheel
Rear wheel
120/70-15
150/70-14
2‐36
37. 2. Periodic Maintenance > Valve Adjustment
XCITING 400i
Valve Clearance
SAFETY FIRST: Protective gloves and eyewear are recommended
at this point.
The valve clearance specification is only relevant if the engine is cold
(below 35°C or 95°F).
Inspection
Remove the crankcase cover protector on the left side of the
engine with a 8mm socket.
Remove the timing inspection cap from the right side of the
engine with a large flat blade screwdriver. Inspect the O-ring
on the cap and replace it as needed.
2‐37
38. XCITING 400i
2. Periodic Maintenance > Valve Adjustment
The crankshaft must be rotate until the piston is at top dead
center (TDC) on the compression stroke.
Turn crankshaft clockwise until the "T" mark aligns with the
index notch in the timing inspection hole.
2‐38
39. XCITING 400i
2. Periodic Maintenance > Valve Adjustment
For correct engine timing the marks on the camshaft sprocket
must be even with the cylinder head mating surface at the
same time the "T" mark is lined up with the with the index notch
in the timing inspection hole. Also the camshaft sprocket
mounting boss should be visible above the cylinder head
surface.
If this is not the case, rotate the crankshaft 360° clockwise until
the "T" mark is once again aligned with the notch on the case
cover.
2‐39
40. XCITING 400i
2. Periodic Maintenance > Valve Adjustment
Measure the valve clearance with a thickness feeler gauge.
Insert the feeler gauge between the tappet adjusting screw and
the valve stem. The clearance is correct when there is a light
drag on the feeler gauge. The clearance is the same for the
exhaust and intake valves. If the clearance is out of spec,
move on to the adjustment section.
Valve clearance
IN: 0.10 mm
EX: 0.10 mm
Adjustment
Use a tappet adjuster tool to adjust the valves.
2‐40
41. XCITING 400i
2. Periodic Maintenance > Valve Adjustment
ITEM
SPECIAL TOOLS
TOOL NO.
TAPPET ADJUSTER
A120E000012
DESCRIPTION
Tappet adjustment
Place a 9 mm box end wrench over the locknut, and loosen the
locknut. If the valve clearance is tight back out the valve tappet
adjusting screws with the tappet adjustment tool. If the
clearance is to loose turn in the adjusting screw until there is a
light drag on the feeler gauge. Hold the adjusting screw locknut
in place with the wrench to make sure it doesn't interfere with
the adjustment.
Lubricate the tappet adjusting screw threads with fresh engine
oil. Hold the adjuster in place and tighten the locknut. Always
recheck the clearance after tightening the locknut. Also,
recheck after turning the engine over a full 360°.
Item
Valve adjusting lock nut
Qty
4
Thread
siize (mm)
Remarks
kgf-m
lb-ft
0.7-1.1
5
2‐41
Torque
5.06-7.96
Apply oil to thread
42. XCITING 400i
2. Periodic Maintenance > Valve Adjustment
Make sure the O-rings on the timing plugs are in good
condition. Replace it as needed. Install the timing inspection to
the right side of the engine. Tighten the caps securely but not
overly with a large flat blade screwdriver.
2‐42