
Recommended
More Related Content
More from uudfjjjskkemmd
More from uudfjjjskkemmd (20)
Recently uploaded
Recently uploaded (17)
Case ih puma 185 tier 4 b (final) tractor service repair manual
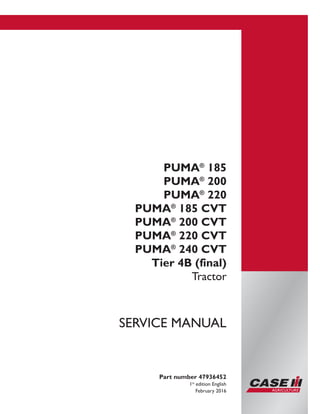
- 1. Printed in U.S.A. © 2016 CNH Industrial Osterreich GmbH. All Rights Reserved. Case IH is a trademark registered in the United States and many other countries, owned by or licensed to CNH Industrial N.V., its subsidiaries or affiliates. PUMA® 185 PUMA® 200 PUMA® 220 PUMA® 185 CVT PUMA® 200 CVT PUMA® 220 CVT PUMA® 240 CVT Tier 4B (final) Tractor Part number 47936452 1st edition English February 2016 SERVICE MANUAL
- 2. SERVICE MANUAL PUMA® 185 CVT , PUMA® 185 , PUMA® 200 CVT , PUMA® 200 , PUMA® 220 CVT , PUMA® 220 , PUMA® 240 CVT 47936452 17/11/2015 EN
- 3. Link Product / Engine Product Market Product Engine PUMA® 185 CVT North America F4DFE613K*B006 PUMA® 200 CVT North America F4DFE613J*B006 PUMA® 220 CVT North America F4DFE613H*B003 PUMA® 240 CVT North America F4DFE613B*B006 PUMA® 185 North America F4DFE613K*B006 PUMA® 200 North America F4DFE613J*B006 PUMA® 220 North America F4DFE613H*B003 47936452 17/11/2015
- 4. Contents INTRODUCTION Engine....................................................................................... 10 [10.001] Engine and crankcase ............................................................. 10.1 [10.216] Fuel tanks .......................................................................... 10.2 [10.218] Fuel injection system............................................................... 10.3 [10.254] Intake and exhaust manifolds and muffler ......................................... 10.4 [10.500] Selective Catalytic Reduction (SCR) exhaust treatment ........................... 10.5 [10.400] Engine cooling system ............................................................. 10.6 [10.414] Fan and drive ...................................................................... 10.7 [10.408] Oil cooler and lines................................................................. 10.8 [10.101] Cylinder heads ..................................................................... 10.9 Clutch ....................................................................................... 18 [18.112] Slip clutch or flywheel damper ..................................................... 18.1 Transmission.............................................................................. 21 [21.113] Powershift transmission ............................................................ 21.1 [21.155] Powershift transmission internal components...................................... 21.2 [21.160] Creeper ............................................................................ 21.3 [21.166] Overdrive........................................................................... 21.4 [21.504] Continuously Variable Transmission (CVT) ........................................ 21.5 [21.505] Continuously Variable Transmission (CVT) external controls...................... 21.6 [21.507] Continuously Variable Transmission (CVT) internal components.................. 21.7 [21.506] Continuously Variable Transmission (CVT) lubrication system .................... 21.8 [21.109] Transmission cooler and lines...................................................... 21.9 Four-Wheel Drive (4WD) system .................................................. 23 [23.202] Electro-hydraulic control ........................................................... 23.1 [23.314] Drive shaft.......................................................................... 23.2 47936452 17/11/2015
- 5. Front axle system ....................................................................... 25 [25.100] Powered front axle ................................................................. 25.1 [25.102] Front bevel gear set and differential ............................................... 25.2 [25.108] Final drive hub, steering knuckles, and shafts ..................................... 25.3 [25.122] Axle suspension control............................................................ 25.4 Rear axle system........................................................................ 27 [27.100] Powered rear axle.................................................................. 27.1 [27.106] Rear bevel gear set and differential................................................ 27.2 [27.120] Planetary and final drives .......................................................... 27.3 [27.126] Spur gear and final drives.......................................................... 27.4 Power Take-Off (PTO)................................................................. 31 [31.101] Rear mechanical control ........................................................... 31.1 [31.104] Rear electro-hydraulic control...................................................... 31.2 [31.114] Two-speed rear Power Take-Off (PTO) ............................................ 31.3 [31.116] Three-speed rear Power Take-Off (PTO) .......................................... 31.4 [31.119] Four-speed rear Power Take-Off (PTO)............................................ 31.5 [31.146] Front Power Take-Off (PTO) ....................................................... 31.6 Brakes and controls .................................................................... 33 [33.202] Hydraulic service brakes ........................................................... 33.1 [33.110] Parking brake or parking lock ...................................................... 33.2 [33.220] Trailer brake hydraulic control...................................................... 33.3 [33.224] Trailer brake pneumatic control .................................................... 33.4 [33.350] Anti-lock Brake System (ABS) ..................................................... 33.5 Hydraulic systems....................................................................... 35 [35.000] Hydraulic systems.................................................................. 35.1 [35.300] Reservoir, cooler, and filters........................................................ 35.2 [35.106] Variable displacement pump ....................................................... 35.3 [35.102] Pump control valves................................................................ 35.4 47936452 17/11/2015
- 6. [35.105] Charge pump....................................................................... 35.5 [35.230] Priority valves ...................................................................... 35.6 [35.322] Regulated/Low pressure system ................................................... 35.7 [35.204] Remote control valves ............................................................. 35.8 [35.220] Auxiliary hydraulic pump ........................................................... 35.9 [35.114] Three-point hitch control valve ................................................... 35.10 [35.162] Front hitch cylinders and lines ................................................... 35.11 Pneumatic system ...................................................................... 36 [36.100] Pneumatic system.................................................................. 36.1 Hitches, drawbars, and implement couplings.................................. 37 [37.120] Rear three-point hitch linkage...................................................... 37.1 [37.110] Rear three-point hitch .............................................................. 37.2 [37.162] Front hitch.......................................................................... 37.3 [37.106] Automatic pickup hitch ............................................................. 37.4 Frames and ballasting ................................................................. 39 [39.100] Frame .............................................................................. 39.1 Steering..................................................................................... 41 [41.101] Steering control .................................................................... 41.1 [41.106] Tie rods............................................................................. 41.2 [41.200] Hydraulic control components...................................................... 41.3 [41.216] Cylinders ........................................................................... 41.4 [41.432] Autoguidance steering ............................................................. 41.5 Wheels...................................................................................... 44 [44.511] Front wheels........................................................................ 44.1 [44.520] Rear wheels........................................................................ 44.2 Cab climate control ..................................................................... 50 [50.100] Heating ............................................................................. 50.1 47936452 17/11/2015
- 7. [50.104] Ventilation .......................................................................... 50.2 [50.200] Air conditioning..................................................................... 50.3 Electrical systems....................................................................... 55 [55.000] Electrical system ................................................................... 55.1 [55.100] Harnesses and connectors......................................................... 55.2 [55.640] Electronic modules ................................................................. 55.3 [55.015] Engine control system.............................................................. 55.4 [55.301] Alternator........................................................................... 55.5 [55.302] Battery.............................................................................. 55.6 [55.011] Fuel tank system ................................................................... 55.7 [55.010] Fuel injection system............................................................... 55.8 [55.988] Selective Catalytic Reduction (SCR) electrical system ............................ 55.9 [55.513] Cab transmission controls........................................................ 55.10 [55.020] Transmission speed sensors..................................................... 55.11 [55.021] Transmission pressure sensors .................................................. 55.12 [55.022] Transmission temperature sensors .............................................. 55.13 [55.023] Transmission position sensors ................................................... 55.14 [55.610] Ground speed control ............................................................ 55.15 [55.045] Front axle control system ........................................................ 55.16 [55.048] Rear Power Take-Off (PTO) control system ..................................... 55.17 [55.049] Front Power Take-Off (PTO) control system ..................................... 55.18 [55.031] Parking brake electrical system .................................................. 55.19 [55.035] Remote control valve electric control ............................................ 55.20 [55.051] Cab Heating, Ventilation, and Air-Conditioning (HVAC) controls................. 55.21 [55.050] Heating, Ventilation, and Air-Conditioning (HVAC) control system............... 55.22 [55.047] Steering control system .......................................................... 55.23 [55.523] Cab hitch controls ................................................................ 55.24 [55.130] Rear three-point hitch electronic control system ................................. 55.25 [55.911] Global Positioning System (GPS) ................................................ 55.26 47936452 17/11/2015
- 8. [55.408] Warning indicators, alarms, and instruments .................................... 55.27 [55.350] Anti-lock Brake System (ABS) electrical system ................................. 55.28 [55.512] Cab controls...................................................................... 55.29 [55.030] Service brake electrical system .................................................. 55.30 [55.510] Cab or platform harnesses and connectors...................................... 55.31 [55.DTC] FAULT CODES.................................................................. 55.32 Platform, cab, bodywork, and decals............................................. 90 [90.100] Engine hood and panels ........................................................... 90.1 [90.150] Cab................................................................................. 90.2 47936452 17/11/2015
- 10. INTRODUCTION Safety rules Personal safety This is the safety alert symbol. It is used to alert you to potential personal injury hazards. Obey all safety messages that follow this symbol to avoid possible death or injury. Throughout this manual you will find the signal words DANGER, WARNING, and CAUTION followed by special in- structions. These precautions are intended for the personal safety of you and those working with you. Read and understand all the safety messages in this manual before you operate or service the machine. DANGER indicates a hazardous situation that, if not avoided, will result in death or serious injury. WARNING indicates a hazardous situation that, if not avoided, could result in death or serious injury. CAUTION indicates a hazardous situation that, if not avoided, could result in minor or moderate injury. FAILURE TO FOLLOW DANGER, WARNING, AND CAUTION MESSAGES COULD RESULT IN DEATH OR SERIOUS INJURY. Machine safety NOTICE: Notice indicates a situation that, if not avoided, could result in machine or property damage. Throughout this manual you will find the signal word Notice followed by special instructions to prevent machine or property damage. The word Notice is used to address practices not related to personal safety. Information NOTE: Note indicates additional information that clarifies steps, procedures, or other information in this manual. Throughout this manual you will find the word Note followed by additional information about a step, procedure, or other information in the manual. The word Note is not intended to address personal safety or property damage. 47936452 17/11/2015 3
- 11. INTRODUCTION Safety rules - Ecology and the environment Soil, air, and water quality is important for all industries and life in general. When legislation does not yet rule the treatment of some of the substances that advanced technology requires, sound judgment should govern the use and disposal of products of a chemical and petrochemical nature. Familiarize yourself with the relative legislation applicable to your country, and make sure that you understand this legislation. Where no legislation exists, obtain information from suppliers of oils, filters, batteries, fuels, anti-freeze, cleaning agents, etc., with regard to the effect of these substances on man and nature and how to safely store, use, and dispose of these substances. Helpful hints • Avoid the use of cans or other inappropriate pressurized fuel delivery systems to fill tanks. Such delivery systems may cause considerable spillage. • In general, avoid skin contact with all fuels, oils, acids, solvents, etc. Most of these products contain substances that may be harmful to your health. • Modern oils contain additives. Do not burn contaminated fuels and or waste oils in ordinary heating systems. • Avoid spillage when you drain fluids such as used engine coolant mixtures, engine oil, hydraulic fluid, brake fluid, etc. Do not mix drained brake fluids or fuels with lubricants. Store all drained fluids safely until you can dispose of the fluids in a proper way that complies with all local legislation and available resources. • Do not allow coolant mixtures to get into the soil. Collect and dispose of coolant mixtures properly. • The air-conditioning system contains gases that should not be released into the atmosphere. Consult an air-condi- tioning specialist or use a special extractor to recharge the system properly. • Repair any leaks or defects in the engine cooling system or hydraulic system immediately. • Do not increase the pressure in a pressurized circuit as this may lead to a component failure. • Protect hoses during welding. Penetrating weld splatter may burn a hole or weaken hoses, allowing the loss of oils, coolant, etc. Battery recycling Batteries and electric accumulators contain several substances that can have a harmful effect on the environment if the batteries are not properly recycled after use. Improper disposal of batteries can contaminate the soil, groundwater, and waterways. CASE IH strongly recommends that you return all used batteries to a CASE IH dealer, who will dispose of the used batteries or recycle the used batteries properly. In some countries, this is a legal requirement. Mandatory battery recycling NOTE: The following requirements are mandatory in Brazil. Batteries are made of lead plates and a sulfuric acid solution. Because batteries contain heavy metals such as lead, CONAMA Resolution 401/2008 requires you to return all used batteries to the battery dealer when you replace any batteries. Do not dispose of batteries in your household garbage. Points of sale are obliged to: • Accept the return of your used batteries • Store the returned batteries in a suitable location • Send the returned batteries to the battery manufacturer for recycling 47936452 17/11/2015 4
- 12. SERVICE MANUAL Engine PUMA® 185 CVT , PUMA® 185 , PUMA® 200 CVT , PUMA® 200 , PUMA® 220 CVT , PUMA® 220 , PUMA® 240 CVT 47936452 17/11/2015 10
- 13. Engine - Engine and crankcase Engine - Remove Prior operation: Separate the front axle and front frame from the engine, for further information refer to Front frame - Remove (39.100) Prior operation: Remove the left-hand fuel tank, for further information refer to Fuel tank - Remove (10.216) Prior operation: Remove the selective catalytic reduction (SRC) muffler, for further information refer to Selective Catalytic Reduction (SCR) muffler and catalyst - Remove (10.500) Prior operation: Remove the engine hood, for further information refer to Hood - Remove (90.100) WARNING Heavy objects! Lift and handle all heavy components using lift- ing equipment with adequate capacity. Always support units or parts with suitable slings or hooks. Make sure the work area is clear of all bystanders. Failure to comply could result in death or seri- ous injury. W0398A WARNING Avoid injury! Handle all parts carefully. Do not place your hands or fingers between parts. Use Personal Protective Equipment (PPE) as indicated in this manual, including protective goggles, gloves, and safety footwear. Failure to comply could result in death or seri- ous injury. W0208A NOTICE: Avoid DEF/ADBLUE® contamination of the electrical connector by disconnecting the DEF/ADBLUE® con- nectors first. 1. 1. Disconnect the radar electrical connector (if fitted). 2. Remove the radar (if fitted). BAIL13TR01648AB 1 47936452 17/11/2015 10.1 [10.001] / 3
- 14. Engine - Engine and crankcase Vehicles with front hitch 2. Disconnect the mid-mount pipes from the mid-mount valve. BAIL13TR01645AB 2 3. Remove the front hitch pipes. BAIL13TR01647AB 3 4. Remove the starter motor cover. BAIL14TR00276AB 4 5. Remove the oil cooler pipe bracket. BAIL14TR00277AB 5 47936452 17/11/2015 10.1 [10.001] / 4
- 15. Engine - Engine and crankcase 6. Detach the fuse box and position it to one side. BAIL13TR01663AB 6 7. Disconnect the starter motor positive cables. BAIL14TR00278AA 7 8. Disconnect the starter motor electrical connector. BAIL13TR01660AB 8 9. Disconnect the starter motor negative terminal. BAIL13TR01661AB 9 47936452 17/11/2015 10.1 [10.001] / 5
- 16. Engine - Engine and crankcase 10. Disconnect the front axle electrical connectors. BAIL13TR01683AB 10 11. Disconnect the brake master cylinder oil supply pipes. BAIL14TR00279AB 11 12. Disconnect the cab hand rail light electrical connec- tors (on both sides). BAIL14TR00280AB 12 13. 1. Disconnect the steering pipes. 2. Disconnect the brake pipe. NOTE: Mark the hoses to aid installation. BAIL14TR00281AB 13 47936452 17/11/2015 10.1 [10.001] / 6
- 17. Engine - Engine and crankcase 14. Disconnect the ground cables. BAIL14TR00282AB 14 15. Disconnect the generator electrical connectors. BAIL14TR00283AB 15 16. 1. Disconnect the brake accumulator electrical con- nector. 2. Disconnect the water-in-fuel sensor electrical connector. BAIL14TR00284AB 16 17. 1. Disconnect the flywheel speed sensor electrical connector. 2. Disconnect the engine wiring harness. BAIL14TR00285AB 17 47936452 17/11/2015 10.1 [10.001] / 7
- 18. Engine - Engine and crankcase 18. Disconnect the air conditioning (A/C) pipes. NOTE: Make sure that all openings are sealed. Use new blanking caps. BAIL14TR00286AB 18 19. 1. Disconnect the coolant hose. 2. Disconnect the brake pipe. BAIL14TR00287AB 19 20. Cut the cable ties. BAIL14TR00288AB 20 21. 1. Disconnect the Diesel Oxidation Catalyst (DOC) electrical connector. 2. Disconnect the hood wiring harness electrical connector. BAIL14TR00289AB 21 47936452 17/11/2015 10.1 [10.001] / 8
- 19. Engine - Engine and crankcase 22. Cut the cable ties. BAIL14TR00290AB 22 23. 1. Detach the DOC wiring harness and the DEF/ ADBLUE® lines. 2. Detach the wiring harness. BAIL14TR00291AB 23 24. Disconnect the dosing module. 1. Disconnect the DEF/ADBLUE® lines. 2. Disconnect the dosing module electrical connec- tor. BAIL14TR00292AB 24 25. 1. Detach the wiring harness. 2. Cut the cable ties. BAIL14TR00293AB 25 47936452 17/11/2015 10.1 [10.001] / 9
- 20. Engine - Engine and crankcase 26. Cut the cable ties. BAIL14TR00294AB 26 27. 1. Disconnect the fan electrical connector. 2. Disconnect front hitch electrical connector. BAIL14TR00295AB 27 28. 1. Disconnect the NOx amplifier electrical connec- tor. 2. Disconnect the coolant level sensor electrical connector. BAIL14TR00296AB 28 29. 1. Disconnect the AC pressure switch electrical con- nector.. 2. Cut the cable tie. BAIL14TR00297AB 29 47936452 17/11/2015 10.1 [10.001] / 10
- 21. Engine - Engine and crankcase 30. 1. Disconnect the air intake sensor electrical con- nector. 2. Disconnect the A/C compressor electrical con- nector. BAIL14TR00316AB 30 31. Remove the right-hand air intake pipe. BAIL14TR00317AB 31 32. Remove the left-hand air intake pipe. BAIL14TR00318AB 32 33. 1. Disconnect the air compressor supply pipe. 2. Disconnect the valve cover breather pipe. BAIL14TR00319AB 33 47936452 17/11/2015 10.1 [10.001] / 11
- 22. Engine - Engine and crankcase 34. Remove the air cleaner outlet pipe. BAIL14TR00320AB 34 35. 1. Disconnect the coolant hose from the exhaust flap. 2. Disconnect the coolant expansion tank hose. 3. Remove the up-stream Nox sensor. BAIL14TR00321AB 35 36. Disconnect the engine frame upper retaining bolts. BAIL14TR00323AB 36 37. 1. Remove the engine frame front retaining nuts. 2. Remove the upper part of the engine frame. BAIL14TR00324AB 37 47936452 17/11/2015 10.1 [10.001] / 12
- 23. Engine - Engine and crankcase 38. 1. Disconnect the coolant lines from the exhaust flap. 2. Disconnect the exhaust flap electrical connector. BAIL14TR00325AB 38 39. Remove the DOC frame rear retaining bolts. BAIL14TR00326AB 39 40. Remove the exhaust flap and exhaust front pipe. BAIL14TR00327AB 40 41. Remove the DOC and frame. BAIL14TR00328AB 41 47936452 17/11/2015 10.1 [10.001] / 13
- 24. Engine - Engine and crankcase 42. Remove the lower part of the engine frame. BAIL14TR00329AB 42 43. Remove the engine side cover bracket. BAIL14TR00330AB 43 44. Remove the rear part of the engine frame. BAIL14TR00331AB 44 45. Remove the A/C pipes. NOTE: Install blanking plugs. BAIL14TR00332AB 45 47936452 17/11/2015 10.1 [10.001] / 14
- 25. Engine - Engine and crankcase 46. Remove the air compressor intake pipe. BAIL14TR00333AB 46 47. Remove the engine frame front retaining bolts. BAIL14TR00334AB 47 48. Position the static part of the tractor splitting stand 380003352 under the transmission and secure to the transmission. BAIL13TR01728AB 48 49. Install three engine lifting eyes 380200013. BAIL14TR00335AB 49 47936452 17/11/2015 10.1 [10.001] / 15
- 26. Engine - Engine and crankcase 50. Using suitable lighting equipment, support the engine. BAIL14TR00336AB 50 51. Remove the engine to transmission lower retaining bolts. BAIL13TR01727AB 51 52. Remove the engine to transmission upper retaining bolts. BAIL13TR01757AB 52 53. Remove the engine to transmission left-hand side re- taining bolts. BAIL13TR00796AB 53 47936452 17/11/2015 10.1 [10.001] / 16
- 27. Engine - Engine and crankcase 54. Remove the engine to transmission right-hand side retaining bolts. BAIL13TR00797AC 54 55. Using suitable lighting equipment, remove the engine. BAIL14TR00337AA 55 47936452 17/11/2015 10.1 [10.001] / 17
- 28. Thank you very much for your reading. Please Click Here. Then Get COMPLETE MANUAL. NO WAITING NOTE: If there is no response to click on the link above, please download the PDF document first and then click on it.
- 29. Engine - Engine and crankcase Engine - Disconnect Prior operation: Discharge the Air conditioning system, for further information refer to Air conditioning - Discharging (50.200) Prior operation: Drain the engine cooling system, for further information refer to Engine cooling system - Drain fluid (10.400) Prior operation: Disconnect the battery ground cable, for further information refer to Battery - Disconnect (55.302) Prior operation: Remove the Selective Catalytic Reduction (SCR) muffler, for further information refer to Selective Catalytic Reduc- tion (SCR) muffler and catalyst - Remove (10.500) Prior operation: Remove the left-hand fuel tank, for further information refer to Fuel tank - Remove (10.216) WARNING Heavy objects! Lift and handle all heavy components using lift- ing equipment with adequate capacity. Always support units or parts with suitable slings or hooks. Make sure the work area is clear of all bystanders. Failure to comply could result in death or seri- ous injury. W0398A WARNING Avoid injury! Handle all parts carefully. Do not place your hands or fingers between parts. Use Personal Protective Equipment (PPE) as indicated in this manual, including protective goggles, gloves, and safety footwear. Failure to comply could result in death or seri- ous injury. W0208A NOTICE: Avoid DEF/ADBLUE® contamination of the electrical connector by connecting the DEF/ADBLUE® connec- tors last. 1. WARNING Crushing hazard! The wheels on this vehicle are very heavy. Al- ways use a wheel remover or chain hoists to re- move and install the wheels. Use an assistant as required. Failure to comply could result in death or seri- ous injury. W0149A Install the left-hand rear wheel. BAIL10CVT461AVA 1 47936452 17/11/2015 10.1 [10.001] / 18
- 30. Engine - Engine and crankcase 2. A. Remove the transmission housing drain plug and drain the transmission oil into a suitable container. B. Install the drain plug and torque to 68 - 82 N·m (50 - 60 lb ft) BAIL07APH288AVA 2 3. 1. Disconnect the radar electrical connector and re- move radar (if fitted). 2. Remove the radar (if fitted). BAIL13TR01648AB 3 Vehicles with front hitch 4. WARNING Heavy object! ALWAYS use a hoist or get assistance to lift the component. Failure to comply could result in death or seri- ous injury. W0086A Remove the right-hand side rail. NOTE: Repeat this step for the left-hand side. BAIL13TR01649AB 4 5. Disconnect the oil cooler supply and return pipes. BAIL13TR01656AB 5 47936452 17/11/2015 10.1 [10.001] / 19
- 31. Engine - Engine and crankcase 6. Detach the cab heater supply pipe. BAIL13TR01657AB 6 7. Remove the starter motor cover. BAIL14TR00276AB 7 8. Remove the oil cooler pipe bracket. BAIL14TR00277AB 8 9. Detach the fuse box and position it to one side. BAIL13TR01663AB 9 47936452 17/11/2015 10.1 [10.001] / 20
- 32. Engine - Engine and crankcase 10. Disconnect the starter motor positive cables. BAIL14TR00278AA 10 11. Disconnect the starter motor electrical connector. BAIL13TR01660AB 11 12. Disconnect the starter motor negative terminal. BAIL13TR01661AB 12 13. Disconnect the front axle electrical connectors. BAIL13TR01683AB 13 47936452 17/11/2015 10.1 [10.001] / 21
- 33. Engine - Engine and crankcase 14. Disconnect the master cylinder oil supply pipes. BAIL14TR00279AB 14 15. Disconnect the cab hand rail light electrical connec- tors (on both sides). BAIL14TR00280AB 15 16. 1. Disconnect the steering pipes. 2. Disconnect the brake pipe. NOTE: Mark the hoses to aid installation. BAIL14TR00281AB 16 17. Disconnect the earth cables. BAIL14TR00282AB 17 47936452 17/11/2015 10.1 [10.001] / 22
- 34. Engine - Engine and crankcase 18. Disconnect the generator electrical connectors. BAIL14TR00283AB 18 19. 1. Disconnect the brake accumulator electrical con- nector. 2. Disconnect the water-in-fuel electrical connector. BAIL14TR00284AB 19 20. 1. Disconnect the flywheel speed sensor. 2. Disconnect the engine wiring harness. BAIL14TR00285AB 20 21. Disconnect the air conditioning (A/C) pipes. BAIL14TR00286AB 21 47936452 17/11/2015 10.1 [10.001] / 23