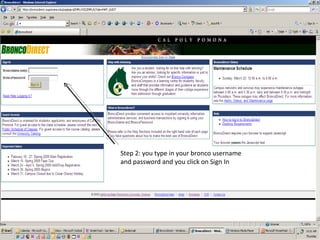
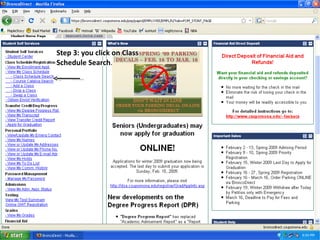
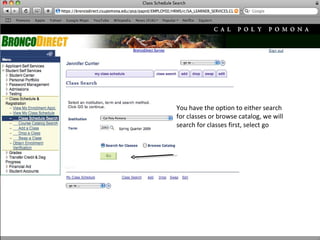
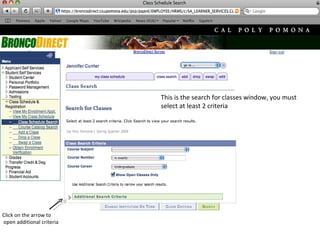
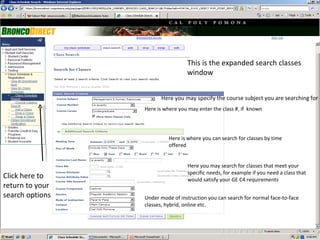
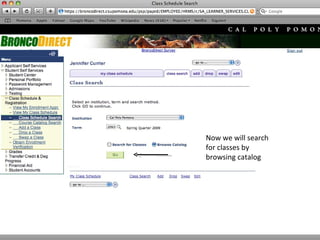
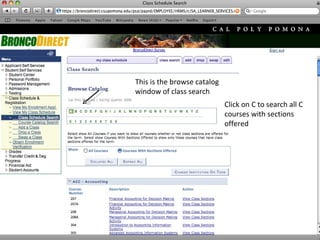
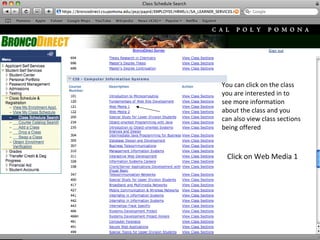
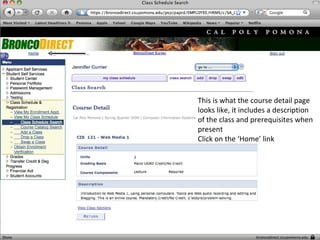
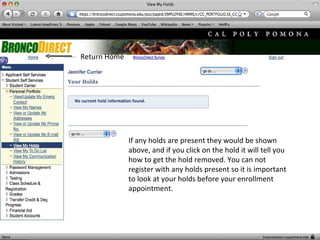
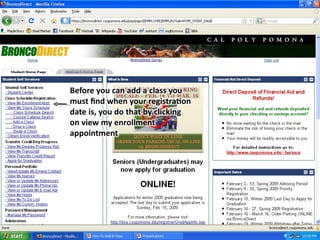
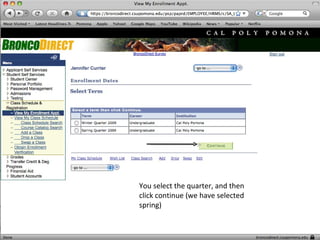
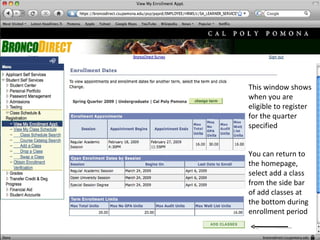
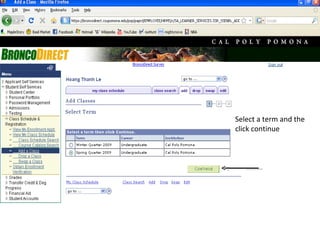
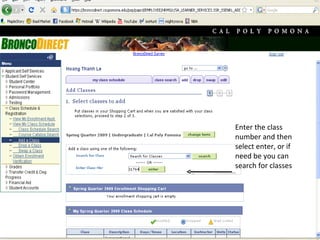
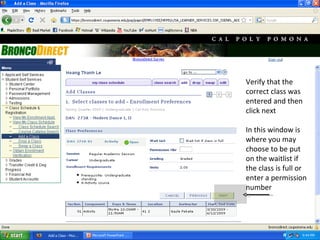
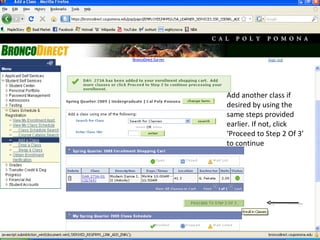
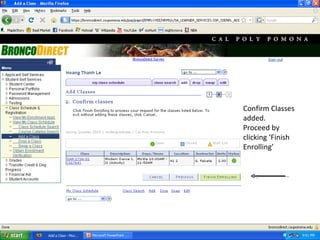
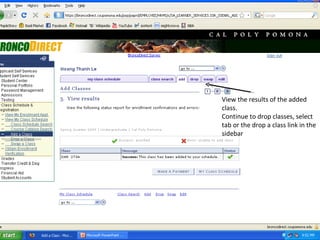
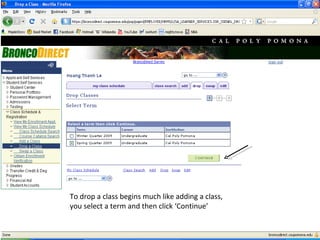
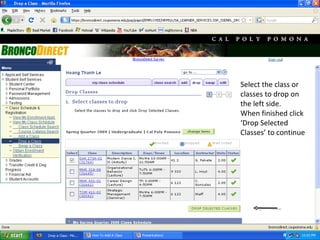
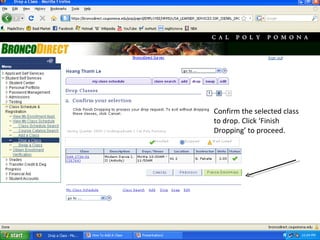
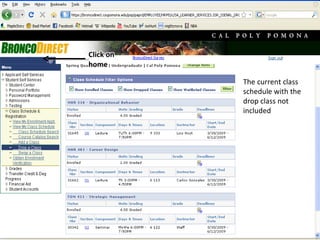
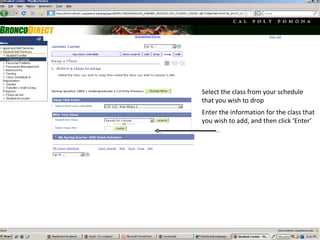
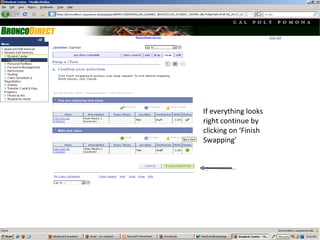
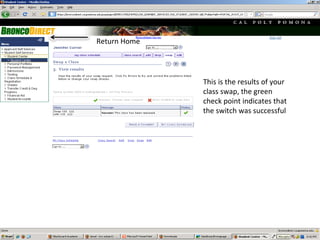
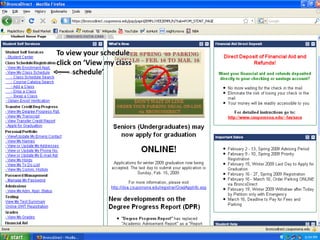
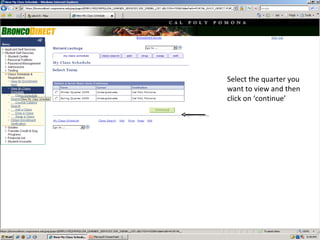
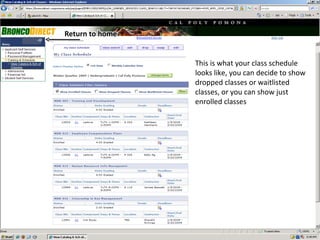
HOW TO:  The Basics of: Richard Vincent Tielen Kendall Jennifer Alicia Click to enter
To enter into bronco direct select ‘Bronco Direct’ from the side bar Follow the links indicated by the arrow
Step 2: you type in your bronco username and password and you click on Sign In
 
You have the option to either search for classes or browse catalog, we will search for classes first, select go
This is the search for classes window, you must select at least 2 criteria  Click on the arrow to open additional criteria
Here you may specify the course subject you are searching for Here is where you may enter the class #, if  known Here is where you can search for classes by time offered Under mode of instruction you can search for normal face-to-face classes, hybrid, online etc. Here you may search for classes that meet your specific needs, for example if you need a class that would satisfy your GE C4 requirements  This is the expanded search classes window Click here to return to your search options
Now we will search for classes by browsing catalog
This is the browse catalog window of class search Click on C to search all C courses with sections offered
You can click on the class you are interested in to see more information about the class and you can also view class sections being offered Click on Web Media 1
This is what the course detail page looks like, it includes a description of the class and prerequisites when present  Click on the ‘Home’ link
 
If any holds are present they would be shown above, and if you click on the hold it will tell you how to get the hold removed. You can not register with any holds present so it is important to look at your holds before your enrollment appointment.  Return Home
 
You select the quarter, and then click continue (we have selected spring)
This window shows when you are eligible to register for the quarter specified  You can return to the homepage, select add a class from the side bar of add classes at the bottom during enrollment period
Select a term and the click continue
Enter the class number and then select enter, or if need be you can search for classes
Verify that the correct class was entered and then click next In this window is where you may choose to be put on the waitlist if the class is full or enter a permission number
Add another class if desired by using the same steps provided earlier. If not, click ‘Proceed to Step 2 Of 3’ to continue
Confirm Classes added. Proceed by clicking ‘Finish Enrolling’
View the results of the added class. Continue to drop classes, select tab or the drop a class link in the sidebar
To drop a class begins much like adding a class,  you select a term and then click ‘Continue’
Select the class or classes to drop on the left side. When finished click ‘Drop Selected Classes’ to continue
Confirm the selected class to drop. Click ‘Finish Dropping’ to proceed.
View the results of the dropped class. Continue by clicking ‘My Class Schedule.’
The current class schedule with the drop class not included
 
Select the class from your schedule that you wish to drop Enter the information for the class that you wish to add, and then click ‘Enter’
If everything looks right continue by clicking ‘Next’
If everything looks right continue by clicking on ‘Finish Swapping’
This is the results of your class swap, the green check point indicates that the switch was successful Return Home
 
Select the quarter you want to view and then click on ‘continue’
This is what your class schedule looks like, you can decide to show dropped classes or waitlisted  classes, or you can show just  enrolled classes

Broncodirect

  • 1.
    HOW TO: The Basics of: Richard Vincent Tielen Kendall Jennifer Alicia Click to enter
  • 2.
    To enter intobronco direct select ‘Bronco Direct’ from the side bar Follow the links indicated by the arrow
  • 3.
    Step 2: youtype in your bronco username and password and you click on Sign In
  • 4.
  • 5.
    You have theoption to either search for classes or browse catalog, we will search for classes first, select go
  • 6.
    This is thesearch for classes window, you must select at least 2 criteria Click on the arrow to open additional criteria
  • 7.
    Here you mayspecify the course subject you are searching for Here is where you may enter the class #, if known Here is where you can search for classes by time offered Under mode of instruction you can search for normal face-to-face classes, hybrid, online etc. Here you may search for classes that meet your specific needs, for example if you need a class that would satisfy your GE C4 requirements This is the expanded search classes window Click here to return to your search options
  • 8.
    Now we willsearch for classes by browsing catalog
  • 9.
    This is thebrowse catalog window of class search Click on C to search all C courses with sections offered
  • 10.
    You can clickon the class you are interested in to see more information about the class and you can also view class sections being offered Click on Web Media 1
  • 11.
    This is whatthe course detail page looks like, it includes a description of the class and prerequisites when present Click on the ‘Home’ link
  • 12.
  • 13.
    If any holdsare present they would be shown above, and if you click on the hold it will tell you how to get the hold removed. You can not register with any holds present so it is important to look at your holds before your enrollment appointment. Return Home
  • 14.
  • 15.
    You select thequarter, and then click continue (we have selected spring)
  • 16.
    This window showswhen you are eligible to register for the quarter specified You can return to the homepage, select add a class from the side bar of add classes at the bottom during enrollment period
  • 17.
    Select a termand the click continue
  • 18.
    Enter the classnumber and then select enter, or if need be you can search for classes
  • 19.
    Verify that thecorrect class was entered and then click next In this window is where you may choose to be put on the waitlist if the class is full or enter a permission number
  • 20.
    Add another classif desired by using the same steps provided earlier. If not, click ‘Proceed to Step 2 Of 3’ to continue
  • 21.
    Confirm Classes added.Proceed by clicking ‘Finish Enrolling’
  • 22.
    View the resultsof the added class. Continue to drop classes, select tab or the drop a class link in the sidebar
  • 23.
    To drop aclass begins much like adding a class, you select a term and then click ‘Continue’
  • 24.
    Select the classor classes to drop on the left side. When finished click ‘Drop Selected Classes’ to continue
  • 25.
    Confirm the selectedclass to drop. Click ‘Finish Dropping’ to proceed.
  • 26.
    View the resultsof the dropped class. Continue by clicking ‘My Class Schedule.’
  • 27.
    The current classschedule with the drop class not included
  • 28.
  • 29.
    Select the classfrom your schedule that you wish to drop Enter the information for the class that you wish to add, and then click ‘Enter’
  • 30.
    If everything looksright continue by clicking ‘Next’
  • 31.
    If everything looksright continue by clicking on ‘Finish Swapping’
  • 32.
    This is theresults of your class swap, the green check point indicates that the switch was successful Return Home
  • 33.
  • 34.
    Select the quarteryou want to view and then click on ‘continue’
  • 35.
    This is whatyour class schedule looks like, you can decide to show dropped classes or waitlisted classes, or you can show just enrolled classes