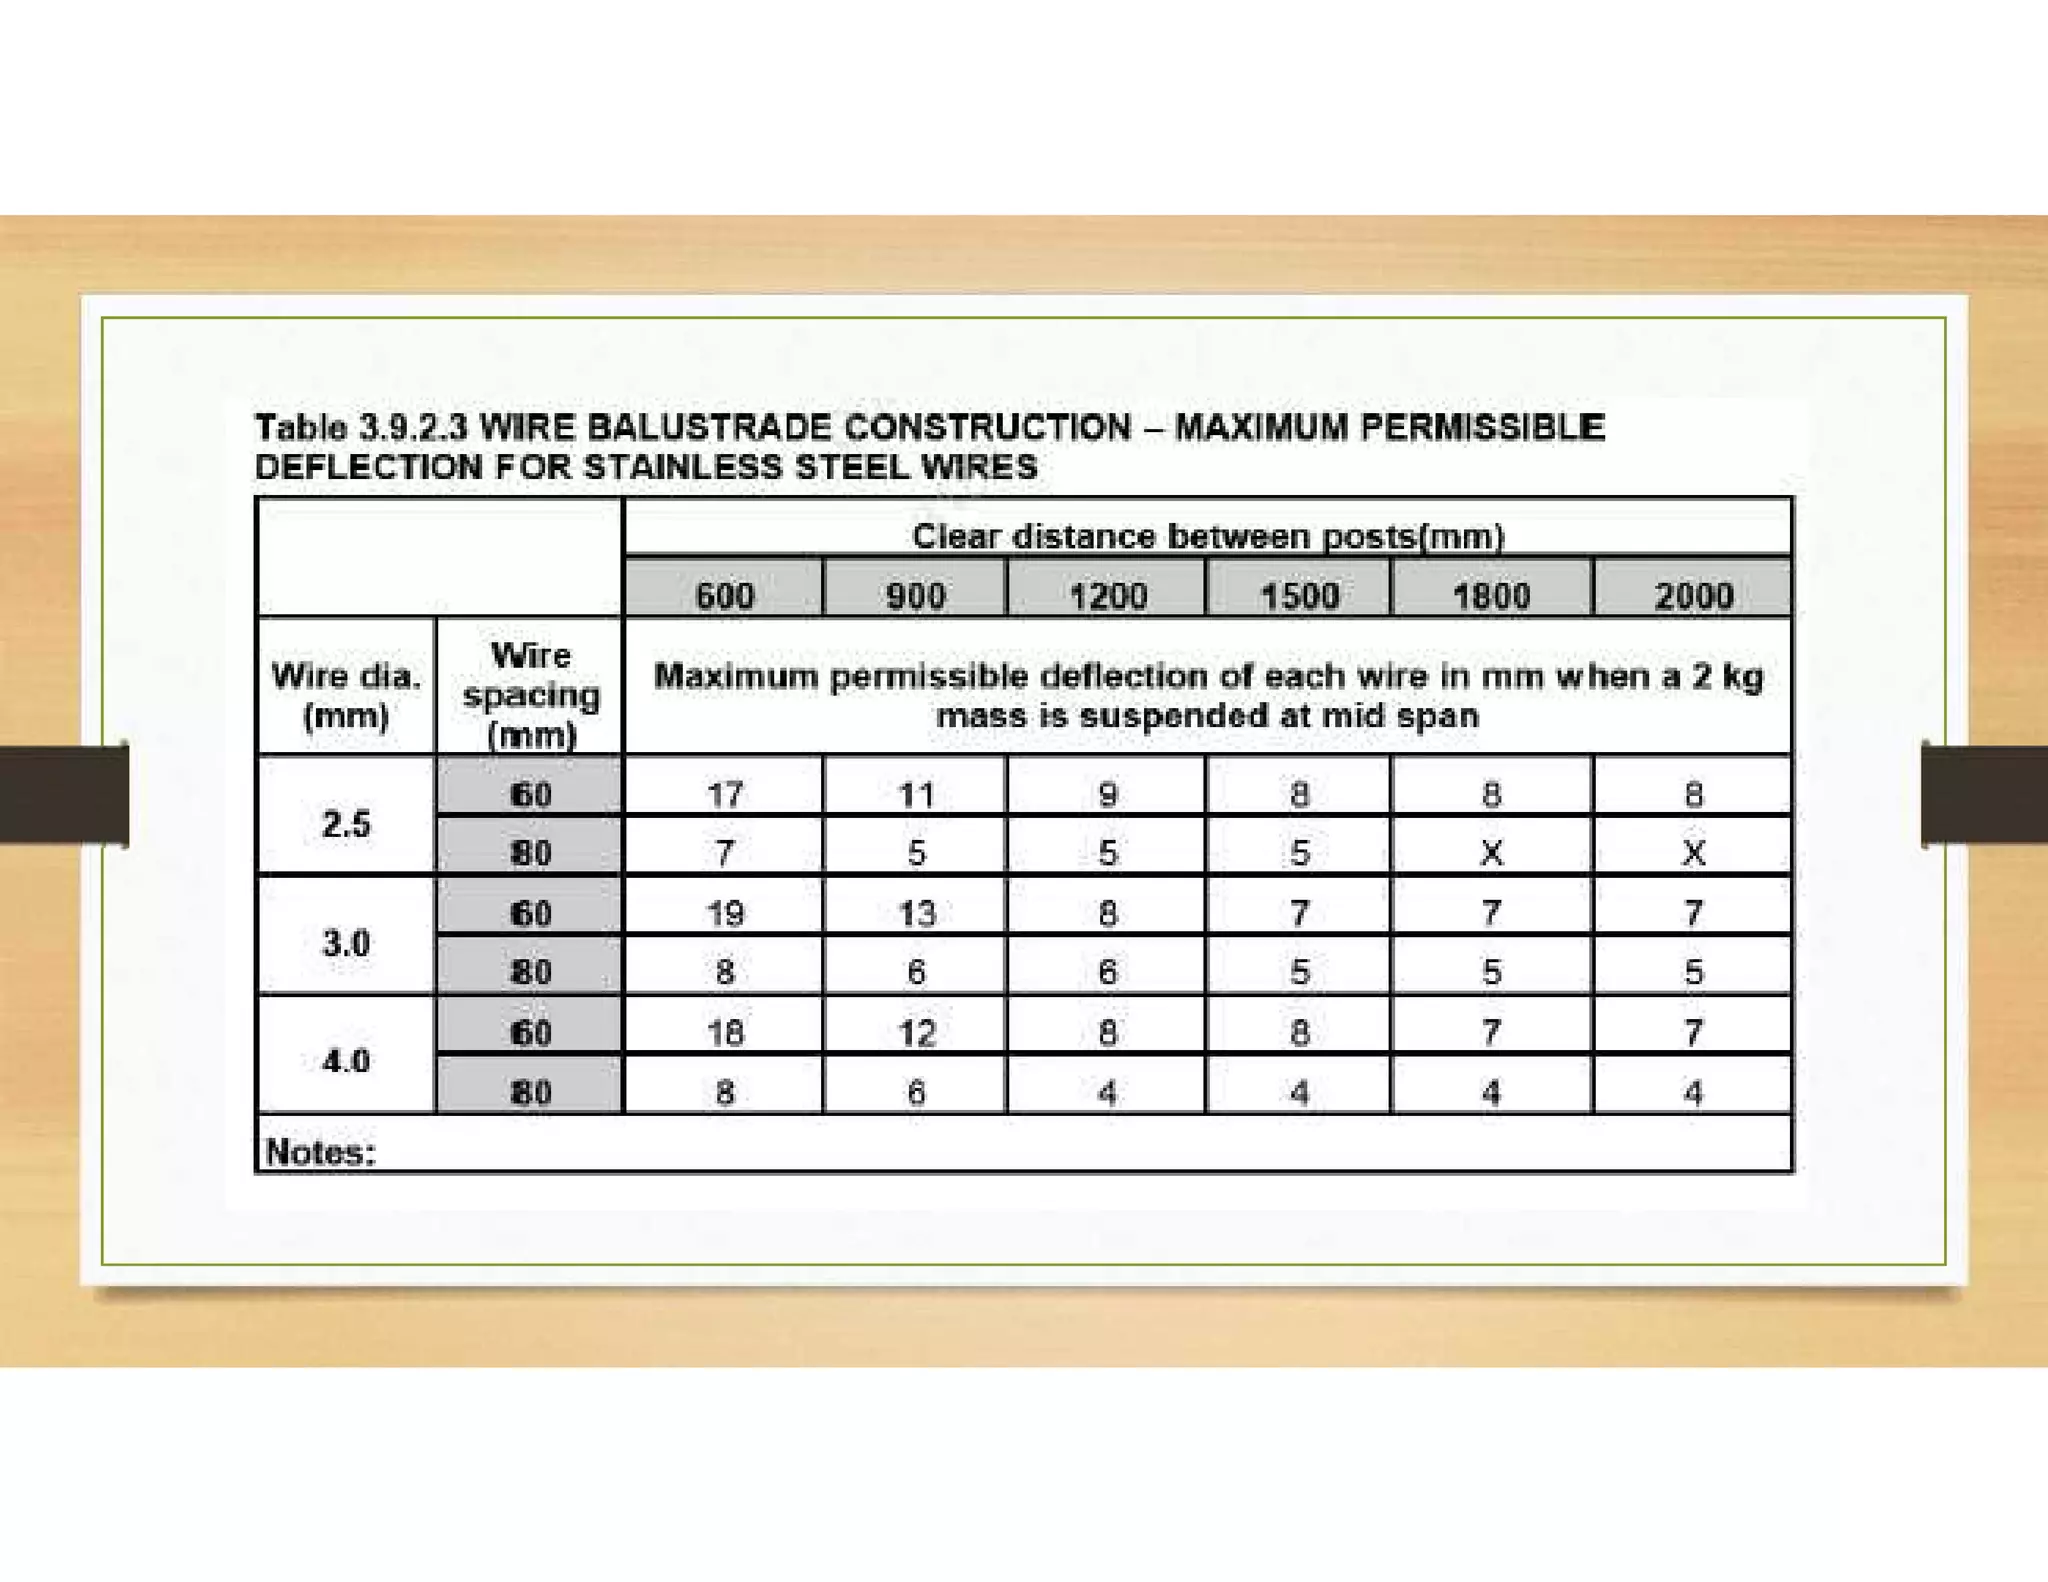
Australia have its own standards and specifications for balustrades. So if you're planning to install balustrades in your home or commercial building make sure to comply with this set of rules.
Any shape other than a straight line has always been a problem for making curtains. Well, not anymore. Get flexible curtain tracks for your bay window curtains or bow window curtains at theflextrack.com and add aesthetic value to your place.
Get a quick and easy-to-build retaining wall system for your garden or poarch with self-interlocking blocks! View wonderful colour variety at APC and choose the best one for your project! Versawall offers you a modern look
in a compact space.
If you are looking for scaffolding accessories or fitting information, this presentation will give you the complete idea. For more
information about scaffold fittings: https://www.turboscaffolding.com.au/scaffolding-perth
How To Install Silver Vapor 3-in-1 Flooring UnderlaymentBestlaminate Inc.
This illustrated guide will show you with detailed step-by-step pictures how to install Silver Vapor 3-in-1 Flooring Underlayment. (Available here: http://ow.ly/yCiNz)
Read this General Laminate Flooring Installation & Tips Guideline that will teach you everything you need to know about laminate flooring and how to install it!
How to Install the Last Row of Laminate Flooring - Installation Tutorial
- Universal Installation: This tutorial walks you a universal installation of the last row of laminate flooring. It can be used in any type of room including one that may have obstacles, cabinets or tight spaces.
Step 1: Measure the Gap: In most cases, the last row of flooring will need to be cut in order to fit the space. You will need to measure the gap between the last installed plank and the wall. Remember to factor in the expansion gap!
Tip: Measure the gap at each end of the plank to get an accurate measurement. Walls can bow in or out causing a slightly different measurement at the beginning and end of a plank.
Step 2: Expansion Gap: Be sure to exclude the expansion gap in your measurement! .25” for a room under 30 ft. in length, .5” for over 30 ft. in length. Your moldings should cover this gap.
Step 3: Mark your Plank: Once the width of the plank is determined, mark the plank with a pencil according to the cut needed. Use another plank as your straight edge guide.
Tip: If the side of the plank with a locking system is against the wall, you will want to trim the plank so it has a smooth, solid edge butting against the wall.
Step 4: Cut your Plank: Use a saw to cut the plank with the decorative side up. We recommend using a jigsaw or table saw.
Jigsaw: Use a laminate cutting blade, which has a medium tooth, downstroke blade.
Table Saw: Use a medium tooth carbide blade with upside down teeth.
Step 5: Lock in the Plank: Add spacers to the end of the plank. Tilt the plank into the locking system at a 45 degree angle.
Tip: Before installing, check to make sure the plank fits. You may have to cut more of the plank to fit if your previous cut wasn’t as precise.
Step 6: Use a Pull Bar: Use a pull bar along the side of the plank, pushing the plank down and into the locking system securely Do this along the full plank.
Hint: Depending on the locking system, you may need to connect several planks together and install all at one time. The ends may not be able to connect plank by plank.
Step 7: The Next Plank: Repeat steps 1-4 to measure and cut the next plank for installation.
Step 8: Trim the Track: In most cases, it will be hard to lock your plank in two both locking systems. You can trim the track down with a blade or end of the pull bar to prepare for gluing the planks together.
Step 9: Glue the Planks: After the track is trimmed, apply woodworkers glue on the joint. Position the next plank on an angle to connect into the locking system without lowering the edge onto the glue.
Step 10: Tap Together: Use the pull bar on the side of the plank like previously stated. To secure the first and second plank, use a tapping block to connect the ends of the first and second plank in the last row.
Step 11 – Continue Installing: Continue installing the planks until you are at the end of the row. Now you’re ready to install your moldings!
This also means that if you need to ever remove a board for access or replace a board the screws are easily located, and the board can be easily removed and replaced.
Scottish Home Improvements provides the highest quality windows and siding to clients in Denver and all across Colorado. We feature James Hardie fiber cement siding as well as Milgard windows and doors. We can also help you with your other fiber cement, vinyl, wood, cedar, and steel siding commercial and residential projects. Contact us today to schedule your consultation.
With the help of awnings you can change your ordinary home to classy and can give charming look to the home.These decorations are beautiful and functional too.
Ash and lacy sa spacer support system a4 12pp v1 hiVaughn Botha
As part of our programme of continuous innovation, Ash & Lacy introduce the high performance Ashgrid bar and brackets incorporating the unique Safe-Loc™ feature (patented). Designed to meet the everincreasing demands from Building Regulations whilst at the same time making installation more efficient and safer for contractors on site.
All spacer support systems are at risk during the installation stage when they are not restrained by the sheeting and are subjected to forces from foot traffic, temporary loading and high winds
based in Thane, Maharashtra, is a new
generation Scaffolding, We are currently manufacturing number of
products such as Cuplok System, M.S and G.I. Prop, Acrow span,
Base Jack, U Head Jack Walkway Planks, Ladder, Cantilever
Frame, Shuttering Plates and all items related to structural
development. We are also using of higher strength as per the
customer requirements.
Laxmi Scaffolding
esides export is also into the domestic
market & is supplying their product to various mega projects
undertaken by many reputed construction houses in india. We also
specialize in designing & supplying of scaffolding for refectories,
boliers and cement plant.
Laxmi Scaffolding b
We are poised for major growth, based on our capability,
confidence and co-operation given to us by our customers along
with their support which has helped us to reach our targeted goals
Viva Railings offers turnkey solutions and wide range of modern Railing systems and railing designs for architectural, deck, balcony, exterior & interior cable. - www.vivarailings.com
2137ad Merindol Colony Interiors where refugee try to build a seemengly norm...luforfor
This are the interiors of the Merindol Colony in 2137ad after the Climate Change Collapse and the Apocalipse Wars. Merindol is a small Colony in the Italian Alps where there are around 4000 humans. The Colony values mainly around meritocracy and selection by effort.
Hadj Ounis's most notable work is his sculpture titled "Metamorphosis." This piece showcases Ounis's mastery of form and texture, as he seamlessly combines metal and wood to create a dynamic and visually striking composition. The juxtaposition of the two materials creates a sense of tension and harmony, inviting viewers to contemplate the relationship between nature and industry.
2137ad - Characters that live in Merindol and are at the center of main storiesluforfor
Kurgan is a russian expatriate that is secretly in love with Sonia Contado. Henry is a british soldier that took refuge in Merindol Colony in 2137ad. He is the lover of Sonia Contado.
Explore the multifaceted world of Muntadher Saleh, an Iraqi polymath renowned for his expertise in visual art, writing, design, and pharmacy. This SlideShare delves into his innovative contributions across various disciplines, showcasing his unique ability to blend traditional themes with modern aesthetics. Learn about his impactful artworks, thought-provoking literary pieces, and his vision as a Neo-Pop artist dedicated to raising awareness about Iraq's cultural heritage. Discover why Muntadher Saleh is celebrated as "The Last Polymath" and how his multidisciplinary talents continue to inspire and influence.
2. Balustrades are getting very popular
because not only they can add beauty and
elegance to a home or office but they can
also make the whole area very safe.
3. Here in Western Australia, the government
is very strict in implementing rules and regulations
regarding balustrading and balustrading
specifications.
4. The fact is, companies offering balustrade
installations in Western Australia follow strict
balustrade standards and specifications
very meticulously.
5. So, before you try to install balustrades
in your home or office, be sure that you adhere to
these balustrading standards without compromising
the aesthetics of balustrades.
6. And always put in mind that safety is always your
priority when doing so.
7. Here are the specifications of balustrades
according to Australian Standards:
A balustrade should be installed alongside of any roof
where the public has access.
8. Any floors, corridors, hallways, balconies, decks,
verandas, mezzanines, and access bridge, should have
balustrades installed if:
9. A) It is not bounded by a wall; and
B) Its level above the surface beneath is
more than 1m.
10. The height of the balustrade and other types of
barriers must be in accordance to the following factors:
11. A) The height must not be less than 865 mm
above the nosing of the floor of a ramp or
the stair treads.
B) The height must not be less than:
12. a) 1m above the floor of any access path,
landing, balcony, among others; or
13. b) It should be 865mm above the floor of a stair or
ramp where balustrades are provided alongside the
inside edge of the said ramp or stair, and should not
exceed more than 500mm in length.
14. There should be incorporation with the transition
zone where the balustrade or any kind of barrier
height changes from 865mm to 1m, from stair
flight, for example, to the landing.
15. Should there be any openings in balustrades or
other barriers, they must be constructed so that they
don’t permit a 125-mm sphere to pass through it and
this includes decorative balustrades.
16. For the stairs, the opening is measured above
the nosing line of the treads of stairs.
17. If a balustrade or barrier is to be installed, it must
be designed to take loading forces in accordance with
AS/NZS 1170.1
18. If a wire balustrade should be the option to be
installed, it must be constructed also in accordance with
the following balustrade standards and specifications
and should meet the requirements of:
19. A) For horizontal wire balustrades
a) It must be in accordance with the tension
values when measured with a strain indicator
shown here:
20.
21.
22. b) It must not exceed the maximum deflections
shown earlier.
23. B) For non-continuous vertical wire balustrades, it
must be in accordance with the tension values
provided by the rules and regulations that apply to it,
when measured with a strain indicator.
24. C) For continuous vertical sloped wire balustrades:
a) Must have wires of no more than 2.5mm
diameter with a lay of 7x7 or 7x19 construction;
25. b) If there are any changes in direction at
support rails, they must pass around a pulley
block without causing any wire deformation that
is permanent;
26. c) It should have supporting rails. These rails
must be constructed with a spacing that should
not exceed 900mm and the materials should not
permit any deflection that can decrease tension
of the wire when it is loaded; and
27. d) If the wire is measured with a strain indicator, it should
follow the regulations/measurements shown here:
28. These are some of the balustrade standards
and specifications that you should be aware of
in case you want to install any type of balustrade in
your home or office. Be it wire balustrades,
steel, or wood balustrades.
29. The thing is you should remember
these specifications and standards so that no
problem may arise in the future that are in
conflict with the rules and regulations.
30. Also remember that to keep the
surrounding beautiful and neat, aesthetic
balustrades should also be in mind.
31. Luckily, you can find many
balustrading companies in the whole of
Western Australia including Perth.
32. References:
• Aristo Balustrades Pty Ltd
• Unit 2, 5 Geelong Court, Bibra Lake WA 6163, Australia
• Phone: 08 9418 8914
• E-mail: admin@aristogroup.com.au