Download free for 30 days
Sign in
Upload
Language (EN)
Support
Business
Mobile
Social Media
Marketing
Technology
Art & Photos
Career
Design
Education
Presentations & Public Speaking
Government & Nonprofit
Healthcare
Internet
Law
Leadership & Management
Automotive
Engineering
Software
Recruiting & HR
Retail
Sales
Services
Science
Small Business & Entrepreneurship
Food
Environment
Economy & Finance
Data & Analytics
Investor Relations
Sports
Spiritual
News & Politics
Travel
Self Improvement
Real Estate
Entertainment & Humor
Health & Medicine
Devices & Hardware
Lifestyle
Change Language
Language
English
Español
Português
Français
Deutsche
Cancel
Save
Submit search
EN
Uploaded by
Atul Uttam
315 views
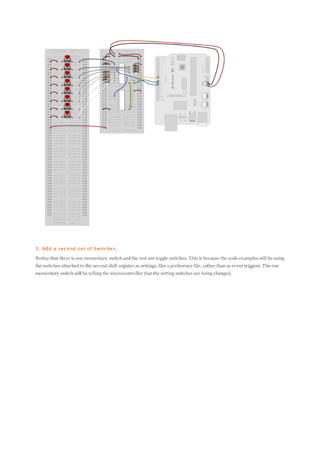
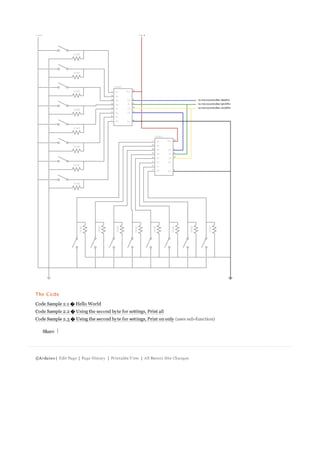
Arduino shift in
Read more
0
Save
Share
Embed
Embed presentation
Download
Download to read offline
1
/ 9
2
/ 9
3
/ 9
4
/ 9
5
/ 9
6
/ 9
7
/ 9
8
/ 9
9
/ 9
More Related Content
PPTX
Lcd programing and pin configuration
by
Atul Uttam
PDF
Id 12-datasheet
by
Atul Uttam
PPTX
Day1
by
Atul Uttam
PPTX
R tist
by
Atul Uttam
PPTX
Day 2
by
Atul Uttam
PPTX
Rfid
by
Atul Uttam
DOC
Sms based patient report from remote place1
by
Atul Uttam
PPTX
Multiplexer
by
Atul Uttam
Lcd programing and pin configuration
by
Atul Uttam
Id 12-datasheet
by
Atul Uttam
Day1
by
Atul Uttam
R tist
by
Atul Uttam
Day 2
by
Atul Uttam
Rfid
by
Atul Uttam
Sms based patient report from remote place1
by
Atul Uttam
Multiplexer
by
Atul Uttam
More from Atul Uttam
PPTX
Sharp sensor
by
Atul Uttam
PPTX
Dtmf
by
Atul Uttam
PDF
Lm35
by
Atul Uttam
PPTX
Max 232
by
Atul Uttam
PDF
Rgb led strip tutorial
by
Atul Uttam
PPTX
Din 4
by
Atul Uttam
PPTX
Din 4
by
Atul Uttam
PPTX
Arduino
by
Atul Uttam
PPTX
Motor driver
by
Atul Uttam
DOCX
Led program
by
Atul Uttam
Sharp sensor
by
Atul Uttam
Dtmf
by
Atul Uttam
Lm35
by
Atul Uttam
Max 232
by
Atul Uttam
Rgb led strip tutorial
by
Atul Uttam
Din 4
by
Atul Uttam
Din 4
by
Atul Uttam
Arduino
by
Atul Uttam
Motor driver
by
Atul Uttam
Led program
by
Atul Uttam
Download