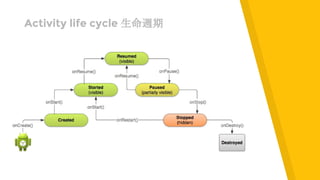
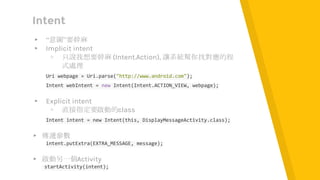
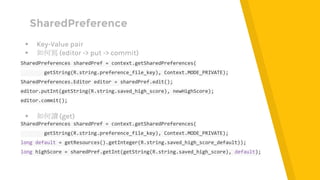
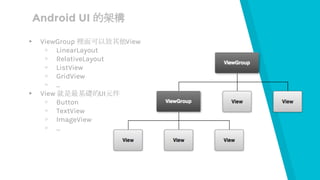
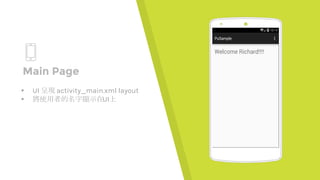
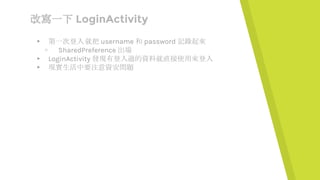
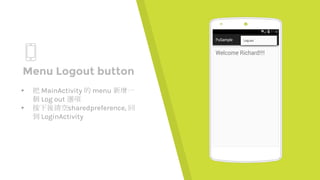
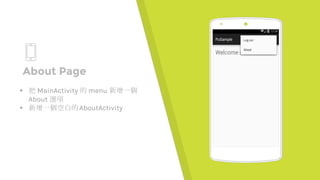
Android 介面實作
2015.12.14
HELLO!
I am Richard Chang
Android Engineer in HTC, Movial and VMFive
You can find me via chiel99 AT gmail.com
Outline
▸ Android basic review
▹ Activity
▹ Intent
▸ Android UI review
▹ Layouts and UI components
▸ Practices
▹ Login page
▹ Main page
▹ About page
1.
Android Basic
Review
Let’s start to
rock the world
Activity life cycle 生命週期
Intent
▸ “意圖”要幹麻
▸ Implicit intent
▹ 只說我想要幹麻 (Intent.Action), 讓系統幫你找對應的程
式處理
Uri webpage = Uri.parse("http://www.android.com");
Intent webIntent = new Intent(Intent.ACTION_VIEW, webpage);
▸ Explicit intent
▹ 直接指定要啟動的class
Intent intent = new Intent(this, DisplayMessageActivity.class);
▸ 傳遞參數
intent.putExtra(EXTRA_MESSAGE, message);
▸ 啟動另一個Activity
startActivity(intent);
儲存資料的三種方法
Shared
Preference
Data
SQLite
File
今天只會用到一個
Shared
Preference
Data
SharedPreference
▸ Key-Value pair
▸ 如何寫 (editor -> put -> commit)
SharedPreferences sharedPref = context.getSharedPreferences(
getString(R.string.preference_file_key), Context.MODE_PRIVATE);
SharedPreferences.Editor editor = sharedPref.edit();
editor.putInt(getString(R.string.saved_high_score), newHighScore);
editor.commit();
▸ 如何讀 (get)
SharedPreferences sharedPref = context.getSharedPreferences(
getString(R.string.preference_file_key), Context.MODE_PRIVATE);
long default = getResources().getInteger(R.string.saved_high_score_default));
long highScore = sharedPref.getInt(getString(R.string.saved_high_score), default);
2.
Android UI
Review
Let’s start to make
things better
Android UI 的架構
▸ ViewGroup 裡面可以放其他View
▹ LinearLayout
▹ RelativeLayout
▹ ListView
▹ GridView
▹ ...
▸ View 就是最基礎的UI元件
▹ Button
▹ TextView
▹ ImageView
▹ ...
UI layout design by XML
▸ 善用 Android Studio Preview 功能
▹ WYSIWYG 所見即所得
Layout XML example
<LinearLayout xmlns:android="http://schemas.android.com/apk/res/android"
xmlns:tools="http://schemas.android.com/tools"
android:layout_width="match_parent"
android:layout_height="match_parent"
android:orientation="horizontal" >
<EditText android:id="@+id/edit_msg"
android:layout_width="wrap_content"
android:layout_height="wrap_content"/>
</LinearLayout>
▸ EditText editText = (EditText)findViewById(R.id.edit_msg);
▸ 每個 UI 元件都要有 layout_width 和 layout_height
▹ wrap_content: 跟元件的內容一樣大
▹ match_parent: 跟上一層的layout一樣大
▸ layout_weight: layout剩餘空間的權重
那就來寫一點程式吧
3. Practice A
Login Page
Let’s start
coding
開始一個新專案
▸ 選擇Blank Activity
▹ MainActivity
▸ 支援 Android 4.0 以上版本
新增一個 LoginActivity
▸ 選擇Blank Activity
▹ LoginActivity
▸ 到 AndroidManifest.xml 將 LoginActivity 設為 Launcher 預
設開啟的Activity
<intent-filter>
<action android:name="android.intent.action.MAIN" />
<category android:name="android.intent.category.LAUNCHER" />
</intent-filter>
Place your screenshot here
Login Page
▸ 啟動一個 LoginActivity
▸ UI 使用 login_activity.xml layout
▸ 點擊登入button跳轉 MainActivity
▸ 使用 intent extra 將使用者的名字
帶給MainActivity
Place your screenshot here
Login Page
▸ ProgressBar when login
Place your screenshot here
Main Page
▸ UI 呈現 activity_main.xml layout
▸ 將使用者的名字顯示在UI上
一切都很
美好
But?
每次都要
先打帳號
密碼?
改寫一下 LoginActivity
▸ 第一次登入 就把 username 和 password 記錄起來
▹ SharedPreference 出場
▸ LoginActivity 發現有登入過的資料就直接使用來登入
▸ 現實生活中要注意資安問題
4. Practice B
Menu Log Out
Let’s just keep
coding
Place your screenshot here
Menu Logout button
▸ 把 MainActivity 的 menu 新增一
個 Log out 選項
▸ 按下後清空sharedpreference, 回
到 LoginActivity
5. Practice C
About Page
Let’s finish the
work
Place your screenshot here
About Page
▸ 把 MainActivity 的 menu 新增一個
About 選項
▸ 新增一個空白的AboutActivity
Place your screenshot here
About Page
▸ 使用可左右滑動的ViewPager
▸ 放上組員照片和名字
THANKS!
Any questions?
You can find all the source code on github
https://github.com/chiel99/PuSample

Android 介面實作

  • 1.
  • 2.
    HELLO! I am RichardChang Android Engineer in HTC, Movial and VMFive You can find me via chiel99 AT gmail.com
  • 3.
    Outline ▸ Android basicreview ▹ Activity ▹ Intent ▸ Android UI review ▹ Layouts and UI components ▸ Practices ▹ Login page ▹ Main page ▹ About page
  • 4.
  • 5.
    Activity life cycle生命週期
  • 6.
    Intent ▸ “意圖”要幹麻 ▸ Implicitintent ▹ 只說我想要幹麻 (Intent.Action), 讓系統幫你找對應的程 式處理 Uri webpage = Uri.parse("http://www.android.com"); Intent webIntent = new Intent(Intent.ACTION_VIEW, webpage); ▸ Explicit intent ▹ 直接指定要啟動的class Intent intent = new Intent(this, DisplayMessageActivity.class); ▸ 傳遞參數 intent.putExtra(EXTRA_MESSAGE, message); ▸ 啟動另一個Activity startActivity(intent);
  • 7.
  • 8.
  • 9.
    SharedPreference ▸ Key-Value pair ▸如何寫 (editor -> put -> commit) SharedPreferences sharedPref = context.getSharedPreferences( getString(R.string.preference_file_key), Context.MODE_PRIVATE); SharedPreferences.Editor editor = sharedPref.edit(); editor.putInt(getString(R.string.saved_high_score), newHighScore); editor.commit(); ▸ 如何讀 (get) SharedPreferences sharedPref = context.getSharedPreferences( getString(R.string.preference_file_key), Context.MODE_PRIVATE); long default = getResources().getInteger(R.string.saved_high_score_default)); long highScore = sharedPref.getInt(getString(R.string.saved_high_score), default);
  • 10.
  • 11.
    Android UI 的架構 ▸ViewGroup 裡面可以放其他View ▹ LinearLayout ▹ RelativeLayout ▹ ListView ▹ GridView ▹ ... ▸ View 就是最基礎的UI元件 ▹ Button ▹ TextView ▹ ImageView ▹ ...
  • 12.
    UI layout designby XML ▸ 善用 Android Studio Preview 功能 ▹ WYSIWYG 所見即所得
  • 13.
    Layout XML example <LinearLayoutxmlns:android="http://schemas.android.com/apk/res/android" xmlns:tools="http://schemas.android.com/tools" android:layout_width="match_parent" android:layout_height="match_parent" android:orientation="horizontal" > <EditText android:id="@+id/edit_msg" android:layout_width="wrap_content" android:layout_height="wrap_content"/> </LinearLayout> ▸ EditText editText = (EditText)findViewById(R.id.edit_msg); ▸ 每個 UI 元件都要有 layout_width 和 layout_height ▹ wrap_content: 跟元件的內容一樣大 ▹ match_parent: 跟上一層的layout一樣大 ▸ layout_weight: layout剩餘空間的權重
  • 14.
  • 15.
    3. Practice A LoginPage Let’s start coding
  • 16.
    開始一個新專案 ▸ 選擇Blank Activity ▹MainActivity ▸ 支援 Android 4.0 以上版本
  • 17.
    新增一個 LoginActivity ▸ 選擇BlankActivity ▹ LoginActivity ▸ 到 AndroidManifest.xml 將 LoginActivity 設為 Launcher 預 設開啟的Activity <intent-filter> <action android:name="android.intent.action.MAIN" /> <category android:name="android.intent.category.LAUNCHER" /> </intent-filter>
  • 18.
    Place your screenshothere Login Page ▸ 啟動一個 LoginActivity ▸ UI 使用 login_activity.xml layout ▸ 點擊登入button跳轉 MainActivity ▸ 使用 intent extra 將使用者的名字 帶給MainActivity
  • 19.
    Place your screenshothere Login Page ▸ ProgressBar when login
  • 20.
    Place your screenshothere Main Page ▸ UI 呈現 activity_main.xml layout ▸ 將使用者的名字顯示在UI上
  • 21.
  • 22.
  • 23.
    改寫一下 LoginActivity ▸ 第一次登入就把 username 和 password 記錄起來 ▹ SharedPreference 出場 ▸ LoginActivity 發現有登入過的資料就直接使用來登入 ▸ 現實生活中要注意資安問題
  • 24.
    4. Practice B MenuLog Out Let’s just keep coding
  • 25.
    Place your screenshothere Menu Logout button ▸ 把 MainActivity 的 menu 新增一 個 Log out 選項 ▸ 按下後清空sharedpreference, 回 到 LoginActivity
  • 26.
    5. Practice C AboutPage Let’s finish the work
  • 27.
    Place your screenshothere About Page ▸ 把 MainActivity 的 menu 新增一個 About 選項 ▸ 新增一個空白的AboutActivity
  • 28.
    Place your screenshothere About Page ▸ 使用可左右滑動的ViewPager ▸ 放上組員照片和名字
  • 29.
    THANKS! Any questions? You canfind all the source code on github https://github.com/chiel99/PuSample