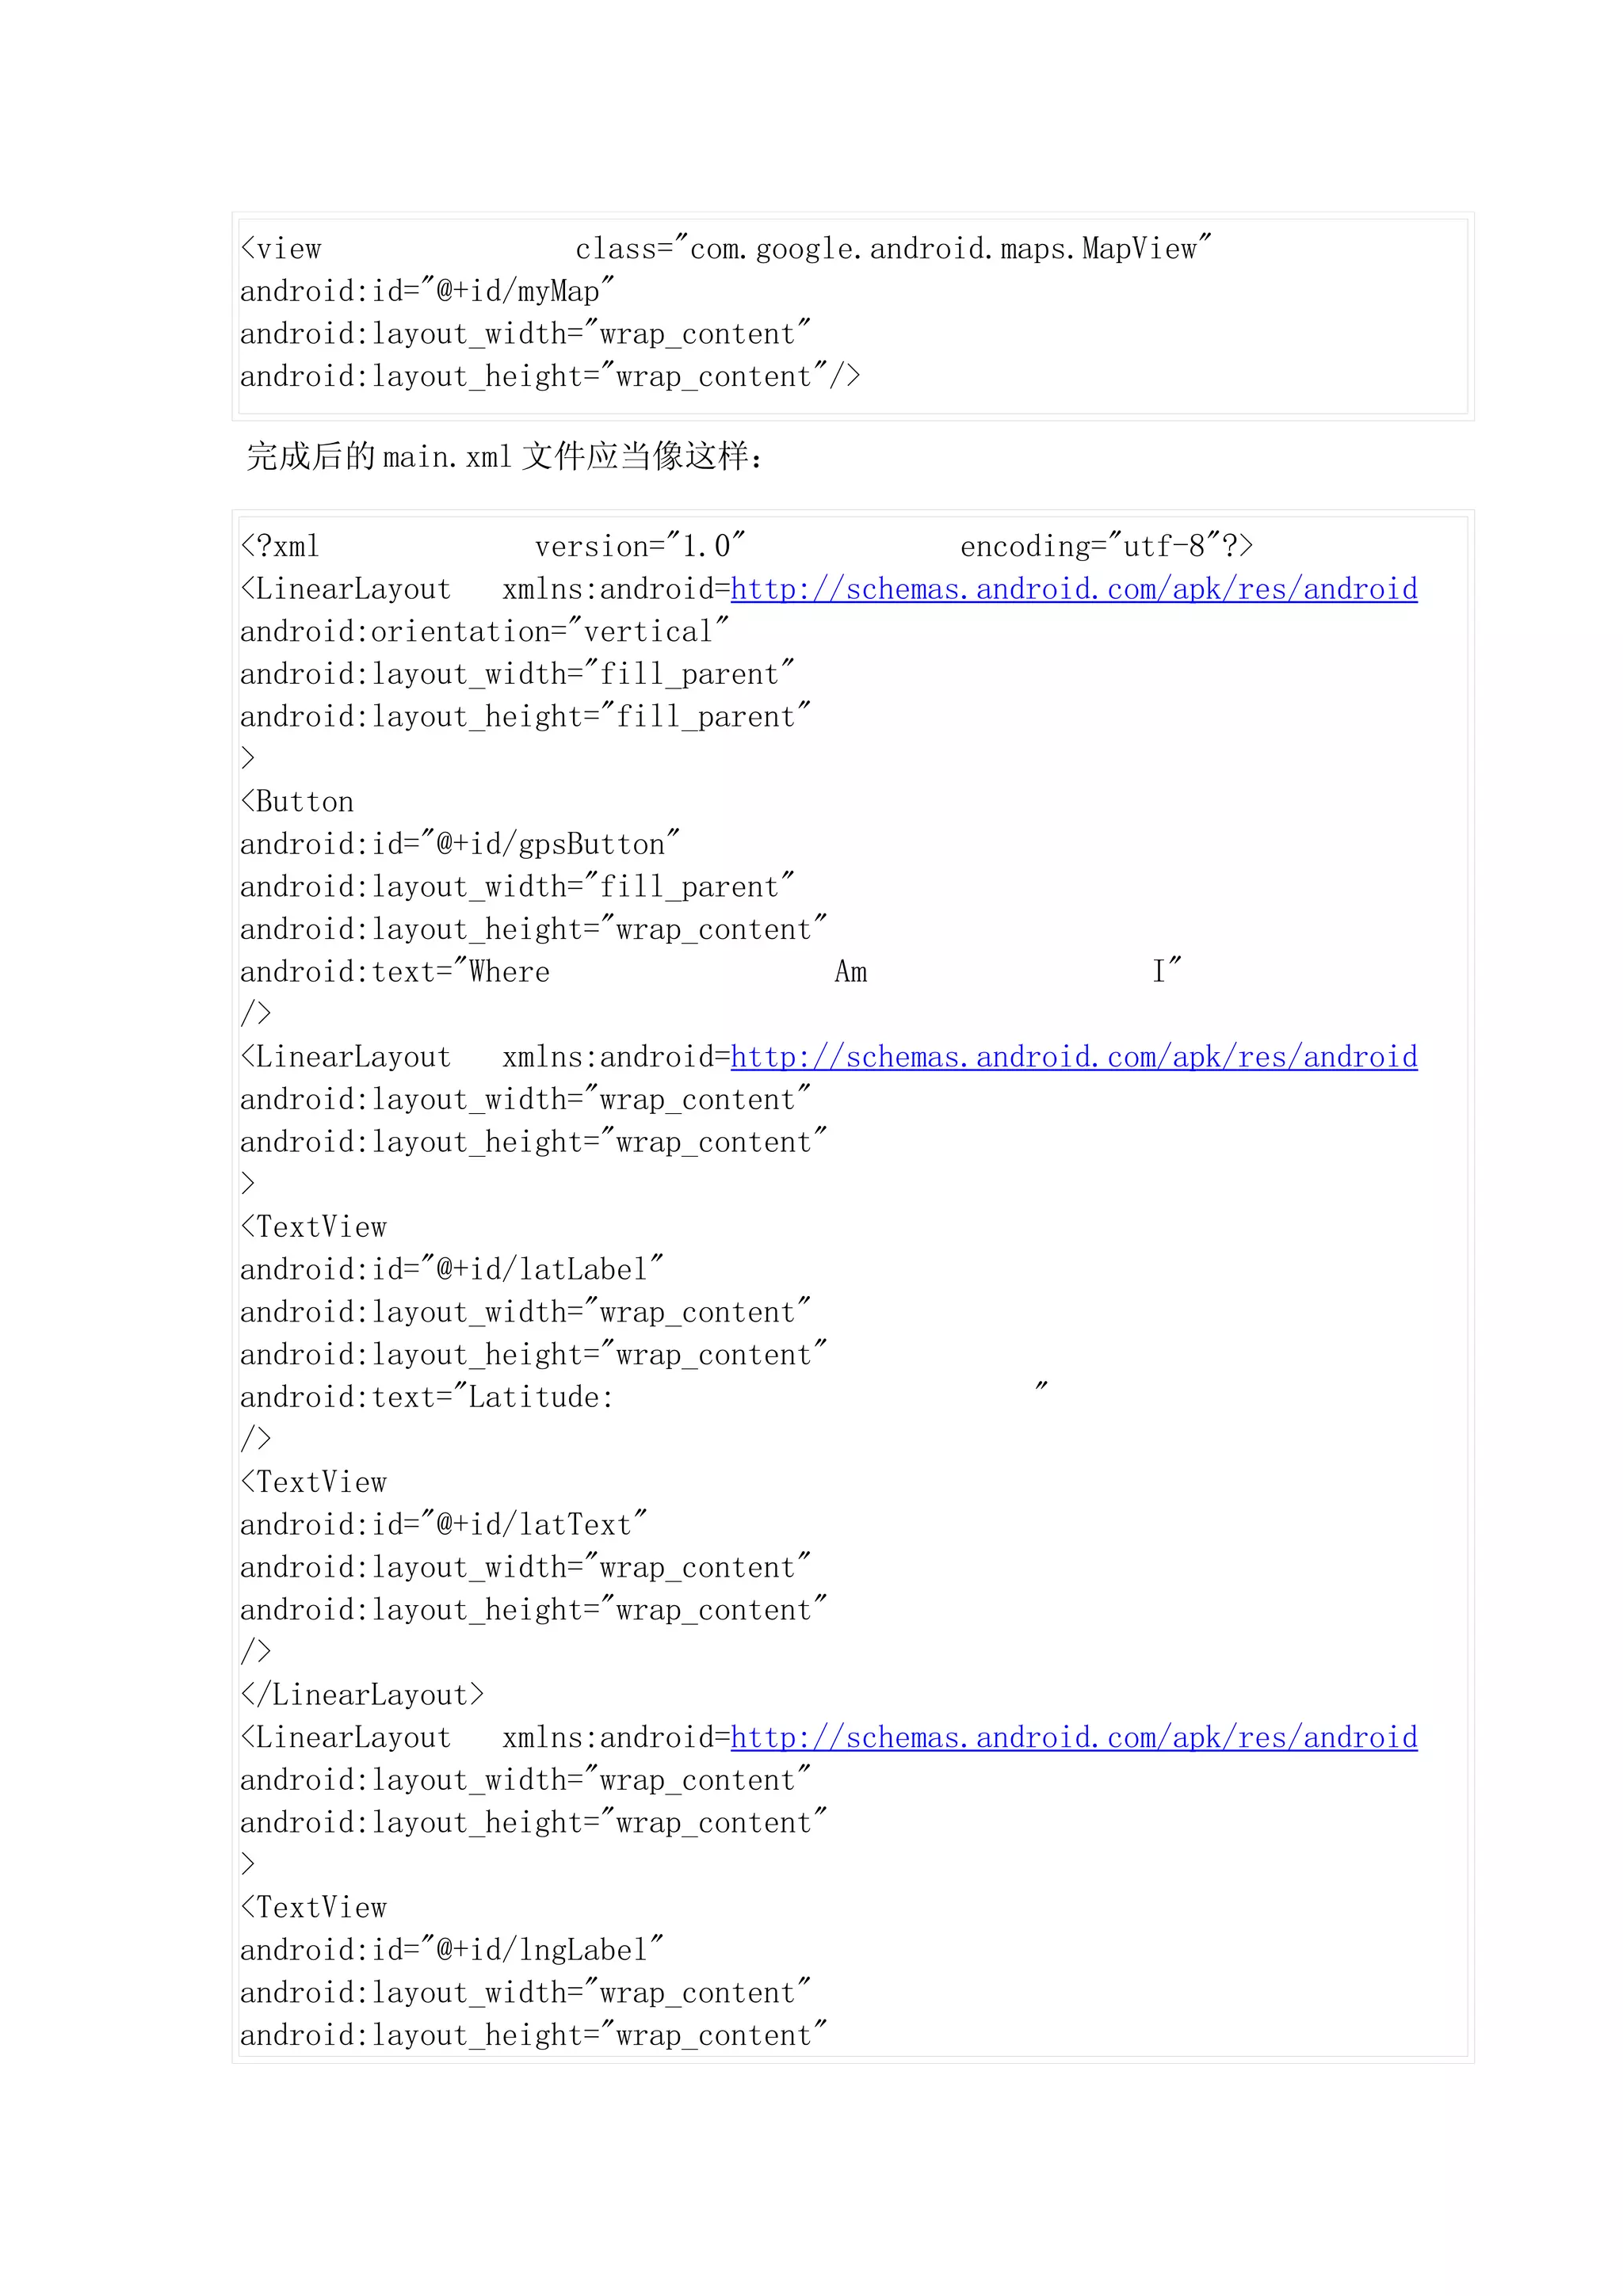
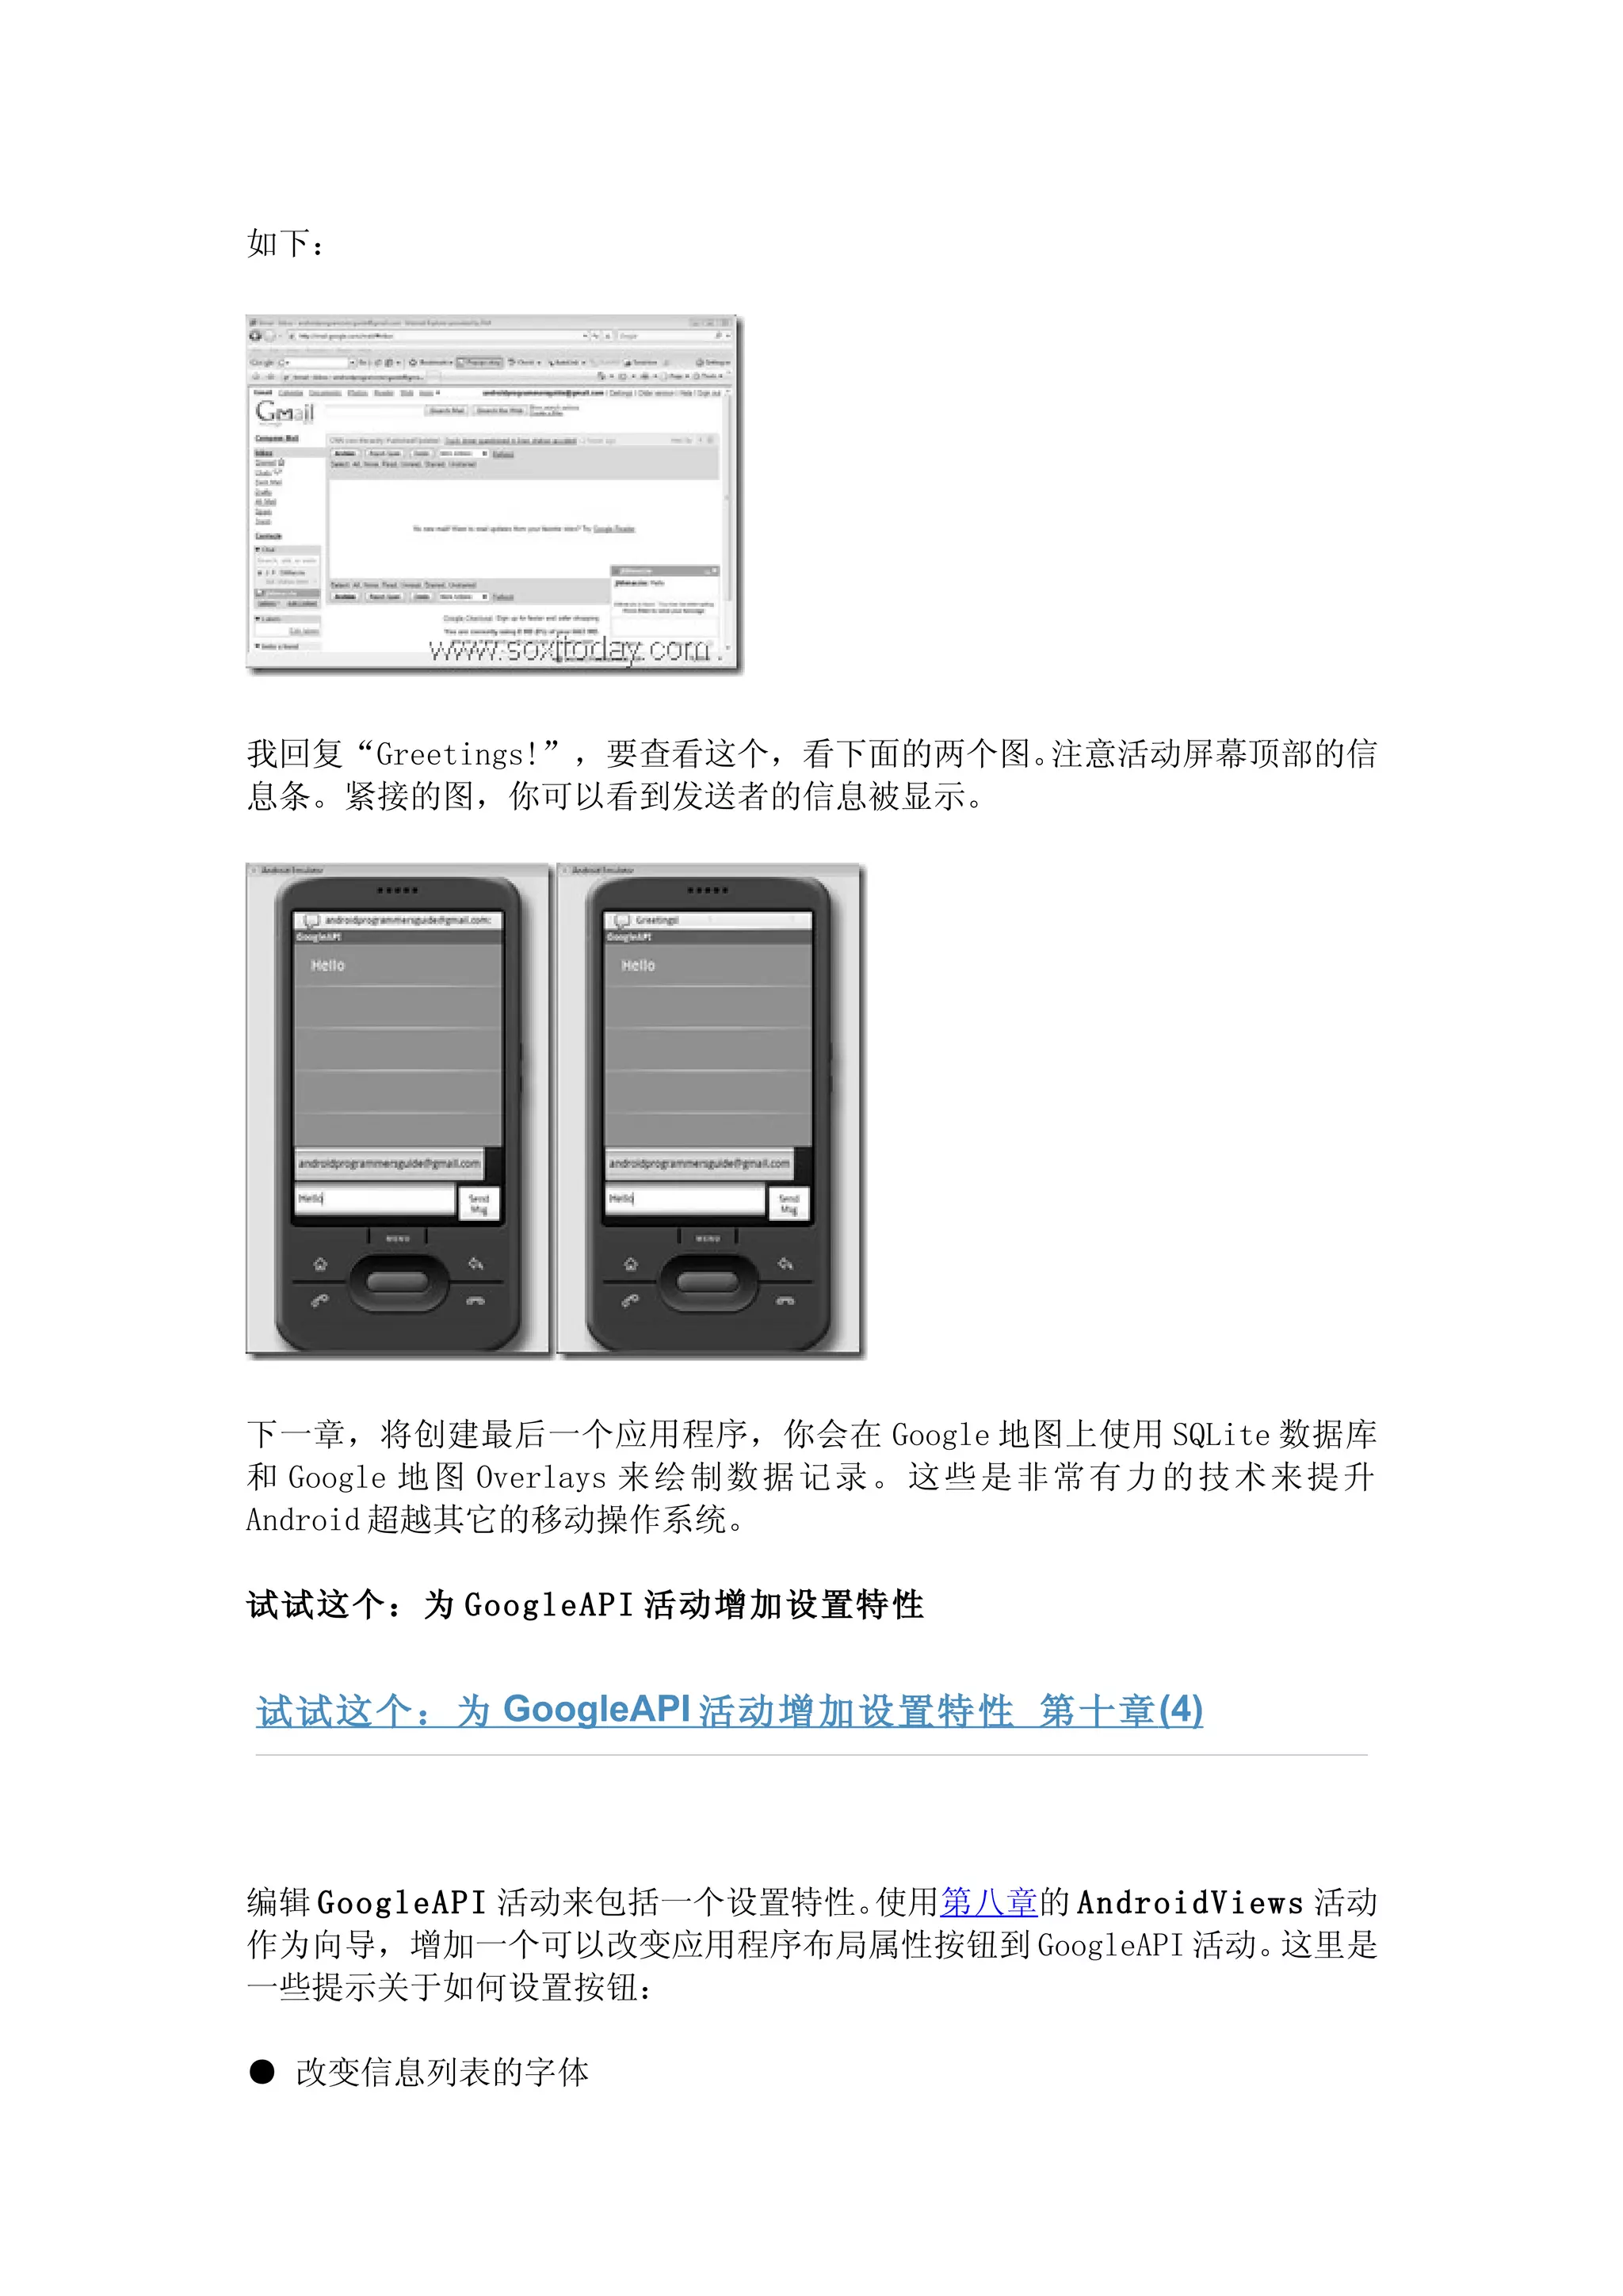
<TextView
android:layout_width="fill_parent"
android:layout_height="wrap_content"
android:text="Hello World, HelloWorldText"
/>
</LinearLayout>
最 后 一 个 在 res 目 录 下 的 文 件 夹 是 values , 放 置 了 XML 文 件 命 名 字 符 串 。
strings.xml 文件是用来放置程序引用的全局字符串。
assets 目录
assets 目录用来放置“原料”文件的。在这个目录中可以包含为流媒体和动画
准备的音频文件。因为 Android 模拟器的 beta 音频驱动没有优化,我不会在本
书的应用程序中使用任何的音频文件。
src 目录
src 目录包含项目里所有的源文件。 当项目一创立,就会包含两个文件 R.java 和
<活动>.Java(本例中是 HelloWorldText.java)
注意:
<activity>.java 总是根据你的活动来命名。
Hello World!自动产生文件的详解 - 第五章 (4)
R.java 是一个由 Android plugin 自动产生并添加到你的应用程序中的文件。这
个文件包含到 drawable,layout 和 values 目录的指针(或者目录里其它的项目,
本例中是字符串和图标)。你不应当必须直接修改这个文件。在你大多数的程序
里会总是提到 R.java.为 HelloWorldText 自动产生的代码如下:
/* AUTO-GENERATED FILE. DO NOT MODIFY.
*
* This class was automatically generated by the
* aapt tool from the resource data it found. It
* should not be modified by hand.
*/
37.
package testPackage.HelloWorldText;
public final class R {
public static final class attr {
}
public static final class drawable {
public static final int icon=0x7f020000;
}
public static final class layout {
public static final int main=0x7f030000;
}
public static final class string {
public static final int app_name=0x7f040000;
}
}
注意:
R.java 文件的注释部分提供了关于这个文件起源的解释。它说明文件由
aapt 工具创建。 在第六章,当你创建命令行版本的 Hello World 时,你将用命令
行工具创建所有自动产生的文件。
<activity>.java 文件在 src 目录下,你会花费大多数时间在这个文件上。
本 例 是 HelloWorldText.java. 这 个 是 你 的 创 建 新 的 Android 程 序 向 导 时 由
Android plugin 创建并与活动名称匹配来命名的。不像本部分大多数你已经看
过的文件,这个文件完全可以编辑。 事实上,如果你不修改代码,它会为了做一
点点的事情。
Package android_programmers_guide.HelloWorldText;
import android.app.Activity;
import android.os.Bundle;
public class HelloWorldText extends Activity {
/** Called when the activity is first created. */
@Override
public void onCreate(Bundle icicle) {
super.onCreate(icicle);
setContentView(R.layout.main);
}
}
在文件上面的三行是标准预处理器指令——那就是,如大多数的编程语言,
在 程 序 处 理 前 声 明 是 指 令 到 编 译 然 后 运 行 。 在 本 例 中 , 你 在 package
android_programmers_guide.HelloWorldText.有了定义和包含。
下两行通过 android.java 从 Android SDK 中导入特别的包装。
真正核心。
在下面的章节中,我演示Android 工具的功能。ActivityCreator.bat 是一
个强有力的工具,被用来为你的程序建立一个活动壳(Activty Shell)。
运行 ActivityCreator.bat - 第六章 (3)
ActivityCreator.bat 文件应当在 Android SDK 的…/tools/文件目录下。大
多数“前向”命令行工具都放置在工具目录的根目录下。 “前向”工具是依次呼
叫在工具根目录下更深目录的工具。ActivityCreator.bat 是工具根目录下一个
示例的工具,它运行时会呼叫另外一个工具。 使用 vi,Notepad 或者一个文本编
辑器,打开 ActivityCreator.bat。它应当包含下面的代码:
注意
ActivityCreator.bat 是定义为 Microsoft Windows 版本的 Android SDK。在本
章 的 后 面 部 分 , 你 将 会 学 习 ActivityVreator.py 。 这 个 是 Linux 版 本 的
ActivityCreator。
@echo off
rem Copyright (C) 2007 Google Inc.
rem
rem Licensed under the Apache License, Version 2.0 (the "License");
rem you may not use this file except in compliance with the License.
rem You may obtain a copy of the License at
rem
rem http://www.apache.org/licenses/LICENSE-2.0
rem
rem Unless required by applicable law or agreed to in writing,
software
rem distributed under the License is distributed on an "AS IS" BASIS,
rem WITHOUT WARRANTIES OR CONDITIONS OF ANY KIND, either express or
implied.
rem See the License for the specific language governing permissions
and
rem limitations under the License.
rem don't modify the caller's environment
setlocal
"%~dp0libactivityCreatoractivityCreator.exe" %*
浏览整个的 rem 声明(批处理文件注释声明),你会看到在文件的底部有
一 个 实 用 的 代 码 。 ActivityCreator.bat 被 用 来 呼 叫 …
49.
/tools/lib/activitycreator/ 目 录里 的 ActivityCreator.exe 。 这 个
ActivityCreator.bat 是一个工具的示例,它只是放置在 SDK 其它工具的前端。
所 以 , ActivityCreator.bat( 或 者 ActivityCreator.exe) 做 了 什 么 ?
ActivityCreator 被用来建立指向在哪里需要开始开发你的应用程序初始文件
的开发环境。这个路径结构和在第五章第五章(1)程序:Hello World!讨论过的
结构一致。 ActivityCreator.bat 创建 R.java, AndroidManifest.xml, 和所有
你应用程序需要的支持文件。
让我们现在转到命令行环境并且浏览 ActivityCreator。在开始菜单,点击
运行,在运行的对话框内输入 CMD 或者 COMMAND,然后点击确定。
执行这个命令会启动命令窗口。 这个窗口和老版本的 DOS 操作系统环境相同。
命令窗口出现后,在光标>后输入 ActivityCreator
提示
Microsoft 命令提示符接口没有大小写限制。在缺省情况下,如果你使用了大小
写限制的不同的开发环境,本章中显示的屏幕截图会不同。
运行命令 ActivityCreator,实际运行的是 ActivityCreator.bat,产生下
面 的 输 出 :
Activity Creator Script
Usage:
activityCreator [--out outdir] [--ide intellij]
yourpackagename.ActivityName
Creates the structure of a minimal Android application.
The following will be created:
- AndroidManifest.xml: The application manifest file.
- build.xml: An Ant script to build/package the application.
- Res: The resource directory.
- Src: The source directory.
- src/your/package/name/ActivityName.java the Activity java class.
packageName
is a fully qualified java Package in the format
<package1>.<package2>... (With at
least two components).
- Bin: The output folder for the build script.
Options:
--out <folder>: specifies where to create the files/folders.
--ide intellij: creates project files for IntelliJ
这个输出简单的指示了你需要提供更多的信息来运行 ActivityCreator。更
确切的是,你需要传递给命令一个你需要建造的壳应用程序的位置。
50.
注意
从 ActivityCreator 输出的命令给了你很多不仅仅是你没有提供足够信息的信
息。它给了你一个完整的使用工具创建的文件列表。这个文件列表和第五章第五
章(1)程序:HelloWorld!看起来相似。 虽然 build.xml 没有直接展示在 Eclipse
用户目前。
回到命令窗口并且使用下面的选项运行 ActivityCreator(如果你使用
Unix/Linux 环境编程,ActivityCreator 同样接受 unix-风格路径参数):
--out
c:AndroidHelloWorldandroid_programmers_guide.HelloWorldCommandLine
--out 选项告诉 ActivityCreator 你想要它输出点东西。这个命令选项使用两个
参数,<folder>和<package.activity>。第一行告诉 ActivityCreator 在一个
不存在的文件夹里创建壳应用程序。c:AndroidHelloWorld.
提示
如果你定义的文件夹或者路径不存在,AcitivityCreator 将会在过程中自动创
建一个。
--out 的第二个参数是包装名称和活动名称。根据前面章节的习俗,这个实例在
本 项 目 中 使 用 android_programmers_guide 作 为 包 装 的 名 字 并 且
HelloWorldCommandLine 作为活动的名称。
注意
成功运行 ActivityCreator 并设置你的初始环境和运行新的 Android Project
wizard 是一致的。
NOTE
the parameters needed to successfully run ActivityCreator and set up
your initial
environment are the same as those required by the New Android Project
wizard.
在新命令行选项和参数下运行 ActivityCreator。你应当从工具的输出看到
下面的内容:(略)。 下面的章节涵盖了由 ActivityCreator 创建的文件,因为
和由 Eclipse 创建的文件有一些不同。
项目结构 - 第六章( 4)
build.xml 接下来的参数,你会立即看到通知你的警告,告诉你不应当去编辑
剩 下 部 分 的 值 :
<!-- No user servicable parts below. -->
Following this warning in build.xml is a list of parameters and
values that are critical to the proper creation of your project. This
list includes compiler options, input directories, and tool
locations. Take a look at the following output of the core processing
information of build.xml:
注意
当 Android 建议反对改变下面这些参数时,如果你非常熟悉 ANT 是如何工作的,
你可以修改这些选项来符合你特定的需求。
<!-- Input directories -->
<property name="resource-dir" value="res" />
<property name="asset-dir" value="assets" />
<property name="srcdir" value="src" />
<!-- Output directories -->
<property name="outdir-classes" value="${outdir}/classes" />
<!-- Create R.java in the source directory -->
<property name="outdir-r" value="src" />
<!-- Intermediate files -->
<property name="dex-file" value="classes.dex" />
<property name="intermediate-dex" value="${outdir}/${dex-file}" />
<!-- The final package file to generate -->
<property name="out-package" value="${outdir}/$
{ant.project.name}.apk"/>
<!-- Tools -->
<property name="aapt" value="${android-tools}/aapt" />
<property name="aidl" value="${android-tools}/aidl" />
<property name="dx" value="${android-tools}/dx" />
<property name="adb" value="${android-tools}/adb" />
<property name="android-jar" value="${sdk-folder}/android.jar" />
92 Android: A Programmer’s Guide
<property name="zip" value="zip" />
<!-- Rules -->
<!-- Create the output directories if they don't exist yet. -->
<target name="dirs">
<mkdir dir="${outdir}" />
<mkdir dir="${outdir-classes}" />
</target>
<! -- Generate the R.java file for this project's resources. -->
<target name="resource-src" depends="dirs">
<target name="package-res-and-assets">
<echo>Packaging resources and assets...</echo>
<exec executable="${aapt}" failonerror="true">
<arg value="package" />
<arg value="-f" />
<arg value="-c" />
<arg value="-M" />
<arg value="AndroidManifest.xml" />
<arg value="-S" />
<arg value="${resource-dir}" />
<arg value="-A" />
<arg value="${asset-dir}" />
<arg value="-I" />
<arg value="${android-jar}" />
<arg value="${out-package}" />
</exec>
</target>
<!-- Same as package-res-and-assets, but without "-A ${asset-dir}" --
>
<target name="package-res-no-assets">
<echo>Packaging resources...</echo>
<exec executable="${aapt}" failonerror="true">
<arg value="package" />
<arg value="-f" />
<arg value="-c" />
<arg value="-M" />
<arg value="AndroidManifest.xml" />
<arg value="-S" />
<arg value="${resource-dir}" />
<!-- No assets directory -->
<arg value="-I" />
<arg value="${android-jar}" />
<arg value="${out-package}" />
</exec>
</target>
<!-- Invoke the proper target depending on whether or not
an assets directory is present. -->
<! -- TODO: find a nicer way to include the "-A ${asset-dir}"
argument
only when the assets dir exists. -->
<target name="package-res">
<available file="${asset-dir}" type="dir"
property="res-target" value="and-assets" />
<property name="res-target" value="no-assets" />
55.
<antcall target="package-res-${res-target}" />
</target>
<!-- Put the project's .class files into the output package file. -->
<target name="package-java" depends="compile, package-res">
<echo>Packaging java...</echo>
<jar destfile="${out-package}"
basedir="${outdir-classes}"
update="true" />
</target>
<!-- Put the project's .dex files into the output package file.
Use the zip command, available on most unix/Linux/MacOS systems,
to create the new package (Ant 1.7 has an internal zip command,
however Ant 1.6.5 lacks it and is still widely installed.)
-->
<target name="package-dex" depends="dex, package-res">
<echo>Packaging dex...</echo>
<exec executable="${zip}" failonerror="true">
<arg value="-qj" />
<arg value="${out-package}" />
<arg value="${intermediate-dex}" />
</exec>
</target>
<!-- Create the package file for this project from the sources. -->
<target name="package" depends="package-dex" />
<!-- Create the package and install package on the default emulator
-->
<target name="install" depends="package">
<echo>Sending package to default emulator...</echo>
<exec executable="${adb}" failonerror="true">
<arg value="install" />
<arg value="${out-package}" />
</exec>
</target>
</project>
现在你对于 build.xml 在人工下,命令行创建的 Android 项目是如何使用
应该有了好的理解,你可以开始来编辑你的项目文件并且创建一个 Android 活
动 。 第 一 个 你 需 要 看 的 文 件 是 main.xml 。 使 用 Windows 资 源 管 理 器 , 在
AndroidHelloWorldreslayout 目录下找到 main.xml。
在 Windows CLI 下创建 Hello World!活动 - 第六 章( 5)
public class AndroidPhoneDialerextends Activity {
/** Called when the activity is first created. */
@Override
public void onCreate(Bundle icicle) {
super.onCreate(icicle);
setContentView(R.layout.main );
final EditText phoneNumber = (EditText)
findViewById(R.id.phoneNumber );
final Button callButton = (Button)
findViewById(R.id.callButton);
callButton.setOnClickListener(new
Button.OnClickListener() {
Chapter 7: Using Intents and the Phone Dialer 147
public void onClick(View v){
if
(validatePhoneNumber(phoneNumber.getText().toString())){
Intent CallIntent = new
Intent(Intent.CALL_ACTION,Uri.parse("tel:" +
phoneNumber.getText()));
CallIntent.setLaunchFlags(Intent.NEW_TASK_LAUNCH );
startActivity(CallIntent);
}
else{
showAlert("Please enter a phone number in the X-XXX-XXX-
XXXX
format.",0, "Format Error", "Re-enter Number",false);
}
}
});
}
public boolean validatePhoneNumber(String number){
Pattern phoneNumber = Pattern.compile("(d-)?
(d{3}-)?d{3}
d{4}");
Matcher matcher = phoneNumber.matcher(number);
return matcher.matches();
}
}
当你运行本项目,它应当产生一个信息和下图类似(略)。
在下一章中,你将学习更多的 Views。你将创建创建一个多活动应用程序来允许
你浏览并创建本书中还没有谈论过的 Views。你也会创建并利用一个菜单系统来
return true;
}
return true;
在这个 case 声明中,对于每一个 id 当前设定的动作是返回 true.这个不会
做任何的事情但是会保留一个开放的可以增加代码的区域。你的
AndroidViews.java 文件现在可以被用来创建被新菜单系统启动的活动了。完整
的 AndroidViews.java 文件代码应当看上去如下:
package android_programmers_guide.AndroidViews;
import android.app.Activity;
import android.os.Bundle;
import android.view.Menu;
public class AndroidViews extends Activity {
/** Called when the Activity is first created. /
@Override
public void onCreate(Bundle icicle) {
super.onCreate(icicle);
setContentView(R.layout.main);
}
@Override
public boolean onCreateOptionsMenu(Menu menu) {
super.onCreateOptionsMenu(menu);
/** Add one menu item for each View in our
project */
menu.add(0, 0, "AutoComplete");
menu.add(0, 1, "Button");
menu.add(0, 2, "CheckBox");
menu.add(0, 3, "EditText");
menu.add(0, 4, "RadioGroup");
menu.add(0, 5, "Spinner");
return true;
}
/** Override onOptionsItemSelected to execute
code for each
menu item */
@Override
public boolean onOptionsItemSelected(Menu.Item
item){
}
/** Select statement to handle calls
to specific menu items */
switch (item.getId()) {
package android_programmers_guide.AndroidLBS;
import android.os.Bundle;
import android.location.LocationManager;
import android.view.View;
import android.widget.TextView;
import android.content.Context;
import android.widget.Button;
import com.google.android.maps.MapActivity;
import com.google.android.maps.MapView;
import com.google.android.maps.Point;
import com.google.android.maps.MapController;
public class AndroidLBS extends MapActivity {
/** Called when the activity is first created. */
@Override
public void onCreate(Bundle icicle) {
super.onCreate(icicle);
setContentView(R.layout.main);
final MapView myMap = (MapView) findViewById(R.id.myMap);
final MapController myMapController = myMap.getController();
final Button zoomIn = (Button) findViewById(R.id.buttonZoomIn);
zoomIn.setOnClickListener(new Button.OnClickListener() {
public void onClick(View v){
ZoomIn(myMap,myMapController);
}});
final Button zoomOut = (Button) findViewById(R.id.buttonZoomOut);
zoomOut.setOnClickListener(new Button.OnClickListener() {
public void onClick(View v){
ZoomOut(myMap,myMapController);
}});
final Button gpsButton = (Button) findViewById(R.id.gpsButton);
gpsButton.setOnClickListener(new Button.OnClickListener() {
public void onClick(View v){
LoadProviders(myMap,myMapController);
}});
final Button viewMap = (Button) findViewById(R.id.buttonMapView);
viewMap.setOnClickListener(new Button.OnClickListener() {
public void onClick(View v){
ShowMap(myMap);
}});
final Button viewSat = (Button) findViewById(R.id.buttonSatView);
viewSat.setOnClickListener(new Button.OnClickListener() {
public void onClick(View v){
ShowSat(myMap);
157.
}});
}
public void LoadProviders(MapView mv, MapController mc){
TextView latText = (TextView) findViewById(R.id.latText);
TextView lngText = (TextView) findViewById(R.id.lngText);
LocationManager myManager = (LocationManager)
getSystemService(Context.LOCATION_SERVICE);
Double latPoint =
myManager.getCurrentLocation("gps").getLatitude()*1E6;
Double lngPoint =
myManager.getCurrentLocation("gps").getLongitude()*1E6;
latText.setText(latPoint.toString());
lngText.setText(lngPoint.toString());
Point myLocation = new Point(latPoint.intValue(),lngPoint.intValue());
mc.centerMapTo(myLocation, false);
mc.zoomTo(9);
}
public void ZoomIn(MapView mv, MapController mc){
if(mv.getZoomLevel()!=21){
mc.zoomTo(mv.getZoomLevel()+ 1);
}
}
public void ZoomOut(MapView mv, MapController mc){
if(mv.getZoomLevel()!=1){
mc.zoomTo(mv.getZoomLevel()- 1);
}
}
public void ShowMap(MapView mv){
if (mv.isSatellite()){
mv.toggleSatellite();
}
}
public void ShowSat(MapView mv){
if (!mv.isSatellite()){
mv.toggleSatellite();
}
}
}
当你运行活动时,应当可以启动和关闭卫星视图,如下图(略)。
在下一章,你将进入更深层次的 Google API 。第十章将一步一步学习使用
Google API 从 Android 手机发送信息到 GTalk。
158.
问专家
Q:最终版本的 Android 还会继续使用.kml或者.nmea 文件吗?
A:本书写的时候,最终的 Android 还没有发布,可以假定的是,是的,最后版
本的 Android 还会利用.kml 和/或者.nmea 文件。这将允许应用程序开发者在应
用程序内使用包括静态坐标文件。
Q:有没有可能来创建有标记的 Google Map?
A:是的,在第十一章,你将学习如何熟练操作 Google 地图 Overlays。这些视
图允许在 Google 地图的上面你绘制文本,标记和其它形状。
第十章 使用 Google API 的 Gtalk
使用 Google API 的 GTalk 第十章 (1)
关键技能 & 概念
● 执行一个 Google API 包装
● 为 Google 存取配置 XMPP 开发环境设置
● 执行 View.OnClickListener( ) 方法
第九章为你介绍了 Google API。你创建了一个影响 Google API 和 Google 地
图的活动。因为 API 的易用和灵活性,可以快速的在 Google 地图上显示用户的
当前位置。同样,你还学习到了如何使用很少量的相关代码来熟练操控地图。
Google API 包括了不仅是进入 Google 地图的功能。在上一章中,你使用了很大
的 API 中很小的一个部分。 对于 Google API 的基本包装是 com.google。 从这个基
础 中 , Google API 包 含 了 允 许 你 创 建 操 控 GTalk ( Google 的 聊 天 服 务 ) ,
Google 日 历 ,Google 文 档 ,Google 电 子 表 格 和 Google 服 务 等等的活动
的权力。
当我看是写这本书时,这个版本的 Android SDK 是 m3-rc22。写完书时,Google
不提倡这些包装中的一些,但是还是留在 SDK 中。有显示 Google 日历,Google
电子表格和 Google 服务仍旧需要升级,遗憾的是,在 m5-rc15 版本的 SDK 中还
159.
处于未完成的状态。为了避免混乱,Google 还移除了任何与这些包装相关联的
帮助文件。因此,本章的重点是在最新发布的 AndroidSDK 中工作很好的 GTalk。
在本章中,将会构造一个小的,利用 Android SDK 的 GTalk 包装的活动。当活动
完成,你将可以利用手机发送并接受信息到/从另外一个 GTalk 用户。
注意
在第一个 Google API 的反复中,处理 GTalk 的包装是一个非常广泛的 XMPP 包
装。(XMPP 是很多聊天平台的基础协议,包括 GTalk 和 Jabber)。使用最新
版的 SDK,初始的 XMPP 包装为反映 GTalk 的特性而加强并重命名。要开始,用
Eclipse 创建一个新项目,并且命名 GoogleAPI。
为 GTalk 配置 Android 模拟器
在开始为本项目写代码之前,你需要在 Android 模拟器中调整开发环境设定,
XMPP 设定。
在项目打开的状态下,需要离开常规的程序一会儿。如果你熟悉 GTalk,你知道
只有登录 Google 帐户以后才可以使用这个产品。 因此,你必须要采取特别的步
骤来确保你的设备(本例是 Android 模拟器)可以登录你的 Google 帐户,这样,
可以确保发送和接受信息。
导航到 AndroidSDK/tools 文件夹并且启动模拟器。你可以从 Eclipse 开发环境
中启动它,但是那样会需要同时启动还没有写代码的活动。 为了节约时间,手动
启动模拟器。
模拟器启动后,点击所有的快捷方式(All shortcut)。找到 Dev Tools 条目
并且启动它。你将会看到和下面类似的图(略)。
滚动 Dev Tools 菜单直到看见 XMPP 设置。选择 XMPP 设定。
注意
当你打开 XMPP 设定,活动的名称是 GTalk 设定。这个可能是个表象说明 Google
将在 Google API 包装中留下这个包装。命名显而易见的断开可能是从不同 SDK
版本之间改变而剩下的。
活动应当读取账户:<None>,如图所示(略)。这表明了设备中没有储存登录信
息。你需要为 Google 帐户增加登录信息来允许活动来有权使用 Google 的服务器。
点击增加帐户来显示一个屏幕。输入用户名和密码之后,点击登录。Android 模
拟器应当试着去验证你的信息。当模拟器尝试验证信息时,它显示
“Authenticating”信息。
提示
Content URI 被用于识别将要处理的内容。这个数值必须唯一。
需要定义的字符串如下:
public static final Uri CONTENT_URI
=
Uri.parse("content://android_programmers_guide.FindAFriend.Friends/friend");
public static final String DEFAULT_SORT_ORDER = "modified DESC";
public static final String NAME = "name";
public static final String LOCATION = "location";
public static final String CREATED_DATE = "created";
public static final String MODIFIED_DATE = "modified";
有了变量的设定以后,Friends 类放在一起应该是这样的:
package android_programmers_guide.FindAFriend;
import android.net.Uri;
import android.provider.BaseColumns;
public final class Friends {
public static final class Friend implements BaseColumns {
public static final Uri CONTENT_URI
=
Uri.parse("content://android_programmers_guide.FindAFriend.Friends/friend");
public static final String DEFAULT_SORT_ORDER = "modified DESC";
public static final String NAME = "name";
public static final String LOCATION = "location";
public static final String CREATED_DATE = "created";
public static final String MODIFIED_DATE = "modified";
}
}
创建 Content Provider
创建 Content Provider 第十一章 (4)
使 用 Eclipse 打 开 将 会 成 为 项 目 Content Provider 的
FriendsProvider.java 文 件 。 你 将 要 在 活 动 中 使 用 这 个 定 制 的 Content
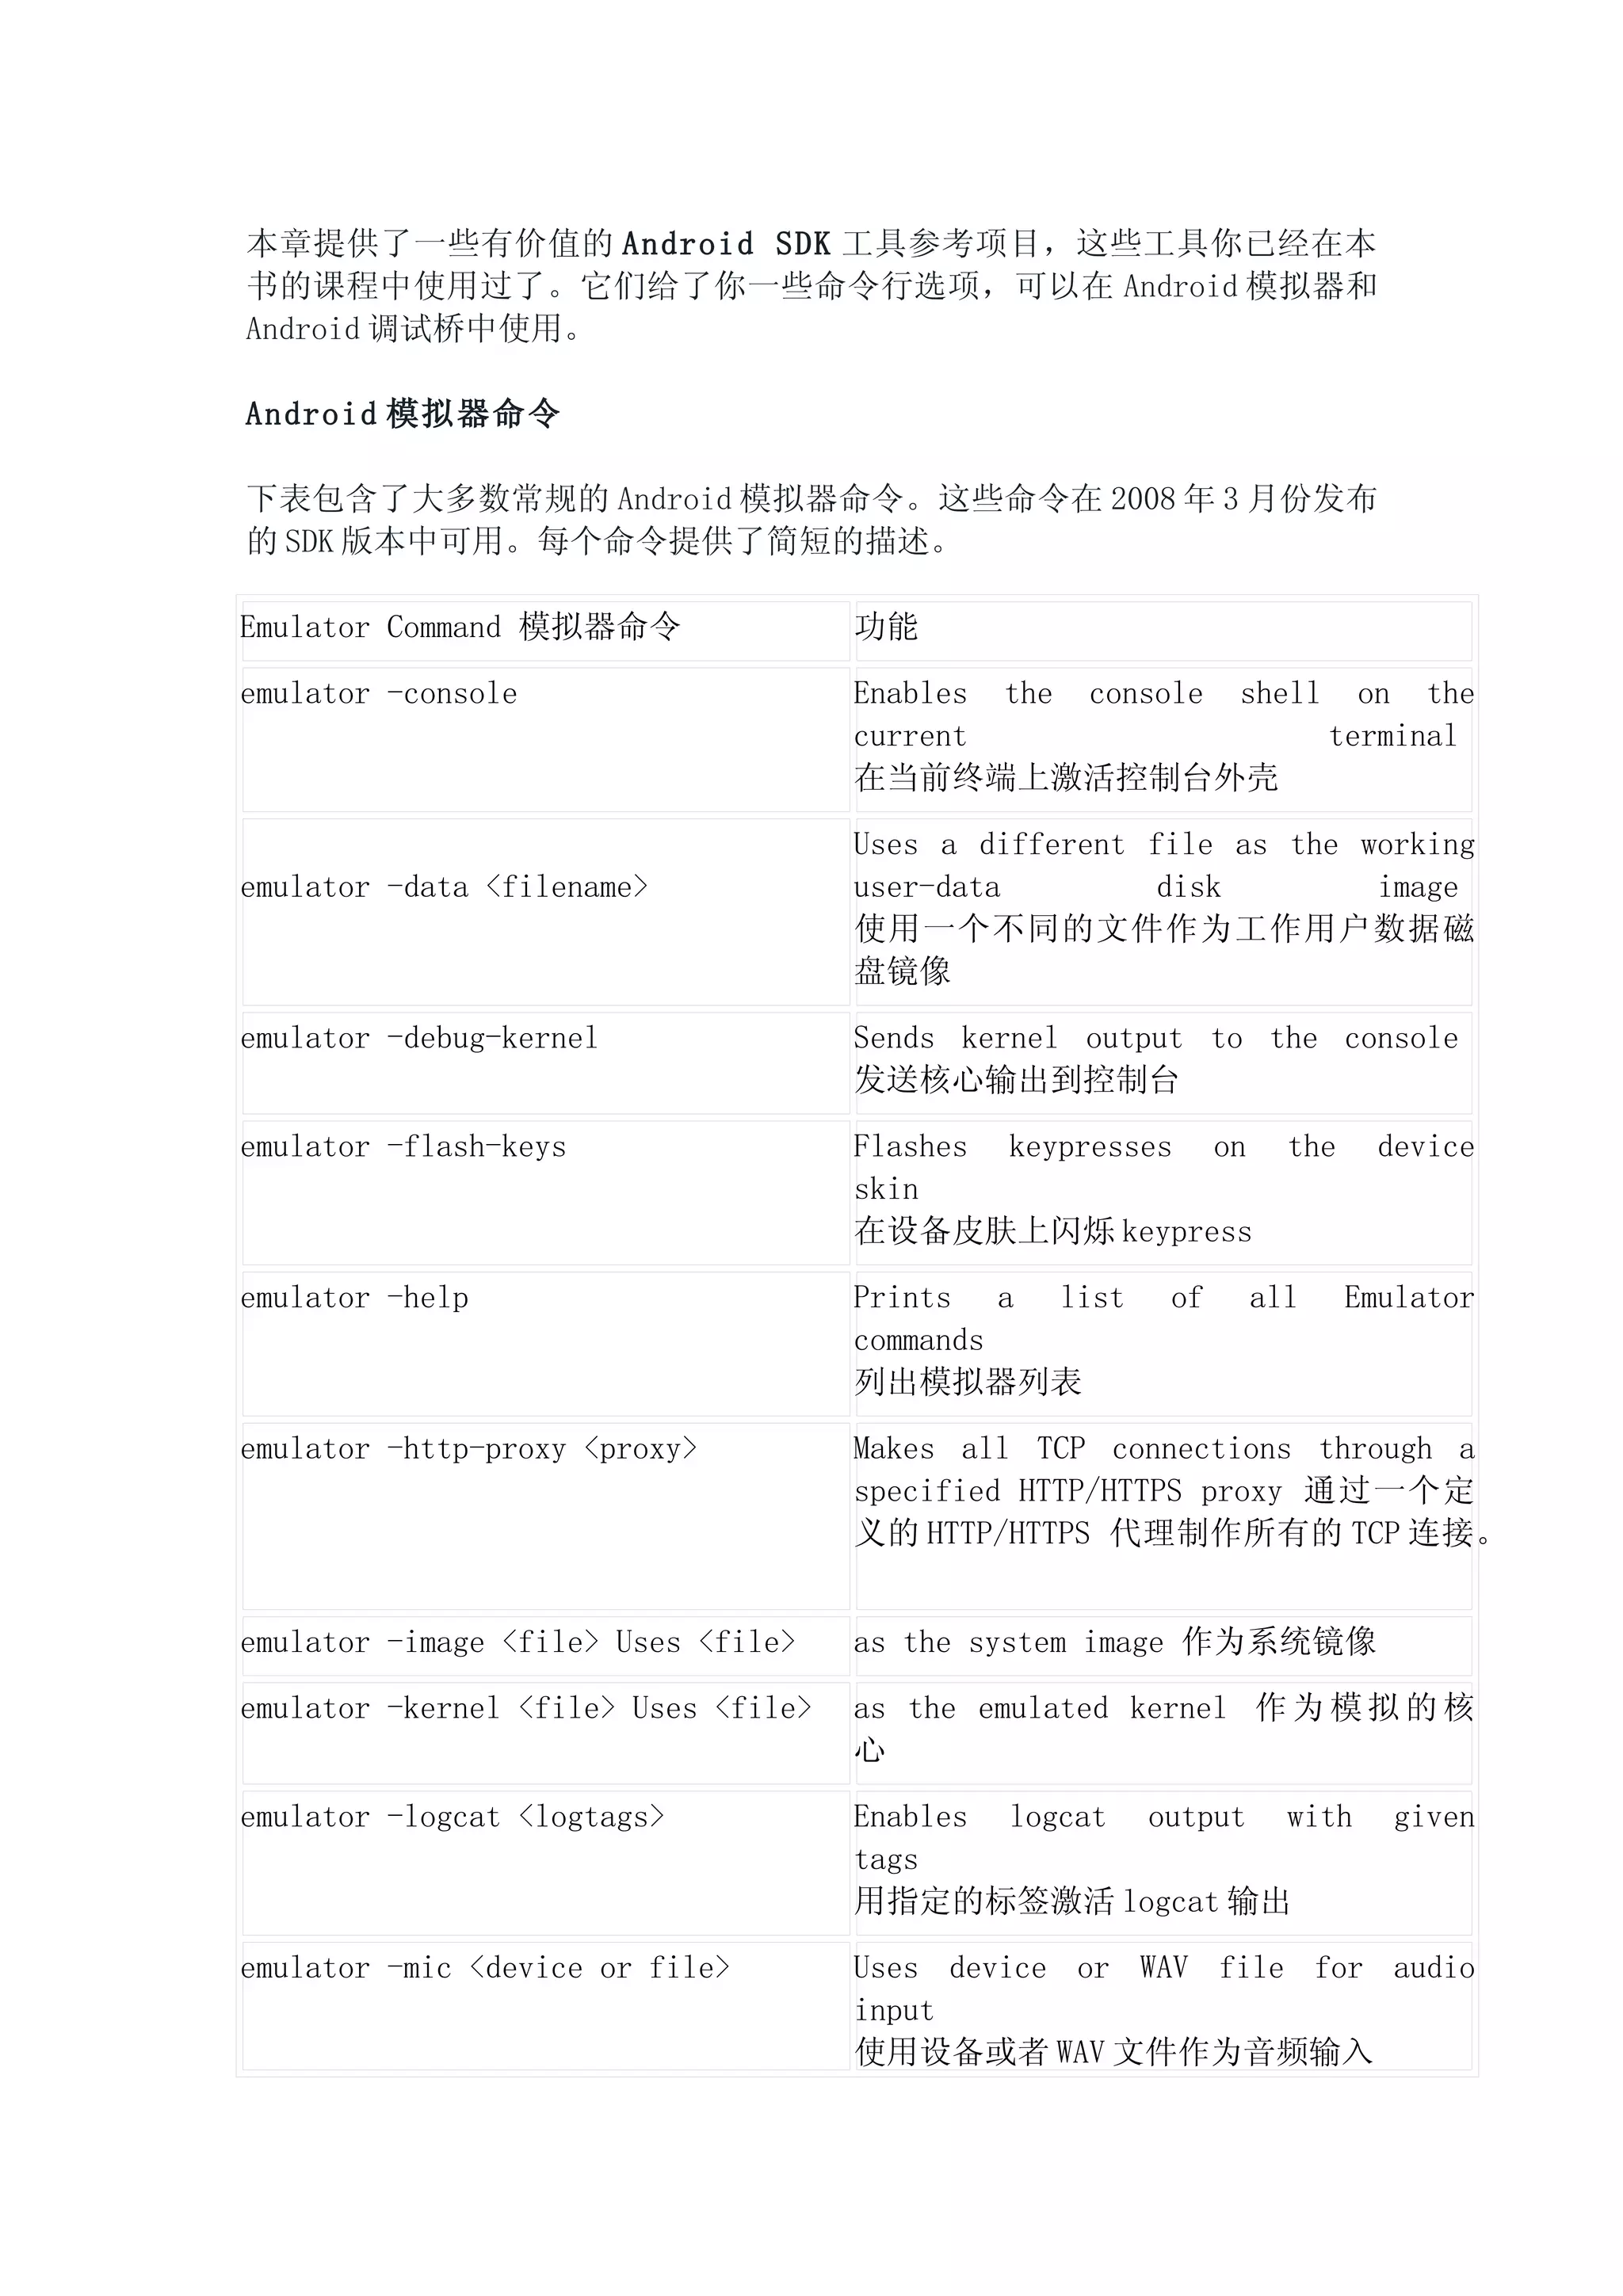
本章提供了一些有价值的 Android SDK工具参考项目,这些工具你已经在本
书的课程中使用过了。它们给了你一些命令行选项,可以在 Android 模拟器和
Android 调试桥中使用。
Android 模拟器命令
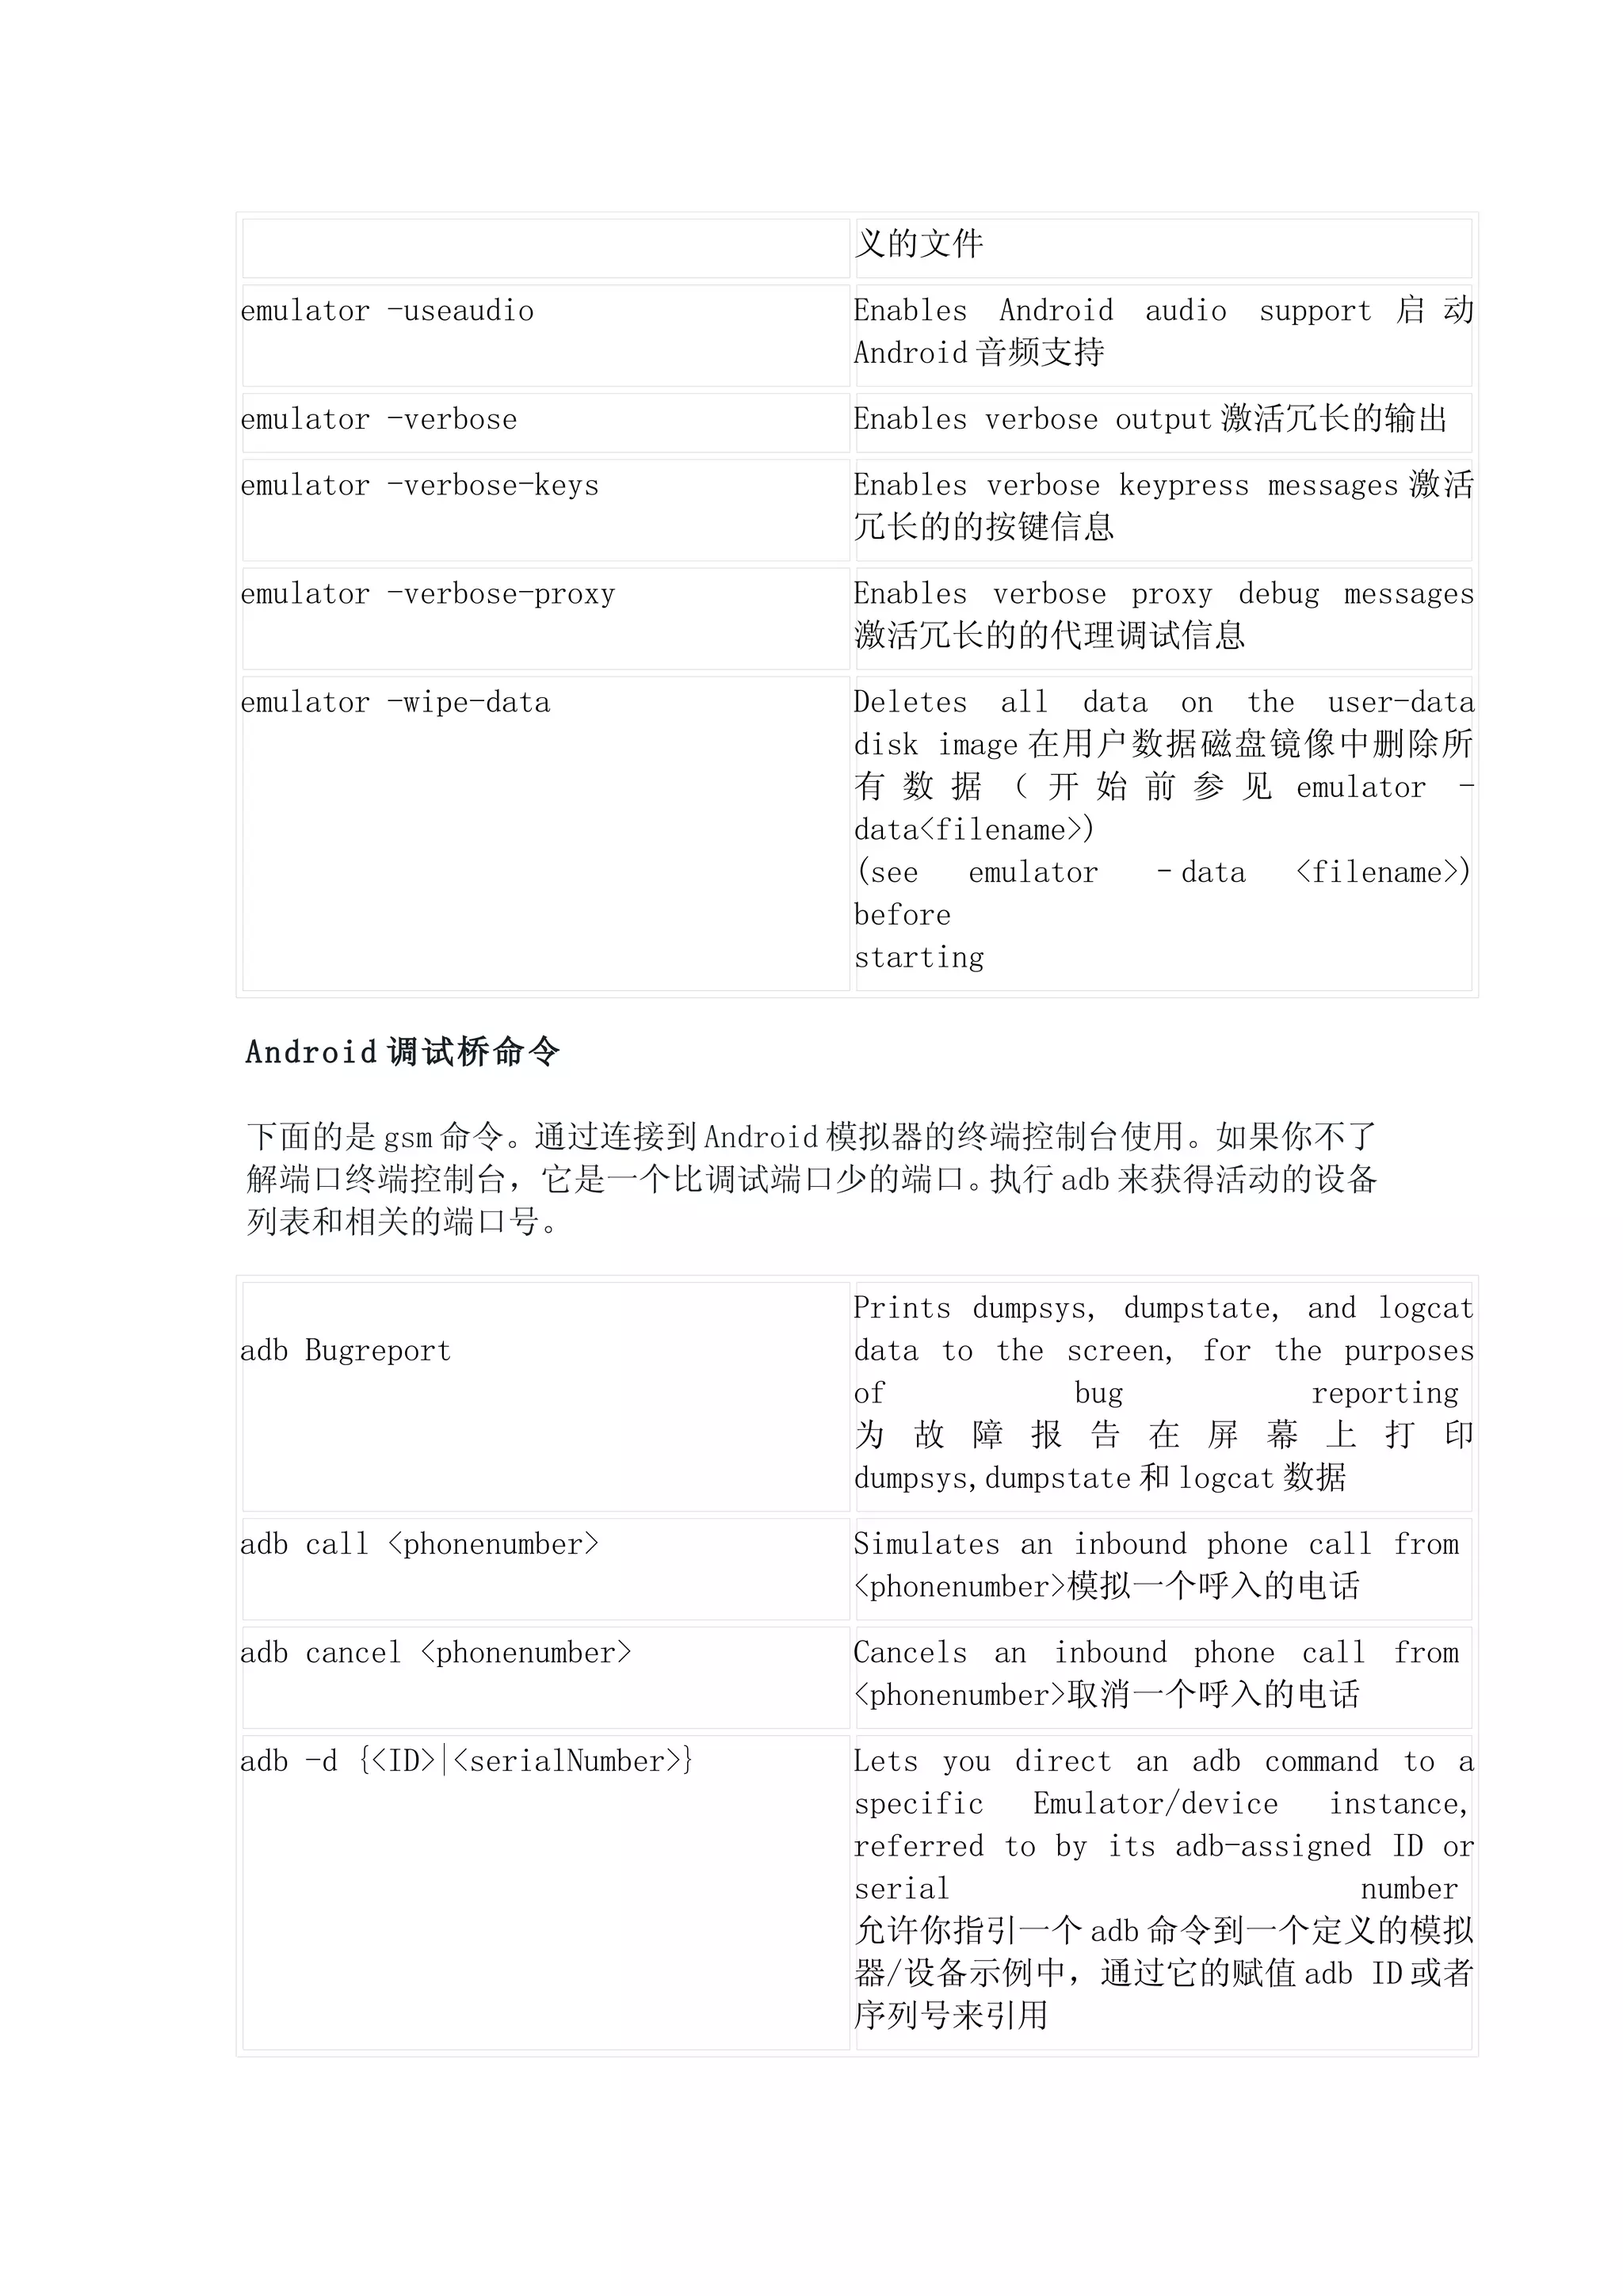
下表包含了大多数常规的 Android 模拟器命令。这些命令在 2008 年 3 月份发布
的 SDK 版本中可用。每个命令提供了简短的描述。
Emulator Command 模拟器命令 功能
emulator -console Enables the console shell on the
current terminal
在当前终端上激活控制台外壳
Uses a different file as the working
emulator -data <filename> user-data disk image
使用一个不同的文件作为工作用户数据磁
盘镜像
emulator -debug-kernel Sends kernel output to the console
发送核心输出到控制台
emulator -flash-keys Flashes keypresses on the device
skin
在设备皮肤上闪烁 keypress
emulator -help Prints a list of all Emulator
commands
列出模拟器列表
emulator -http-proxy <proxy> Makes all TCP connections through a
specified HTTP/HTTPS proxy 通过一个定
义的 HTTP/HTTPS 代理制作所有的 TCP 连接。
emulator -image <file> Uses <file> as the system image 作为系统镜像
emulator -kernel <file> Uses <file> as the emulated kernel 作 为 模 拟 的 核
心
emulator -logcat <logtags> Enables logcat output with given
tags
用指定的标签激活 logcat 输出
emulator -mic <device or file> Uses device or WAV file for audio
input
使用设备或者 WAV 文件作为音频输入
212.
emulator -netdelay <delay> 设 置 网 络 反 应 时 间 模 拟 到 <delay>Sets
network latency emulation to
<delay>.
(The <delay> parameter simulates the
delay experienced on specific types
of networks.<delay>参数模拟在定义类型
的 网 络 )
The <delay>s you can use are as
follows
可 以 使 用 的 <delay> 如 下 :
● Gprs
● Edge
● Umts
● None
● <num>
● <min>:<max>
emulator -netfast Shortcut fornone
-netspeed full -netdelay
emulator -netspeed <speed> 设 置 网 络 速 度 模 拟 到 <speed> 。 Sets
network speed emulation to <speed>.
(The
<speed> parameter simulates the data
speed
experienced on specific types of
networks.) The
<speed>s you can use are as follows:
● Gsm
● Hscsd
● Gprs
● Edge
● Umts
● Hsdpa
● Full
● <num>
● <up>:<down>
emulator -noaudio Disables Android audio support 废 除
Android 音频支持
emulator -nojni Disables JNI checks in the Dalvik
virtual machine 在 Dalvik virtual
machine 中废除 JNI 检查
213.
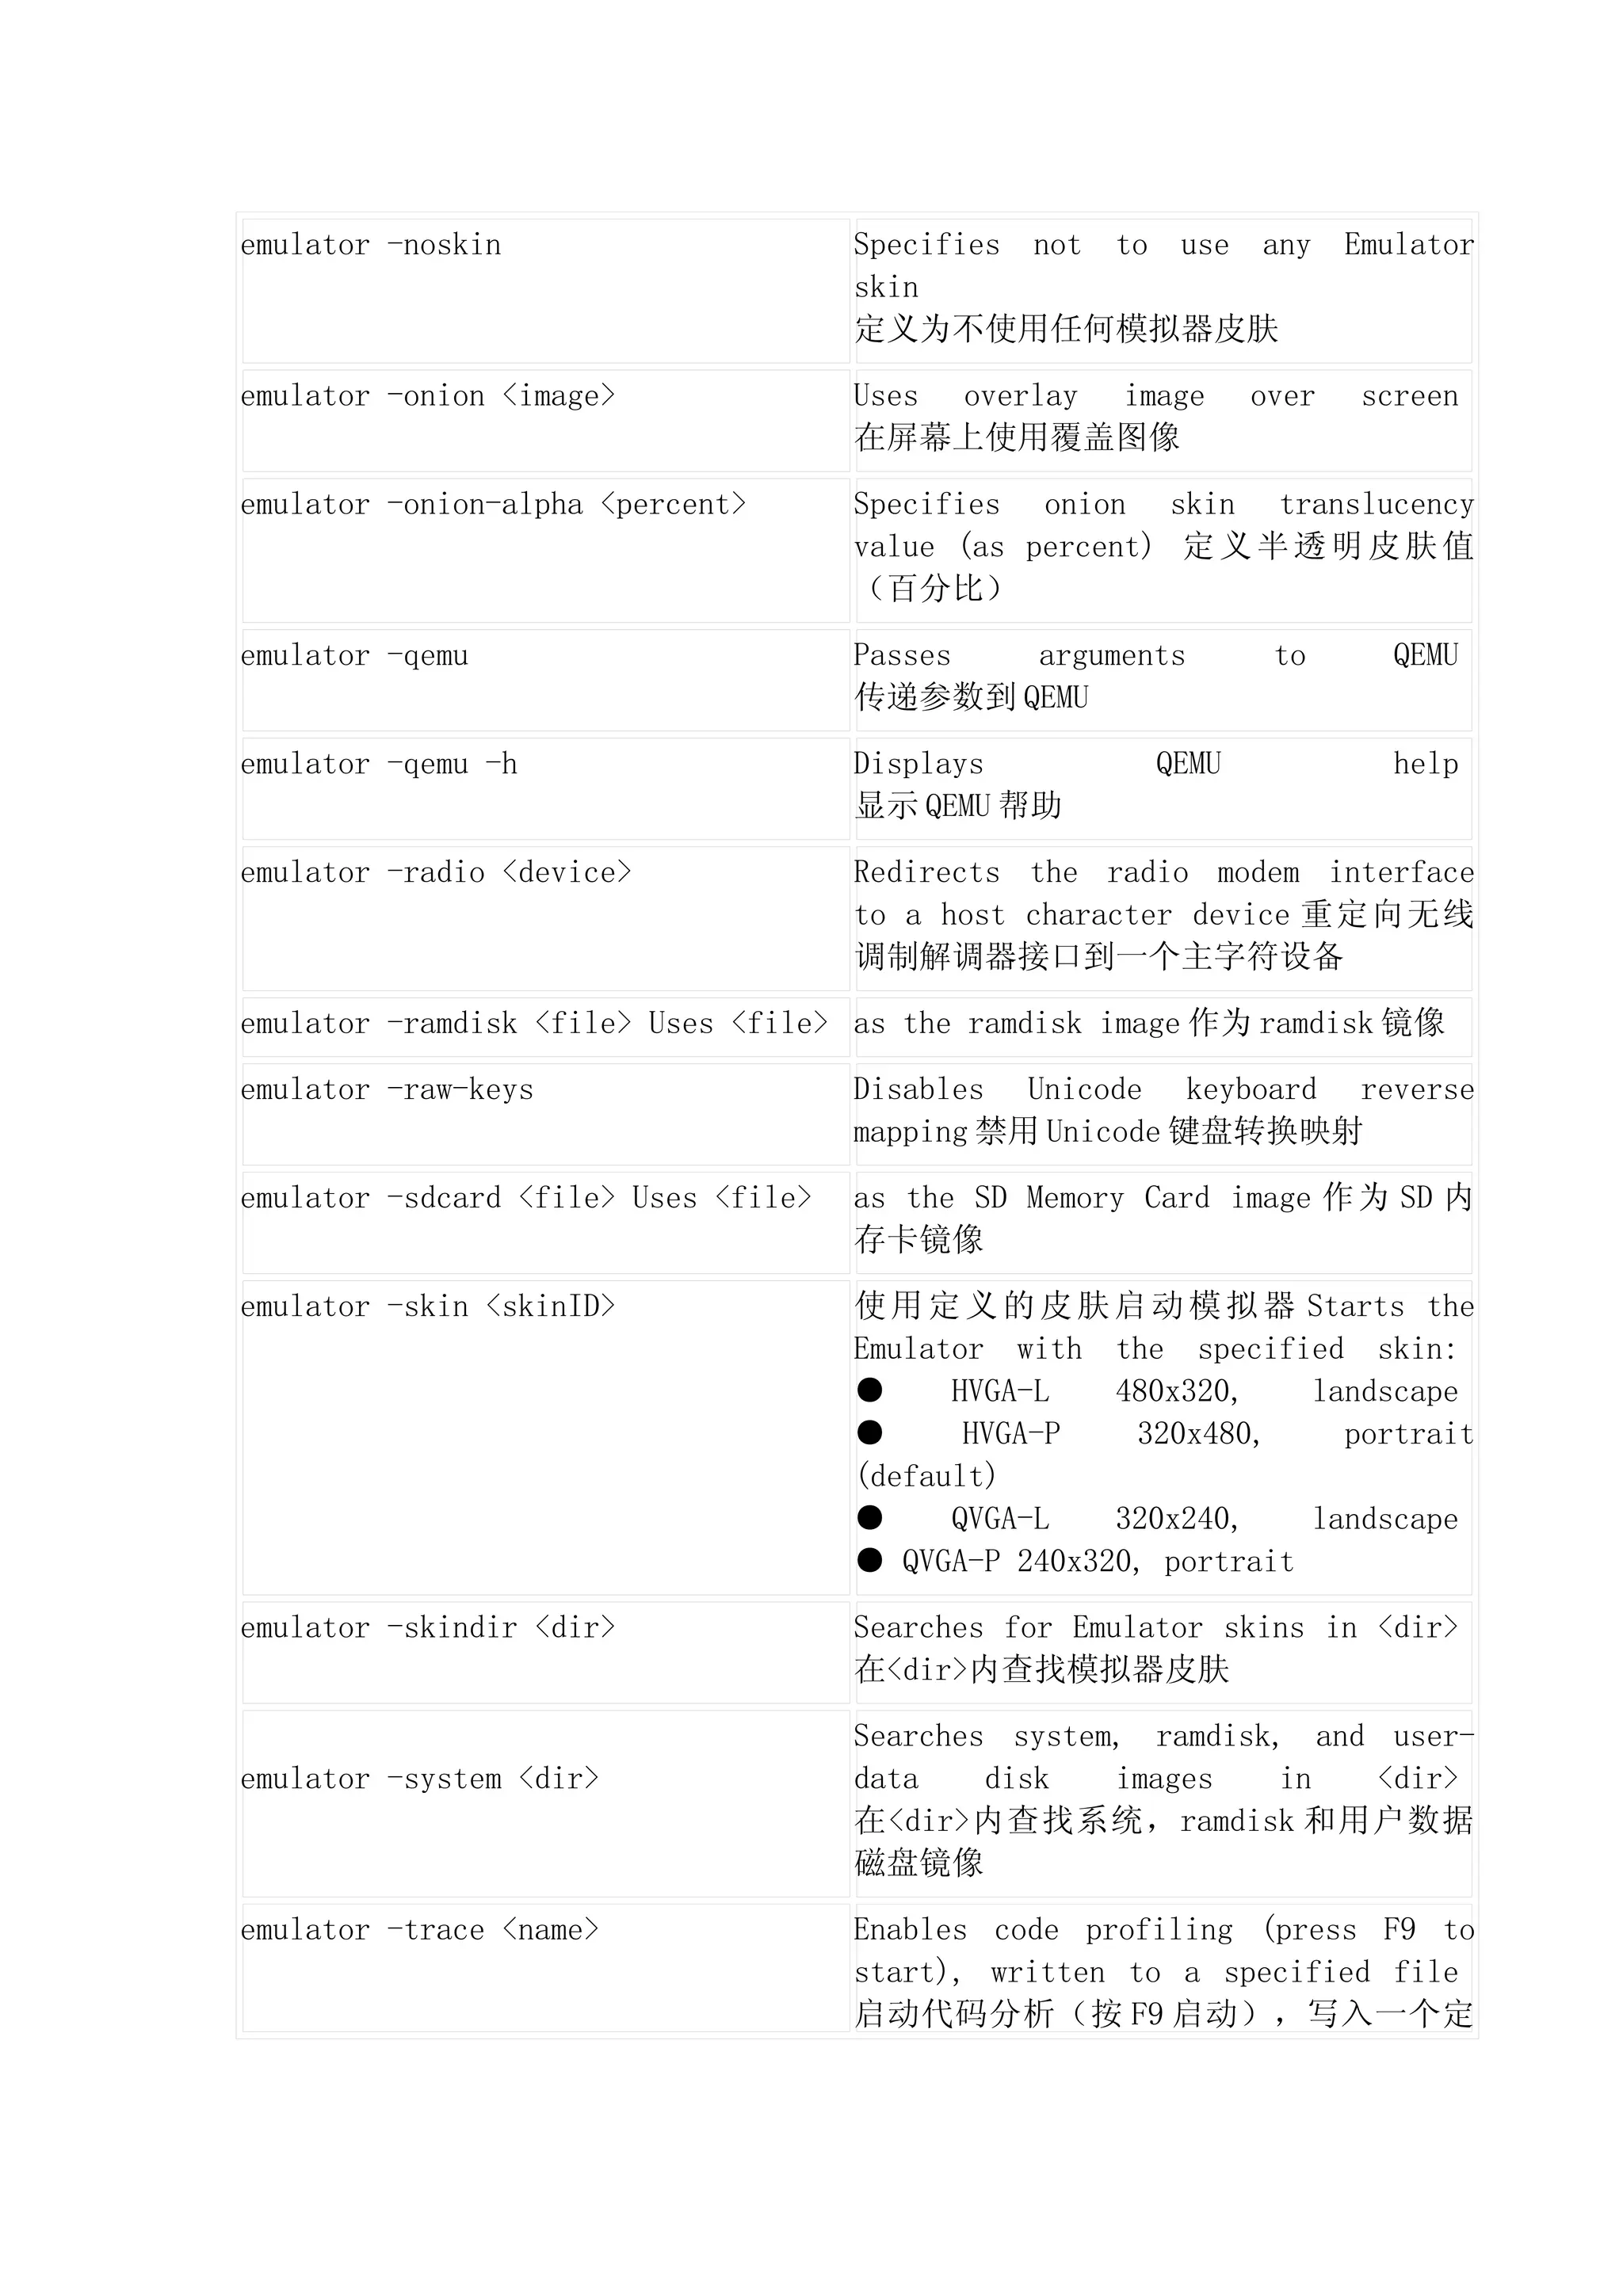
emulator -noskin Specifies not to use any Emulator
skin
定义为不使用任何模拟器皮肤
emulator -onion <image> Uses overlay image over screen
在屏幕上使用覆盖图像
emulator -onion-alpha <percent> Specifies onion skin translucency
value (as percent) 定 义 半 透 明 皮 肤 值
(百分比)
emulator -qemu Passes arguments to QEMU
传递参数到 QEMU
emulator -qemu -h Displays QEMU help
显示 QEMU 帮助
emulator -radio <device> Redirects the radio modem interface
to a host character device 重定向无线
调制解调器接口到一个主字符设备
emulator -ramdisk <file> Uses <file> as the ramdisk image 作为 ramdisk 镜像
emulator -raw-keys Disables Unicode keyboard reverse
mapping 禁用 Unicode 键盘转换映射
emulator -sdcard <file> Uses <file> as the SD Memory Card image 作为 SD 内
存卡镜像
emulator -skin <skinID> 使 用 定 义 的 皮 肤 启 动 模 拟 器 Starts the
Emulator with the specified skin:
● HVGA-L 480x320, landscape
● HVGA-P 320x480, portrait
(default)
● QVGA-L 320x240, landscape
● QVGA-P 240x320, portrait
emulator -skindir <dir> Searches for Emulator skins in <dir>
在<dir>内查找模拟器皮肤
Searches system, ramdisk, and user-
emulator -system <dir> data disk images in <dir>
在<dir>内查找系统,ramdisk 和用户数据
磁盘镜像
emulator -trace <name> Enables code profiling (press F9 to
start), written to a specified file
启动代码分析(按 F9 启动),写入一个定
214.
义的文件
emulator -useaudio Enables Android audio support 启 动
Android 音频支持
emulator -verbose Enables verbose output 激活冗长的输出
emulator -verbose-keys Enables verbose keypress messages 激活
冗长的的按键信息
emulator -verbose-proxy Enables verbose proxy debug messages
激活冗长的的代理调试信息
emulator -wipe-data Deletes all data on the user-data
disk image 在用户数据磁盘镜像中删除所
有 数 据 ( 开 始 前 参 见 emulator -
data<filename>)
(see emulator –data <filename>)
before
starting
Android 调试桥命令
下面的是 gsm 命令。通过连接到 Android 模拟器的终端控制台使用。如果你不了
解端口终端控制台,它是一个比调试端口少的端口。 执行 adb 来获得活动的设备
列表和相关的端口号。
Prints dumpsys, dumpstate, and logcat
adb Bugreport data to the screen, for the purposes
of bug reporting
为 故 障 报 告 在 屏 幕 上 打 印
dumpsys,dumpstate 和 logcat 数据
adb call <phonenumber> Simulates an inbound phone call from
<phonenumber>模拟一个呼入的电话
adb cancel <phonenumber> Cancels an inbound phone call from
<phonenumber>取消一个呼入的电话
adb -d {<ID>|<serialNumber>} Lets you direct an adb command to a
specific Emulator/device instance,
referred to by its adb-assigned ID or
serial number
允许你指引一个 adb 命令到一个定义的模拟
器/设备示例中,通过它的赋值 adb ID 或者
序列号来引用
215.
adb data <state> Changes the state of the GPRS data
connection to <state>改变 GPRS 数据连接
状态到<state>
adb Devices Prints a list of all attached
mulator/device
instances
打印所附模拟器列表/设备示例
adb forward <local> <remote> Forwards socket connections from a
specified local port to a specified
remote port on the Emulator/device
instance
在模拟器/设备示例中从一个定义的本来端
口转递 socket 连接到一个定义的远程端口
adb get-serialno Prints the adb instance identifier
string
打印 adb 示例标识符字符串
adb get-state Prints the adb state of an
emulator/device instance
打印一个模拟器/设备示例的 adb 状态
adb help Prints a list of supported adb
commands
打印支持的 adb 命令列表
adb install <path-to-apk> Pushes an Android application
(specified as a full path to an .apk
file) to the data file of an
Emulator/device
推入 Android 应用程序(作为一个完整路径
一个.apk 文件)到模拟器/设备示例
adb jdwp Prints a list of available JDWP
processes on a given device
在指定的设备上列出可用的 JDWP 进程
adb kill-server Terminates the adb server process
终止 adb 服务器进程
adb logcat [<option>] [<filter-Prints log data to the screen 在屏幕上
specs>] 打印 log 数据
adb ppp <tty> [parm]... Runs PPP over USB 通 过 USB 运 行 PPP:
● <tty> The tty for PPP stream; for
216.
example, dev:/dev/omap_csmi_ttyl
<tty>ppp 流 ; 例 如
dev:/dev/omap_csmi_ttyl
● [parm]... Zero or more PPP/PPPD
options, such as defaultroute,
local,
notty, etc.
0 或 者 更 多 的 PPP/PPPD 选 项 , 如
defaultroute, local,notty 等 等
Note that you should not
automatically start
a PDP connection.
注意,你不应当自动启动一个 PDP 连接
adb pull <remote> <local> Copies a specified file from an
Emulator/device instance to your
development computer
从模拟器/设备复制定义的文件到你的电脑
adb push <local> <remote> Copies a specified file from your
development
computer to an Emulator/device
instance
从电脑中复制文件到模拟器/设备
adb Shell Starts a remote shell in the target
Emulator/device instance
在目标模拟器/设备上启动远程外壳
adb start-server Checks whether the adb server process
is
running and, if not, starts it
检测 adb 服务器进程是否启动,如果否,启
动它
adb Status Reports the current GSM voice/data
state
报告当前 GSM 声音/数据状态
adb unregistered Indicates no network is available
指示无网络可用
adb Version Prints the adb version number
打印 adb 版本号
adb voice <state> Changes the state of the GPRS voice
connection to <state>改变 GPRS 声音状态
217.
连接到<state>
adb wait-for-bootloader Blocks execution until the bootloader
is
online—that is, until the instance
state is
bootloader
阻止执行直到引导装入完成。也就是除非设
备完成引导
adb wait-for-device Blocks execution until the device is
online—that is, until the instance
state is
device
阻止执行直到设备在线。也就是示例状态是
设备
注意:为不产生歧义,本表格的解释部分仍保留英文。
至此,历经两个多月的时间,本书的翻译工作全部完成,在英文版的书中还有
索引部分,这里就没有必要翻译了。
Android SDK 1.5 - 包装索引
这些就是 Android APIs。
android
包含由标准 Android 应用程序使用的资源类。
android.app


![/tools/lib/activitycreator/ 目 录 里 的 ActivityCreator.exe 。 这 个
ActivityCreator.bat 是一个工具的示例,它只是放置在 SDK 其它工具的前端。
所 以 , ActivityCreator.bat( 或 者 ActivityCreator.exe) 做 了 什 么 ?
ActivityCreator 被用来建立指向在哪里需要开始开发你的应用程序初始文件
的开发环境。这个路径结构和在第五章第五章(1)程序:Hello World!讨论过的
结构一致。 ActivityCreator.bat 创建 R.java, AndroidManifest.xml, 和所有
你应用程序需要的支持文件。
让我们现在转到命令行环境并且浏览 ActivityCreator。在开始菜单,点击
运行,在运行的对话框内输入 CMD 或者 COMMAND,然后点击确定。
执行这个命令会启动命令窗口。 这个窗口和老版本的 DOS 操作系统环境相同。
命令窗口出现后,在光标>后输入 ActivityCreator
提示
Microsoft 命令提示符接口没有大小写限制。在缺省情况下,如果你使用了大小
写限制的不同的开发环境,本章中显示的屏幕截图会不同。
运行命令 ActivityCreator,实际运行的是 ActivityCreator.bat,产生下
面 的 输 出 :
Activity Creator Script
Usage:
activityCreator [--out outdir] [--ide intellij]
yourpackagename.ActivityName
Creates the structure of a minimal Android application.
The following will be created:
- AndroidManifest.xml: The application manifest file.
- build.xml: An Ant script to build/package the application.
- Res: The resource directory.
- Src: The source directory.
- src/your/package/name/ActivityName.java the Activity java class.
packageName
is a fully qualified java Package in the format
<package1>.<package2>... (With at
least two components).
- Bin: The output folder for the build script.
Options:
--out <folder>: specifies where to create the files/folders.
--ide intellij: creates project files for IntelliJ
这个输出简单的指示了你需要提供更多的信息来运行 ActivityCreator。更
确切的是,你需要传递给命令一个你需要建造的壳应用程序的位置。](https://image.slidesharecdn.com/android-120419204454-phpapp01/75/Android-49-2048.jpg)


![用户在框中输入,它会猜测那个月份用户试图去输入。假定 AutoComplete
TextView 将 包 含 月 份 的 清 单 , 你 需 要 来 创 建 一 个 可 以 被 赋 值 到
AutoCompleteTextView 的清单。
创建字符串数组并赋值月份数值到其中:
static final String[] Months = new String[]{
"January","February","March","April","May","June","July","August",
"September","October","November","December"
};
下一个任务是复制这个字符串到 AutoCompleteTextView。到目前为止,你已经
创建了一些 Views 了。所以,创建 AutoCompleteTextView 的代码看上去应该很
熟悉。你之前没看到过的就是把字符串赋值给 View:
ArrayAdapter<String> monthArray = new
ArrayAdapter<String>(this,
android.R.layout.simple_list_item_1, Months);
final AutoCompleteTextView textView =
(AutoCompleteTextView)
findViewById(R.id.testAutoComplete);
textView.setAdapter(monthArray);
在 第 一 行 , 拿 去 创 建 的 字 符 串 数 组 并 且 复 制 到 一 个 名 为 monthArray 的
ArrayAdapter 。 下 一 步 , 你 通 过 在 .xml 文 件 中 定 位 来 例 示
AutoCompleteTextView 。 最 后 , 使 用 setAdapter() 方 法 来 赋 值 monthArray
ArrayAdapter 到 AutoCompleteTextView 中。
下一个零星的代码例示那两个按钮。与上一章的代码相同。 唯一和你所写代码不
同的是你正在呼叫两个函数,changeOption 和 changeOption2,而这些,你还
没有创建呢。
注意
你在传递 AutoCompleteTextView 到函数呼叫。当你创建函数还需要创建参数。
final Button changeButton = (Button)
findViewById(R.id.autoCompleteButton);
changeButton.setOnClickListener(new
Button.OnClickListener() {
public void onClick(View v){
changeOption(textView);](https://image.slidesharecdn.com/android-120419204454-phpapp01/75/Android-104-2048.jpg)
![完整的 autocomplete.java 文件应当看起来像这样:
package android_programmers_guide.AndroidViews;
import android.app.Activity;
import android.os.Bundle;
import android.view.View;
import android.widget.ArrayAdapter;
import android.widget.AutoCompleteTextView;
import android.widget.Button;
import android.graphics.Color;
public class AutoComplete extends Activity {
@Override
public void onCreate(Bundle icicle) {
super.onCreate(icicle);
setContentView(R.layout.autocomplete);
ArrayAdapter<String> monthArray = new ArrayAdapter<String>(this,
android.R.layout.simple_list_item_1, Months);
final AutoCompleteTextView textView = (AutoCompleteTextView)
findViewById(R.id.testAutoComplete);
textView.setAdapter(monthArray);
final Button changeButton = (Button)
findViewById(R.id.autoCompleteButton);
changeButton.setOnClickListener(new Button.OnClickListener() {
public void onClick(View v){
changeOption(textView);
}
});
final Button changeButton2 = (Button)
findViewById(R.id.textColorButton);
changeButton2.setOnClickListener(new Button.OnClickListener() {
public void onClick(View v){
changeOption2(textView);
}
});
}
static final String[] Months = new String[]{
"January","February","March","April","May","June","July","August",
"September","October","November","December"
};
public void changeOption(AutoCompleteTextView text){
if (text.getHeight()==100){
text.setHeight(30);](https://image.slidesharecdn.com/android-120419204454-phpapp01/75/Android-106-2048.jpg)


![testSpinner.java 的新文件。这是个活动的主要文件并且包含可执行代码。在
testSpinner.java 文件中使用下面的代码来完成这个活动。
package android_programmers_guide.AndroidViews;
import android.app.Activity;
import android.os.Bundle;
import android.view.View;
import android.widget.ArrayAdapter;
import android.widget.Spinner;
import android.widget.Button;
import android.graphics.Color;
198 Android: A Programmer’s Guide
public class testSpinner extends Activity {
@Override
public void onCreate(Bundle icicle) {
super.onCreate(icicle);
setContentView(R.layout.spinner);
final Spinner spinner = (Spinner) findViewById(R.id.testSpinner);
ArrayAdapter<String> adapter = new ArrayAdapter<String>(this,
android.R.layout.simple_spinner_item, Months);
adapter.setDropDownViewResource(android.R.layout.simple_spinner_dropd
own_item);
spinner.setAdapter(adapter);
final Button changeButton = (Button)findViewById(R.id.enableButton);
changeButton.setOnClickListener(new Button.OnClickListener() {
public void onClick(View v){
changeOption(spinner); }
});
final Button changeButton2 = (Button)
findViewById(R.id.backgroundColorButton);
changeButton2.setOnClickListener(new Button.OnClickListener() {
public void onClick(View v){
changeOption2(spinner);
}
});
}
static final String[] Months = new String[]{
"January","February","March","April","May","June","July","August",
"September","October","November","December"
};
public void changeOption(Spinner spinner){
if (spinner.isEnabled()){
spinner.setEnabled(false);](https://image.slidesharecdn.com/android-120419204454-phpapp01/75/Android-130-2048.jpg)


![myIGTalkSession = null;
}
};
在 onServiceConnected()方法中,你建立了一个使用 IGTalkService.Stub 的
片段。 如果这个过程失败,你需要再次把这个片段设为 null。 现在,可以为类的
onClick 事件创建代码。在每一个 onClick 事件中你应当执行一些行动:
1. 为任何的信息检查数据库。
2. 从查询的结果中创建一个 ListAdapter 并显示到 ListView 中。
3. 创建一个 ChatSession 到 EditView 中的地址并发送你的信息文本。
注意
Android 服 务 器 包 括 SQLite 数 据 库 ,你可以使用来保留任何你认为需要放
入的活动相关条目和任何的定制数据。这个数据库在第十一章做深入的介绍。
下面的代码为你和接受者之间发生的信息查询数据库:
Cursor cursor = managedQuery(Im.Messages.CONTENT_URI, null,
"contact='" + messageTo.getText().toString() + "'", null, null);
使 用 下 面 的 代 码 来 从 查 询 结 果 创 建 一 个 ListAdapter 并 且 赋 值 接 收 器 到
ListView。在前一个活动,你已经使用了一个类似的过程,所以,对你应该不陌
生。
ListAdapter adapter = new SimpleCursorAdapter(this,
android.R.layout.simple_list_item_1, cursor,
new String[]{Im.MessagesColumns.BODY},
new int[]{android.R.id.text1});
this.messageList.setAdapter(adapter);
信息可以显示了,最后的步骤是发送你的信息。下面的代码用定义的 messageTO
address 创建一个 IchatSession。这个信息文本然后被从这里传递到接受者。
try {
IChatSession chatSession;
chatSession =
myIGTalkSession.createChatSession(messageTo.getText().toString(););
chatSession.sendTextMessage(messageText.getText().toString());](https://image.slidesharecdn.com/android-120419204454-phpapp01/75/Android-165-2048.jpg)
![messageList.setBackgroundColor(Color.GRAY );
Chapter 10: Using the Google API with GTalk 251
this.bindService(new
Intent().setComponent(GTalkServiceConstants.GTALK_SERVICE_COMPONENT),
connection, 0);
}
private ServiceConnection connection = new ServiceConnection() {
public void onServiceConnected(ComponentName name, IBinder service) {
try {
myIGTalkSession =
IGTalkService.Stub.asInterface(service).getDefaultSession();
} catch (DeadObjectException e) {
myIGTalkSession = null;
}
}
public void onServiceDisconnected(ComponentName name) {
myIGTalkSession = null;
}
};
public void onClick(View view) {
Cursor cursor = managedQuery(Im.Messages.CONTENT_URI, null,
"contact='" + messageTo.getText().toString() + "'",
null, null);
ListAdapter adapter = new SimpleCursorAdapter(this,
android.R.layout.simple_list_item_1, cursor,
new String[]{Im.MessagesColumns.BODY},
new int[]{android.R.id.text1});
this.messageList.setAdapter(adapter);
try {
IChatSession chatSession;
chatSession =
myIGTalkSession.createChatSession(messageTo.getText().toString());
chatSession.sendTextMessage(messageText.getText().toString());
} catch (DeadObjectException ex) {
myIGTalkSession = null;
}
}
}
编译并运行 GoogleAPI
编译并运行 GoogleAPI 第十章 (3)](https://image.slidesharecdn.com/android-120419204454-phpapp01/75/Android-167-2048.jpg)


![主要部分。query()方法是从活动通过 Content Provider 被呼叫来从数据
库中获得记录。看下优先版本的 query()方法代码:
@Override
public Cursor query(Uri url, String[] projection, String selection,
String[] selectionArgs, String sort) {
SQLiteQueryBuilder qb = new SQLiteQueryBuilder();
switch (URL_MATCHER.match(url)) {
case FRIENDS:
qb.setTables("friends");
qb.setProjectionMap(FRIENDS_PROJECTION_MAP);
break;
case FRIENDS_ID:
qb.setTables("friends");
qb.appendWhere("_id=" + url.getPathSegments().get(1));
break;
default:
throw new IllegalArgumentException("Unknown URL " + url);
}
String orderBy;
if (TextUtils.isEmpty(sort)) {
orderBy = Friends.Friend.DEFAULT_SORT_ORDER;
} else {
orderBy = sort;
}
Cursor c = qb.query(mDB, projection, selection, selectionArgs, null,
null, orderBy);
c.setNotificationUri(getContext().getContentResolver(), url);
return c;
}
query()方法做了一点家务管理之类的事宜,通过检查传递到其中的数据库 URL
的有效性和定义一个查询分类序列达到的。 URL 检查是为了确保你只是要进入
Friends 数据库。如果你试图从其它活动进入数据库,或者从其它的 Content
Provider,query()方法投递一个例外。
到方法的结尾,你使用 SQLiteQueryBuilder 来执行一个查询。通过下面的代码,
导致的数据集被赋值到一个光标:
Cursor c = qb.query(mDB, projection, selection, selectionArgs, null,
null, orderBy);
注意](https://image.slidesharecdn.com/android-120419204454-phpapp01/75/Android-178-2048.jpg)
![public int delete(Uri url, String where, String[] whereArgs) {
int count;
long rowId = 0;
switch (URL_MATCHER.match(url)) {
case FRIENDS:
count = mDB.delete("friends", where, whereArgs);
break;
case FRIENDS_ID:
String segment = url.getPathSegments().get(1);
rowId = Long.parseLong(segment);
count = mDB
.delete("friends", "_id="
+ segment
+ (!TextUtils.isEmpty(where) ? " AND (" + where
+ ')' : ""), whereArgs);
break;
default:
throw new IllegalArgumentException("Unknown URL " + url);
}
getContext().getContentResolver().notifyChange(url, null);
return count;
}
@Override
public int update(Uri url, ContentValues values, String where, String[]
whereArgs) {
int count;
switch (URL_MATCHER.match(url)) {
case FRIENDS:
count = mDB.update("friends", values, where, whereArgs);
break;
case FRIENDS_ID:
String segment = url.getPathSegments().get(1);
count = mDB
.update("friends", values, "_id=" + segment
Chapter 11: Application: Find a Friend 271
+ (!TextUtils.isEmpty(where) ? " AND (" + where + ')' : ""), whereArgs);
break;
default:
throw new IllegalArgumentException("Unknown URL " + url);
}
getContext().getContentResolver().notifyChange(url, null);
return count;
}](https://image.slidesharecdn.com/android-120419204454-phpapp01/75/Android-180-2048.jpg)
![private static final int FRIENDS = 1;
private static final int FRIENDS_ID = 2;
private static final UriMatcher URL_MATCHER;
private static class DatabaseHelper extends SQLiteOpenHelper {
@Override
public void onCreate(SQLiteDatabase db) {
db.execSQL("CREATE TABLE friends (_id INTEGER PRIMARY KEY,"
+ "name TEXT," + "location TEXT," + "created INTEGER,"
+ "modified INTEGER" + ");");
}
@Override
public void onUpgrade(SQLiteDatabase db, int oldVersion, int
newVersion) {
Log.w(TAG, "Upgrading database from version " + oldVersion + "to "
+ newVersion + ", which will destroy all old data");
db.execSQL("DROP TABLE IF EXISTS friends");
onCreate(db);
}
}
@Override
public boolean onCreate() {
DatabaseHelper dbHelper = new DatabaseHelper();
mDB = dbHelper.openDatabase(getContext(), DATABASE_NAME, null,
DATABASE_VERSION);
return (mDB == null) ? false : true;
}
@Override
public Cursor query(Uri url, String[] projection, String selection,
String[] selectionArgs, String sort) {
SQLiteQueryBuilder qb = new SQLiteQueryBuilder();
switch (URL_MATCHER.match(url)) {
case FRIENDS:
qb.setTables("friends");
qb.setProjectionMap(FRIENDS_PROJECTION_MAP);
break;
case FRIENDS_ID:
qb.setTables("friends");
qb.appendWhere("_id=" + url.getPathSegments().get(1));
break;
default:
throw new IllegalArgumentException("Unknown URL " + url);
}
String orderBy;](https://image.slidesharecdn.com/android-120419204454-phpapp01/75/Android-182-2048.jpg)
![if (values.containsKey(Friends.Friend.NAME) == false) {
values.put(Friends.Friend.NAME,
r.getString(android.R.string.untitled));
}
if (values.containsKey(Friends.Friend.LOCATION) == false) {
values.put(Friends.Friend.LOCATION , "");
}
rowID = mDB.insert("friends", "friend", values);
if (rowID > 0) {
Uri uri = ContentUris.withAppendedId(Friends.Friend.CONTENT_URI
, rowID);
getContext().getContentResolver().notifyChange(uri, null);
return uri;
}
throw new SQLException("Failed to insert row into " + url);
}
@Override
public int delete(Uri url, String where, String[] whereArgs) {
int count;
long rowId = 0;
switch (URL_MATCHER.match(url)) {
case FRIENDS:
Chapter 11: Application: Find a Friend 275
count = mDB.delete("friends", where, whereArgs);
break;
case FRIENDS_ID:
String segment = url.getPathSegments().get(1);
rowId = Long.parseLong(segment);
count = mDB
.delete("friends", "_id="
+ segment
+ (!TextUtils.isEmpty(where) ? " AND (" + where
+ ')' : ""), whereArgs);
break;
default:
throw new IllegalArgumentException("Unknown URL " + url);
}
getContext().getContentResolver().notifyChange(url, null);
return count;
}
@Override
public int update(Uri url, ContentValues values, String where, String[]
whereArgs) {](https://image.slidesharecdn.com/android-120419204454-phpapp01/75/Android-184-2048.jpg)
![android:ems="25"
android:layout_height="wrap_content"
android:autoText="true"
android:capitalize="sentences"
android:scrollHorizontally="true" />
<Button android:id="@+id/ok"
android:layout_width="wrap_content"
android:layout_height="wrap_content"
android:layout_gravity="right"
android:text="@string/button_ok" />
</LinearLayout>
现在,编辑 NameEditor.java 并开始写代码。需要导入前一节的 Friends 类并且
导入 Cursor 包装来帮助你使用数据库记录:
import android.app.Activity;
import android.database.Cursor;
import android.net.Uri;
import android.os.Bundle;
import android.view.View;
import android.widget.Button;
import android.widget.EditText;
应 当 建 立 活 动 来 执 行 View.OnClickListener() 。 这 将 允 许 你 在 活 动 中 优 先
OnClickListener()方法。这部分代码显示 NameEditor 类的概要和一些你需要的
变量定义:
public class NameEditor extends Activity implements View.OnClickListener {
public static final String EDIT_NAME_ACTION =
"android_programmers_guide.FindAFriend.action.EDIT_NAME";
private static final int NAME_INDEX = 1;
private static final String[] PROJECTION = new String[] {
Friends.Friend._ID,
Friends.Friend.NAME,
};
Cursor mCursor;
EditText mText;
}
下一步,需要优先一些方法,从 onCreate()开始。已经在其它章节里看过方法
被优先。通常,当活动被创建,它保留所有被执行的代码:](https://image.slidesharecdn.com/android-120419204454-phpapp01/75/Android-189-2048.jpg)
![最后,从 onClick 句柄呼叫活动方法 finish()。它将清除并关闭活动。完成后的
NameEditor.java 文件应当如下:
package android_programmers_guide.FindAFriend;
import android_programmers_guide.FindAFriend.Friends;
import android.app.Activity;
import android.database.Cursor;
import android.net.Uri;
import android.os.Bundle;
import android.view.View;
import android.widget.Button;
import android.widget.EditText;
public class NameEditor extends Activity implements View.OnClickListener {
public static final String EDIT_NAME_ACTION =
"android_programmers_guide.FindAFriend.action.EDIT_NAME";
private static final int NAME_INDEX = 1;
private static final String[] PROJECTION = new String[] {
Friends.Friend._ID,
Chapter 11: Application: Find a Friend 281
Friends.Friend.NAME,
};
Cursor mCursor;
EditText mText;
@Override
public void onCreate(Bundle icicle) {
super.onCreate(icicle);
setContentView(R.layout.name_editor);
Uri uri = getIntent().getData();
mCursor = managedQuery(uri, PROJECTION, null, null);
mText = (EditText) this.findViewById(R.id.name);
mText.setOnClickListener(this);
Button b = (Button) findViewById(R.id.ok);
b.setOnClickListener(this);
}
@Override
protected void onResume() {
super.onResume();
if (mCursor != null) {
mCursor.first();
String title = mCursor.getString(NAME_INDEX);
mText.setText(title);
}](https://image.slidesharecdn.com/android-120419204454-phpapp01/75/Android-191-2048.jpg)
![android:background="#ffffff"
android:padding="10dip"
android:scrollbars="vertical"
android:fadingEdge="vertical" />
LocationEditor 还会包含一个菜单系统,允许用户废弃,删除或者恢复他们做
的任何改变。这会是一个非常复杂的活动。因此,最好从头开始,那就是
LocationEditor.java 文件的输入部分。
LocationEditor.java
看看这个活动的输入,很多是处理屏幕上 View 的图样:
import android.app.Activity;
import android.content.ComponentName;
import android.content.Context;
import android.content.Intent;
import android.database.Cursor;
import android.graphics.Canvas;
import android.graphics.Paint;
import android.graphics.Rect;
import android.net.Uri;
import android.os.Bundle;
import android.util.AttributeSet;
import android.view.Menu;
import android.widget.EditText;
import java.util.Map;
下一步,设置活动的主类概要。使用 LocationEditor 期间,这里有不少的变量
需要定义:
public class LocationEditor extends Activity {
private static final String TAG = "Friends";
private static final int FRIEND_INDEX = 1;
private static final int NAME_INDEX = 2;
private static final int MODIFIED_INDEX = 3;
private static final String[] PROJECTION = new String[] {
Friends.Friend._ID, // 0
Friends.Friend.LOCATION, // 1
Friends.Friend.NAME, // 2
Friends.Friend.MODIFIED_DATE // 3
};
private static final String ORIGINAL_CONTENT = "origContent";
private static final int REVERT_ID = Menu.FIRST;](https://image.slidesharecdn.com/android-120419204454-phpapp01/75/Android-193-2048.jpg)
![package android_programmers_guide.FindAFriend;
import android.app.Activity;
import android.content.ComponentName;
import android.content.Context;
import android.content.Intent;
import android.database.Cursor;
import android.graphics.Canvas;
import android.graphics.Paint;
import android.graphics.Rect;
import android.net.Uri;
import android.os.Bundle;
import android.util.AttributeSet;
import android.view.Menu;
import android.widget.EditText;
import java.util.Map;
public class LocationEditor extends Activity {
private static final String TAG = "Friends";
private static final int FRIEND_INDEX = 1;
private static final int NAME_INDEX = 2;
private static final int MODIFIED_INDEX = 3;
private static final String[] PROJECTION = new String[] {
Friends.Friend._ID, // 0
Friends.Friend.LOCATION, // 1
Friends.Friend.NAME, // 2
Friends.Friend.MODIFIED_DATE // 3
};
private static final String ORIGINAL_CONTENT = "origContent";
private static final int REVERT_ID = Menu.FIRST;
private static final int DISCARD_ID = Menu.FIRST + 1;
private static final int DELETE_ID = Menu.FIRST + 2;
private static final int STATE_EDIT = 0;
private static final int STATE_INSERT = 1;
private int mState;
288 Android: A Programmer’s Guide
Chapter 11: Application: Find a Friend 289
private boolean mNoteOnly = false;
private Uri mURI;
private Cursor mCursor;
private EditText mText;
private String mOriginalContent;
public static class MyEditText extends EditText {
private Rect mRect;
private Paint mPaint;](https://image.slidesharecdn.com/android-120419204454-phpapp01/75/Android-197-2048.jpg)

![因为在第九章已经看过绝大多数的 FriendsMap.java 文件了,我不会再阐述每一个细节。但
是,有一个方法需要解释。
你会创建一个叫做 LoadFriends()的方法来存取数据库,读取记录,并且绘制 Overlay。看
一下 LoadFriends()的代码。注意,你打开数据库,匹配并分析位置字段,从位置字段的纬
度和经度创建点,并且绘制点到 Overlay 中。这个方法最后所做的事情就是从 GPS 上抓取
坐标并且在 Overlay 上绘制出来,用标签“ME”表示。
public void LoadFriends(MapView mv, MapController mc, Cursor c){
Point myLocation = null;
Double latPoint = null;
Double lngPoint = null;
c.first();
do{
if (c.getString(c.getColumnIndex("location")) != null) {
final String geoPattern = "(geo:[-]?[0-9]{1,3}.[0
9]{1,6},[-]?[0-9]{1,3}.[0-9]{1,6}#)";
Pattern pattern = Pattern.compile(geoPattern);
CharSequence inputStr =
c.getString(c.getColumnIndex("location"));
Matcher matcher = Pattern.matcher(inputStr);
boolean matchFound = matcher.find();
if (matchFound) {
String groupStr = matcher.group(0);
latPoint =
Double.valueOf(groupStr.substring(groupStr.indexOf(":") + 1,
groupStr.indexOf(","))) ;
lngPoint =
Double.valueOf(groupStr.substring(groupStr.indexOf(",") + 1,
groupStr.indexOf("#"))) ;
Point friendLocation = new
Point(latPoint.intValue(),lngPoint.intValue());
294 Android: A Programmer’s Guide
drawFriendsOverlay.addNewFriend(c.getString(c.getColumnIndex("name")),
friendLocation);
}
}
}while(c.next());
LocationManager myManager = (LocationManager)
getSystemService(Context.LOCATION_SERVICE);
Double myLatPoint =
myManager.getCurrentLocation("gps").getLatitude()*1E6;
Double myLngPoint =
myManager.getCurrentLocation("gps").getLongitude()*1E6;
myLocation = new Point(myLatPoint.intValue(),myLngPoint.intValue());
drawFriendsOverlay.addNewFriend("Me", myLocation);
mc.centerMapTo(myLocation, false);
mc.zoomTo(9);
mv = null;
}
剩余的 FriendsMap.java 文件操控第十章介绍的缩放和棒性按钮:](https://image.slidesharecdn.com/android-120419204454-phpapp01/75/Android-203-2048.jpg)
![package android_programmers_guide.FindAFriend;
import android.os.Bundle;
import android.location.LocationManager;
import android.view.View;
import android.content.Context;
import android.content.Intent;
import android.database.Cursor;
import android.widget.Button;
import java.util.regex.Pattern;
import java.util.regex.Matcher;
import android.graphics.Canvas;
import android.graphics.RectF;
import android.graphics.Paint;
import com.google.android.maps.MapActivity;
import com.google.android.maps.MapView;
import com.google.android.maps.Point;
import com.google.android.maps.MapController;
import com.google.android.maps.Overlay;
import com.google.android.maps.OverlayController;
public class FriendsMap extends MapActivity {
private static final String[] PROJECTION = new String[] {
Friends.Friend.NAME, Friends.Friend.LOCATION};
public Cursor mCursor;
DrawFriendsOverlay drawFriendsOverlay = new DrawFriendsOverlay();
@Override
public void onCreate(Bundle icicle) {
super.onCreate(icicle);
setContentView(R.layout.friendsmap);
Intent intent = getIntent();
if (intent.getData() == null) {
intent.setData(Friends.Friend.CONTENT_URI);
}
mCursor = managedQuery(getIntent().getData(), PROJECTION, null,null);
final MapView myMap = (MapView) findViewById(R.id.myMap);
final MapController myMapController = myMap.getController();
LoadFriends(myMap, myMapController, mCursor);
OverlayController myOverlayController =
myMap.createOverlayController();
myOverlayController.add(drawFriendsOverlay, true);
final Button zoomIn = (Button) findViewById(R.id.buttonZoomIn);
zoomIn.setOnClickListener(new Button.OnClickListener() {
public void onClick(View v){
ZoomIn(myMap,myMapController);
}});
final Button zoomOut = (Button) findViewById(R.id.buttonZoomOut);
zoomOut.setOnClickListener(new Button.OnClickListener() {
public void onClick(View v){
ZoomOut(myMap,myMapController);
}});
final Button viewMap = (Button) findViewById(R.id.buttonMapView);
viewMap.setOnClickListener(new Button.OnClickListener() {
public void onClick(View v){
ShowMap(myMap,myMapController);](https://image.slidesharecdn.com/android-120419204454-phpapp01/75/Android-204-2048.jpg)
![}});
final Button viewSat = (Button) findViewById(R.id.buttonSatView);
viewSat.setOnClickListener(new Button.OnClickListener() {
public void onClick(View v){
ShowSat(myMap,myMapController);
}});
}
public void LoadFriends(MapView mv, MapController mc, Cursor c){
Point myLocation = null;
Double latPoint = null;
Double lngPoint = null;
c.first();
do{
if (c.getString(c.getColumnIndex("location")) != null) {
final String geoPattern = "(geo:[-]?[0-9]{1,3}.[0
9]{1,6},[-]?[0-9]{1,3}.[0-9]{1,6}#)";
Pattern pattern = Pattern.compile(geoPattern);
CharSequence inputStr =
c.getString(c.getColumnIndex("location"));
Matcher matcher = pattern.matcher(inputStr);
boolean matchFound = matcher.find();
if (matchFound) {
String groupStr = matcher.group(0);
latPoint =
Double.valueOf(groupStr.substring(groupStr.indexOf(":") + 1,
groupStr.indexOf(","))) ;
lngPoint =
Double.valueOf(groupStr.substring(groupStr.indexOf(",") + 1,
groupStr.indexOf("#"))) ;
Point friendLocation = new
Point(latPoint.intValue(),lngPoint.intValue());
drawFriendsOverlay.addNewFriend(c.getString(c.getColumnIndex("name")),
friendLocation);
}
}
}while(c.next());
LocationManager myManager = (LocationManager)
getSystemService(Context.LOCATION_SERVICE);
Double myLatPoint =
myManager.getCurrentLocation("gps").getLatitude()*1E6;
Double myLngPoint =
myManager.getCurrentLocation("gps").getLongitude()*1E6;
myLocation = new Point(myLatPoint.intValue(),myLngPoint.intValue());
drawFriendsOverlay.addNewFriend("Me", myLocation);
mc.centerMapTo(myLocation, false);
mc.zoomTo(9);
mv = null;
}
public void ZoomIn(MapView mv, MapController mc){
if(mv.getZoomLevel()!=21){
mc.zoomTo(mv.getZoomLevel()+ 1);
}
}](https://image.slidesharecdn.com/android-120419204454-phpapp01/75/Android-205-2048.jpg)
![public void ZoomOut(MapView mv, MapController mc){
if(mv.getZoomLevel()!=1){
mc.zoomTo(mv.getZoomLevel()- 1);
}
}
public void ShowMap(MapView mv, MapController mc){
if (mv.isSatellite()){
mv.toggleSatellite();
}
}
public void ShowSat(MapView mv, MapController mc){
if (!mv.isSatellite()){
mv.toggleSatellite();
}
}
protected class DrawFriendsOverlay extends Overlay{
public String[] friendName = new String[0];
public Point[] friendPoint = new Point[0];
final Paint paint = new Paint();
@Override
public void draw(Canvas canvas, PixelCalculator calculator, Boolean
shadow){
for(int x=0;x<friendPoint.length; x++){
int[] coords = new int[2];
calculator.getPointXY(friendPoint[x], coords);
RectF oval = new RectF(coords[0] - 7, coords[1] + 7,
coords[0] + 7, coords[1] - 7);
paint.setTextSize(14);
canvas.drawText(friendName[x],
coords[0] +9, coords[1], paint);
canvas.drawOval(oval, paint);
}
}
public void addNewFriend(String name,Point point ){
int x = friendPoint.length;
String[] friendNameB = new String[x + 1];
Point[] friendPointB = new Point[x + 1];
System.arraycopy(friendName, 0, friendNameB, 0, x );
System.arraycopy(friendPoint, 0, friendPointB, 0, x);
friendNameB[x] = name;
friendPointB[x]= point;
friendName = new String[x + 1];
friendPoint = new Point[x + 1];
System.arraycopy(friendNameB, 0, friendName, 0, x + 1 );
System.arraycopy(friendPointB, 0, friendPoint, 0, x + 1 );
}
}
}
完成本项目的最后一个任务是创建主活动,FindAFriend。该活动被放置在一个壳内来呼叫
本章创建的活动。](https://image.slidesharecdn.com/android-120419204454-phpapp01/75/Android-206-2048.jpg)
![创建 FindAFriend 活动 第十一章 (9)
要开始本节,创建两个文件,findafriend.xml 和 FindAFriend.java。再说一次,这些文件将
为当前部分独自保留你的布局和代码。布局文件非常的基本并且只有一个 TextView。这个
TextView 将被用来写入到 friends 的列表中。完整的 findafriend.xml 文件应当显示如下:
<?xml version="1.0" encoding="utf-8"?>
<TextView xmlns:android="http://schemas.android.com/apk/res/android"
android:id="@android:id/text1"
android:layout_width="fill_parent"
android:layout_height="?android:attr/listPreferredItemHeight"
android:textAppearance="?android:attr/textAppearanceLargeInverse"
android:gravity="center_vertical"
android:paddingLeft="27dip"
/>
完整的 FindAFriend.java 文件如下。文件中的所有代码在本章中已经讨论过。首先,读取数
据库并且写入结果到一个 ListView。 给予用户一个菜单项目来编辑或者删除条目,或者启动
FriendsMap 活动。很简单,对不对?
package android_programmers_guide.FindAFriend;
import android_programmers_guide.FindAFriend.Friends;
import android.app.ListActivity;
import android.content.ComponentName;
import android.content.Intent;
import android.content.ContentUris;
import android.database.Cursor;
import android.graphics.Color;
import android.net.Uri;
import android.os.Bundle;
import android.view.Menu;
import android.view.View;
import android.view.View.MeasureSpec;
import android.widget.ListAdapter;
import android.widget.ListView;
import android.widget.SimpleCursorAdapter;
import android.widget.TextView;
public class FindAFriend extends ListActivity {
300 Android: A Programmer’s Guide
public static final int DELETE_ID = Menu.FIRST;
public static final int INSERT_ID = Menu.FIRST + 1;
public static final int FIND_FRIENDS = Menu.FIRST + 2;
private static final String[] PROJECTION = new String[] {
Friends.Friend._ID, Friends.Friend.NAME};
private Cursor mCursor;
@Override
protected void onCreate(Bundle icicle) {
super.onCreate(icicle);](https://image.slidesharecdn.com/android-120419204454-phpapp01/75/Android-207-2048.jpg)
![setDefaultKeyMode(SHORTCUT_DEFAULT_KEYS);
Intent intent = getIntent();
if (intent.getData() == null) {
intent.setData(Friends.Friend.CONTENT_URI);
}
setupList();
mCursor = managedQuery(getIntent().getData(), PROJECTION, null,
null);
ListAdapter adapter = new SimpleCursorAdapter(this,
R.layout.findafriend_item, mCursor,
new String[] {Friends.Friend.NAME}, new int[]
{android.R.id.text1});
setListAdapter(adapter);
}
private void setupList() {
View view = getViewInflate().inflate(
android.R.layout.simple_list_item_1, null, null);
TextView v = (TextView) view.findViewById(android.R.id.text1);
v.setText("X");
getListView().setBackgroundColor(Color.GRAY);
v.measure(MeasureSpec.makeMeasureSpec(View.MeasureSpec.EXACTLY,
100),
MeasureSpec.makeMeasureSpec(View.MeasureSpec.UNSPECIFIED,
0));
}
@Override
public boolean onCreateOptionsMenu(Menu menu) {
super.onCreateOptionsMenu(menu);
menu.add(0, INSERT_ID, R.string.menu_insert).setShortcut('3', 'a');
Intent intent = new Intent(null, getIntent().getData());
intent.addCategory(Intent.ALTERNATIVE_CATEGORY);
menu.addIntentOptions(
Menu.ALTERNATIVE, 0, new ComponentName(this, FindAFriend.class),
null, intent, 0, null);
return true;
}
@Override
public boolean onPrepareOptionsMenu(Menu menu) {
super.onPrepareOptionsMenu(menu);
final boolean haveItems = mCursor.count() > 0;
if (haveItems) {
Uri uri = ContentUris.withAppendedId(getIntent().getData(),
getSelectedItemId());
Intent[] specifics = new Intent[1];
specifics[0] = new Intent(Intent.EDIT_ACTION, uri);
Menu.Item[] items = new Menu.Item[1];
Intent intent = new Intent(null, uri);
intent.addCategory(Intent.SELECTED_ALTERNATIVE_CATEGORY);
menu.addIntentOptions(Menu.SELECTED_ALTERNATIVE, 0, null,
specifics, intent, 0, items);
menu.add(Menu.SELECTED_ALTERNATIVE, DELETE_ID,
R.string.menu_delete)
.setShortcut('2', 'd');](https://image.slidesharecdn.com/android-120419204454-phpapp01/75/Android-208-2048.jpg)
![menu.add(Menu.SELECTED_ALTERNATIVE, FIND_FRIENDS,
R.string.find_friends).setShortcut('4', 'f');
if (items[0] != null) {
items[0].setShortcut('1', 'e');
}
} else {
menu.removeGroup(Menu.SELECTED_ALTERNATIVE);
}
menu.setItemShown(DELETE_ID, haveItems);
return true;
}
@Override
public boolean onOptionsItemSelected(Menu.Item item) {
switch (item.getId()) {
case DELETE_ID:
deleteItem();
return true;
case INSERT_ID:
insertItem();
return true;
case FIND_FRIENDS:
Intent findfriends = new Intent(this, FriendsMap.class);
startActivity(findfriends);
return true;
}
return super.onOptionsItemSelected(item);
}
@Override
protected void onListItemClick(ListView l, View v, int position, long
id) {
Uri url = ContentUris.withAppendedId(getIntent().getData(), id);
String action = getIntent().getAction();
if (Intent.PICK_ACTION.equals(action)
|| Intent.GET_CONTENT_ACTION.equals(action)) {
setResult(RESULT_OK, url.toString());
} else {
startActivity(new Intent(Intent.EDIT_ACTION, url));
}
}
private final void deleteItem() {
mCursor.moveTo(getSelectedItemPosition());
mCursor.deleteRow();
}
private final void insertItem() {
startActivity(new Intent(Intent.INSERT_ACTION,
getIntent().getData()));
}
}
这个是本书中最长的一个活动,需要注意的是你所做的相关所需的编程工作还是非常的少。
下一步,运行这个活动并且查看所有工作的成果。](https://image.slidesharecdn.com/android-120419204454-phpapp01/75/Android-209-2048.jpg)
![adb data <state> Changes the state of the GPRS data
connection to <state>改变 GPRS 数据连接
状态到<state>
adb Devices Prints a list of all attached
mulator/device
instances
打印所附模拟器列表/设备示例
adb forward <local> <remote> Forwards socket connections from a
specified local port to a specified
remote port on the Emulator/device
instance
在模拟器/设备示例中从一个定义的本来端
口转递 socket 连接到一个定义的远程端口
adb get-serialno Prints the adb instance identifier
string
打印 adb 示例标识符字符串
adb get-state Prints the adb state of an
emulator/device instance
打印一个模拟器/设备示例的 adb 状态
adb help Prints a list of supported adb
commands
打印支持的 adb 命令列表
adb install <path-to-apk> Pushes an Android application
(specified as a full path to an .apk
file) to the data file of an
Emulator/device
推入 Android 应用程序(作为一个完整路径
一个.apk 文件)到模拟器/设备示例
adb jdwp Prints a list of available JDWP
processes on a given device
在指定的设备上列出可用的 JDWP 进程
adb kill-server Terminates the adb server process
终止 adb 服务器进程
adb logcat [<option>] [<filter-Prints log data to the screen 在屏幕上
specs>] 打印 log 数据
adb ppp <tty> [parm]... Runs PPP over USB 通 过 USB 运 行 PPP:
● <tty> The tty for PPP stream; for](https://image.slidesharecdn.com/android-120419204454-phpapp01/75/Android-215-2048.jpg)
![example, dev:/dev/omap_csmi_ttyl
<tty>ppp 流 ; 例 如
dev:/dev/omap_csmi_ttyl
● [parm]... Zero or more PPP/PPPD
options, such as defaultroute,
local,
notty, etc.
0 或 者 更 多 的 PPP/PPPD 选 项 , 如
defaultroute, local,notty 等 等
Note that you should not
automatically start
a PDP connection.
注意,你不应当自动启动一个 PDP 连接
adb pull <remote> <local> Copies a specified file from an
Emulator/device instance to your
development computer
从模拟器/设备复制定义的文件到你的电脑
adb push <local> <remote> Copies a specified file from your
development
computer to an Emulator/device
instance
从电脑中复制文件到模拟器/设备
adb Shell Starts a remote shell in the target
Emulator/device instance
在目标模拟器/设备上启动远程外壳
adb start-server Checks whether the adb server process
is
running and, if not, starts it
检测 adb 服务器进程是否启动,如果否,启
动它
adb Status Reports the current GSM voice/data
state
报告当前 GSM 声音/数据状态
adb unregistered Indicates no network is available
指示无网络可用
adb Version Prints the adb version number
打印 adb 版本号
adb voice <state> Changes the state of the GPRS voice
connection to <state>改变 GPRS 声音状态](https://image.slidesharecdn.com/android-120419204454-phpapp01/75/Android-216-2048.jpg)