Chapter 6.1 OpenCV란
OpenCV란?
OpenCVmeans Intel® Open Source Computer Vision Library.
It is a collection of C functions and a few C++ classes that implement
some popular Image Processing and Computer Vision algorithms.
인텔에서 개발한 컴퓨터 비전 라이브러리로 다양한 OS에서 동작하는 Cross-platform API.
이미지 프로세싱 라이브러리: OpenGL
비전 프로세싱 라이브러리: OpenCV
이미지 프로세싱 비전 프로세싱
대상 이미지(Image) 피쳐(Feature)
애플리케이션 Noise filtering,
Compression,
Edge detection
Face detection,
Face recognition,
Object tracking
3.
Chapter 6.1 OpenCV란
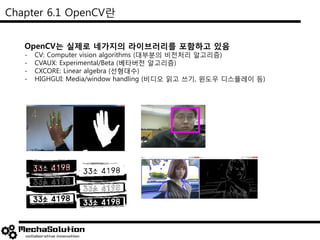
OpenCV는실제로 네가지의 라이브러리를 포함하고 있음
- CV: Computer vision algorithms (대부분의 비전처리 알고리즘)
- CVAUX: Experimental/Beta (베타버전 알고리즘)
- CXCORE: Linear algebra (선형대수)
- HIGHGUI: Media/window handling (비디오 읽고 쓰기, 윈도우 디스플레이 등)
4.
Chapter 6.2 OpenCV애플리케이션
OpenCV를 기반으로 한 애플리케이션
- 동영상 스트리밍
- Text 인식 및 번역
- Security 및 Monitoring
- 무인 자동차 및 쿼드콥터의 영상 처리
- 모션 인식 게임 인터페이스
Chapter 6. 4실습: 얼굴 인식 (Face detection)
Viola/Jones Face Detector
<관련논문>
P. Viola and M. Jones. Rapid object detection using a boosted cascade of simple featur
es. CVPR 2001.
P. Viola and M. Jones. Robust real-time face detection. IJCV 57(2), 2004.
Training Data
• 5000 faces
• All frontal, 24x24 pixels
• Normalized, scaled, translated
핵심 테크닉
• Rectangle features (Haar feature)
• Integral images for fast computation
• Ada-Boosting for feature selection
• Attentional cascade for fast rejection of negati
ve windows
가장 널리 알려진 얼굴 인식 (Face detection) 알고리즘으로 Viola와 Jones에 의해서 고
안됨.
• Rectangle feature
간단히 설명하면,
F= (흰부분 픽셀) – (어두운부분 픽셀)
눈 부분은 어둡고 코와 입부분은 밝음
F 값이 큼 >> “얼굴로 인식”
13.
Chapter 6. 4실습: 얼굴 인식 (Face detection)
• Ada-Boosting for feature selection
간단히 설명하면,
보다 좋은 classifier를 찾기 위해 트레이닝하는 방법으로, 약한 classifier의 집합으
로 strong한 classifier를 구성한다는 것. Ada는 adaptive의 약자.
• Integral images for fast computation
어느 영역의 면적을 구할 때, 단순히 더하기 빼기로 빨리 구할 수 있다는 컨셉.
즉, 점D의 값이 (1-2-D-5) 면적, B의 값이 (1-3-B-5)의 면적, A값이 (1-3-A-7)의
면적, 그리고 C의 값이 (1-2-C-7)의 면적이라고 할 때, 파란색 면적 (A-C-D-B)
은 각각의 적분 면적을 더하고 빼서 구할 수 있음: A의 값-B의 값-C의 값+D의
값 = 파란색 면적
• Attentional cascade for fast rejection of negative windows
1 2 3 4
5 6
7 8
Ada-boost classifier를 통해 얼굴이 아닌 것은 버려지고 얼굴인 것만 계속적으로
검출
Ada-boost
Classifier1
Ada-boost
Classifier2
Ada-boost
Classifier3
True True True
Face
found
Non-face Non-face
Input image
False False False
Non-face
14.
Chapter 6. 4실습: 얼굴 인식 (Face detection)
import cv2.cv as cv
cv.NamedWindow('a', 1)
cap = cv.CaptureFromCAM(-1)
cv.SetCaptureProperty(cap, cv.CV_CAP_PROP_FRAME_HEIGHT, 240)
cv.SetCaptureProperty(cap, cv.CV_CAP_PROP_FRAME_WIDTH, 320)
hc = cv.Load("haarcascade_frontalface_alt.xml")
while True:
frame = cv.QueryFrame(cap)
face = cv.HaarDetectObjects(frame, hc, cv.CreateMemStorage(), 1.05,2, cv.CV_HAAR_DO_CANNY_PRUNING, (120,120))
for (x,y,w,h),n in face:
cv.Rectangle(frame,(int(x),int(y)),(int(x)+w,int(y)+h),(255,0,255),8,0)
cv.ShowImage('a', frame)
c = cv.WaitKey(1)
if c == 13:
exit(0)
Python 코드 using webcam
15.
Chapter 6. 5실습: 달걀 인식 (egg detection)
import time
import serial
import picamera
import picamera.array
import cv2
import cv2.cv as cv
import numpy as np
hsv_min = np.array([20, 130, 100])
hsv_max = np.array([40, 180, 120])
width = 320
height = 240
with picamera.PiCamera() as camera:
with picamera.array.PiRGBArray(camera) as stream:
camera.resolution = (width,height)
camera.vflop = True
while True:
camera.capture(stream, format='bgr', use_video_port=True)
edges = cv2.Canny(stream.array, 100,300)
hsv = cv2.cvtColor(stream.array, cv2.COLOR_BGR2HSV)
imgray = cv2.cvtColor(stream.array, cv2.COLOR_BGR2GRAY)
ret, thresh = cv2.threshold(imgray, 127, 255, 0)
contours, hierarchy = cv2.findContours(thresh, cv2.RETR_LIST, cv2.CHAIN_APPROX_SIMPLE)
contours = sorted(contours, key = cv2.contourArea, reverse = True)[:5]
screenCnt = None
Python 코드 using Pi-camera
for h, cnt in enumerate(contours):
peri = cv2.arcLength(cnt, True)
approx = cv2.approxPolyDP(cnt, 0.01*peri, True)
screenCnt = approx
M = cv2.moments(cnt)
if M['m00']!=0:
cx = int(M['m10']/M['m00'])
cy = int(M['m01']/M['m00'])
else:
cx = width/2
cy = height/2
center = np.array([cx,cy])
R_arr = np.zeros((1000,5))
for idx, val in enumerate(cnt):
R_arr[idx][h]= np.linalg.norm(val-center)
R = R_arr[:,h]
ratio = np.min(R[np.nonzero(R)])/max(R_arr[:,h])
cv2.circle(hsv, (cx, cy), 2, (255,0,0),2)
if cx < width and cy < height and ratio > 0.6 and ratio < 0.75:
cv2.putText(hsv, 'EGG', (cx,cy+10), cv2.FONT_HERSHEY_SIMPLEX,
0.4, (255,255,255), 1, 8)
else:
cv2.putText(hsv, str(ratio), (cx,cy), cv2.FONT_HERSHEY_SIMPLEX,
0.4, (255,255,255), 1, 8)
cv2.putText(hsv, str(hsv[cy-10,cx-10]), (cx,cy-15), cv2.FONT_HERSHEY_SIMPLEX,
0.4, (255,255,255), 1, 8)
if ratio > 0.6 and ratio < 0.75:
cv2.drawContours(hsv, [screenCnt], -1, (0,255,0),1) #[screenCnt was contours]
mask = cv2.inRange(hsv, hsv_min, hsv_max)
cv2.imshow('color-based', hsv)
if cv2.waitKey(1) & 0xFF == ord('q'):
break
stream.seek(0)
stream.truncate()
cv2.destroyAllWindows()


![Chapter 6. 5 실습: 달걀 인식 (egg detection)
import time
import serial
import picamera
import picamera.array
import cv2
import cv2.cv as cv
import numpy as np
hsv_min = np.array([20, 130, 100])
hsv_max = np.array([40, 180, 120])
width = 320
height = 240
with picamera.PiCamera() as camera:
with picamera.array.PiRGBArray(camera) as stream:
camera.resolution = (width,height)
camera.vflop = True
while True:
camera.capture(stream, format='bgr', use_video_port=True)
edges = cv2.Canny(stream.array, 100,300)
hsv = cv2.cvtColor(stream.array, cv2.COLOR_BGR2HSV)
imgray = cv2.cvtColor(stream.array, cv2.COLOR_BGR2GRAY)
ret, thresh = cv2.threshold(imgray, 127, 255, 0)
contours, hierarchy = cv2.findContours(thresh, cv2.RETR_LIST, cv2.CHAIN_APPROX_SIMPLE)
contours = sorted(contours, key = cv2.contourArea, reverse = True)[:5]
screenCnt = None
Python 코드 using Pi-camera
for h, cnt in enumerate(contours):
peri = cv2.arcLength(cnt, True)
approx = cv2.approxPolyDP(cnt, 0.01*peri, True)
screenCnt = approx
M = cv2.moments(cnt)
if M['m00']!=0:
cx = int(M['m10']/M['m00'])
cy = int(M['m01']/M['m00'])
else:
cx = width/2
cy = height/2
center = np.array([cx,cy])
R_arr = np.zeros((1000,5))
for idx, val in enumerate(cnt):
R_arr[idx][h]= np.linalg.norm(val-center)
R = R_arr[:,h]
ratio = np.min(R[np.nonzero(R)])/max(R_arr[:,h])
cv2.circle(hsv, (cx, cy), 2, (255,0,0),2)
if cx < width and cy < height and ratio > 0.6 and ratio < 0.75:
cv2.putText(hsv, 'EGG', (cx,cy+10), cv2.FONT_HERSHEY_SIMPLEX,
0.4, (255,255,255), 1, 8)
else:
cv2.putText(hsv, str(ratio), (cx,cy), cv2.FONT_HERSHEY_SIMPLEX,
0.4, (255,255,255), 1, 8)
cv2.putText(hsv, str(hsv[cy-10,cx-10]), (cx,cy-15), cv2.FONT_HERSHEY_SIMPLEX,
0.4, (255,255,255), 1, 8)
if ratio > 0.6 and ratio < 0.75:
cv2.drawContours(hsv, [screenCnt], -1, (0,255,0),1) #[screenCnt was contours]
mask = cv2.inRange(hsv, hsv_min, hsv_max)
cv2.imshow('color-based', hsv)
if cv2.waitKey(1) & 0xFF == ord('q'):
break
stream.seek(0)
stream.truncate()
cv2.destroyAllWindows()](https://image.slidesharecdn.com/7-150410094152-conversion-gate01/85/7_-15-320.jpg)


![[IoT] MAKE with Open H/W + Node.JS - 3rd](https://cdn.slidesharecdn.com/ss_thumbnails/iotoshwnodejslesson3-150329102149-conversion-gate01-thumbnail.jpg?width=640&height=640&fit=bounds)


![[드론] 펌웨어 분석 [2015.5.23]](https://cdn.slidesharecdn.com/ss_thumbnails/v2-150524160009-lva1-app6891-thumbnail.jpg?width=640&height=640&fit=bounds)

![[0618구경원]초보 게임프로그래머를 위한 c++](https://cdn.slidesharecdn.com/ss_thumbnails/0618c-110627045007-phpapp02-thumbnail.jpg?width=640&height=640&fit=bounds)

![[2014 CodeEngn Conference 10] 노용환 - 디버거 개발, 삽질기](https://cdn.slidesharecdn.com/ss_thumbnails/2014codeengnconference10-140713113014-phpapp01-thumbnail.jpg?width=640&height=640&fit=bounds)


![[IoT] MAKE with Open H/W + Node.JS - 1st](https://cdn.slidesharecdn.com/ss_thumbnails/iotoshwnodejslesson1-150218080320-conversion-gate02-thumbnail.jpg?width=640&height=640&fit=bounds)