Download to read offline
![MICROSCOPY 1
ELECTRON MICROSCOPE
Electron beam is the source of illumination.
Image is produced by magnetic field.
Contrasting features between light microscope and electron microscope are
construction, working principle, specimen preparation, cost-expenses and designed
room (vacuum chamber).
ELECTRON
Electrons are sub-atomic particles around the nucleus with negative charge.
Electrons have high velocity and shorter wavelength about 0.05 A0 [105K times shorter
than wavelength of visible light- 5500 A0]
Shorter the wavelength, higher is the resolution.
Electrons are sensitive to magnetic field.
In 1924, BROGLIE proposed Dual nature of electrons (wave and particular)
PRINCIPLE OF ELECTRON MICROSCOPE
A vacuum chamber with heating metal filament such as tungsten [at about ~6000volts]
generates electron rays. Multiple electro-magnetic lenses i.e., the copper wires coiled
around hallow cylindrical tube induces electromagnetic field during current flow and
converts electron rays into electron beam. Electron beam is similar to light rays, but
have shorter wavelength. Electron beam on interaction with atoms of the biological
sample produces image and is displayed on fluorescent screen. Faster the electron
moves, shorter the wavelength and greater is the image quality.
TYPES OF ELECTRON MICROSCOPE
1. Transmission Electron Microscope [TEM]
2. Scanning Electron Microscope [SEM]
TRANSMISSION ELECTRON MICROSCOPE [TEM]
The Transmission Electron Microscope [TEM] was first type of Electron Microscope.
TEM was developed by MAX RUSKA in 1931 and was awarded Nobel Prize for Physics
in 1986.
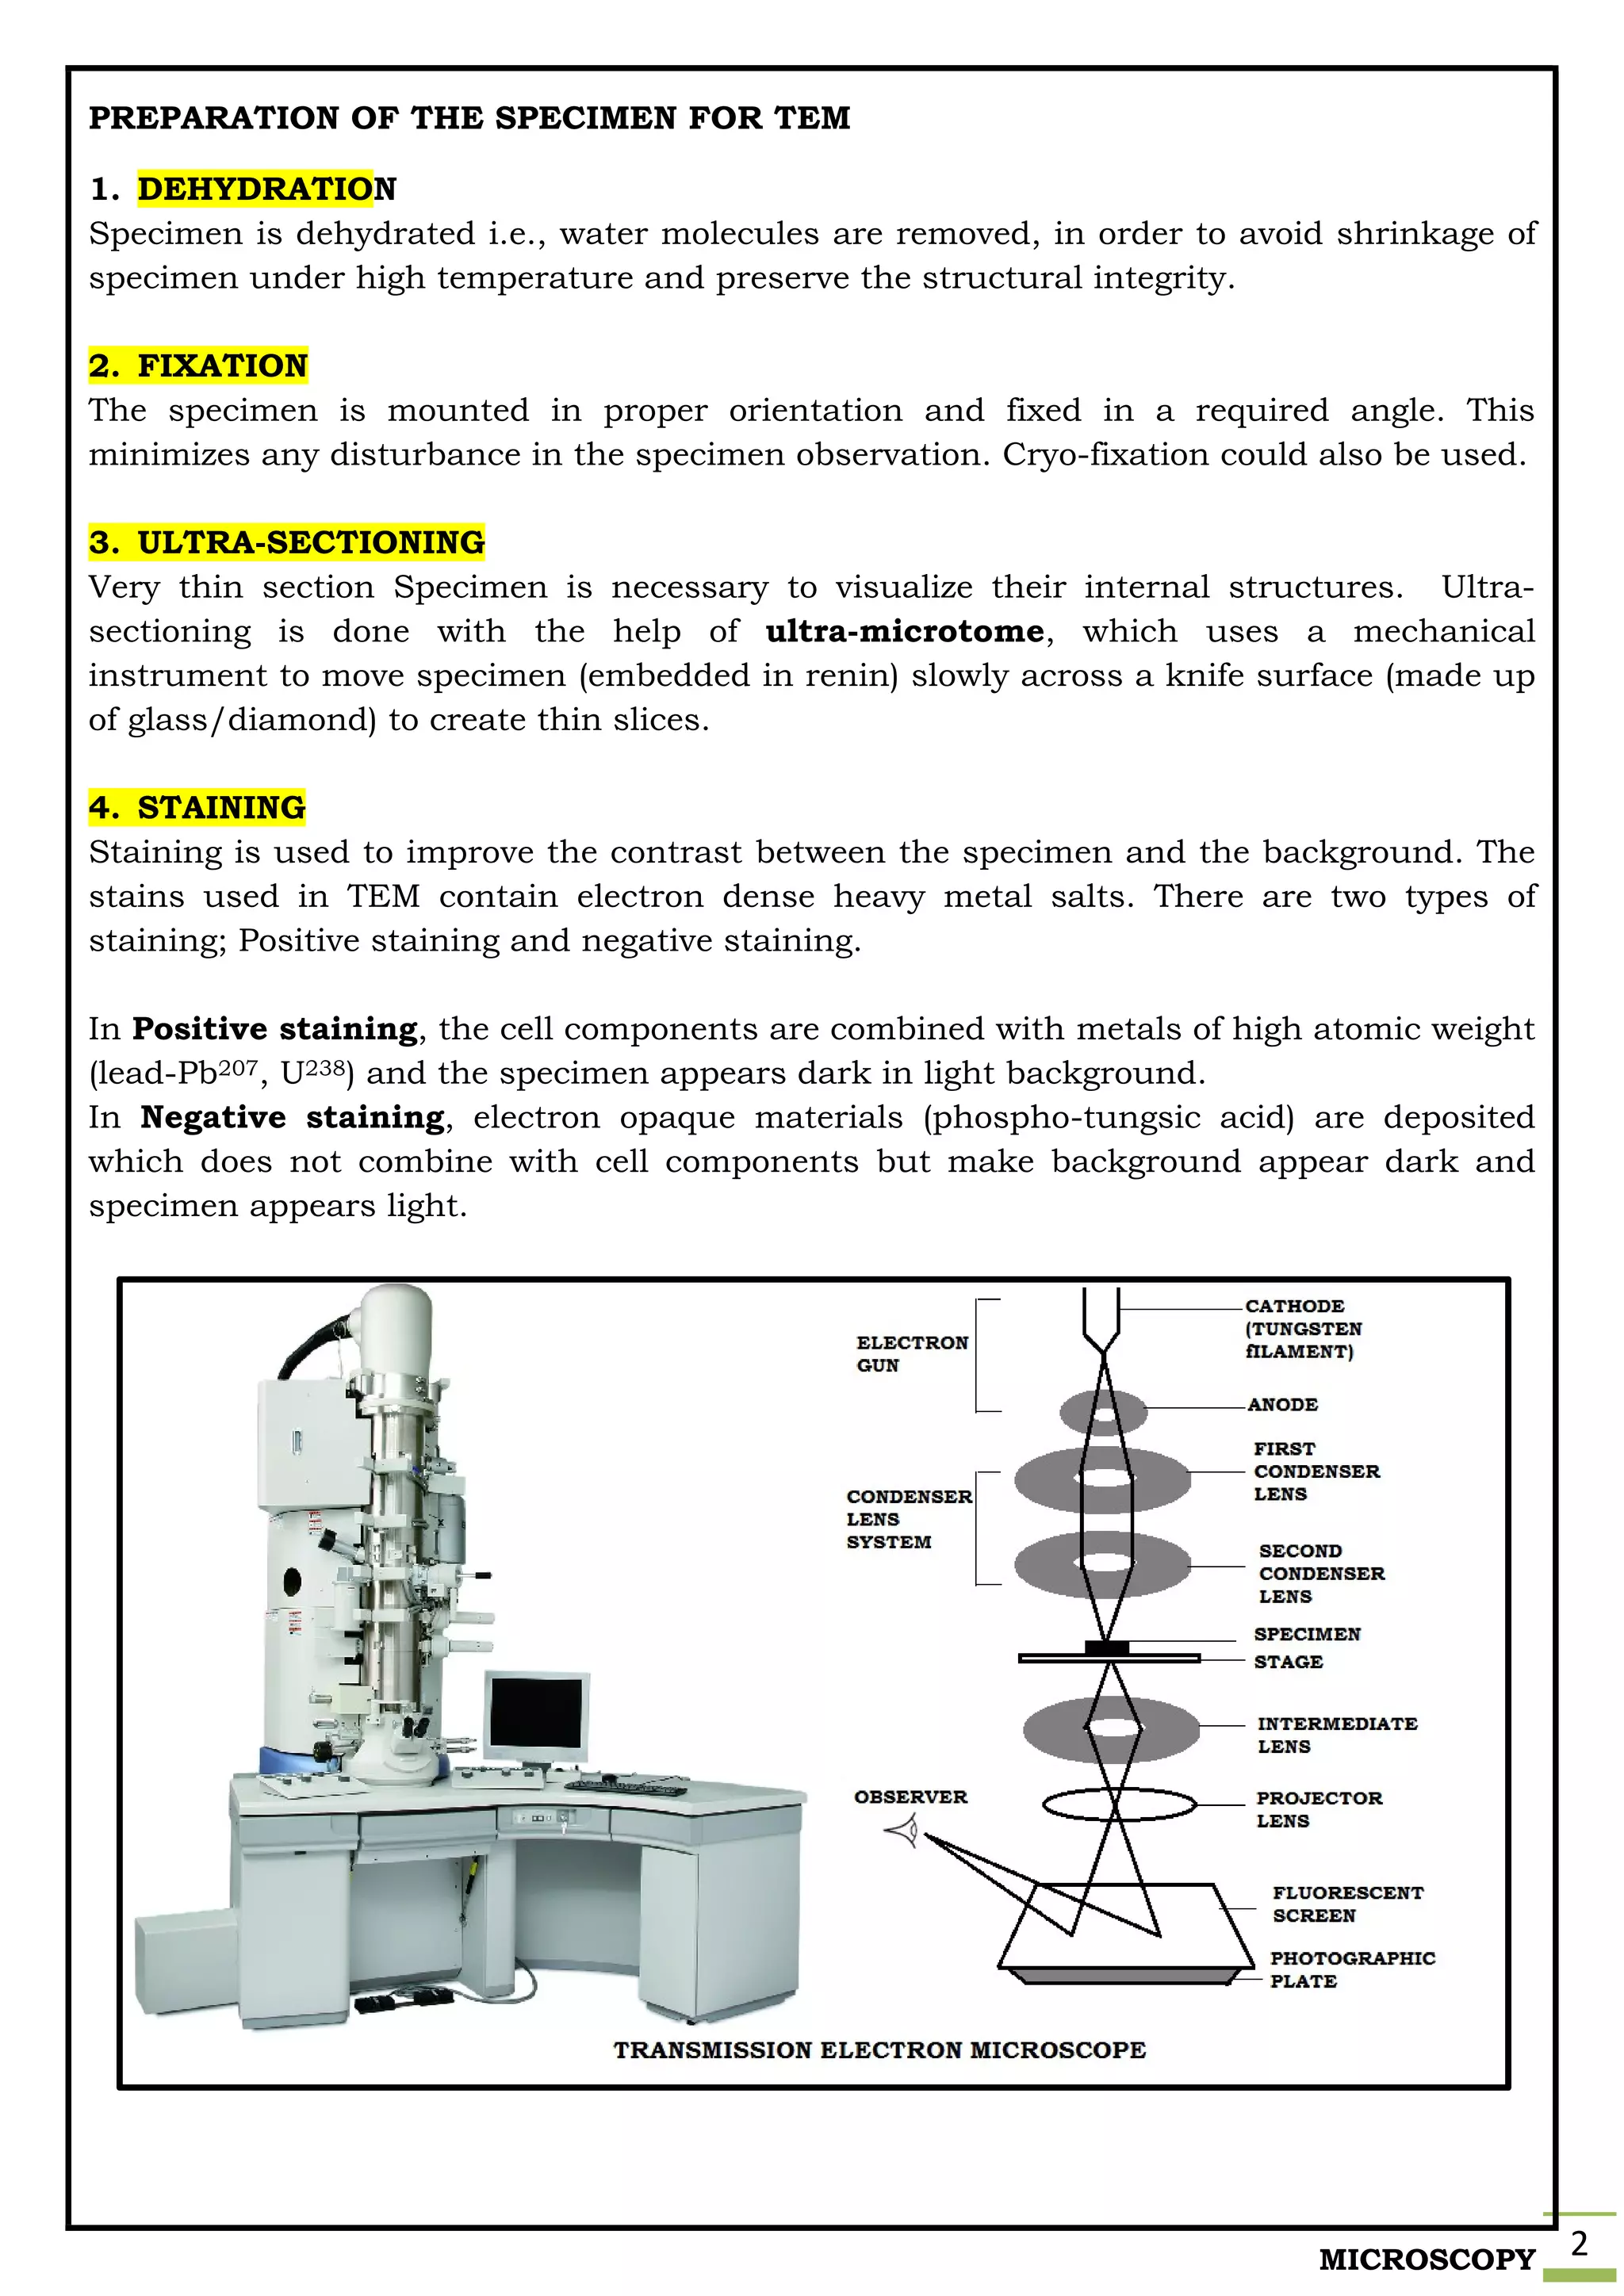
WORKING PRINCIPLE
Electron generator is the source of illumination with a tungsten filament. When heated
by electric current, it emits a stream of electrons. The stream of electrons is directed
through anode aperture into a condenser lens system. The condenser lens system (1st
electromagnetic coils) adjusts the beam and guides the beam towards the specimen. As
the electron beam passes through the specimen placed below the condenser, electron
beam is scattered depending on the varying refractive index of the specimen. From the
specimen, the beam of electrons passes through objective/intermediary lens (2ndset of
electromagnetic coils) forming an intermediary image. The projection lens(3rdset of
electromagnetic coils) produces final image and is projected on a fluorescent screen/
photographic plate.](https://image.slidesharecdn.com/5-210528083125/75/5-Microsocope-ELECTRON-MICROSCOPE-TEM-SEM-Basics-1-2048.jpg)
![MICROSCOPY 3
TEM ADVANTAGES
TEM provides most powerful magnification.
TEM offers detailed and high quality image.
They are easy to operate with proper training.
TEM is ideal for a number of different fields such as life-sciences, nanotechnology,
medical, biological and material research, forensic analysis, gemology and metallurgy.
TEM provides topographical, morphological, compositional and crystalline information.
TEM DISADVANTAGES
TEMs are large and very expensive.
Dehydration may alter morphological features dealing to mis-interpretation.
Requires large, special housing and maintenance.
They are expensive and as laborious sample preparation
Images are black and white.
Operation and analysis requires special training.
SCANNING ELECTRON MICROSCOPE [SEM]
Scanning Electron Microscope [SEM] was developed by DENNIS MC MULLAN (PhD
student - England) and CHARLES OUTLAY (Engineer) in 1948.
SEM generates an image by scanning the specimens with a beam of electrons and
enables topographical study of the specimen surface.
NOTE: The path of the electron beam within SEM differs from that of the TEM.
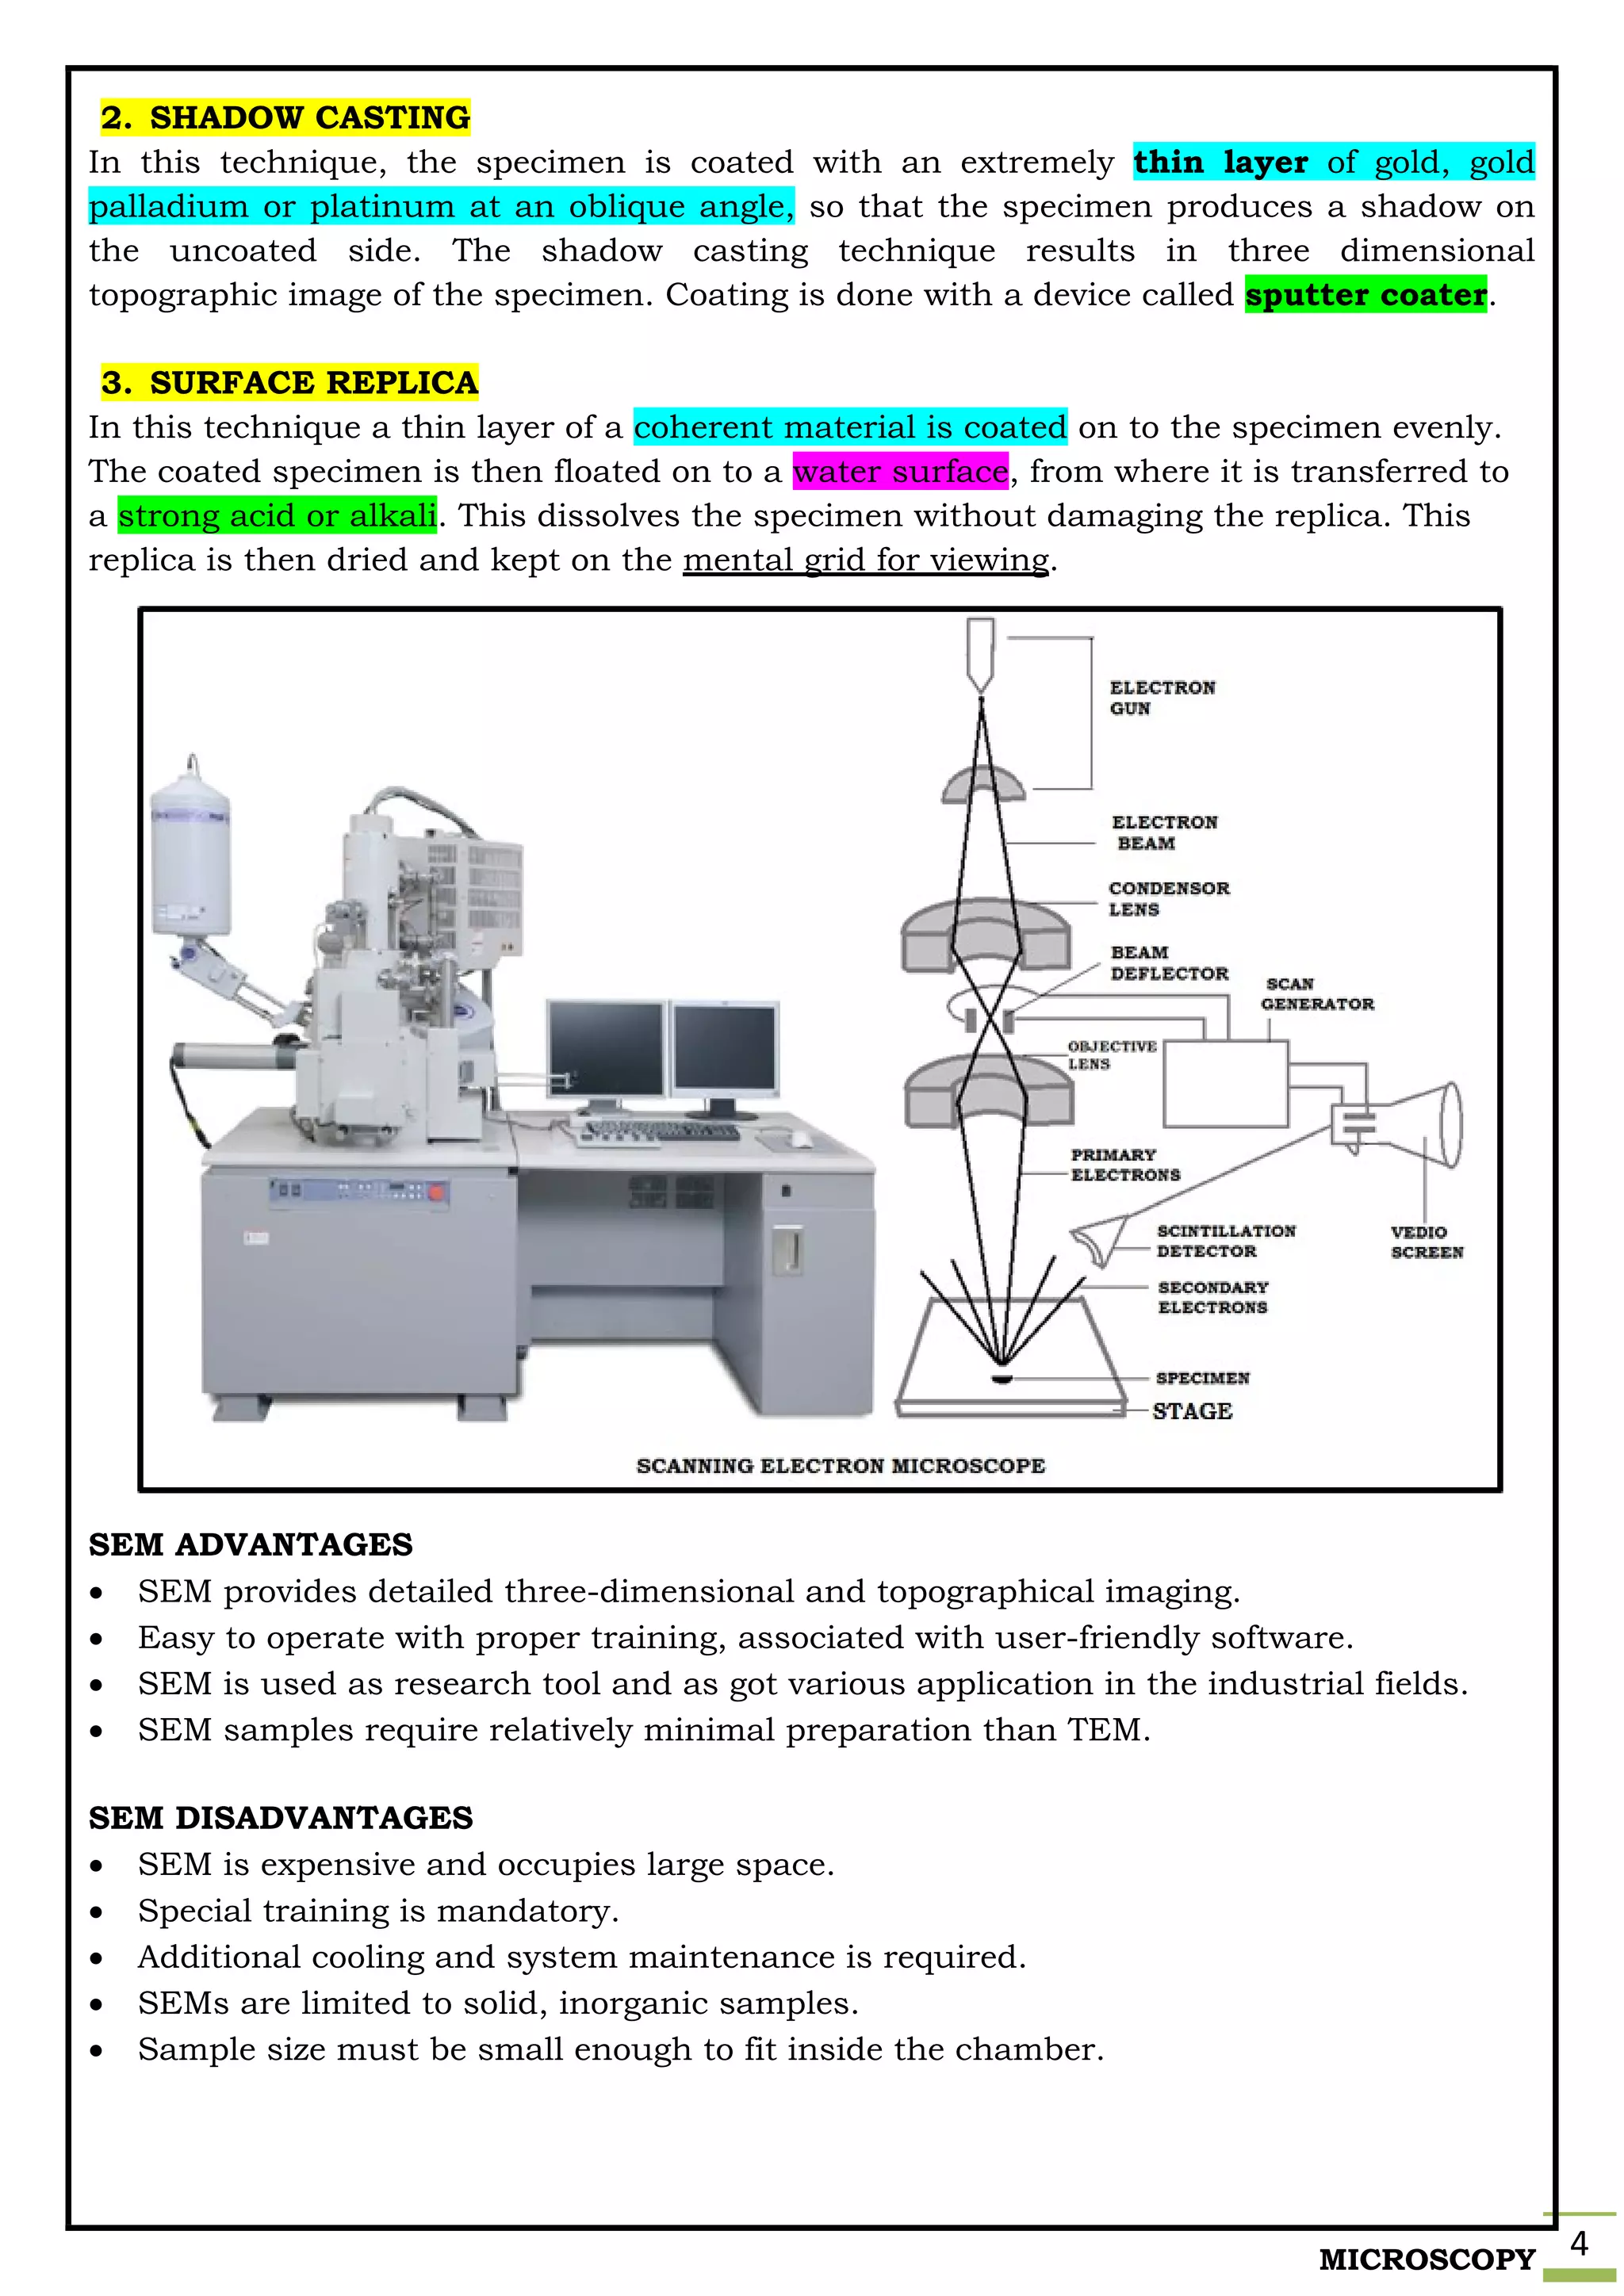
WORKING PRINCIPLE
Electron gun is the source of illumination in a vacuum chamber that produces a stream
of electrons and is directed into a condenser lens, thus generating the narrow electron
beam. Rapidly moving electron beam passes through the beam deflector, enters the
objective lens and primary electron beam is created. The primary electron beam strikes
the specimen, the surface atoms discharge shower of second electrons and are called as
Secondary electrons. The secondary electrons are collected by a Scintillator detector
(composed of scintillator and photomultiplier) which generates an electronic signal.
These signals help in the formation of the final image on a CRT/Video screen. The
secondary electrons emitted from each point on the specimen are characteristic of the
surface. The image on the screen thus reflects the composition and topography of the
specimen surface. This image gives a three-dimensional appearance.
PREPARATION OF THE SPECIMEN FOR SEM
1. DEHYDRATION
SEM allows observing the surface topography. So, dehydration is achieved by critical
point drying which minimizes artifact formation (disturbance in surface configuration).
In critical point drying, at a particular temperature and pressure the liquid changes to
gas without any surface tension damage to the specimen. The specimen is first immersed
in ethanol or acetone to remove water and then in pressurized liquid of CO2.
Simultaneously, rising the temperature above 320C (the critical point of CO2). At this
temperature, the liquid vaporizes without surface tension leaving the specimen perfectly
dry.](https://image.slidesharecdn.com/5-210528083125/75/5-Microsocope-ELECTRON-MICROSCOPE-TEM-SEM-Basics-3-2048.jpg)

The document discusses electron microscopy, detailing its principles, types, and specimen preparation methods. It explains two main types: Transmission Electron Microscope (TEM) and Scanning Electron Microscope (SEM), highlighting their working mechanisms, advantages, and disadvantages. The document emphasizes their applications in various scientific fields and outlines the required sample preparations, including dehydration and staining techniques.


![Measurement of Radioactivity - Geiger Muller [GM] Counter & SCINTILLATION COU...](https://cdn.slidesharecdn.com/ss_thumbnails/radioisotopes-210528094310-thumbnail.jpg?width=640&height=640&fit=bounds)


