
More Related Content
Viewers also liked
Similar to 33 Creare Fimo Lanterna Tulipano
Similar to 33 Creare Fimo Lanterna Tulipano (13)
More from Bijouxnatu
More from Bijouxnatu (20)
33 Creare Fimo Lanterna Tulipano
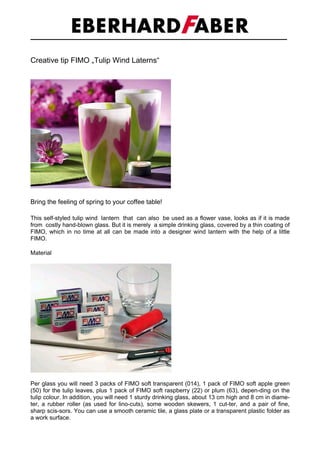
- 1. Creative tip FIMO „Tulip Wind Laterns“ Bring the feeling of spring to your coffee table! This self-styled tulip wind lantern that can also be used as a flower vase, looks as if it is made from costly hand-blown glass. But it is merely a simple drinking glass, covered by a thin coating of FIMO, which in no time at all can be made into a designer wind lantern with the help of a little FIMO. Material Per glass you will need 3 packs of FIMO soft transparent (014), 1 pack of FIMO soft apple green (50) for the tulip leaves, plus 1 pack of FIMO soft raspberry (22) or plum (63), depen-ding on the tulip colour. In addition, you will need 1 sturdy drinking glass, about 13 cm high and 8 cm in diame- ter, a rubber roller (as used for lino-cuts), some wooden skewers, 1 cut-ter, and a pair of fine, sharp scis-sors. You can use a smooth ceramic tile, a glass plate or a transparent plastic folder as a work surface.
- 2. Step 1 Using the rubber roller, roll out 1 block of FIMO soft transparent into sheets of about 1 mm thickness, which are a little longer than the height of the glass. (Warm the FIMO blocks slightly in your hands before you begin). Straighten the edges of the rolled-out sheets with the cutter. Now wrap the prepared FIMO sheets around your glass as tightly as possible. Cut off the overlapping FIMO at the edges and the seams using the cutter. Smooth the seams with your thumb so that no folds can be seen and the whole glass is evenly covered by a thin, white layer of FIMO. Step 2 Now decorate the coated glass with the tulip pattern. Mix 16 parts of FIMO soft transparent with 1 part of FIMO soft apple green for the leaves and stems. Depending on the colour of the flower, blend 16 parts of FIMO transparent with 1 part of FIMO soft raspberry or plum. Roll out all of the mixed FIMO colours into sheets of 1 mm thickness. Now put the leaf or floral stencil from the pattern chart onto the appropriate sheet and outline the contours of the pattern using a small wooden skewer. It is easy to cut out the tulip and leaf shapes from the FIMO sheet with the scissors and the cutter. For the flower stem, simply cut strips of 3 mm from the apple green sheet. Now arrange the cut out flower shapes around the coated glass and press gently onto the surface.
- 3. Motif tulip Step 3 Using the rubber roller, roll the surface of the decorated glass till the arranged tulips form a smooth, even surface with the white coating. To finish, level the edges of the FIMO coating with the cutter again.
- 4. Step 4 Now harden your finished FIMO wind lantern in the pre-heated oven at 130°C for 30 minutes. Then, remove it carefully and leave it to cool slowly - that's all there is to it! Tips: Before you begin, wash your hands thoroughly with soap and water to avoid getting dirt and dust on the FIMO glass. Remove pieces of fluff from your finished glass with the cutter before hardening in the oven. Rolling out FIMO is child's play if you have a pasta machine which allows you to adjust the thickness of the sheet precisely. If any air bubbles form under the FIMO coating, prick them open with the cutter and smooth over the surface again before hardening in the oven. Idea, production, photo-styling, text Hufnagel-Design, Forchheim Photos: Burger Studios Fürth