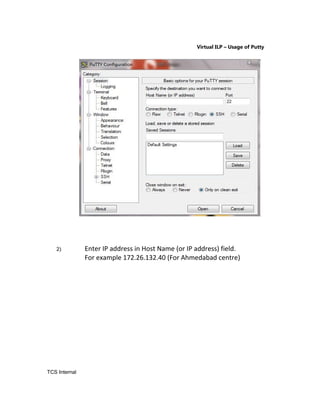
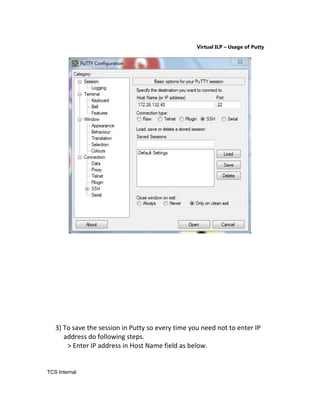
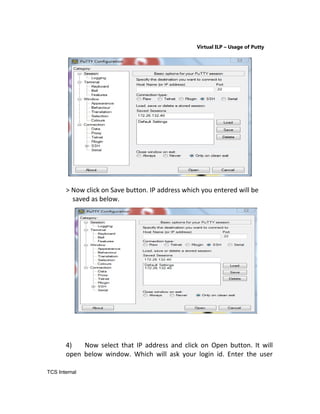
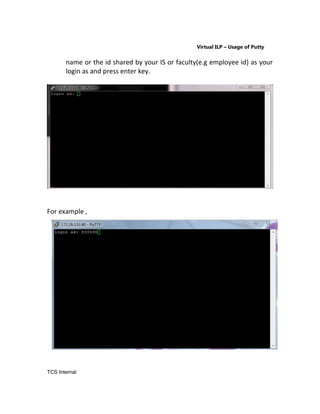
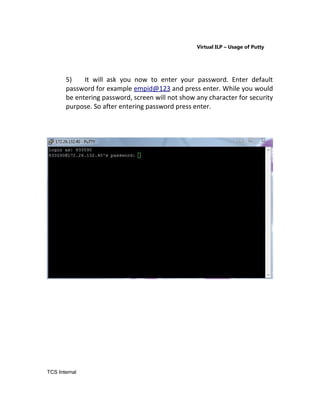
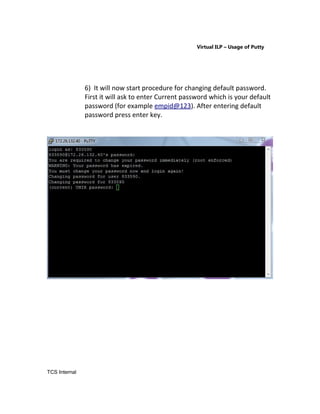
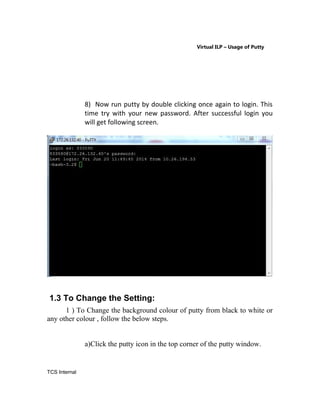
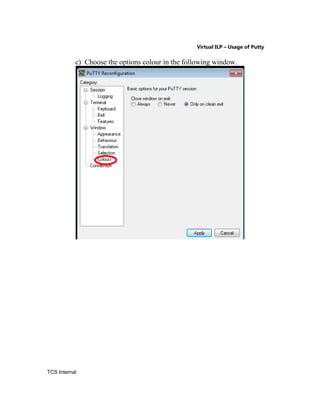
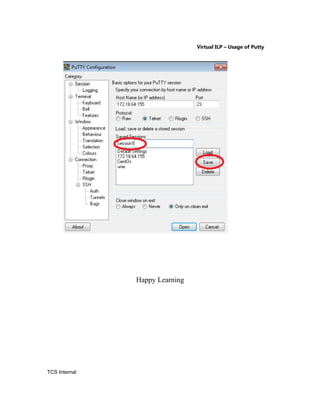
Virtual ILP – Usage of Putty
Document Number: <QMS Ref. No.> Copy Number: <copy number>
TATA CONSULTANCY SERVICES
Virtual ILP – Usage of Putty
Content Manual Version 1.0
June 2014
TCS Internal
Virtual ILP – Usage of Putty
DOCUMENT RELEASE NOTICE
Notice No.
Client
Project
Document
details
Name Version No. Author Description
Virtual_ILP_Put
ty_Usage
Virtual_ILP_Put
ty_Usage
_Usages
1
1.1
1.2
Priyank Patel –
781382
M Karuthapandian -
254840
2444319
Initial version of putty
usage
Added the content
for changing the
background color of
putty and the text
color.
Added the slides for
Revision details:
Acti
on
take
Preceding
page No.
New
page No.
Revision
description
Add
ed
slide
s
Change Register serial numbers covered:
The documents or revised pages are subject to document control.
Please keep them up-to-date using the release notices from the distributor of the document.
These are confidential documents. Unauthorised access or copying is prohibited.
Approved by : ________________________________ Date: _________
Authorised by: ________________________________ Date: _________
TCS Internal
Virtual ILP – Usage of Putty
DOCUMENT REVISION LIST
Client
Project
Document Name virtual_ILP_Putty_Usage
Release Notice Reference (for
release)
Re
v.
No
.
Revis
ion
date
Revision
description
Page
No.
Prev
page
No.
Action
taken
Addenda
/New
page
Release
Notice
reference
TCS internal
Virtual ILP – Usage of Putty
CONTENTS
Course 1: Usage of Putty...............................................................................................................4
1.1 What is putty and why we use it................................................................................................4
1.2 How to use Putty ....................................................................................................................5
1.3 To Change the Setting:...........................................................................................................13
1.4 Save settings...........................................................................................................................19
TCS Internal
Virtual ILP – Usage of Putty
Course 1: Usage of Putty
1.1 What is putty and why we use it
PuTTY is a free SSH, Telnet and Rlogin client for 32-bit
Windows systems. Multi-user operating systems, such as Unix usually
present a command-line interface to the user, much like the ‘Command
Prompt’ or ‘MS-DOS Prompt’ in Windows. Using this type of interface, there
is no need for you to be sitting at the same machine you are typing
commands to. The commands, and responses, can be sent over a network,
so you can sit at one computer and give commands to another one, or even
to more than one.
SSH, Telnet and Rlogin are network protocols that allow you to do this. On
the computer you sit at, you run a client, which makes a network
connection to the other computer (the server). The network connection
carries your keystrokes and commands from the client to the server, and
carries the server's responses back to you.
TCS Internal
Virtual ILP – Usage of Putty
1.2 How to use Putty
For running putty you need to have Host IP address. Run putty icon by
double clicking on it and follow below steps.
1) After running putty icon you will get following window
TCS Internal
Virtual ILP – Usage of Putty
2) Enter IP address in Host Name (or IP address) field.
For example 172.26.132.40 (For Ahmedabad centre)
TCS Internal
Virtual ILP – Usage of Putty
3) To save the session in Putty so every time you need not to enter IP
address do following steps.
> Enter IP address in Host Name field as below.
TCS Internal
Virtual ILP – Usage of Putty
> Now click on Save button. IP address which you entered will be
saved as below.
4) Now select that IP address and click on Open button. It will
open below window. Which will ask your login id. Enter the user
TCS Internal
Virtual ILP – Usage of Putty
name or the id shared by your IS or faculty(e.g employee id) as your
login as and press enter key.
For example ,
TCS Internal
Virtual ILP – Usage of Putty
5) It will ask you now to enter your password. Enter default
password for example empid@123 and press enter. While you would
be entering password, screen will not show any character for security
purpose. So after entering password press enter.
TCS Internal
Virtual ILP – Usage of Putty
6) It will now start procedure for changing default password.
First it will ask to enter Current password which is your default
password (for example empid@123). After entering default
password press enter key.
TCS Internal
Virtual ILP – Usage of Putty
7) It will ask now to enter new password. Enter new password
and press enter key. Again new password you are entering
would not be visible for security purpose. Again it will ask to
reconfirm password. Once you reconfirmed the password
putty will be closed automatically means you have successfully
changed the password.
TCS Internal
Virtual ILP – Usage of Putty
8) Now run putty by double clicking once again to login. This
time try with your new password. After successful login you
will get following screen.
1.3 To Change the Setting:
1 ) To Change the background colour of putty from black to white or
any other colour , follow the below steps.
a)Click the putty icon in the top corner of the putty window.
TCS Internal
Virtual ILP – Usage of Putty
b) Select change settings options like below.
TCS Internal
Virtual ILP – Usage of Putty
c) Choose the options colour in the following window.
TCS Internal
Virtual ILP – Usage of Putty
d) Select the option default background in the dropdown and select the
option Modify.
e) Select the colour as white or any other clour and click OK in the window.
TCS Internal
Virtual ILP – Usage of Putty
f) It will come back to putty configuration window. After that, Select
Default Foreground option,click Modify and choose black colour. This
Default Foreground option for text colour.
TCS Internal
Virtual ILP – Usage of Putty
g)It will come back to putty configuration window. Click Apply in the
window.
1.4 Save settings
To make the settings parmanenet, we need to save the session by a name.
Later , using the name easily we can load the session.
The following are the steps to be followed:
a) Give a name as shown in the field Saved Sessions as below(session1).
b) Click Save as below.
TCS Internal
Virtual ILP – Usage of Putty
Happy Learning
TCS Internal

2_Connecting_to_Unix_Server

  • 1.
    Virtual ILP –Usage of Putty Document Number: <QMS Ref. No.> Copy Number: <copy number> TATA CONSULTANCY SERVICES Virtual ILP – Usage of Putty Content Manual Version 1.0 June 2014 TCS Internal
  • 2.
    Virtual ILP –Usage of Putty DOCUMENT RELEASE NOTICE Notice No. Client Project Document details Name Version No. Author Description Virtual_ILP_Put ty_Usage Virtual_ILP_Put ty_Usage _Usages 1 1.1 1.2 Priyank Patel – 781382 M Karuthapandian - 254840 2444319 Initial version of putty usage Added the content for changing the background color of putty and the text color. Added the slides for Revision details: Acti on take Preceding page No. New page No. Revision description Add ed slide s Change Register serial numbers covered: The documents or revised pages are subject to document control. Please keep them up-to-date using the release notices from the distributor of the document. These are confidential documents. Unauthorised access or copying is prohibited. Approved by : ________________________________ Date: _________ Authorised by: ________________________________ Date: _________ TCS Internal
  • 3.
    Virtual ILP –Usage of Putty DOCUMENT REVISION LIST Client Project Document Name virtual_ILP_Putty_Usage Release Notice Reference (for release) Re v. No . Revis ion date Revision description Page No. Prev page No. Action taken Addenda /New page Release Notice reference TCS internal
  • 4.
    Virtual ILP –Usage of Putty CONTENTS Course 1: Usage of Putty...............................................................................................................4 1.1 What is putty and why we use it................................................................................................4 1.2 How to use Putty ....................................................................................................................5 1.3 To Change the Setting:...........................................................................................................13 1.4 Save settings...........................................................................................................................19 TCS Internal
  • 5.
    Virtual ILP –Usage of Putty Course 1: Usage of Putty 1.1 What is putty and why we use it PuTTY is a free SSH, Telnet and Rlogin client for 32-bit Windows systems. Multi-user operating systems, such as Unix usually present a command-line interface to the user, much like the ‘Command Prompt’ or ‘MS-DOS Prompt’ in Windows. Using this type of interface, there is no need for you to be sitting at the same machine you are typing commands to. The commands, and responses, can be sent over a network, so you can sit at one computer and give commands to another one, or even to more than one. SSH, Telnet and Rlogin are network protocols that allow you to do this. On the computer you sit at, you run a client, which makes a network connection to the other computer (the server). The network connection carries your keystrokes and commands from the client to the server, and carries the server's responses back to you. TCS Internal
  • 6.
    Virtual ILP –Usage of Putty 1.2 How to use Putty For running putty you need to have Host IP address. Run putty icon by double clicking on it and follow below steps. 1) After running putty icon you will get following window TCS Internal
  • 7.
    Virtual ILP –Usage of Putty 2) Enter IP address in Host Name (or IP address) field. For example 172.26.132.40 (For Ahmedabad centre) TCS Internal
  • 8.
    Virtual ILP –Usage of Putty 3) To save the session in Putty so every time you need not to enter IP address do following steps. > Enter IP address in Host Name field as below. TCS Internal
  • 9.
    Virtual ILP –Usage of Putty > Now click on Save button. IP address which you entered will be saved as below. 4) Now select that IP address and click on Open button. It will open below window. Which will ask your login id. Enter the user TCS Internal
  • 10.
    Virtual ILP –Usage of Putty name or the id shared by your IS or faculty(e.g employee id) as your login as and press enter key. For example , TCS Internal
  • 11.
    Virtual ILP –Usage of Putty 5) It will ask you now to enter your password. Enter default password for example empid@123 and press enter. While you would be entering password, screen will not show any character for security purpose. So after entering password press enter. TCS Internal
  • 12.
    Virtual ILP –Usage of Putty 6) It will now start procedure for changing default password. First it will ask to enter Current password which is your default password (for example empid@123). After entering default password press enter key. TCS Internal
  • 13.
    Virtual ILP –Usage of Putty 7) It will ask now to enter new password. Enter new password and press enter key. Again new password you are entering would not be visible for security purpose. Again it will ask to reconfirm password. Once you reconfirmed the password putty will be closed automatically means you have successfully changed the password. TCS Internal
  • 14.
    Virtual ILP –Usage of Putty 8) Now run putty by double clicking once again to login. This time try with your new password. After successful login you will get following screen. 1.3 To Change the Setting: 1 ) To Change the background colour of putty from black to white or any other colour , follow the below steps. a)Click the putty icon in the top corner of the putty window. TCS Internal
  • 15.
    Virtual ILP –Usage of Putty b) Select change settings options like below. TCS Internal
  • 16.
    Virtual ILP –Usage of Putty c) Choose the options colour in the following window. TCS Internal
  • 17.
    Virtual ILP –Usage of Putty d) Select the option default background in the dropdown and select the option Modify. e) Select the colour as white or any other clour and click OK in the window. TCS Internal
  • 18.
    Virtual ILP –Usage of Putty f) It will come back to putty configuration window. After that, Select Default Foreground option,click Modify and choose black colour. This Default Foreground option for text colour. TCS Internal
  • 19.
    Virtual ILP –Usage of Putty g)It will come back to putty configuration window. Click Apply in the window. 1.4 Save settings To make the settings parmanenet, we need to save the session by a name. Later , using the name easily we can load the session. The following are the steps to be followed: a) Give a name as shown in the field Saved Sessions as below(session1). b) Click Save as below. TCS Internal
  • 20.
    Virtual ILP –Usage of Putty Happy Learning TCS Internal