
Recommended
Recommended
More Related Content
What's hot
Similar to Coolant Replacement Guide for 2010 Toyota Venza 2.7L Engine
Similar to Coolant Replacement Guide for 2010 Toyota Venza 2.7L Engine (20)
More from jjfksekdmejik
More from jjfksekdmejik (20)
Recently uploaded
Recently uploaded (20)
Coolant Replacement Guide for 2010 Toyota Venza 2.7L Engine
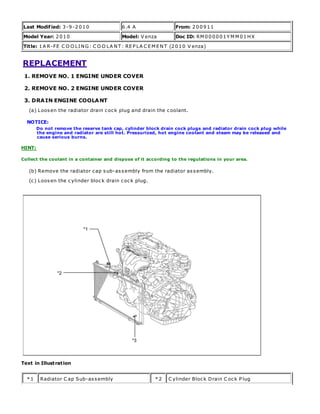
- 1. Last Modified: 3-9-2010 6.4 A From: 200911 Model Year: 2010 Model: V enza Doc ID: RM 000001Y M M 01 HX Title: 1A R-FE C O O LING: C O O LA NT : REP LA C EM ENT (2010 V enza) REPLACEMENT 1. REMOVE NO. 1 ENGINE UNDER COVER 2. REMOVE NO. 2 ENGINE UNDER COVER 3. DRAIN ENGINE COOLANT (a) Loosen the radiator drain cock plug and drain the coolant. NOTICE: Do not remove the reserve tank cap, cylinder block drain cock plugs and radiator drain cock plug while the engine and radiator are still hot. Pressurized, hot engine coolant and steam may be released and cause serious burns. HINT: Collect the coolant in a container and dispose of it according to the regulations in your area. (b) Remove the radiator cap sub-assembly from the radiator assembly. (c) Loosen the cylinder block drain cock plug. Text in Illustration *1 Radiator C ap Sub-assembly *2 C ylinder Bloc k Drain C ock P lug
- 2. *3 Radiator Drain C ock P lug - - 4. ADD ENGINE COOLANT (a) T ighten the radiator drain cock plug by hand. (b) T ighten the cylinder block drain c ock plug. Torque: 13 N·m (130 kgf·cm, 9ft·lbf) (c) Slowly fill the radiator with T O Y O T A Super Long Life C oolant (SLLC ). Standard C apacity: 7.1 liters (7.5 U S qts, 6.2 lmp. qts) HINT: T O Y O T A vehicles are filled with T O Y O T A SLLC at the factory. In order to avoid damage to the engine cooling sys tem and other technical problems, only use T O Y O T A SLLC or similar high quality ethylene glycol based non-silicate, non-amine, non-nitrite, non-borate coolant with long-life hybrid organic acid technology (coolant with long-life hybrid organic acid technology is a combination of low phosphates and organic acids). C ontact your T O Y O T A dealer for further details. NOTICE: Never use water as a substitute for engine coolant. (d) Slowly pour coolant into the radiator reservoir tank until it reaches the full line. Text in Illustration *1 Full Line (e) Squeeze the No. 1 and No. 2 radiator hoses several times by hand, and then check the level of the coolant. If the coolant level is low, add coolant. (f) Bleed air from the cooling system. (1) Warm up the engine until the thermostat opens. While the thermostat is open, circulate the coolant for several minutes. HINT: The thermostat open timing can be confirmed by squeezing the No. 2 radiator hose by hand, and checking when the engine coolant starts to flow inside the hose. (2) M aintain the engine speed at 250 0 to 3000 rpm. (3) Squeeze the inlet and No. 1 and N o. 2 radiator hoses several times by hand to bleed air. CAUTION:
- 3. When squeezing the radiator hoses: Wear protective gloves. Be careful as the radiator hoses are hot. Keep your hands away from the cooling fans. NOTICE: M ake sure that the radiator reservoir still has some coolant in it. If the coolant temperature gauge indic ates an excessive temperature, turn off the engine and let it cool. If there is not enough coolant, the engine may overheat or be seriously damaged. If the radiator reservoir does not have enough coolant, perform the following: 1) stop the engine, 2) wait until the coolant has cooled down, and 3) add coolant until the reservoir is filled to the full line. (g) Stop the engine and wait until the engine coolant cools down. (h) A dd engine coolant to the full line on the radiator res ervoir. 5. INSPECT FOR COOLANT LEAK 6. INSTALL NO. 2 ENGINE UNDER COVER 7. INSTALL NO. 1 ENGINE UNDER COVER
- 4. Last Modified: 3-9-2010 6.4 A From: 200911 Model Year: 2010 Model: V enza Doc ID: RM 000001Y M M 01 IX Title: 2GR-FE C O O LING: C O O LA NT : REP LA C EM ENT (2010 V enza) REPLACEMENT 1. REMOVE V-BANK COVER SUB-ASSEMBLY 2. REMOVE NO. 1 ENGINE UNDER COVER 3. REMOVE NO. 2 ENGINE UNDER COVER 4. DRAIN ENGINE COOLANT (a) Loosen the radiator drain cock plug and drain the coolant. NOTICE: Do not remove the reserve tank cap, cylinder block drain cock plugs and radiator drain cock plug while the engine and radiator are still hot. Pressurized, hot engine coolant and steam may be released and cause serious burns. HINT: Collect the coolant in a container and dispose of it according to the regulations in your area. (b) Remove the radiator cap sub-assembly from the radiator assembly. (c) Loosen the 2 c ylinder block drain cock plugs. Text in Illustration
- 5. *1 A ir Drain C oc k P lug *2 Radiator C ap Sub-assembly *3 C ylinder Bloc k Drain C ock P lug *4 Radiator Drain C ock P lug 5. ADD ENGINE COOLANT (a) T ighten the radiator drain cock plug by hand. (b) T ighten the 2 c ylinder block drain cock plugs. Torque: 13 N·m (130 kgf·cm, 9ft·lbf) (c) Loosen the air drain cock plug on the water inlet housing. (d) A dd T O Y O T A Super Long Life C oolant (SLLC ) to the radiator inlet opening until coolant overflows from the air drain c ock hole. T hen tighten the air drain cock plug to the water inlet housing. Torque: 13 N·m (130 kgf·cm, 9ft·lbf) (e) Slowly fill the radiator with T O Y O T A Super Long Life C oolant (SLLC ). Standard capacity w/o Engine oil cooler 9.8 liters (10.4 U S qts, 8.6 lmp. qts) w/ Engine oil cooler 10.0 liters (10.6 U S qts, 8.8 lmp. qts ) HINT: T O Y O T A vehicles are filled with T O Y O T A SLLC at the factory. In order to avoid damage to the engine cooling sys tem and other technical problems, only use T O Y O T A SLLC or similar high quality ethylene glycol based non-silicate, non-amine, non-nitrite, non-borate coolant with long-life hybrid organic acid technology (coolant with long-life hybrid organic acid technology is a combination of low phosphates and organic acids). C ontact your T O Y O T A dealer for further details. NOTICE: Never use water as a substitute for engine coolant. (f) Slowly pour coolant into the radiator reservoir tank until it reaches the Full line. Text in Illustration *1 Full Line (g) Squeeze the No. 1 and No. 2 radiator hoses several times by hand, and then check the level of the coolant. If the coolant level is low, add coolant. (h) Bleed air from the cooling system.
- 6. (1) Warm up the engine until the thermostat opens. While the thermostat is open, circulate the coolant for several minutes. HINT: The thermostat open timing can be confirmed by squeezing the No. 2 radiator hose by hand, and checking when the engine coolant starts to flow inside the hose. (2) M aintain the engine speed at 250 0 to 3000 rpm. (3) Squeeze the inlet and No. 1 and N o. 2 radiator hoses several times by hand to bleed air. CAUTION: When squeezing the radiator hoses: Wear protective gloves. Be careful as the radiator hoses are hot. Keep your hands away from the cooling fans. NOTICE: M ake sure that the radiator reservoir still has some coolant in it. If the coolant temperature gauge indic ates an excessive temperature, turn off the engine and let it cool. If there is not enough coolant, the engine may overheat or be seriously damaged. If the radiator reservoir does not have enough coolant, perform the following: 1) stop the engine, 2) wait until the coolant has cooled down, and 3) add coolant until the reservoir is filled to the full line. (i) Stop the engine and wait until the engine coolant cools down. (j) A dd engine coolant to the Full line on the radiator res ervoir. 6. INSPECT FOR COOLANT LEAK 7. INSTALL NO. 2 ENGINE UNDER COVER 8. INSTALL NO. 1 ENGINE UNDER COVER 9. INSTALL V-BANK COVER SUB-ASSEMBLY
- 7. Last Modified: 3-9-2010 6.4 G From: 200911 Model Year: 2010 Model: V enza Doc ID: RM 000000Y FK02 V X Title: 2GR-FE C O O LING: C O O LING FA N E C U : O N-V EHIC LE INSP EC T IO N (2010 V enza) ON-VEHICLE INSPECTION 1. INSPECT COOLING FAN ECU (a) P ut the vehicle in the following conditions: (1) T urn the ignition switch off. (2) T he coolant temperature is less than 95°C (203°F). (3) T he battery voltage is between 9 and 14 V . (4) T he A /C switch is off. (b) C lamp the 400 A probe of an ammeter over the M + wire of each cooling fan motor. (c) T urn the ignition switch to O N and wait for approximately 10 seconds. C heck that the fans stop. (d) Start the engine. C heck that the fans are stopped with the engine idling. HINT: M ake sure that the engine coolant temperature is less than 95°C (203°F). M ake sure that the A /C switch is off. (e) C heck that the fans operate when the A /C switch is turned on (M A X C O O L and the magnetic clutch is operating). Standard C urrent: IT EM SP EC IFIED C O NDIT IO N C ooling fan motor 2 to 8 A No. 2 cooling fan motor 2 to 8 A HINT: The coolant temperature should be less than 95°C (203°F). (f) C heck that the fans operate when the engine coolant temperature sens or connector is disconnected. Standard C urrent: IT EM SP EC IFIED C O NDIT IO N C ooling fan motor 2 to 11 A No. 2 cooling fan motor 2 to 11 A (g) A fter the engine is warmed up, check that the fans operate as shown in the illustration.
- 8. HINT: T he coolant temperature at which the fans start operating is approximately 9 7°C (207°F). T his system can also be checked using the T echstream. Enter the following menus: P owertrain / Engine / Data Lis t / C oolant T emp.
- 9. Last Modified: 3-9-2010 6.4 K From: 200911 Model Year: 2010 Model: V enza Doc ID: RM 000001X9A 00 XX Title: 1A R-FE C O O LING: C O O LING FA N M O T O R: C O M P O NENT S (2010 V enza) COMPONENTS ILLUSTRATION
- 11. Last Modified: 3-9-2010 6.4 G From: 200911 Model Year: 2010 Model: V enza Doc ID: RM 00000202U 01 1X Title: 1A R-FE C O O LING: C O O LING FA N M O T O R: O N-V EHIC LE INSP EC T IO N (2010 V enza) ON-VEHICLE INSPECTION 1. INSPECT COOLING FAN MOTOR (a) C heck that the motor operates smoothly when the battery is connected to the cooling fan motor connector. Text in Illustration *1 C omponent without harness connected (C ooling fan motor) If the motor does not operate smoothly, replace the cooling fan motor. (b) C onnect the pic kup of a clamp-on ammeter over one of the 2 wires for the cooling fan motor. (c) M easure the current while the motor is operating. Standard C urrent: IT EM C O NDIT IO N SP EC IFIED C O NDIT IO N C ooling fan motor (w/o T owing package) 20°C (68°F) 11.8 to 14.8 A at 12 V C ooling fan motor (w/ T owing package) 20°C (68°F) 7.9 to 10.9 A at 12 V If the result is not as specified, replace the cooling fan motor. 2. INSPECT NO. 2 COOLING FAN MOTOR (a) C heck that the motor operates smoothly when the battery is connected to the No. 2 cooling fan motor connector. Text in Illustration *1 C omponent without harness connected (No. 2 cooling fan motor) If the motor does not operate smoothly, replace the No. 2 cooling fan motor. (b) C onnect the pic kup of a clamp-on ammeter over one of the 2 wires for the No. 2 cooling fan
- 12. motor. (c) M easure the current while the motor is operating. Standard C urrent: IT EM C O NDIT IO N SP EC IFIED C O NDIT IO N No. 2 cooling fan motor (w/o T owing package) 20°C (68°F) 7.9 to 10.9 A at 12 V No. 2 cooling fan motor (w/ T owing package) 20°C (68°F) 7.9 to 10.9 A at 12 V If the result is not as specified, replace the No. 2 cooling fan motor.
- 13. Thank you very much for your reading. Please Click Here. Then Get COMPLETE MANUAL. NO WAITING NOTE: If there is no response to click on the link above, please download the PDF document first and then click on it.
- 14. Last Modified: 3-9-2010 6.4 A From: 200911 Model Year: 2010 Model: V enza Doc ID: RM 000001X9801 8X Title: 1A R-FE C O O LING: C O O LING FA N M O T O R: INST A LLA T IO N (2010 V enza) INSTALLATION 1. INSTALL NO. 2 COOLING FAN MOTOR (a) Install the No. 2 cooling fan motor with the 3 screws . w/o Towing package - Torque: 2.6 N·m (26 kgf·cm, 23in·lbf) w/ Towing package - Torque: 3.9 N·m (40 kgf·cm, 35in·lbf) (b) C onnect the No. 2 cooling fan motor connector and 2 clamps.
- 15. 2. INSTALL COOLING FAN MOTOR (a) Install the cooling fan motor with the 3 screws. w/o Towing package - Torque: 2.6 N·m (26 kgf·cm, 23in·lbf) w/ Towing package - Torque: 3.9 N·m (40 kgf·cm, 35in·lbf) 3. INSTALL COOLING FAN MOTOR INSULATOR (a) Install the cooling fan motor insulator with the 2 bolts. Torque: 2.6 N·m (26 kgf·cm, 23in·lbf) 4. INSTALL NO. 2 FAN (a) Install the No. 2 fan with the nut.
- 16. Torque: 6.3 N·m (64 kgf·cm, 56in·lbf) 5. INSTALL FAN (a) Install the fan with the nut. Torque: 6.3 N·m (64 kgf·cm, 56in·lbf) 6. INSTALL RADIATOR ASSEMBLY AND FAN ASSEMBLY WITH MOTOR HINT:
- 17. Last Modified: 3-9-2010 6.4 A From: 200911 Model Year: 2010 Model: V enza Doc ID: RM 000001X9B01 7X Title: 1A R-FE C O O LING: C O O LING FA N M O T O R: REM O V A L (2010 V enza) REMOVAL 1. REMOVE RADIATOR ASSEMBLY AND FAN ASSEMBLY WITH MOTOR HINT: 2. REMOVE FAN (a) Remove the nut and fan. 3. REMOVE NO. 2 FAN (a) Remove the nut and No. 2 fan. 4. REMOVE COOLING FAN MOTOR INSULATOR (a) Remove the 2 bolts and cooling fan motor insulator.
- 18. 5. REMOVE COOLING FAN MOTOR (a) Remove the 3 s crews and cooling fan motor. 6. REMOVE NO. 2 COOLING FAN MOTOR (a) Disconnect the No. 2 cooling fan motor connector and 2 clamps.
- 19. (b) Remove the 3 s crews and No. 2 cooling fan motor.