Is Your BMW PDC Malfunctioning Discover How to Easily Reset It
2009 Toyota Tundra Service Repair Manual.pdf
1. 2009 ACCESSORIES AND EQUIPMENT
Engine Hood/Door - Tundra
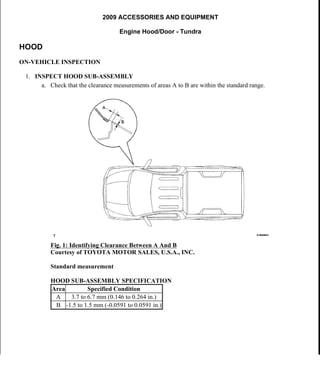
HOOD
ON-VEHICLE INSPECTION
1. INSPECT HOOD SUB-ASSEMBLY
a. Check that the clearance measurements of areas A to B are within the standard range.
Fig. 1: Identifying Clearance Between A And B
Courtesy of TOYOTA MOTOR SALES, U.S.A., INC.
Standard measurement
HOOD SUB-ASSEMBLY SPECIFICATION
Area Specified Condition
A 3.7 to 6.7 mm (0.146 to 0.264 in.)
B -1.5 to 1.5 mm (-0.0591 to 0.0591 in.)
2009 Toyota Tundra
2009 ACCESSORIES AND EQUIPMENT Engine Hood/Door - Tundra
2009 Toyota Tundra
2009 ACCESSORIES AND EQUIPMENT Engine Hood/Door - Tundra
2. Fig. 2: Identifying Centering And Standard Bolts
Courtesy of TOYOTA MOTOR SALES, U.S.A., INC.
ADJUSTMENT
HINT:
Centering bolts are used to mount the hood hinge and hood lock. The hood and hood lock cannot be
adjusted with the centering bolts on. Substitute the centering bolts with standard bolts (w/ washers) when
making adjustments.
A bolt without a torque specification is shown in the standard bolt chart (see SPECIFIED TORQUE
FOR STANDARD BOLTS ).
1. ADJUST HOOD SUB-ASSEMBLY
a. Adjust the hood's position.
1. Loosen the hood's 4 hinge bolts.
2. Move the hood and adjust the clearance between the hood and front fender.
3. Tighten the hood's 4 hinge bolts after the adjustment.
Torque: 13 N*m (133 kgf*cm, 10 ft.*lbf)
Fig. 3: Adjusting Hood's Hinge Bolts
Courtesy of TOYOTA MOTOR SALES, U.S.A., INC.
4. Adjust the cushion rubber so that the height of the hood and fender are aligned.
2009 Toyota Tundra
2009 ACCESSORIES AND EQUIPMENT Engine Hood/Door - Tundra
3. Fig. 4: Adjusting Cushion Rubber
Courtesy of TOYOTA MOTOR SALES, U.S.A., INC.
HINT:
Raise or lower the hood's front end by turning the cushion rubber.
b. Adjust the hood lock.
1. Using a screwdriver, remove the hood lock nut cap as shown in the illustration.
Fig. 5: Identifying Hood Lock Nut Cap
Courtesy of TOYOTA MOTOR SALES, U.S.A., INC.
HINT:
Tape the screwdriver tip before use.
2. Loosen the 2 bolts and hood lock nut.
3. Adjust the hood lock position so that the striker can enter it smoothly.
2009 Toyota Tundra
2009 ACCESSORIES AND EQUIPMENT Engine Hood/Door - Tundra
4. Fig. 6: Adjusting Hood Lock
Courtesy of TOYOTA MOTOR SALES, U.S.A., INC.
4. Tighten the bolts and nut after the adjustment.
Torque: 8.0 N*m (82 kgf*cm, 71 in.*lbf)
5. Install a new cap.
HOOD SUPPORT
COMPONENTS
2009 Toyota Tundra
2009 ACCESSORIES AND EQUIPMENT Engine Hood/Door - Tundra
6. Fig. 7: Identifying Hood Support Components With Torque Specification
Courtesy of TOYOTA MOTOR SALES, U.S.A., INC.
REMOVAL
1. REMOVE HOOD SUPPORT ASSEMBLY LH
a. Using a screwdriver, remove the hood support assembly while releasing the 2 clips.
2009 Toyota Tundra
2009 ACCESSORIES AND EQUIPMENT Engine Hood/Door - Tundra
7. Fig. 8: Identifying Hood Support Assembly
Courtesy of TOYOTA MOTOR SALES, U.S.A., INC.
HINT:
Tape the screwdriver tip before use.
2. REMOVE NO. 1 HOOD SUPPORT BOLT
a. Remove the hood support bolt.
Fig. 9: Identifying Hood Support Bolt
Courtesy of TOYOTA MOTOR SALES, U.S.A., INC.
INSTALLATION
CAUTION: Remove the hood support while supporting the hood by hand.
CAUTION: Remove the hood support bolt while supporting the hood by
hand.
NOTE: As much as possible avoid touching the stroke portions of the rod to
prevent foreign matter from attaching to it. Be sure to hold the cylinders
while servicing.
Do not wear cotton gloves or other similar materials when handling the
2009 Toyota Tundra
2009 ACCESSORIES AND EQUIPMENT Engine Hood/Door - Tundra
8. HINT:
Use the same procedures for the RH side and LH side.
The procedures listed below are for the LH side.
1. INSTALL NO. 1 HOOD SUPPORT BOLT
a. Install the hood support bolt.
Torque: 22 N*m (224 kgf*cm, 16 ft.*lbf)
Fig. 10: Identifying Hood Support Bolt
Courtesy of TOYOTA MOTOR SALES, U.S.A., INC.
2. INSTALL HOOD SUPPORT ASSEMBLY LH
a. Install the hood support assembly.
Fig. 11: Installing Hood Support Assembly
Courtesy of TOYOTA MOTOR SALES, U.S.A., INC.
rod. Fibers may attach to the rod and result in gas leaks.
Do not apply any load to the cylinders in the horizontal direction in order
to prevent the rod from being deformed.
CAUTION: Install the hood support bolt while supporting the hood by
hand.
2009 Toyota Tundra
2009 ACCESSORIES AND EQUIPMENT Engine Hood/Door - Tundra
9. DISPOSAL
HINT:
Use the same procedures for the RH side and LH side.
The procedures listed below are for the LH side.
1. DISPOSE OF HOOD SUPPORT ASSEMBLY
a. Horizontally fix the hood support in a vise with the piston-rod pulled out.
b. Wear safety glasses. Gradually cut a part between A and B shown in the illustration using a metal
saw and gradually release the gas.
Fig. 12: Identifying Cutting Area A And B
Courtesy of TOYOTA MOTOR SALES, U.S.A., INC.
HOOD LOCK CONTROL CABLE ASSEMBLY
COMPONENTS
CAUTION: Install the hood support while supporting the hood by hand.
NOTE: Check that the hood support is engaged in the ball joint and it cannot
be pulled out.
CAUTION: Be careful when drilling because shards of metal may fly about.
Always use the proper safety equipment.
NOTE: The gas is colorless, odorless and nonpoisonous.
2009 Toyota Tundra
2009 ACCESSORIES AND EQUIPMENT Engine Hood/Door - Tundra
10. Fig. 13: Identifying Hood Lock Control Cable Assembly Replacement Components (1 Of 3)
Courtesy of TOYOTA MOTOR SALES, U.S.A., INC.
2009 Toyota Tundra
2009 ACCESSORIES AND EQUIPMENT Engine Hood/Door - Tundra
11. Fig. 14: Identifying Hood Lock Control Cable Assembly Replacement Components With Torque
Specifications (2 Of 3)
Courtesy of TOYOTA MOTOR SALES, U.S.A., INC.
Fig. 15: Identifying Hood Lock Control Cable Assembly Replacement Components With Torque
2009 Toyota Tundra
2009 ACCESSORIES AND EQUIPMENT Engine Hood/Door - Tundra
12. Specifications (3 Of 3)
Courtesy of TOYOTA MOTOR SALES, U.S.A., INC.
REMOVAL
1. REMOVE HOOD LOCK CONTROL CABLE COVER
Fig. 16: Identifying Cable Cover Clamp And Screw
Courtesy of TOYOTA MOTOR SALES, U.S.A., INC.
a. Remove the screw.
b. Remove the cap and nut.
c. Detach the clamp and remove the cable cover.
2. REMOVE HOOD LOCK ASSEMBLY
Fig. 17: Identifying Hood Lock Assembly
Courtesy of TOYOTA MOTOR SALES, U.S.A., INC.
a. Remove the cap.
b. Remove the 2 bolts and nut.
c. Remove the hood lock.
d. w/ Theft Deterrent System:
1. Disconnect the hood lock control cable.
3. REMOVE HOOD LOCK CONTROL LEVER SUB-ASSEMBLY
2009 Toyota Tundra
2009 ACCESSORIES AND EQUIPMENT Engine Hood/Door - Tundra
13. Fig. 18: Identifying Claws On Hood Lock Control Lever Sub-Assembly
Courtesy of TOYOTA MOTOR SALES, U.S.A., INC.
a. Detach the 2 claws.
b. Disconnect the hood lock control cable and remove the hood lock lever.
4. REMOVE HOOD LOCK CONTROL CABLE ASSEMBLY
Fig. 19: Identifying Hood Lock Control Cable
Courtesy of TOYOTA MOTOR SALES, U.S.A., INC.
a. Using a screwdriver, detach the cable from the clamps shown in the illustration.
HINT:
Tape the screwdriver tip before use.
2009 Toyota Tundra
2009 ACCESSORIES AND EQUIPMENT Engine Hood/Door - Tundra
14. b. Pull the cable from the engine room and remove it.
INSTALLATION
HINT:
A bolt without a torque specification is shown in the standard bolt chart (see SPECIFIED TORQUE FOR
STANDARD BOLTS ).
1. INSTALL HOOD LOCK CONTROL CABLE ASSEMBLY
a. Pass the cable into the engine room.
b. Pass the cable rear side through the grommet until the cable stopper is attached to the grommet.
c. Pass the cable front side through the upper radiator support.
d. Attach the cable to the clamps as shown in the illustration.
Fig. 20: Identifying Hood Lock Control Cable
Courtesy of TOYOTA MOTOR SALES, U.S.A., INC.
2. INSTALL HOOD LOCK CONTROL LEVER SUB-ASSEMBLY
a. Connect the hood lock control cable to the hood lock lever.
b. Attach the 2 claws to install the hood lock lever
2009 Toyota Tundra
2009 ACCESSORIES AND EQUIPMENT Engine Hood/Door - Tundra
15. Fig. 21: Identifying Claws On Hood Lock Control Lever Sub-Assembly
Courtesy of TOYOTA MOTOR SALES, U.S.A., INC.
3. INSTALL HOOD LOCK ASSEMBLY
a. Apply MP grease to the sliding areas of the lock.
Fig. 22: Identifying Applying Sliding Areas Of Lock
Courtesy of TOYOTA MOTOR SALES, U.S.A., INC.
b. Connect the hood lock control cable.
c. Install the hood lock.
d. Install the 2 bolts and nut.
Torque: 8.0 N*m (82 kgf*cm, 71 in.*lbf)
Fig. 23: Identifying Hood Lock Assembly
Courtesy of TOYOTA MOTOR SALES, U.S.A., INC.
2009 Toyota Tundra
2009 ACCESSORIES AND EQUIPMENT Engine Hood/Door - Tundra
16. e. Install a new cap.
f. w/ Theft Deterrent System:
Connect the connector.
4. INSTALL HOOD LOCK CONTROL CABLE COVER
Fig. 24: Identifying Cable Cover Clamp And Screw
Courtesy of TOYOTA MOTOR SALES, U.S.A., INC.
a. Attach the clamp to install the cable cover.
b. Install the screw and nut.
FRONT DOOR (FOR DOUBLE CAB)
COMPONENTS
2009 Toyota Tundra
2009 ACCESSORIES AND EQUIPMENT Engine Hood/Door - Tundra
17. Fig. 25: Identifying Front Door Replacement Components (1 Of 5) (For Double Cab)
Courtesy of TOYOTA MOTOR SALES, U.S.A., INC.
2009 Toyota Tundra
2009 ACCESSORIES AND EQUIPMENT Engine Hood/Door - Tundra
18. Fig. 26: Identifying Front Door Replacement Components With Torque Specifications (2 Of 5) (For
Double Cab)
Courtesy of TOYOTA MOTOR SALES, U.S.A., INC.
2009 Toyota Tundra
2009 ACCESSORIES AND EQUIPMENT Engine Hood/Door - Tundra
19. Fig. 27: Identifying Front Door Replacement Components (3 Of 5) (For Double Cab)
Courtesy of TOYOTA MOTOR SALES, U.S.A., INC.
2009 Toyota Tundra
2009 ACCESSORIES AND EQUIPMENT Engine Hood/Door - Tundra
20. Fig. 28: Identifying Front Door Replacement Components With Torque Specifications (4 Of 5) (For
Double Cab)
Courtesy of TOYOTA MOTOR SALES, U.S.A., INC.
2009 Toyota Tundra
2009 ACCESSORIES AND EQUIPMENT Engine Hood/Door - Tundra
21. Thank you very much
for your reading.
Please Click Here
Then Get More
Information.