SlideShare a Scribd company logo
1 of 18
PHP, MYSQL, APACHE, PHPMYADMIN on AWS EC2
Setting up AWS EC2 Instance:-
Signup for amazon AWS ec2 account. You can start with free tier account. Free tier account
permits usage of 750 hours per month for free if you do not select any paid option.
Login to ec2 console https://console.aws.amazon.com/ec2. Goto launch instance. You will get a
list of machine images to choose from, you can select any from the free tier eligible depending
onto your need. But lets go ahead with first image amazon ami 64 bit.
Next step is to choose instance type. We can go with first one as it is free tier eligible.
Click Next configure instance details.
You can choose number of instances network settings etc. Do not edit anything unless you are
familiar with these configurations. Just one thing to note here, check the check box protect
against accidental termination. This is useful to prevent data loss.
Click add storage to choose volume to store data. You can configure size and type according to
your requirements. Max 30 gb is permitted for free tier usage. You can add multiple volumes to
your instance.
Next step is to tag instance through a key - value pair. For ease of use put key as Name and
value as Webserver.
Next step is to configure security group. Here you can set rules for ssh, tcp and other protocols.
You can set permissions for ip ranges. You can create your own or can go with default security
group. if after setting everything your site is not running on browser then check if http protocol is
allowed here or not.
Now Click on review and launch. It will open a popup for volume type. Choose any that suits
your needs or you can go ahead with default selected one. Click Next and the launch.
It will now ask for creating keys or choosing existing keys. Go with choosing new keys if you are
setting first instance. Create the key and download it. This is just one time key save it else you
may need to create new instance. This is in pem format public key.
Now we may need to set elastic IP because public dns will change once you terminate or reboot
your instance. Don;t create more than one elastic ip for now and as soon as you create
associate it with instance. You won’t be charged if you associate it with instance else you will
get charged.
Thanks it is done now. Now you can go ahead with connecting it through ssh or ftp and
installing php, mysql, apache envrionments.
Connecting to AWS through SSH/FTP:-
Open the puttygen load the pem file downloaded from aws while creating keys. Load the key
and and save private key.
To connect through ftp. oepn filezilla click edit then settings under edit. Now click sftp and add
ppk key. It may ask you for conversion do the conversion.
Click ok then add hostname as public dns/publicip/elastic ip, username as ec2-user port as 22.
Click connect you will be connected. Now go to /var/www/html to view files.
To connect to server open putty click session on left. Type in hostname, incase of aws it will be
public dns or public ip or the elastic ip associated with the instance. Put some name to identify
the connection under saved session and save it.
Now click on SSH is left and then click Auth under SSH. Browse the ppk file you have
generated through puttygen from pem file. Then click session on and save it again.
Then click open to connect to the instance. Login with ec2-user
Once you press enter, you will get logged in successfully.
If you get any error like connection time out or other. Login to your amazon aws on browser.
Select your instance and on go to security group. Now edit inbound connection to check if TCP
is open for your ip address or not. Incase if TCP or ssh not on make them available for your ip.
Installations:-
● Inorder to install php, mysql, phpmyadmin and apache, login as root.
○ [root@localhost ~]# sudo su -
● To Install PHP and Apache
○ [root@localhost ~]# sudo yum install php-mysql php php-xml php-mcrypt
php-mbstring php-cli mysql httpd
● To start apache automatically while booting
○ [root@localhost ~]# chkconfig --levels 235 httpd on
● Open the file /etc/httpd/conf/httpd.conf
Find “#ServerName www.example.com:80″ (line no : 276 ) .
and add this line below . “ServerName youripaddress:80″
#
#ServerName www.example.com:80
ServerName 192.168.141.22:80
● Now restart apache service
○ [root@localhost ~]# service httpd restart
● Now you have successfully configured apache web server . open your browser and type
the ip address in the address bar and hit enter . you can see the test page of your web
server .
● To install Mysql server
○ [root@localhost ~]# sudo yum install mysql-server
○ [root@localhost ~]# sudo /etc/init.d/mysqld start
● To start apache automatically while booting
○ [root@localhost ~]# chkconfig --levels 235 mysqld on
● To secure mysql using username and password
○ [root@localhost ~]# mysqladmin -u root password '[PASSWORD]'
where PASSWORD is the password you want to choose, don’t include square
brackets. Simply use like example below:-
[root@localhost ~]# mysqladmin -u root password ‘root@123’
● To install phpmyadmin
○ [root@localhost ~]# sudo yum install phpmyadmin
○ Might be you will get no package find message. This means you may need to
add repository to install phpmyadmin. Choose the repository according to OS you
have.
CentOS/RHEL 6:
# rpm -Uvh http://rpms.famillecollet.com/enterprise/remi-release-6.rpm
CentOS/RHEL 5:
# rpm -Uvh http://rpms.famillecollet.com/enterprise/remi-release-5.rpm
Fedora 20:
# rpm -Uvh http://rpms.famillecollet.com/remi-release-20.rpm
Fedora 19:
# rpm -Uvh http://rpms.famillecollet.com/remi-release-19.rpm
Fedora 18:
# rpm -Uvh http://rpms.famillecollet.com/remi-release-18.rpm
○ Enable the repository through
[root@localhost ~]# yum --enablerepo=remi install phpMyAdmin
○ phpMyAdmin by default allowed to access from localhost only. If you want to
make it accessible from remote computers edit
/etc/httpd/conf.d/phpMyAdmin.conf and update all 127.0.0.1 with your network
like below or enable phpMyAdmin access for everyone.
Alias /phpMyAdmin /usr/share/phpMyAdmin
Alias /phpmyadmin /usr/share/phpMyAdmin
## Comment below section to allow everyone
<Directory /usr/share/phpMyAdmin/>
<IfModule !mod_authz_core.c>
Order Deny,Allow
Deny from All
Allow from 192.168.1.0/24
Allow from ::1
</IfModule>
</Directory>
<Directory /usr/share/phpMyAdmin/libraries/>
Order Deny,Allow
Deny from All
Allow from None
</Directory>
<Directory /usr/share/phpMyAdmin/setup/lib/>
Order Deny,Allow
Deny from All
Allow from None
</Directory>
<Directory /usr/share/phpMyAdmin/setup/frames/>
Order Deny,Allow
Deny from All
Allow from None
</Directory>
● Could not connect: Can’t connect to local MySQL server through socket
‘/var/lib/mysql/mysql.sock’ (2)
This means your mysql server service is stopped , you must start the service
[root@localhost ~]# service mysqld start
● Inorder for your domain to point the aws ec2 hosting you can use elastic ip address and
add this address as A record into DNS Zone file on domain registrar. The other way will
be through route 53 service. Fow now lets go ahead with elastic ip as A record.
● Connect to amazon ec2 through putty. sudo as root through sudo su - .
Open up /etc/hosts file down to localhost entry you can create new entry as
○ 54.78.90.21 xyz.com
where 54.78.90.21 is the elastic ip address and domain name is xyz.com
● Now open /etc/httpd/conf/httpd.conf file here we will be adding up virtual host to serve
domain xyz.com. We can put multiple virtual host entries inorder to host multiple
websites.
Uncomment NameVirtualHost *:80, Uncomment <VirtualHost *:80> and further lines till
</VirtualHost>
Add your domain name in front of ServerName , Change path of DocumentRoot to
/var/www/html/yourdomainname.com/
Save the file and run service httpd restart
Upload your files to /var/www/html/yourdomainname.com
Its done now. You can now run your website on browser.
● How to do using route 53. Activate route 53 service through aws console. Open the
Amazon Route 53 console at https://console.aws.amazon.com/route53/. In the Route 53:
Hosted Zones window, click Create Hosted Zone.
In the Domain Name box, type your custom domain name.
● Click the Create Hosted Zone button at the bottom of the pane.
● When the hosted zone is successfully created, in the list of domain names, select the
check box that corresponds to your domain name. In the details pane, under Delegation
Set, Amazon Route 53 displays the set of name servers that have been allocated for
your domain. You can use this nameservers to put on domain registrar’s DNS zone file.
Now inorder for connecting the DNS Hosting Route 53 to Files hosting EC2. We may need to
configure A record entry on Route 53 with the elastic ip of EC2.
● Go to Record sets, click create record set. Under Create Record Set, do the following:
○ In the Name box, accept the default. The root domain is already entered for you.
○ In the Type box, select A — IPv4 address to create an A record for your domain.
○ Choose aliasing as No and enter your elastic ip address as target.
○ In the Routing Policy box, select Simple.
○ Leave Evaluate Target Health set to No.
○ DNS propogataion may take from 2 hrs to 48 hrs. After DNS propogation there
may be case where your site may not work on www. So inorder to make it run on
www. Use the same process and create new record set as A record. The only
difference is put www into the name box and you are done.
Thanks:-
Thankyou all for reading this with patience. I expect by reading this you may be able
setup your own server and hosting environments. Excuse me for typo mistakes if any.
Though I have tried to cover almost every aspect but might be the case you may face
some issues while doing this. Don’t worry feel free to drop me any queries on
prasoon.sharma1983@gmail.com

More Related Content

Viewers also liked

RailsAdmin - Overview and Best practices
RailsAdmin - Overview and Best practicesRailsAdmin - Overview and Best practices
RailsAdmin - Overview and Best practicesBenoit Bénézech
 
How To Create RDS Database for WordPress in AWS on RHEL 7 or CentOS 7
How To Create RDS Database for WordPress in AWS on RHEL 7 or CentOS 7How To Create RDS Database for WordPress in AWS on RHEL 7 or CentOS 7
How To Create RDS Database for WordPress in AWS on RHEL 7 or CentOS 7VCP Muthukrishna
 
Formulario HTML-PHP dirigido a una Base de datos
Formulario HTML-PHP dirigido a una Base de datosFormulario HTML-PHP dirigido a una Base de datos
Formulario HTML-PHP dirigido a una Base de datosCursando Desarrollo Web
 
RIP Alan Rickman.
 RIP Alan Rickman. RIP Alan Rickman.
RIP Alan Rickman.Makala D.
 
Getting Started with Amazon EC2 and AWS Compute Services
Getting Started with Amazon EC2 and AWS Compute ServicesGetting Started with Amazon EC2 and AWS Compute Services
Getting Started with Amazon EC2 and AWS Compute ServicesAmazon Web Services
 
How I learned to stop worrying and love the cloud
How I learned to stop worrying and love the cloudHow I learned to stop worrying and love the cloud
How I learned to stop worrying and love the cloudShlomo Swidler
 
Cuaderno de-ejercicios-y-practicas-php
Cuaderno de-ejercicios-y-practicas-phpCuaderno de-ejercicios-y-practicas-php
Cuaderno de-ejercicios-y-practicas-phplgcj1989
 
Web Services PHP Tutorial
Web Services PHP TutorialWeb Services PHP Tutorial
Web Services PHP TutorialLorna Mitchell
 
Unit Testng with PHP Unit - A Step by Step Training
Unit Testng with PHP Unit - A Step by Step TrainingUnit Testng with PHP Unit - A Step by Step Training
Unit Testng with PHP Unit - A Step by Step TrainingRam Awadh Prasad, PMP
 
On-demand Transport Technology Companies around the World - Top 30 Players
On-demand Transport Technology Companies around the World - Top 30 PlayersOn-demand Transport Technology Companies around the World - Top 30 Players
On-demand Transport Technology Companies around the World - Top 30 PlayersValoriser Consultants
 
TEDx Manchester: AI & The Future of Work
TEDx Manchester: AI & The Future of WorkTEDx Manchester: AI & The Future of Work
TEDx Manchester: AI & The Future of WorkVolker Hirsch
 

Viewers also liked (12)

RailsAdmin - Overview and Best practices
RailsAdmin - Overview and Best practicesRailsAdmin - Overview and Best practices
RailsAdmin - Overview and Best practices
 
Tema4[php]
Tema4[php]Tema4[php]
Tema4[php]
 
How To Create RDS Database for WordPress in AWS on RHEL 7 or CentOS 7
How To Create RDS Database for WordPress in AWS on RHEL 7 or CentOS 7How To Create RDS Database for WordPress in AWS on RHEL 7 or CentOS 7
How To Create RDS Database for WordPress in AWS on RHEL 7 or CentOS 7
 
Formulario HTML-PHP dirigido a una Base de datos
Formulario HTML-PHP dirigido a una Base de datosFormulario HTML-PHP dirigido a una Base de datos
Formulario HTML-PHP dirigido a una Base de datos
 
RIP Alan Rickman.
 RIP Alan Rickman. RIP Alan Rickman.
RIP Alan Rickman.
 
Getting Started with Amazon EC2 and AWS Compute Services
Getting Started with Amazon EC2 and AWS Compute ServicesGetting Started with Amazon EC2 and AWS Compute Services
Getting Started with Amazon EC2 and AWS Compute Services
 
How I learned to stop worrying and love the cloud
How I learned to stop worrying and love the cloudHow I learned to stop worrying and love the cloud
How I learned to stop worrying and love the cloud
 
Cuaderno de-ejercicios-y-practicas-php
Cuaderno de-ejercicios-y-practicas-phpCuaderno de-ejercicios-y-practicas-php
Cuaderno de-ejercicios-y-practicas-php
 
Web Services PHP Tutorial
Web Services PHP TutorialWeb Services PHP Tutorial
Web Services PHP Tutorial
 
Unit Testng with PHP Unit - A Step by Step Training
Unit Testng with PHP Unit - A Step by Step TrainingUnit Testng with PHP Unit - A Step by Step Training
Unit Testng with PHP Unit - A Step by Step Training
 
On-demand Transport Technology Companies around the World - Top 30 Players
On-demand Transport Technology Companies around the World - Top 30 PlayersOn-demand Transport Technology Companies around the World - Top 30 Players
On-demand Transport Technology Companies around the World - Top 30 Players
 
TEDx Manchester: AI & The Future of Work
TEDx Manchester: AI & The Future of WorkTEDx Manchester: AI & The Future of Work
TEDx Manchester: AI & The Future of Work
 

Recently uploaded

AWS Community Day CPH - Three problems of Terraform
AWS Community Day CPH - Three problems of TerraformAWS Community Day CPH - Three problems of Terraform
AWS Community Day CPH - Three problems of TerraformAndrey Devyatkin
 
Rising Above_ Dubai Floods and the Fortitude of Dubai International Airport.pdf
Rising Above_ Dubai Floods and the Fortitude of Dubai International Airport.pdfRising Above_ Dubai Floods and the Fortitude of Dubai International Airport.pdf
Rising Above_ Dubai Floods and the Fortitude of Dubai International Airport.pdfOrbitshub
 
presentation ICT roal in 21st century education
presentation ICT roal in 21st century educationpresentation ICT roal in 21st century education
presentation ICT roal in 21st century educationjfdjdjcjdnsjd
 
Connector Corner: Accelerate revenue generation using UiPath API-centric busi...
Connector Corner: Accelerate revenue generation using UiPath API-centric busi...Connector Corner: Accelerate revenue generation using UiPath API-centric busi...
Connector Corner: Accelerate revenue generation using UiPath API-centric busi...DianaGray10
 
TrustArc Webinar - Unlock the Power of AI-Driven Data Discovery
TrustArc Webinar - Unlock the Power of AI-Driven Data DiscoveryTrustArc Webinar - Unlock the Power of AI-Driven Data Discovery
TrustArc Webinar - Unlock the Power of AI-Driven Data DiscoveryTrustArc
 
Mcleodganj Call Girls 🥰 8617370543 Service Offer VIP Hot Model
Mcleodganj Call Girls 🥰 8617370543 Service Offer VIP Hot ModelMcleodganj Call Girls 🥰 8617370543 Service Offer VIP Hot Model
Mcleodganj Call Girls 🥰 8617370543 Service Offer VIP Hot ModelDeepika Singh
 
Six Myths about Ontologies: The Basics of Formal Ontology
Six Myths about Ontologies: The Basics of Formal OntologySix Myths about Ontologies: The Basics of Formal Ontology
Six Myths about Ontologies: The Basics of Formal Ontologyjohnbeverley2021
 
Web Form Automation for Bonterra Impact Management (fka Social Solutions Apri...
Web Form Automation for Bonterra Impact Management (fka Social Solutions Apri...Web Form Automation for Bonterra Impact Management (fka Social Solutions Apri...
Web Form Automation for Bonterra Impact Management (fka Social Solutions Apri...Jeffrey Haguewood
 
Apidays New York 2024 - Scaling API-first by Ian Reasor and Radu Cotescu, Adobe
Apidays New York 2024 - Scaling API-first by Ian Reasor and Radu Cotescu, AdobeApidays New York 2024 - Scaling API-first by Ian Reasor and Radu Cotescu, Adobe
Apidays New York 2024 - Scaling API-first by Ian Reasor and Radu Cotescu, Adobeapidays
 
Navigating the Deluge_ Dubai Floods and the Resilience of Dubai International...
Navigating the Deluge_ Dubai Floods and the Resilience of Dubai International...Navigating the Deluge_ Dubai Floods and the Resilience of Dubai International...
Navigating the Deluge_ Dubai Floods and the Resilience of Dubai International...Orbitshub
 
Vector Search -An Introduction in Oracle Database 23ai.pptx
Vector Search -An Introduction in Oracle Database 23ai.pptxVector Search -An Introduction in Oracle Database 23ai.pptx
Vector Search -An Introduction in Oracle Database 23ai.pptxRemote DBA Services
 
Platformless Horizons for Digital Adaptability
Platformless Horizons for Digital AdaptabilityPlatformless Horizons for Digital Adaptability
Platformless Horizons for Digital AdaptabilityWSO2
 
ICT role in 21st century education and its challenges
ICT role in 21st century education and its challengesICT role in 21st century education and its challenges
ICT role in 21st century education and its challengesrafiqahmad00786416
 
Apidays New York 2024 - Accelerating FinTech Innovation by Vasa Krishnan, Fin...
Apidays New York 2024 - Accelerating FinTech Innovation by Vasa Krishnan, Fin...Apidays New York 2024 - Accelerating FinTech Innovation by Vasa Krishnan, Fin...
Apidays New York 2024 - Accelerating FinTech Innovation by Vasa Krishnan, Fin...apidays
 
Apidays New York 2024 - The Good, the Bad and the Governed by David O'Neill, ...
Apidays New York 2024 - The Good, the Bad and the Governed by David O'Neill, ...Apidays New York 2024 - The Good, the Bad and the Governed by David O'Neill, ...
Apidays New York 2024 - The Good, the Bad and the Governed by David O'Neill, ...apidays
 
Apidays New York 2024 - Passkeys: Developing APIs to enable passwordless auth...
Apidays New York 2024 - Passkeys: Developing APIs to enable passwordless auth...Apidays New York 2024 - Passkeys: Developing APIs to enable passwordless auth...
Apidays New York 2024 - Passkeys: Developing APIs to enable passwordless auth...apidays
 
Artificial Intelligence Chap.5 : Uncertainty
Artificial Intelligence Chap.5 : UncertaintyArtificial Intelligence Chap.5 : Uncertainty
Artificial Intelligence Chap.5 : UncertaintyKhushali Kathiriya
 
ProductAnonymous-April2024-WinProductDiscovery-MelissaKlemke
ProductAnonymous-April2024-WinProductDiscovery-MelissaKlemkeProductAnonymous-April2024-WinProductDiscovery-MelissaKlemke
ProductAnonymous-April2024-WinProductDiscovery-MelissaKlemkeProduct Anonymous
 
Cloud Frontiers: A Deep Dive into Serverless Spatial Data and FME
Cloud Frontiers:  A Deep Dive into Serverless Spatial Data and FMECloud Frontiers:  A Deep Dive into Serverless Spatial Data and FME
Cloud Frontiers: A Deep Dive into Serverless Spatial Data and FMESafe Software
 
DEV meet-up UiPath Document Understanding May 7 2024 Amsterdam
DEV meet-up UiPath Document Understanding May 7 2024 AmsterdamDEV meet-up UiPath Document Understanding May 7 2024 Amsterdam
DEV meet-up UiPath Document Understanding May 7 2024 AmsterdamUiPathCommunity
 

Recently uploaded (20)

AWS Community Day CPH - Three problems of Terraform
AWS Community Day CPH - Three problems of TerraformAWS Community Day CPH - Three problems of Terraform
AWS Community Day CPH - Three problems of Terraform
 
Rising Above_ Dubai Floods and the Fortitude of Dubai International Airport.pdf
Rising Above_ Dubai Floods and the Fortitude of Dubai International Airport.pdfRising Above_ Dubai Floods and the Fortitude of Dubai International Airport.pdf
Rising Above_ Dubai Floods and the Fortitude of Dubai International Airport.pdf
 
presentation ICT roal in 21st century education
presentation ICT roal in 21st century educationpresentation ICT roal in 21st century education
presentation ICT roal in 21st century education
 
Connector Corner: Accelerate revenue generation using UiPath API-centric busi...
Connector Corner: Accelerate revenue generation using UiPath API-centric busi...Connector Corner: Accelerate revenue generation using UiPath API-centric busi...
Connector Corner: Accelerate revenue generation using UiPath API-centric busi...
 
TrustArc Webinar - Unlock the Power of AI-Driven Data Discovery
TrustArc Webinar - Unlock the Power of AI-Driven Data DiscoveryTrustArc Webinar - Unlock the Power of AI-Driven Data Discovery
TrustArc Webinar - Unlock the Power of AI-Driven Data Discovery
 
Mcleodganj Call Girls 🥰 8617370543 Service Offer VIP Hot Model
Mcleodganj Call Girls 🥰 8617370543 Service Offer VIP Hot ModelMcleodganj Call Girls 🥰 8617370543 Service Offer VIP Hot Model
Mcleodganj Call Girls 🥰 8617370543 Service Offer VIP Hot Model
 
Six Myths about Ontologies: The Basics of Formal Ontology
Six Myths about Ontologies: The Basics of Formal OntologySix Myths about Ontologies: The Basics of Formal Ontology
Six Myths about Ontologies: The Basics of Formal Ontology
 
Web Form Automation for Bonterra Impact Management (fka Social Solutions Apri...
Web Form Automation for Bonterra Impact Management (fka Social Solutions Apri...Web Form Automation for Bonterra Impact Management (fka Social Solutions Apri...
Web Form Automation for Bonterra Impact Management (fka Social Solutions Apri...
 
Apidays New York 2024 - Scaling API-first by Ian Reasor and Radu Cotescu, Adobe
Apidays New York 2024 - Scaling API-first by Ian Reasor and Radu Cotescu, AdobeApidays New York 2024 - Scaling API-first by Ian Reasor and Radu Cotescu, Adobe
Apidays New York 2024 - Scaling API-first by Ian Reasor and Radu Cotescu, Adobe
 
Navigating the Deluge_ Dubai Floods and the Resilience of Dubai International...
Navigating the Deluge_ Dubai Floods and the Resilience of Dubai International...Navigating the Deluge_ Dubai Floods and the Resilience of Dubai International...
Navigating the Deluge_ Dubai Floods and the Resilience of Dubai International...
 
Vector Search -An Introduction in Oracle Database 23ai.pptx
Vector Search -An Introduction in Oracle Database 23ai.pptxVector Search -An Introduction in Oracle Database 23ai.pptx
Vector Search -An Introduction in Oracle Database 23ai.pptx
 
Platformless Horizons for Digital Adaptability
Platformless Horizons for Digital AdaptabilityPlatformless Horizons for Digital Adaptability
Platformless Horizons for Digital Adaptability
 
ICT role in 21st century education and its challenges
ICT role in 21st century education and its challengesICT role in 21st century education and its challenges
ICT role in 21st century education and its challenges
 
Apidays New York 2024 - Accelerating FinTech Innovation by Vasa Krishnan, Fin...
Apidays New York 2024 - Accelerating FinTech Innovation by Vasa Krishnan, Fin...Apidays New York 2024 - Accelerating FinTech Innovation by Vasa Krishnan, Fin...
Apidays New York 2024 - Accelerating FinTech Innovation by Vasa Krishnan, Fin...
 
Apidays New York 2024 - The Good, the Bad and the Governed by David O'Neill, ...
Apidays New York 2024 - The Good, the Bad and the Governed by David O'Neill, ...Apidays New York 2024 - The Good, the Bad and the Governed by David O'Neill, ...
Apidays New York 2024 - The Good, the Bad and the Governed by David O'Neill, ...
 
Apidays New York 2024 - Passkeys: Developing APIs to enable passwordless auth...
Apidays New York 2024 - Passkeys: Developing APIs to enable passwordless auth...Apidays New York 2024 - Passkeys: Developing APIs to enable passwordless auth...
Apidays New York 2024 - Passkeys: Developing APIs to enable passwordless auth...
 
Artificial Intelligence Chap.5 : Uncertainty
Artificial Intelligence Chap.5 : UncertaintyArtificial Intelligence Chap.5 : Uncertainty
Artificial Intelligence Chap.5 : Uncertainty
 
ProductAnonymous-April2024-WinProductDiscovery-MelissaKlemke
ProductAnonymous-April2024-WinProductDiscovery-MelissaKlemkeProductAnonymous-April2024-WinProductDiscovery-MelissaKlemke
ProductAnonymous-April2024-WinProductDiscovery-MelissaKlemke
 
Cloud Frontiers: A Deep Dive into Serverless Spatial Data and FME
Cloud Frontiers:  A Deep Dive into Serverless Spatial Data and FMECloud Frontiers:  A Deep Dive into Serverless Spatial Data and FME
Cloud Frontiers: A Deep Dive into Serverless Spatial Data and FME
 
DEV meet-up UiPath Document Understanding May 7 2024 Amsterdam
DEV meet-up UiPath Document Understanding May 7 2024 AmsterdamDEV meet-up UiPath Document Understanding May 7 2024 Amsterdam
DEV meet-up UiPath Document Understanding May 7 2024 Amsterdam
 

SET UP PHP, MYSQL, PHPMYADMIN, APACHE ON AMAZON AWS EC2

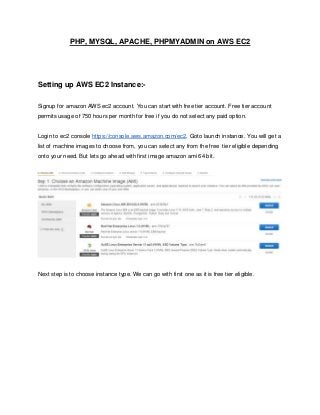
  • 1. PHP, MYSQL, APACHE, PHPMYADMIN on AWS EC2 Setting up AWS EC2 Instance:- Signup for amazon AWS ec2 account. You can start with free tier account. Free tier account permits usage of 750 hours per month for free if you do not select any paid option. Login to ec2 console https://console.aws.amazon.com/ec2. Goto launch instance. You will get a list of machine images to choose from, you can select any from the free tier eligible depending onto your need. But lets go ahead with first image amazon ami 64 bit. Next step is to choose instance type. We can go with first one as it is free tier eligible.
  • 2. Click Next configure instance details. You can choose number of instances network settings etc. Do not edit anything unless you are familiar with these configurations. Just one thing to note here, check the check box protect against accidental termination. This is useful to prevent data loss. Click add storage to choose volume to store data. You can configure size and type according to your requirements. Max 30 gb is permitted for free tier usage. You can add multiple volumes to your instance.
  • 3. Next step is to tag instance through a key - value pair. For ease of use put key as Name and value as Webserver. Next step is to configure security group. Here you can set rules for ssh, tcp and other protocols. You can set permissions for ip ranges. You can create your own or can go with default security group. if after setting everything your site is not running on browser then check if http protocol is allowed here or not.
  • 4. Now Click on review and launch. It will open a popup for volume type. Choose any that suits your needs or you can go ahead with default selected one. Click Next and the launch.
  • 5. It will now ask for creating keys or choosing existing keys. Go with choosing new keys if you are setting first instance. Create the key and download it. This is just one time key save it else you may need to create new instance. This is in pem format public key. Now we may need to set elastic IP because public dns will change once you terminate or reboot your instance. Don;t create more than one elastic ip for now and as soon as you create associate it with instance. You won’t be charged if you associate it with instance else you will get charged. Thanks it is done now. Now you can go ahead with connecting it through ssh or ftp and installing php, mysql, apache envrionments. Connecting to AWS through SSH/FTP:-
  • 6. Open the puttygen load the pem file downloaded from aws while creating keys. Load the key and and save private key. To connect through ftp. oepn filezilla click edit then settings under edit. Now click sftp and add ppk key. It may ask you for conversion do the conversion.
  • 7. Click ok then add hostname as public dns/publicip/elastic ip, username as ec2-user port as 22. Click connect you will be connected. Now go to /var/www/html to view files. To connect to server open putty click session on left. Type in hostname, incase of aws it will be public dns or public ip or the elastic ip associated with the instance. Put some name to identify the connection under saved session and save it.
  • 8. Now click on SSH is left and then click Auth under SSH. Browse the ppk file you have generated through puttygen from pem file. Then click session on and save it again.
  • 9. Then click open to connect to the instance. Login with ec2-user Once you press enter, you will get logged in successfully.
  • 10. If you get any error like connection time out or other. Login to your amazon aws on browser. Select your instance and on go to security group. Now edit inbound connection to check if TCP is open for your ip address or not. Incase if TCP or ssh not on make them available for your ip. Installations:-
  • 11. ● Inorder to install php, mysql, phpmyadmin and apache, login as root. ○ [root@localhost ~]# sudo su - ● To Install PHP and Apache ○ [root@localhost ~]# sudo yum install php-mysql php php-xml php-mcrypt php-mbstring php-cli mysql httpd ● To start apache automatically while booting ○ [root@localhost ~]# chkconfig --levels 235 httpd on ● Open the file /etc/httpd/conf/httpd.conf Find “#ServerName www.example.com:80″ (line no : 276 ) . and add this line below . “ServerName youripaddress:80″ # #ServerName www.example.com:80 ServerName 192.168.141.22:80 ● Now restart apache service ○ [root@localhost ~]# service httpd restart ● Now you have successfully configured apache web server . open your browser and type the ip address in the address bar and hit enter . you can see the test page of your web server .
  • 12. ● To install Mysql server ○ [root@localhost ~]# sudo yum install mysql-server ○ [root@localhost ~]# sudo /etc/init.d/mysqld start ● To start apache automatically while booting ○ [root@localhost ~]# chkconfig --levels 235 mysqld on ● To secure mysql using username and password ○ [root@localhost ~]# mysqladmin -u root password '[PASSWORD]' where PASSWORD is the password you want to choose, don’t include square brackets. Simply use like example below:- [root@localhost ~]# mysqladmin -u root password ‘root@123’ ● To install phpmyadmin ○ [root@localhost ~]# sudo yum install phpmyadmin
  • 13. ○ Might be you will get no package find message. This means you may need to add repository to install phpmyadmin. Choose the repository according to OS you have. CentOS/RHEL 6: # rpm -Uvh http://rpms.famillecollet.com/enterprise/remi-release-6.rpm CentOS/RHEL 5: # rpm -Uvh http://rpms.famillecollet.com/enterprise/remi-release-5.rpm Fedora 20: # rpm -Uvh http://rpms.famillecollet.com/remi-release-20.rpm Fedora 19: # rpm -Uvh http://rpms.famillecollet.com/remi-release-19.rpm Fedora 18: # rpm -Uvh http://rpms.famillecollet.com/remi-release-18.rpm ○ Enable the repository through [root@localhost ~]# yum --enablerepo=remi install phpMyAdmin ○ phpMyAdmin by default allowed to access from localhost only. If you want to make it accessible from remote computers edit /etc/httpd/conf.d/phpMyAdmin.conf and update all 127.0.0.1 with your network like below or enable phpMyAdmin access for everyone. Alias /phpMyAdmin /usr/share/phpMyAdmin Alias /phpmyadmin /usr/share/phpMyAdmin ## Comment below section to allow everyone <Directory /usr/share/phpMyAdmin/> <IfModule !mod_authz_core.c> Order Deny,Allow Deny from All Allow from 192.168.1.0/24 Allow from ::1
  • 14. </IfModule> </Directory> <Directory /usr/share/phpMyAdmin/libraries/> Order Deny,Allow Deny from All Allow from None </Directory> <Directory /usr/share/phpMyAdmin/setup/lib/> Order Deny,Allow Deny from All Allow from None </Directory> <Directory /usr/share/phpMyAdmin/setup/frames/> Order Deny,Allow Deny from All Allow from None </Directory> ● Could not connect: Can’t connect to local MySQL server through socket ‘/var/lib/mysql/mysql.sock’ (2) This means your mysql server service is stopped , you must start the service [root@localhost ~]# service mysqld start ● Inorder for your domain to point the aws ec2 hosting you can use elastic ip address and add this address as A record into DNS Zone file on domain registrar. The other way will be through route 53 service. Fow now lets go ahead with elastic ip as A record. ● Connect to amazon ec2 through putty. sudo as root through sudo su - . Open up /etc/hosts file down to localhost entry you can create new entry as ○ 54.78.90.21 xyz.com where 54.78.90.21 is the elastic ip address and domain name is xyz.com
  • 15. ● Now open /etc/httpd/conf/httpd.conf file here we will be adding up virtual host to serve domain xyz.com. We can put multiple virtual host entries inorder to host multiple websites. Uncomment NameVirtualHost *:80, Uncomment <VirtualHost *:80> and further lines till </VirtualHost> Add your domain name in front of ServerName , Change path of DocumentRoot to /var/www/html/yourdomainname.com/ Save the file and run service httpd restart
  • 16. Upload your files to /var/www/html/yourdomainname.com Its done now. You can now run your website on browser. ● How to do using route 53. Activate route 53 service through aws console. Open the Amazon Route 53 console at https://console.aws.amazon.com/route53/. In the Route 53: Hosted Zones window, click Create Hosted Zone. In the Domain Name box, type your custom domain name. ● Click the Create Hosted Zone button at the bottom of the pane. ● When the hosted zone is successfully created, in the list of domain names, select the check box that corresponds to your domain name. In the details pane, under Delegation Set, Amazon Route 53 displays the set of name servers that have been allocated for your domain. You can use this nameservers to put on domain registrar’s DNS zone file.
  • 17. Now inorder for connecting the DNS Hosting Route 53 to Files hosting EC2. We may need to configure A record entry on Route 53 with the elastic ip of EC2. ● Go to Record sets, click create record set. Under Create Record Set, do the following: ○ In the Name box, accept the default. The root domain is already entered for you. ○ In the Type box, select A — IPv4 address to create an A record for your domain. ○ Choose aliasing as No and enter your elastic ip address as target. ○ In the Routing Policy box, select Simple. ○ Leave Evaluate Target Health set to No. ○ DNS propogataion may take from 2 hrs to 48 hrs. After DNS propogation there may be case where your site may not work on www. So inorder to make it run on www. Use the same process and create new record set as A record. The only difference is put www into the name box and you are done.
  • 18. Thanks:- Thankyou all for reading this with patience. I expect by reading this you may be able setup your own server and hosting environments. Excuse me for typo mistakes if any. Though I have tried to cover almost every aspect but might be the case you may face some issues while doing this. Don’t worry feel free to drop me any queries on prasoon.sharma1983@gmail.com