Presentation 4 rifidi emulator lab
•
3 likes•1,412 views

Sharing RFID training materials which i developed for assignment in my MSc for software systems , in Heriott Watt University

Recommended
Recommended
More Related Content
What's hot
What's hot (20)
Similar to Presentation 4 rifidi emulator lab
Similar to Presentation 4 rifidi emulator lab (20)
Recently uploaded
Recently uploaded (20)
Presentation 4 rifidi emulator lab
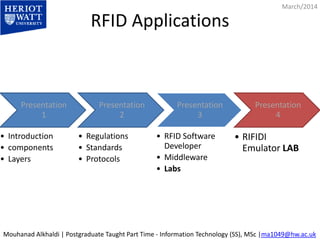
- 1. RFID Applications March/2014 Presentation 1 • Introduction • components • Layers Presentation 2 • Regulations • Standards • Protocols Presentation 3 • RFID Software Developer • Middleware • Labs Presentation 4 • RIFIDI Emulator LAB Mouhanad Alkhaldi | Postgraduate Taught Part Time - Information Technology (SS), MSc |ma1049@hw.ac.uk
- 2. RIFIDI Emulator to test your programs March/2014 http://www.transcends.co/ http://sourceforge.net/projects/rifidi/ Mouhanad Alkhaldi | Postgraduate Taught Part Time - Information Technology (SS), MSc |ma1049@hw.ac.uk
- 3. Background RIFIDI Training : • Helps RFID Middleware developer in testing. • Helps RFID developer testing the LLRP layer. • Helps RFID implementer doing RFID POC, test , prototype implementation. • Shows how to connect to reader using telnet client. • Also it shows how to verify the reader using Microsoft BizTalk RFID.
- 4. RIFIDI • Rifidi is a middleware and development platform for RFID. • With Rifidi you can prototype an RFID application down to the core RFID Hardware • using Rifidi Edge you can develop business rules to turn RFID events into real business applications
- 6. Getting started http://wiki.rifidi.net/index.php?title=Edge_Server_Getting_Started Run it 1. Download the Edge Server from our sourceforge page. The download comes bundled with two programs: the Edge Server which does the core work of connecting to sensors (such as RFID readers), collecting tag information, and making that data available. It ships with adapters for Alien, LLRP, Awid, and several other types of RFID readers. It also ships with ALE support. The second program isWorkbench which is a user interface that allows you to control the edge server and view tag information that it is collecting, as well as experiment with ALE. 2. Download Rifidi Emulator. This program allows you to virtualize several popular types of RFID readers on your desktop. 3. Follow the quick start guide to start getting tag reads back from virtual readers. Develop Your Own Application The edge server by itself allows you to connect to sensors and collect tag data from them, but if you really want to put it to work, you will need to develop your own applications that run on the edge server. 1. Download our SDK (Standard Development Kit). This provides our API, sourcecode and examples to help you get started. You can find out how to set up a development environment here: Edge Server Development Environment. 2. Develop an application. There are several example applications which ship with the Rifidi Edge Server. You can read about them in detail in the developer guide that is included in the release 3. Export your application 4. Deploy the application you've built. Once you've built and tested your application, you can deploy it onto the edge server that you've downloaded.
- 7. Rifidi’s Repositories • To access Subversion via traditional clients, please use the following address: https://svn.sourceforge.net/svnroot/rifidi • To browse the repository using a web-interface, point your browser to http://svn.sourceforge.net/viewcvs.cgi/rifidi/ • http://sourceforge.net/projects/rifidi/
- 8. Rifidi Help • Main Help http://wiki.rifidi.net/index.php?title=Main_Page • Emulator User's Guide http://wiki.rifidi.net/index.php?title=Emulator_User%27s_Guide • RIFIDI LLRP Reader http://wiki.rifidi.net/index.php?title=LLRP_Reader • LLRP XML Messages http://wiki.rifidi.net/index.php?title=LLRP_XML_Messages
- 9. LAB – Step by Step All the lab steps are done by me on my machine • The purpose of this lab is to learn how to create a virtual LLRP reader through “RIFIDI Emulator”. • Use “MS BizTalk RFID” Server to communicate with this virtual device (same way as Biztalk is used with real devices). 1- Start Rifidi Server 2- Start Rifidi Emulator , Add virtual LLRP reader 3- Adding virtual tags 4- attach tags to reader antenna 5- Start the reader 6- RIFIDI with LLRP 8- Your Reader is ready ! 9- connect the virtual reader through MS BizTalk RFID middleware 10- Enable The reader 11- View Tags 12- Check Request & Response in RIFIDI
- 10. 1- Start Rifidi Server RIFIDI Server Running
- 11. 2- Start Rifidi Emulator , Add virtual LLRP reader 1. Start RIFIDI Emulator 2. click on create new reader 3. then select LLRP reader from the list 4. Define the reader properties: name, number of antennas , IP addresses , Ports..
- 12. 3- Adding virtual tags 1. Click on add tags 2. Select the tag data type , generation , and number of tags 3. You have also to define the tag prefix
- 13. 4- attach tags to reader antenna Drag the tags to the antenna ….
- 14. 5- Start the reader Right click on the reader and “start reader”
- 15. 6- RIFIDI with LLRP In command line: telnet ip port In telnet: mode client [IP] [PORT]
- 16. 8- Your Reader is ready ! You can try to connect to the reader through your code … or any other middleware In next slides we are going to connect through another middle ware Microsoft BizTalk RFID Server
- 17. 9- connect the virtual reader through MS BizTalk RFID middleware 1. Open MS BizTalk RFID “RFID Manager” Console 2. Right Click on devices 3. Click add new device wizard
- 18. 10- Enable The reader • Now the reader is defined in RFID Manager • Right click and enable the device
- 19. 11- View Tags • Right click, and view tags… • You will see the communication happening in RIFIDI (next slide)
- 20. 12- Check Request & Response in RIFIDI • We can see the data flow (Requests & Responses) through “RIFIDI” • When sending the commands like “Read Tag” from “BizTalk RFID“ , xml commands are sent behind the scene , and RIFIDI helps you seeing the message content • Request in red , response in green
- 21. Sample LLRP request & Response from RIFIDI Request (LLRP Sample Request): <Messagetype="GetReaderCapabilities"> <RequestedData value="0"/> </Message> Response (LLRP Reader Response to the above request) File: Sample Request & Response: Full LLRP communication sample from RIFIDI console , helps to show different LLRP commands in XML File:
- 22. End of RIFIDI Lab
- 23. RIFIDI for non LLRP Readers Get TagList on “Alien” Reader Rifidi supports LLRP and some non-LLRP RFID readers • get TagList - Displays the tags currently detected by the reader. • get $PROPERTY - Returns the value for the passed property. • set $PROPERTY=$VALUE - Sets the passed property to the passed value. q - Close the connection
- 24. Similar open source Projects – Tag Centric - http://sourceforge.net/projects/tag-centric/ TagCentric is RFID middleware that controls heterogeneous RFID devices and gathers RFID-related data into a user-specified database. It's cost (free!) and simplicity make it ideal for use by small businesses, RFID testing facilities, and universities.
- 25. References • http://www.transcends.co/ • http://sourceforge.net/projects/rifidi/ • https://svn.sourceforge.net/svnroot/rifidi • http://svn.sourceforge.net/viewcvs.cgi/rifidi/ • http://www.rifidi.org/documentation_architecture.html • http://wiki.rifidi.net/index.php?title=Edge_Server_Getting_Started • http://wiki.rifidi.net/index.php?title=Main_Page • http://wiki.rifidi.net/index.php?title=Emulator_User%27s_Guide • http://wiki.rifidi.net/index.php?title=LLRP_Reader • http://wiki.rifidi.net/index.php?title=LLRP_XML_Messages • http://wiki.rifidi.net/index.php?title=Alien_Beginners_Guide • http://wiki.rifidi.net/index.php?title=Alien_9800 • http://sourceforge.net/projects/tag-centric/ • http://sourceforge.net/projects/rifidi/
- 26. Thank You
Editor's Notes
- Slide Notes: Slide Resources: http://www.transcends.co/ http://sourceforge.net/projects/rifidi/
- Slide Notes: Slide Resources:
- Slide Notes: Slide Resources: http://sourceforge.net/projects/rifidi/?source=recommended
- Slide Notes: Slide Resources: http://www.rifidi.org/documentation_architecture.html
- Slide Notes: Slide Resources: http://wiki.rifidi.net/index.php?title=Edge_Server_Getting_Started
- Slide Notes: Slide Resources:
- Slide Notes: Slide Resources: http://wiki.rifidi.net/index.php?title=Alien_Example_Client
- Slide Notes: Slide Resources:
- Slide Notes: Slide Resources:
- Slide Notes: Slide Resources:
- Slide Notes: Slide Resources:
- Slide Notes: Slide Resources:
- Slide Notes: Slide Resources:
- Slide Notes: Slide Resources:
- Slide Notes: Slide Resources:
- Slide Notes: Slide Resources:
- Slide Notes: Slide Resources:
- Slide Notes: Slide Resources:
- Slide Notes: Slide Resources:
- Slide Notes: Slide Resources:
- Slide Notes: Slide Resources:
- Slide Notes: Default User/Password : alien/password Slide Resources: wiki.rifidi.net/index.php?title=Alien_Beginners_Guide wiki.rifidi.net/index.php?title=Alien_9800
- Slide Notes: Slide Resources:
- Slide Notes: Slide Resources:
- Slide Notes: